
4-Port ADSL Router User Manual

Configuring IPoA Interfaces
124
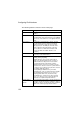
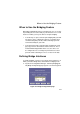
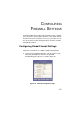
2.
Select the next available interface name from the [IPoA
Interface:] drop-down list.
3.
In the [Conf. IP Address:] and [Netmask:] fields, type the
address
and mask that what you want to assign to the IPoA
interface.
4.
From the [IPF Type:] drop-down list, select the level of
firewall
security for the interface ([Public], [Private] or [DMZ], see
page 121 for definitions).
5.
In the [IPoA Type:] field, click the [1577] radio button if the
interface
complies with the IETF specification RFC 1577.
Otherwise click the
[Non 1577] radio button, then click [Add].
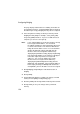
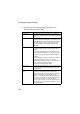
6.
If you want the IPoA interface to serve as the default route for
your LAN, click the [Enable] radio button in the [Default
Route:] field.
7.
In the [Gateway IP Address:] field, enter the address of the
Internet computer to contact to gain initial access to the
Internet.
8.
Select the Lower Interface from the [Lower Interface:]
drop-down list.
9.
Click [Add].
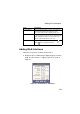
10.
Click [Submit]. A [Confirmation] page will appear to confirm
your changes.
11.
Click [Close] to return to the [IP over ATM (IPoA) Configuration]
page and view the new interface in the table.
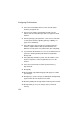
12.
Click the [Admin] tab. Click [Commit & Reboot] in the task bar.
13.
Click [Commit] to save your changes to the permanent
memory.