
4-Port ADSL Router User Manual

Configuring Bridging
128
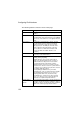
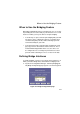
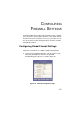
The page displays radio buttons for enabling, and a table for
specifying the interfaces on which bridging will be performed.
The table may be empty if bridging has not yet been configured.
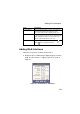
2.
Select the [Interface Name] on which you want to perform
bridging and click [Add]. For example, select [eth-0] (LAN)
and [eoa-0] (WAN) interfaces. If you use a USB-connected
computer, you can also select [usb-0].
Note:
If you enable bridging on an interface that has already
been assigned an IP address, it is considered
IP-enabled and will route (rather than bridge) IP packets
received on the interface. The interface will however
bridge the non-IP data it receives. You can determine
whether the Ethernet ([eth-0]) and USB ([usb-0])
interfaces have to be assigned IP addresses by
displaying the [IP Address Table] (display the [Routing]
tab, and click [IP Address]). The interfaces will appear
in the table only if they have been assigned IP
addresses. You can check whether the [eoa-0]
interface has been assigned an IP address by
displaying the [EOA Configuration Table] (click the
[WAN] tab, and click [EOA]). If the [Config IP Address]
field is empty and the [Use DHCP] field contains the
word [Disable], then no IP address has been assigned.
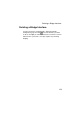
3.
Click [Bridging:] and [Enable] the radio button to turn on
bridging.
4.
Click [Submit].
5.
A page will briefly display to confirm your changes, and will
return you to the [Bridge Configuration] page.
6.
Click the [Admin] tab. Click [Commit & Reboot] in the task bar.
7.
Click [Commit] to save your changes to the permanent
memory.