
User's Manual

3
DOCSIS 3.0 Wireless Gateway Installation Instructions
Copyright ©2013 SMC Networks. All rights reserved
All information contained in this documentation is subject to change without notice.
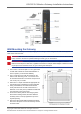
Wall-Mounting the Gateway
You can mount the Gateway on a wall by hanging the unit along its width using the two wall mount keyhole
slots on the side of the unit.
WARNING: Wall-mount the Gateway to concrete or plaster wallboard with anchor inserts. Before drilling
holes, check the structure for potential damage to water, gas, or electric lines.
AVERTISSEMENT: Montez la passerelle sur une plaque murale en béton ou en plâtre à l’aide de
xations. Avant de percer des trous, regardez si la structure n’est pas endommagée et assurez-vous de
ne pas percer des conduites d’eau, de gaz ou des lignes électriques.
1. Use 3.5 mm x 40-50 mm (#6 x 1.5-2 in.) pan head
screws with a maximum screw head diameter of
6.5 mm (0.25 in.) to mount the Gateway.
2. Use a center punch to mark the location on the
wall for each mounting screw. The screws must
be oriented horizontal to each other and spaced at
101.6 mm (4 in.) on center.
3. Drill holes to a depth and diameter appropriate for
the size and type of hardware you have selected.
4. Using a screwdriver, turn each screw until the
head protrudes from the wall so that there is a
distance of 12.5 mm (0.5 in.) between the wall and
the underside of the screw head.
5. Orient the Gateway with the mounting keyholes
above the mounting screws, and then slide the
Gateway down so it stops against the top of the
keyhole opening.
6. Reconnect the coaxial cable and Ethernet cables.
Reconnect the power cord to the Gateway and the
electrical outlet.