
User Manual
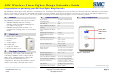
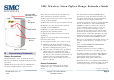
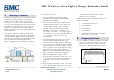
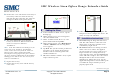
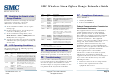
Table Of Contents
- 1 Models
- 2 Parts List
- 3 Package Contents
- 4 Specifications
- 5 Key Components
- 6 Precautionary Statements
- 7 Selecting a Location
- 8 Preparing the Siren
- 9 Adding the Siren
- 10 Installation Instructions
- 11 Testing
- 12 Deleting the Range Extender
- 13 Modifying the Details of the Range Extender
- 14 LED Operating Conditions
- 15 Maintenance Procedures
- 16 Troubleshooting
- 17 Compliance Statements

SMC Wireless Siren Zigbee Range Extender Guide
Copyright
©
2011 SMC Networks Page 5
All Rights Reserved
I/M SMCSRXX-Z rev. 1.0
7/6/11
C. If the TouchScreen reports a Tamper trouble
or A/C power trouble for the device, be sure
it is pushed all the way into the outlet, so
the tamper switch is pressed against the
wall. Add rubber pads to the tamper button
if necessary to ensure the tamper button is
pressed firmly when secured to a wall outlet.
11 Testing
After you complete the installation, perform the
following test procedure:
Note: Additionally, test the Range Extender at
least once a year to verify correct operation.
A. On the TouchScreen tap the Settings app and
enter you key pad code.
B. At the Settings menu, tap Security > Alarm
Test. The Alarm Test Options screen
appears.
C. Toggle the Disabled/Enabled button to
Disabled by tapping it. This prevents your
test alarm from being sent to the central
monitoring station.
IMPORTANT: If you enable Send Test Alarm
Messages, contact your central monitoring
station and tell them you are testing your
system.
D. Tap Next. The Alarm Test Checklist appears.
E. Ensure all the security zones are unfaulted
(that is, doors and windows closed, motion
detectors not showing motion, etc.).
F. When the security zones are ready for
testing, Ready to Arm appears below the
Arm button.
G. Tap Arm. Your security system is armed in
the special Test mode. The Exit Delay is only
10 seconds long. Motion sensors are turned
off (not tripping alarms, but recording
events) until an Entry/Exit security zone is
faulted. The Arm button changes to a System
Armed notice.
H. Confirm that the Siren Repeater LED is red.
I. Tap Next. The Alarm Test screen appears.
J. Open and close an Entry/Exit door. The Entry
Delay period starts (default 30 seconds). The
TouchScreen beeps once per second and
speeds up to twice per second in the last 10
seconds of the Entry Delay period. Motion
detectors are turned on.
When the alarm sounds
K. , confirm that the
SMC Siren Repeater is sounding and the
White LED is flashing.
12 Deleting the Range Extender
Deleting a siren from the premises removes it
from the customer’s system. Only delete a si
to de-install the siren from the premises. To
r n
G.
battery in the compar
battery cover.
continued on next pag
e
reset the sensor to factory default settings,
delete the sensor and re-add it immediately.
A. At the TouchScreen Home screen, tap the
Settings app.
B. On the Settings screen, use the keypad to
enter the Installer Code.
C. On the Technician Code/Id screen, enter
your Technician ID and tap Done.
At the Technician SettingD. s menu, select
Home Devices > Sirens > Delete Siren. The
Remove Siren screen appears.
Tap the icon of the siren you want to delete.
When a confirmation dialog asks you t
E.
F. o verify
you want to delete the siren, tap Yes. The
siren is deleted from the system.
Open the battery cover with a PH1 screw
driver and disconnect the battery. Leave the
tment and reseal the
e