TM MR Item # 1005 115 303 Model # DS18916 USE AND CARE GUIDE SMART LED COLOR CHANGING FLUSHMOUNT Questions, problems, missing parts? Before returning to the store, call Design Solutions International Customer Service Mon-Fri 9:30 am to 3:00 pm EST 1-800-388-6141 ext. 216 For customer service support and the fastest response, please email us at CustomerSupport@DSILighting.com www.SMRTLite.
Table of Contents Table of Contents ........................................................... 2 Safety Information ......................................................... 2 Warranty ......................................................................... 2 Three (3) Year Warranty ............................................................. 2 What is Covered ........................................................................ 2 What is Not Covered ...................................................
Pre-Installation PLANNING INSTALLATION Read all instructions before installing. To avoid damaging this product, place it on a soft, non-abrasive surface, such as carpet or cardboard. IMPORTANT: Inspect the wire insulation for any cuts, abrasions, or exposed copper that may have occurred during shipping. If there is a defect in the wire, do not attempt installation. Please call the Customer Service Team at 1-800-388-6141 ext. 216.
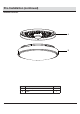
Pre-Installation (continued) PACKAGE CONTENTS A B Part Description Quantity A Fixture body 1 B Shade 1 4
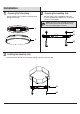
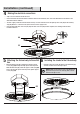
Installation 1 Ƒ 2 Preparing the fixture body Ƒ Turn the shade (B) counter clockwise to remove the fixture body (A) from the shade. Preparing the mounting strip Thread the support screws (long) (DD) into holes of the mounting strip (AA) about 4 complete turns, secure by hex nuts (FF) as show in diagram. NOTE: The support screws (long) (DD) should extend long enough to protrude through the fixture body (A) when it is mounted. (Adjust as needed.
Installation (continued) 4 Making the electrical connections Ƒ Strip 3/4 in. of insulation from the wire ends. Ƒ Connect the black wire from the fixture to the black wire from the outlet box, then connect the white wire from the fixture to the white wire from the outlet box. Ƒ The bare copper ground wire from the fixture must loop one turn under the head of the green ground screw (CC) on the mounting strip (AA) before it is connected to the ground conductor of the supply circuit.
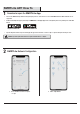
SMRTLite APP How To 1 Download or open the SMRTLite App Ƒ Turn on the SMRTLite lamp while ensuring that your phone is connected to a secure 2.4GHz WiFi network. 5GHz networks are not supported. Ƒ Download and Open the app by searching for SMRTLite in the Apple App Store or Google Play Store or by visiting one of the URLs below: http://ios.smrtlite.com Ƒ http://android.smrtlite.
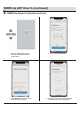
SMRTLite APP How To (continued) 2 SMRTLite Network Configuration (continued) 3. Toggle the wall light switch on/off 3 times and the light fixture will begin to blink rapidly 4. Press “Confirm Rapid Blinking” 5. Select WiFi Network and enter network password then tap “Confirm”. 6. You will see “Connecting.” The light fixture will stop blinking as the connection progresses.
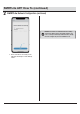
SMRTLite APP How To (continued) 2 SMRTLite Network Configuration (continued) NOTE: For tutorials on additional features including sharing your lighting device with family members and how to control your LED lamp via Amazon Alexa, Google Assistant or Apple Siri please visit SMRTLite.com. 7. Once connection is successful, you can edit name and assign to a room then tap “Done”.
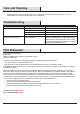
Care and Cleaning Ƒ Do not use any cleaners with chemicals, solvents, or harsh abrasives. Use only a dry, soft cloth to dust or wipe carefully. Ƒ To clean the fixture, disconnect power by turning off the circuit breaker or by removing the fuse at the fuse box. Use a dry or slightly dampened, clean cloth to wipe the exterior surface of the fixture. Troubleshooting Problem The LED lights will not light. The fuse blows or the circuit breaker trips when the light is turned on.
Service Parts MODEL: DS18916 AA BB CC DD EE FF B Part Description AA Mounting strip BB Outlet box screw (short) CC Green ground screw DD Support screw (long) EE Wire connector FF Hex nut B Shade (Pre-assembled to the mounting strip (AA)) 11
TM MR Questions, problems, missing parts? Before returning to the store, call Design Solutions International Customer Service Mon-Fri 9:30 am to 3:00 pm EST 1-800-388-6141 ext. 216 For customer service support and the fastest response, please email us at CustomerSupport@DSILighting.com www.SMRTLite.com Retain this manual for future use.
TM MR Artículo núm. 1005 115 303 Modelo DS18916 GUÍA DE USO Y MANTENIMIENTO LÁMPARA INTELIGENTE EMPOTRADA QUE CAMBIA DE COLOR ¿Tiene alguna pregunta o algún problema? ¿Le faltan piezas? Antes de volver a la tienda, llame al Servicio de atención al cliente de Design Solutions International, de lunes a viernes, de 9.30 a 15 h EST 1-800-388-6141 ext. 216 Para obtener ayuda de nuestro Servicio de atención al cliente y la respuesta más rápida, envíenos un correo electrónico a CustomerSupport@DSILighting.
Tabla de contenidos Tornillería incluida...................................................................... 3 Contenidos del paquete.............................................................. 4 Instalación....................................................................... 5 Cómo utilizar la aplicación SMRTLite........................... 7 Mantenimiento y limpieza.............................................. 10 Solución de problemas...................................................
Preinstalación PLANIFICACIÓN DE LA INSTALACIÓN Lea las instrucciones antes de comenzar la instalación. Para evitar dañar este producto, colóquelo sobre una superficie suave, no abrasiva, como una alfombra o un cartón. IMPORTANTE: Inspeccione el aislamiento del cable para detectar cualquier corte, abrasión o exposición del cobre que pueda haberse producido durante el envío. Si el cable tiene algún defecto, no intente realizar la instalación. Llame al 1-800-388-6141, ext.
Preinstalación (continuación) CONTENIDOS DEL PAQUETE A B Pieza Descripción Cantidad A Cuerpo de la lámpara 1 B Pantalla 1 4
Instalación 1 Ƒ 2 Preparación del cuerpo de la lámpara Ƒ Gire la pantalla (B) en el sentido contrario a las agujas del reloj para extraer el cuerpo de la lámpara (A) de la pantalla. A Preparación de la regleta de montaje Enrosque los tornillos de soporte (largos) (DD) en los orificios de la regleta de montaje (AA), dando aproximadamente 4 vueltas completas y, a continuación, fíjelos con tuercas hexagonales (FF), tal como se muestra en el diagrama.
Instalación (Continuación) 6 Realización de las conexiones eléctricas Ƒ Pele unos 2 cm del aislamiento de los extremos de los cables. Ƒ Conecte el cable negro de la lámpara al cable negro de la caja de distribución y, a continuación, conecte el cable blanco de la lámpara al cable blanco de la caja de distribución.
Cómo utilizar la aplicación SMRTLite 1 Descargar o abrir la aplicación SMRTLite Ƒ Encienda la lámpara SMRTLite y asegúrese de que el teléfono esté conectado a una red wifi segura de 2,4 GHz. Las redes de 5 GHz no son compatibles. Ƒ Busque SMRTLite en la Apple App Store o en Google Play Store, descargue la aplicación y ábrala o visite una de las siguientes URL para hacerlo: http://ios.smrtlite.com Ƒ http://android.smrtlite.
Cómo utilizar la aplicación SMRTLite (continuación) 2 SMRTLite Configuración de red (continuación) 3. Alterne el interruptor on/off de la luz de la pared 3 veces y la lámpara empezará a parpadear rápido 4. Presione “Confirmar Parpadeo Rápido” 5. Elija la red de wifi, ingrese la contraseña de la red y toque “Confirmar” 6. “Conectando” aparecerá en la pantalla.
Cómo utilizar la aplicación SMRTLite (continuación) 2 SMRTLite Configuración de red (continuación) OBSERVACIÓN: Para ver tutoriales sobre funciones adicionales, por ejemplo, cómo compartir el dispositivo de iluminación con otros familiares y cómo controlar la lámpara LED a través de Alexa (Amazon), el Asistente de Google o Siri (Apple), visite SMRTLite.com. 7.
Mantenimiento y limpieza Ƒ No emplee productos de limpieza que contengan químicos, disolventes ni abrasivos. Utilice únicamente un paño seco para quitar el polvo o limpiar con cuidado. Ƒ Para limpiar la lámpara, desconecte la alimentación apagando el disyuntor del circuito o retirando el fusible de la caja de fusibles. Utilice un paño suave seco o ligeramente mojado para limpiar la superficie exterior de la lámpara. Solución de problemas Problema Las luces de LED no se encienden.
Piezas de repuesto MODELO: DS18916 AA BB CC DD EE FF B Pieza Descripción AA Regleta de montaje BB Tornillo de la caja de distribución (corto) CC Tornillo de toma a tierra verde DD Tornillo de soporte (largo) EE Conector de cables FF Tuerca hexagonal B Pantalla (preinstalado en el regleta de montaje [AA]) 11
TM MR ¿Tiene alguna pregunta o algún problema? ¿Le faltan piezas? Antes de volver a la tienda, llame al Servicio de atención al cliente de Design Solutions International De lunes a viernes, de 9.30 a 15 h EST 1-800-388-6141 ext. 216 Para obtener ayuda de nuestro Servicio de atención al cliente y la respuesta más rápida, envíenos un correo electrónico a CustomerSupport@DSILighting.com www.SMRTLite.com Conserve este manual para futuras consultas.