
Instructions / Assembly


Installation (continued)
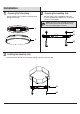
A
A
B
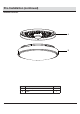
DD
6
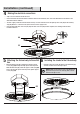
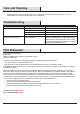
Ƒ Attach the xture body (A) to ceiling by passing the support
screws (long) (DD) through the larger portion of the key holes.
Twist the xture body (A) so that the support screws (long) (DD)
move to the narrower portion of the key holes, tighten support
screws (long) (DD).
Ƒ Carefully position the shade (B) against to the xture body (A),
and turn clockwise to lock the lamp in place.
5
Attaching the xture body to the outlet
box
6
Installing the shade to the xture body
Ƒ Strip 3/4 in. of insulation from the wire ends.
Ƒ Connect the black wire from the xture to the black wire from the outlet box, then connect the white wire from the xture to the
white wire from the outlet box.
Ƒ The bare copper ground wire from the xture must loop one turn under the head of the green ground screw (CC) on the mounting
strip (AA) before it is connected to the ground conductor of the supply circuit.
Ƒ Cover the wires with wire connectors (EE). Tape the wire connectors (EE) and wires together, and carefully position all wires
inside the outlet box.
4
Making the electrical connections
CC
AA
EE
A
NOTE: Make sure the emboss point on the fixture body
(A) matches the groove on the shade (B) well, and then
turn the shade (B) to lock it.