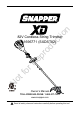
n ro du ct io N ot fo rR ep 82V Cordless String Trimmer 1696771 (SXDST82) Owner’s Manual TOLL-FREE HELPLINE: 1-800-317-7833 www.snapper.com Read all safety rules and instructions carefully before operating this tool.
CONTENTS Contents............................................................................................................................... 2 Product Specifications ......................................................................................................... 2 Important Safety Instructions................................................................................................ 3 Symbols...................................................................................................
important safety instructions WA R N I N G Read and understand all instructions before using this product. Failure to follow all instructions listed below may result in electric shock, fire, and/or serious personal injury. • Use only identical manufacturer’s replacement parts and accessories. Use of any other parts may create a hazard or cause product damage. n • Always wear safety glasses with side shields marked to comply with ANSI Z87.1. Everyday glasses have only impact resistant lenses.
important safety instructions • Do not dispose of the batteries in a fire. The cells may explode. Check with local codes for possible special disposal instructions. • Do not open or mutilate the batteries. Released electrolyte is corrosive and may cause damage to the eyes or skin. It may be toxic if swallowed. • Exercise care in handling batteries in order not to short the battery with conducting materials such as rings, bracelets, and keys. The battery or conductor may overheat and cause burns.
SymbolS Some of the following symbols may be used on this product. Please study them and learn their meaning. Proper interpretation of these symbols will allow you to operate the product better and safer. SYMBOL NAME DESIGNATION/EXPLANATION V Volts Voltage A Amperes Current Hertz Frequency (cycles per second) W Watts Power Minutes Time Alternating Current /min ro du ct io min Type of current Revolutions, strokes, surface speed, orbits etc., per minute.
SymbolS The following signal words and meanings are intended to explain the levels of risk associated with this product. SYMBOL SIGNAL MEANING Indicates an imminently hazardous situation, which, if not avoided, will result in death or serious injury. WARNING Indicates a potentially hazardous situation, which, if not avoided, could result in death or serious injury. CAUTION Indicates a potentially hazardous situation, which, if not avoided, may result in minor or moderate injury.
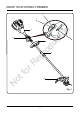
know your string trimmer 7 6 ro du ct io n 1 5 2 8 ot fo rR ep 3 N 4 Fig.
know your string trimmer KNOW YOUR string trimmer (See Figure 1.) The safe use of this product requires an understanding of the information on the product and in this operator’s manual as well as a knowledge of the project you are attempting. Before use of this product, familiarize yourself with all operating features and safety rules. 1. REAR HANDLE Ergonomic handle with overmold improves comfort and grip. n 2. AUXILIARY HANDLE 3.
ASSEMBLY UNPACKING ro du ct io WA R N I N G n This product requires assembly. • Carefully remove the product and any accessories from the box. Make sure that all items listed in the packing list are included. • Inspect the tool carefully to make sure no breakage or damage occurred during shipping. • Do not discard the packing material until you have carefully inspected and satisfactorily operated the tool. • If any parts are damaged or missing, please call 1-800-317-7833.
ASSEMBLY WA R N I N G If any parts are damaged or missing, do not operate this product until the parts are replaced. Use of this product with damaged or missing parts could result in serious personal injury. WA R N I N G WA R N I N G ro du ct io n Do not attempt to modify this product or create accessories not recommended for use with this string trimmer. Any such alteration or modification is misuse and could result in a hazardous condition leading to possible serious personal injury.
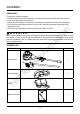
ASSEMBLY attaching the Guard (see Figure 2.) NOTE: Install the guard before the attachment is connected to the lower shaft. 1. 2. Invert the string trimmer to access the trimmer head. Remove supplied screws (1) from the guard with a philips screwdriver. ro du ct io n 1 Fig. 2.1 Place the guard (2) on to the trimmer head. Align the screw holes on the guard (3) with the screw holes on the trimmer head (4). fo rR 2 ep 3. 4. 4 Fig. 2.
ASSEMBLY attaching the Auxiliary handle (See Figure 3.) 1. Loosen the four screws (1) in the handle with a philips screwdriver (not included) and remove the screws from the handle. 3 ro du ct io 2 n 1 Fig. 3.1 Attach the auxiliary handle (2) and lower clamp (3) on the shaft. Adjust handle up or down, if necessary, to desired operating position. rR ep 2. 3. fo Tighten the four screws so that the handle cannot be rotated on the shaft. N ot 4. Fig. 3.2 Fig. 3.
ASSEMBLY iNSTALLING THE UPPER SHAFT TO THE LOWER SHAFT (See Figure 4.) WA R N I N G Never install, remove, or adjust any attachment while string trimmer is running. Failure to stop the motor can cause serious personal injury. The attachment connects to the power head by means of a coupler device. Set the unit on a flat, level surface. 2. Loosen the knob (1) on the coupler (5). 3. Push in the release button (2) located on the lower shaft (3).
ASSEMBLY aDJUSTING the CUTTING SWATH (See Figure 5.) This trimmer is equipped with a line cut-off blade on the guard. The line cut off blade continuously trims the line to ensure a consistent and efficient cut diameter. Advance line whenever you hear the engine running faster than normal, or when trimming efficiency diminishes. This will maintain best performance and keep line long enough to advance properly. ro du ct io • Remove the battery pack.
OPERATIon WA R N I N G Read and understand entire Operator's Manual for each optional attachment used on this power head and follow all warnings and instructions. Failure to follow all instructions may result in electric shock, fire and/or serious personal injury. WA R N I N G WA R N I N G ro du ct io n Do not allow familiarity with this product to make you careless. Remember that a careless fraction of a second is sufficient to inflict serious injury.
OPERATIon starting and stopping the trimmer (See Figure 7.) To start: • Press the power button. • Depress the lock-out button and squeeze the switch trigger. • Press high speed button to increase speed depending upon grass condition. Two LED's will illuminate above the high speed button indicating that the trimmer is in the high speed setting. • Release the switch trigger. ro du ct io • Press the power button again to turn the unit off.
OPERATIon operating the trimmer (See Figure 8.) WA R N I N G Always hold the string trimmer away from the body keeping clearance between your body and the string trimmer. Any contact with the string trimmer cutting head while operating can result in serious personal injury. n Follow these tips when using the string trimmer: ro du ct io • Hold the trimmer with your right hand on the rear handle and your left hand on the auxiliary handle. • Keep a firm grip with both hands while in operation.
OPERATIon WA R N I N G Any contact with the attachment cutting head can result in burns and/or other serious personal injury. WA R N I N G ADVANCING LINE (See Figure 9.) ro du ct io n Read the safety information for safe operation when using a blade attachment and refer to the safety rules and instructions in your attachment manual. Never use a brush cutter attachment with this electric power head. Improper operation of a blade or any attachment could result in serious injury.
OPERATIon REPLACING STRING HEAD (See Figure 10.) The string head should be replaced whenever damage is visible or if the wear indicators on the face are worn smooth. If replacing line only refer to Replacing the Line later in this manual. Stop the unit and remove the battery pack. 2. Insert the gear head locking tool or screwdriver (1) through the slot (2). 2 ro du ct io 1 n 1. Rotate the string head (4) clockwise until it can be removed from the gear shaft (3). 3 N ot fo 4 rR 3. ep Fig. 10.
OPERATIon Spool replacement (See Figure 11.) ro du ct io n If replacing line only, refer to Line Replacement later in this manual. 1. Press the tabs simultaneously on the side of the trimmer head and remove cover and spool. Tab Cover Fig. 11.1 fo Remove any remaining line. Clean dirt and debris from all parts. Place the spool in the cover as shown below. N ot 2. 3. 4. rR ep Spool Fig. 11.
OPERATIon 5. Insert the ends of the lines through line exit holes in the sides of the cover. Reinstall the spool and cover onto the trimmer head. Push until cover snaps into place. ep 6. Fig. 11.3 ro du ct io Cover n Line exit hole rR Fig. 11.4 1. fo Line replacement (See Figure 12.) Line up the slots on the spool cap with the slots on the string head. ot Spool cap N String head Slots Slots Fig. 12.1 2. Insert line through the string head hole.
OPERATIon Pull the line through until there is an equal amount of line on each side. ro du ct io n 3. String head hole 4. Fig. 12.2 Turn the spool cap clock-wise to begin winding the string into the string head. Leave approximately 5 inches of string protruding out of each side of the head. fo rR ep Spool cap N ot Fig. 12.
OPERATIon cutting tips (See Figure 13.) • Keep the trimmer tilted toward the area being cut; this is the best cutting area. • The trimmer cuts when passing the unit from right to left. This will avoid throwing debris at the operator. Avoid cutting in the dangerous area shown in figure 13. • Use the tip of string to do the cutting; do not force string head into uncut grass. • Wire and picket fences cause extra string wear and breakage. Stone and brick walls, curbs, and wood may wear string rapidly.
BATTERY & CHARGER MAINTENANCE CHARGING PROCEDURE NOTE: The battery is not shipped fully charged. It is recommended to fully charge before first use to ensure that maximum run time can be achieved. This lithium-ion battery will not develop a memory and may be charged at any time. Low voltage charging: n If the battery has been stored with little to no charge for a long period of time, the charger will go into recovery mode, which will take 20 hrs to fully charge the battery.
BATTERY & CHARGER MAINTENANCE CHARGER MOUNTING This charger can be installed hanging on a wall using two #8 screws (not included). 2. Locate the placement for the charger to be wall mounted. 3. If fastening to wood studs use 2 wood screws (not included). 4. Drill two holes 4.5 in. apart ensuring that they are vertically aligned. 5. If fastening to drywall use wall anchors (not included) and screws to secure the charger to the wall. n 1.
MAINTENANCE general maintenance Avoid using solvents when cleaning plastic parts. Most plastics are susceptible to damage from various types of commercial solvents and may be damaged by their use. Use clean cloths to remove dirt, dust, lubricant, grease, etc. Always store the machine clean and in a dry enclosure with the battery charged.
ENVIRONMENTALLY SAFE BATTERY DISPOSAL The following toxic and corrosive materials are in the batteries used in this string trimmer battery pack: Lithium-Ion, a toxic material. n WA R N I N G WA R N I N G ro du ct io All toxic materials must be disposed of in a specified manner to prevent contamination of the environment.
troubleshooting Problem Cause Solution 2. No electrical contact between the trimmer and battery. 2. Remove battery check contact and reinstall the battery pack. 1. The battery pack is not attached to the trimmer. n 3. The battery pack is depleted. 3. Charge the battery pack. 4. The lock-off lever and trigger are not depressed simultaneously. 4. Press down the lock-off lever and hold it, then depress the trigger to turn on the string trimmer. 5.
troubleshooting Solution 1. Lubricate with silicone spray. 2. Not enough line on spool. 2. Install more line. Refer to Line Replacement earlier in this manual. 3. Lines are worn too short. 3. Pull both lines while pressing button. 4. Lines are tangled on spool. 4. Remove lines from spool and rewind. Refer to Line Replacement earlier in this manual. ro du ct io Lines will not advance. Cause 1. Lines are welded to themselves. n Problem 1. Trimmer used incorrectly. Line keeps breaking. 1.
LIMITED WARRANTY Briggs & Stratton warrants that, during the warranty period specified below, it will repair or replace, free of charge, any part that is defective in material or workmanship or both. Transportation charges on product submitted for repair or replacement under this warranty must be borne by purchaser. This warranty is effective for and is subject to the time periods and conditions stated below. For warranty service, find the nearest Authorized Service Dealer in our dealer locator map at www.
LIMITED WARRANTY ABOUT YOUR WARRANTY Warranty service is available only through Snapper Authorized Service Dealers. This warranty covers only defects in materials or workmanship. It does not cover damage caused by improper use or abuse, improper maintenance or repair, normal wear and tear, or stale or unapproved fuel. ro du ct io n Improper Use and Abuse - The proper, intended use of this product is described in the Operator’s Manual.
EXPLODED VIEW 1A 1A1 17A 17A1 1A5 1A3 17A2 14A 14A1 17A3 14A2 14A3 1A2 16A1 14A7 14A6 3A1 18A 18A1 14A5 16A5 18A2 3A2 3A3 11A2 4A4 11A3 11A5 10A3 10A2 10A fo ot 15A5 12A 12A1 6A 9A2 9A 12A2 12A3 13A 13A2 6A2 13A4 13A5 13A3 6A3 6A4 9A6 7A 15A 2A 5A N 15A1 15A2 15A4 10A1 6A1 16A3 16A4 15A6 rR 11A4 18A4 18A3 ep 4A3 4A1 4A2 11A 11A1 18A5 4A 16A 16A2 ro du ct io 14A4 3A n 19A 9A5 9A3 22A 9A4 8A 21A 20A 32
parts list fo N QTY 1 1 1 5 2 1 1 1 1 4 1 1 1 1 1 1 1 3 1 1 1 1 1 1 1 1 2 4 1 1 1 1 1 1 1 1 2 ep ro du ct io n Description KIT, HOUSING TOP COVER, NA COVER, TOP INSERT, TOP COVER SCREW SCREW HANDLE, RIGHT KIT, AUXILIARY HANDLE HANDLE, AUXILIARY BASE, AUXILIARY HANDLE SCREW KIT, HARNESS CLAMP BOLT SCREW CLAMP, HARNESS CLIP, HARNESS SHAFT, BOTTOM KIT, GEAR BOX ASSEMBLY SCREW ASSEMBLY, GEAR BOX SLEEVE, AXLE BASE, BLADE FIXED PLATE, GRASS PREVENTION HEAD, STRING KIT, GUARD ASSEMBLY GUARD BLADE SCREW BOLT
parts list fo N QTY 1 1 1 1 1 1 1 2 1 1 4 1 2 1 1 1 1 1 1 1 1 1 1 1 7 1 1 1 1 1 2 1 1 1 1 1 2 2 1 ep ro du ct io n Description BOLT, T COUPLING KIT, SWITCH AND LOCK-OUT BUTTON BUTTON, LOCK-OUT BUTTON, LOCK-OUT TRIGGER KIT, LEFT HANDLE BUTTON, PCB HOUSING, HANDLE LEFT SCREW SCREW KIT, MOTOR AND SWITCH BRACKET, RUBBER PLATE MOTOR CLIP SCREW BRACKET , RUBBER PLATE SCREW SCREW KIT, LEFT HOUSING BOLT BRACKET, RUBBER PLATE HOUSING, MOTOR SCREW SCREW KIT, BATTERY RELEASAE BUTTON SPRING PIN BUTTON, BATTERY R
parts list Part No. --------770167 1760266 1760263 1760265 Description PCB BRACKET, INSERT PLATE STRAP, HARNESS BATTERY, 2AH, NA (OPTION) CHARGER, RAPID, NA (OPTION) BATTERY, 4AH, NA (OPTION) QTY 1 1 1 1 1 1 N ot fo rR ep ro du ct io n Item No.
n ro du ct io ep rR fo ot N Briggs & Stratton Power Products Group, LLC P.O.
n ro du ct io N ot fo rR ep 82V CORDLESS BLOWER 1696775 (SXDBL82) Owner’s Manual TOLL-FREE HELPLINE: 1-800-317-7833 www.snapper.com Read all safety rules and instructions carefully before operating this tool.
CONTENTS Contents .............................................................................................................................. 2 ......................................................................................................... 2 General Safety Rules ........................................................................................................... 3 Symbols ......................................................................................................................
GENERAL SAFETY RULES READ ALL INSTRUCTIONS BEFORE USING (THIS POWER TOOL) WA R N I N G Read and understand all instructions before using this product. Failure to follow all instructions listed below may result in electric shock, fire, and/or serious personal injury. When using an electrical appliance, basic precautions should always be followed, including the following: N ot fo rR ep ro du ct io n • Do not allow to be use as a toy. Close attention is necessary when used by or near children.
GENERAL SAFETY RULES • • • • N • ep • rR • fo • Do not charge battery in rain, or in wet locations. Do not use battery-operated appliance in rain. Remove or disconnect battery before servicing, cleaning, or removing material from the appliance. Do not dispose of the battery in a fire. The cell may explode. Check with local codes for possible special disposal instructions. Do not open or mutilate the battery. Released electrolyte is corrosive and may cause damage to the eyes or skin.
GENERAL SAFETY RULES (PROPOSITION 65) ep WA R N I N G ro du ct io n • Under extreme usage or temperature conditions, battery leakage may occur. If liquid comes in contact with your skin, wash immediately with soap and water, then neutralize with lemon juice or vinegar. If liquid gets into your eyes, flush them with clean water for at least 10 minutes, then seek immediate medical attention. Following this rule will reduce the risk of serious personal injury.
SYMBOLS Some of the following symbols may be used on this product. Please study them and learn their meaning. Proper interpretation of these symbols will allow you to operate the product better and safer.
SYMBOLS The following signal words and meanings are intended to explain the levels of risk associated with this product. SIGNAL MEANING Indicates an imminently hazardous situation, which, if not avoided, will result in death or serious injury. WARNING Indicates a potentially hazardous situation, which, if not avoided, could result in death or serious injury. CAUTION Indicates a potentially hazardous situation, which, if not avoided, may result in minor or moderate injury.
KNOW YOUR BLOWER Battery Release Button On/Off Button ro du ct io Blower Tube n Cruise Control Lever Fig. 1 ep Trigger 82V LithiumIon Battery KNOW YOUR BLOWER (See Figure 1.) rR The safe use of this product requires an understanding of the information on the product and in this operator’s manual as well as a knowledge of the project you are attempting. Before use of this product, familiarize yourself with all operating features and safety rules. fo ON/OFF BUTTON Turns power on/off.
ASSEMBLY W A R N I N G If any parts are damaged or missing, do not operate this product until the parts are replaced. Use of this product with damaged or missing parts could result in serious personal injury. W A R N I N G UNPACKING ro du ct io n Do not attempt to modify this product or create accessories not recommended for use with this blower. Any such alteration or modification could result in a hazardous condition leading to possible serious personal injury.
ASSEMBLY ASSEMBLING THE BLOWER TUBE(See Figure 2.) W A R N I N G To prevent accidental starting that could cause serious personal injury, always remove the battery pack from the tool when assembling parts. ro du ct io n 1. Align either of the grooves on the tube with the tabs on the blower housing. Push the tube onto the blower housing until the tab engages the grooves (See Figure 2.1.) Tab ep Tube Fig. 2.1 rR Groove ot fo 2.
OPERATION W A R N I N G Do not allow familiarity with this product to make you careless. Remember that a careless fraction of a second is sufficient to inflict serious injury. W A R N I N G W A R N I N G ro du ct io n Always wear eye protection with side shields marked to comply with ANSI Z87.1, along with hearing protection. Failure to do so could result in objects being thrown into your eyes and other possible serious injuries. Use only as described in this manual.
OPERATION TO INSTALL/REMOVE BATTERY PACK (See Figure 3.) TO INSTALL • Align the ribs of the battery pack with the mounting slots in the blower’s battery port. • Insert the battery into the battery opening until the battery release button locks into place. TO REMOVE W A R N I N G ro du ct io • Grasp the blower firmly and pull the battery out of the handle. n • Press the battery release button on the blower. This will cause the battery to slightly protrude out of the tool.
OPERATION STARTING/STOPPING THE BLOWER (See Figure 4.) • Ensure that the battery is installed in the blower. • To start the blower, press the On/Off Button located on the blower. You will hear two audible beeps signaling the blower is active. • Squeeze the trigger to start the blower. ADJUSTING THE AIR VELOCITY (See Figure 5.) n • Release the trigger to stop. • Squeeze the trigger to start the blower. ro du ct io • Ensure that blower is blower is on. The LED above the On/Off Button will illuminate.
BATTERY & CHARGER MAINTENANCE CHARGING PROCEDURE NOTE: The battery is not shipped fully charged. It is recommended to fully charge before first use to ensure that maximum run time can be achieved. This lithium-ion battery will not develop a memory and may be charged at any time. Low voltage charging: n If the battery has been stored with little to no charge for a long period of time, the charger will go into recovery mode, which will take 20 hrs to fully charge the battery.
BATTERY & CHARGER MAINTENANCE CHARGER MOUNTING This charger can be installed hanging on a wall using two #8 screws (not included). 2. Locate the placement for the charger to be wall mounted. 3. If fastening to wood studs use 2 wood screws (not included). 4. Drill two holes 4.5 in. apart ensuring that they are vertically aligned. 5. If fastening to drywall use wall anchors (not included) and screws to secure the charger to the wall. n 1.
MAINTENANCE W A R N I N G In order to avoid personal injury and the risk of fire and electric shock, remove the battery pack before adjusting, inspecting, or cleaning the blower. Cleaning Battery Pack ro du ct io n Remove the battery pack. 1. Brush or blow dust and debris out of the air vents using compressed air or a vacuum. Keep the air vents free of obstructions, sawdust, and wood chips. Do not spray, wash, or immerse the air vents in water. 2.
ENVIRONMENTALLY SAFE BATTERY DISPOSAL The following toxic and corrosive materials are in the batteries used in this blower battery pack: Lithium-Ion, a toxic material. n W A R N I N G W A R N I N G ro du ct io All toxic materials must be disposed of in a specified manner to prevent contamination of the environment.
TROUBLESHOOTING PROBLEM POSSIBLE CAUSE SOLUTION Ensure that the battery is fully secured in the blower. Refer to Installing the Battery section in this manual. Battery is not charged. Charge the battery pack according to the instructions included with your model. Unit will not start. Defective power switch. Have the power switch replaced by an authorized service center. The unit will start, but air will not flow through the tube. Blocked tube. Cruise Control Lever doesn't work.
LIMITED WARRANTY Briggs & Stratton warrants that, during the warranty period specified below, it will repair or replace, free of charge, any part that is defective in material or workmanship or both. Transportation charges on product submitted for repair or replacement under this warranty must be borne by purchaser. This warranty is effective for and is subject to the time periods and conditions stated below. For warranty service, find the nearest Authorized Service Dealer in our dealer locator map at www.
LIMITED WARRANTY ABOUT YOUR WARRANTY Warranty service is available only through Snapper Authorized Service Dealers. This warranty covers only defects in materials or workmanship. It does not cover damage caused by improper use or abuse, improper maintenance or repair, normal wear and tear, or stale or unapproved fuel. ro du ct io n Improper Use and Abuse - The proper, intended use of this product is described in the Operator’s Manual.
EXPLODED VIEW 34 33 38A 11 36 35 ro du ct io n 12A 37A 31 20 32 21A 17 10 19 7A 4 18 26 30 27 ep 23A 3A 6 6 rR 8A 29 25 5 24 4 28 5 2A 10 9A 9 N ot fo 1 8A 12 1A 7A 41A 11 3A 40A 39A 21 22
PARTS LIST ITEM NO. PART NO.
PARTS LIST PART NO. DESCRIPTION KIT, BATTERY RELEASE BUTTON 770455 ASSEMBLY ----BUTTON, RELEASE ----AXIS, FIXED ----SLEEVE, AXIAL ----SPRING, RESET KIT, RIGHT HANDLE, NA & EU 770456 11 33 34 35 36 12A QTY 1 1 1 2 1 1 n ITEM NO.
n ro du ct io ep rR fo ot N Briggs & Stratton Power Products Group, LLC P.O.
n ro du ct io 82V LITHIUM-ION BATTERY CHARGER N ot fo rR ep 1760263 (BSRC82) Owner’s Manual TOLL-FREE HELPLINE: 1-800-743-4115 www.briggsandstratton.com Read all safety rules and instructions carefully before operating this tool.
CONTENTS Product Specifications.......................................................................................................... 2 Important Safety Instructions ............................................................................................... 3 Symbols................................................................................................................................ 5 Know Your Charger.........................................................................................
IMPORTANT SAFETY INSTRUCTIONS IMPORTANT SAFET Y INSTRUCTIONS – SAVE THESE INSTRUCTIONS DANGER – TO REDUCE THE RISK OF FIRE OR ELECTRIC SHOCK, CAREFULLY FOLLOW THESE INSTRUCTIONS C A U T I O N Risk of Electric Shock. Dry location use only. C A U T I O N ro du ct io WA R N I N G FOR INDOOR USE ONLY. n Read and understand all instructions before using this product. Failure to follow all instructions listed below may result in electric shock, fire, and/or serious personal injury.
IMPORTANT SAFETY INSTRUCTIONS • Do not abuse cord or charger. Never use the cord to carry the charger. Do not pull the charger cord rather than the plug when disconnecting from receptacle. Damage to the cord or charger could occur and create an electric shock hazard. Replace damaged cords immediately. • Do not operate charger if it has received a sharp blow, been dropped, or otherwise damaged in any way.
SYMBOLS Some of the following symbols may be used on this product. Please study them and learn their meaning. Proper interpretation of these symbols will allow you to operate the product better and safer. NAME DESIGNATION/EXPLANATION V Volts Voltage Hz Hertz Frequency (cycles per second) Watts Power Direct Current Type or a characteristic of current n W Wet Conditions Alert ro du ct io SYMBOL Do not expose to rain or use in damp locations.
KNOW YOUR CHARGER The safe use of this product requires an understanding of the information on the product and in this operator’s manual as well as a knowledge of the project you are attempting. Before using this product, familiarize yourself with all operating features and safety rules.
OPERATION This device complies with Part 15 of the FCC Rules. Operation is subject to the following two conditions: (1) This device may not cause harmful interference. (2) This device must accept any interference received, including interference that may cause undesired operation. WA R N I N G ro du ct io n Changes or modifications to this unit not expressly approved by the party responsible for compliance could void the user’s authority to operate the equipment.
OPERATION CHARGING PROCEDURE NOTE: The battery is not shipped fully charged. It is recommended to fully charge before first use to ensure that maximum run time can be achieved. This lithium-ion battery will not develop a memory and may be charged at any time. Low voltage charging: ro du ct io n If the battery has been stored with little to no charge for a long period of time, the charger will go into recovery mode, which will take 20 hrs to fully charge the battery.
OPERATION CHARGER MOUNTING rR ep ro du ct io n 1. This charger can be installed hanging on a wall using two #8 screws (not included). 2. Locate the placement for the charger to be wall mounted. 3. If fastening to wood studs use 2 wood screws (not included). 4. Drill two holes on center 4.5 in. apart ensuring that they are vertically aligned. 5. If fastening to drywall use wall anchors (not included) and screws to secure the charger to the wall. 6.
MAINTENANCE WA R N I N G To avoid serious personal injury, always remove the battery pack from the tool when cleaning or performing any maintenance. WA R N I N G ro du ct io WA R N I N G n When servicing, use only identical Briggs & Stratton replacement parts. Use of any other parts may create a hazard or cause product damage. It is not recommended to use compressed dry air as cleaning method of the charger.
TROUBLESHOOTING CAUSE Battery pack or charger is defective or bad connection between the battery pack and charger. SOLUTION 1. Try to remove and reinsert the battery pack in the charger. 2. Try charging a different battery pack. 3. Unplug the charger and wait until the red LED goes out, then reconnect the plug to the power supply. Allow the battery pack to reach normal temperature. Charging will begin when battery pack returns to 3°C-47°C (37°F-117°F). ro du ct io n PROBLEM Charger doesn't work.
LIMITED WARRANTY Briggs & Stratton warrants that, during the warranty period specified below, it will repair or replace, free of charge, any part that is defective in material or workmanship or both. Transportation charges on product submitted for repair or replacement under this warranty must be borne by purchaser. This warranty is effective for and is subject to the time periods and conditions stated below. For warranty service, find the nearest Authorized Service Dealer in our dealer locator map at www.
LIMITED WARRANTY ABOUT YOUR WARRANTY Warranty service is available only through Briggs & Stratton Authorized Service Dealers. This warranty covers only defects in materials or workmanship. It does not cover damage caused by improper use or abuse, improper maintenance or repair, normal wear and tear, or stale or unapproved fuel. ro du ct io n Improper Use and Abuse - The proper, intended use of this product is described in the Operator’s Manual.
n ro du ct io ep rR fo ot N Briggs & Stratton Power Products Group, LLC P.O.
n ro du ct io CHARGEUR DE BATTERIE LITHIUM-ION 82V N ot fo rR ep 1760263 (BSRC82) Guide D’utilisation LIGNE D’ASSISTANCE SANS FRAIS : 1-800-743-4115 www.briggsandstratton.com Avant d’utiliser le produit, veuillez lire et suivre toutes les consignes de sécurité et les instructions d’utilisation.
MATIÈRES Fiche Technique................................................................................................................... 2 Consignes De Sécurité Importantes .................................................................................... 3 Symboles.............................................................................................................................. 5 Veiller À Bien Connaître Votre Chargeur.........................................................................
CONSIGNES DE SÉCURITÉ IMPORTANTES CONSIGNES DE SÉCURITÉ IMPORTANTES – CONSERVEZ CES INSTRUCTIONS DA NGER – POUR RÉDUIRE LES RISQUES D’INCENDIE OU DE DÉCHARGE ÉLECTRIQUE, SUIVEZ SCRUPULEUSEMENT CES INSTRUCTIONS ro du ct io n Lire et veiller à bien comprendre toutes les instructions. Le non-respect de toutes les instructions ci-dessous peut entraîner un choc électrique, un incendie et/ou des blessures graves. AV E R T I S S E M E N T POUR UNE UTILISATION À L’INTÉRIEUR EXCLUSIVEMENT.
CONSIGNES DE SÉCURITÉ IMPORTANTES • Ne pas maltraiter le cordon d’alimentation ou le chargeur. Ne jamais utiliser le cordon d’alimentation pour transporter le chargeur. Ne pas débrancher le chargeur en tirant sur le cordon. Tirer sur la fiche pour la débrancher. Un cordon ou un chargeur endommagé peut présenter un risque de choc électrique. Remplacer immédiatement tout cordon endommagé. • Ne pas utiliser le chargeur s’il a été soumis à un choc violent ou autrement endommagé.
SYMBOLES Certains des symboles ci-après sont susceptibles de fi gurer sur cet appareil. Etudiez-les et apprenez leur signifi cation. Une interprétation correcte de ces symboles vous permettra d’utiliser votre appareil dans de meilleures conditions de sécurité et de manière plus adéquate.
VEILLER À BIEN CONNAÎTRE VOTRE CHARGEUR Pour utiliser ce produit en toute sécurité, vous devez comprendre les renseignements figurant sur l’outil et dans le présent guide d’utilisation, et vous devez avoir de bonnes connaissances au sujet du projet que vous allez entreprendre. Avant d’utiliser ce produit, familiarisez-vous avec toutes ses caractéristiques et avec les règles de sécurité qui s’y rapportent.
UTILISATION Cet artifice se plie à la Partie 15 des Règles de FCC. L’opération est soumise aux deux conditions suivantes : (1) Cet artifice peut ne pas provoquer l’interférence malfaisante. (2) Cet artifice doit accepter n’importe quelle interférence reçue, en incluant l’interférence qui peut provoquer l’opération indésirable.
UTILISATION PROCÉDURE DE CHARGE NOTE : La batterie n’est pas livrée totalement chargée. Il est recommandé de la recharger totalement avant utilisation pour lui assurer une autonomie maximale. Cette batterie lithium-ion est exempte d’effet mémoire et peut être rechargée à tout moment.
UTILISATION MONTAGE DU CHARGEUR fo rR ep ro du ct io n 1. Ce chargeur peut être installé au mur au moyen de #8 vis (non incluses). 2. Repérez l’endroit où vous désirez effectuer le montage mural du chargeur. 3. Si l’endroit choisi comporte des montants de bois, utilisez 2 vis à bois (non incluses). 4. Percez deux trous dans le centre, avec une distance de 11,43 cm entre chaque trou et assurezvous qu’ils sont alignés verticalement. 5.
ENTRETIEN AV E R T I S S E M E N T Pour empêcher un démarrage accidentel pouvant entraîner des blessures graves, toujours retirer le bloc-piles de l’outil avant tout nettoyage ou entretien. AV E R T I S S E M E N T ro du ct io n Lorsque vous procédez à l’entretien de l’article, utilisez uniquement des pièces de remplacement Briggs & Stratton identiques à celles d’origine. L’utilisation de toute autre pièce peut constituer un danger ou endommager le produit.
DÉPANNAGE CAUSE Le bloc-pile ou le chargeur est défectueux ou il y a un mauvais contact entre le bloc-pile et le chargeur. SOLUTION 1. Essayez d’enlever le blocpile et réinstallez-le sur le chargeur. 2. Essayez de charger un autre bloc-pile. 3. Débranchez le chargeur et attendez que le voyant à DEL rouge s’éteigne, puis rebranchez la fiche dans la prise de courant. Attendez que le bloc-pile atteigne une température normale.
GARANTIE LIMITÉE Briggs & Stratton garantit la réparation ou le remplacement gratuit, pendant la période de garantie spécifiée ci-dessous, de toute pièce présentant des vices de matériaux ou de fabrication. Les frais de transport du produit à réparer ou remplacer seront, dans le cadre de cette garantie, réglés par l’acheteur. Cette garantie court sur les périodes énoncées ci-dessous et est assujettie aux conditions énoncées ci-dessous.
GARANTIE LIMITÉE Conservez votre reçu d’achat comme preuve. Si vous n’avez pas de preuve de la date de l’achat initial au moment de la demande d’un service en vertu de la garantie, la date de fabrication du produit sera utilisée pour déterminer la période de garantie. L’enregistrement du produit n’est pas requis pour obtenir un service en vertu de la garantie pour les produits Briggs & Stratton.
n ro du ct io ep rR fo ot N Briggs & Stratton Power Products Group, LLC P.O.
n ro du ct io CARGADOR DE BATERÍA 82V ÍON-LÍTIO N ot fo rR ep 1760263 (BSRC82) Manual del Propietario LÍNEA DE AYUDA GRATUITA: 1-800-743-4115 www.briggsandstratton.com Antes de hacer funcionar esta herramienta, lea cuidadosamente todas las reglas de seguridad y las instrucciones.
CONTENIDOS Especificaciones................................................................................................................... 2 Instrucción De Seguridad Importante................................................................................... 3 Símbolos............................................................................................................................... 5 Familiarícese Con Su Cargador...............................................................................
INSTRUCCIÓN DE SEGURIDAD IMPORTANTE INSTRUCCIÓN DE SEGURIDAD IMPORTANTE – SALVE ÉSTOS INSTRUCCIONES PELI G RO – PA R A R ED U CI R EL R I ESG O D E INCENDIOS O DESCARGA ELÉCTRICA , SIGA CUIDADOSAMENTE ESTAS INSTRUCCIONES n Lea y comprenda todas las instrucciones. El incumplimiento de las instrucciones señaladas abajo puede causar descargas eléctricas, incendios y lesiones serias. P R E C A U C I Ó N Riesgo de descarga eléctrica. Uso en entornos secos.
INSTRUCCIÓN DE SEGURIDAD IMPORTANTE seria. • No maltrate el cordón eléctrico ni el cargador. Para trasladar el cargador nunca lo sostenga del cordón. No tire del cordón del cargador en lugar de tirar de la clavija al desconectar el aparato de la toma de corriente. Puede dañar el cordón o el cargador y causar un peligro de descarga eléctrica. Cambie de inmediato todo cordón eléctrico dañado. • No utilice el cargador si el mismo ha sufrido una caída, un golpe sólido o un daño de cualquier tipo.
SÍMBOLOS Es posible que se empleen en este producto algunos de los siguientes símbolos. Le suplicamos estudiarlos y aprender su significado. Una correcta interpretación de estos símbolos le permitirá utilizar mejor y de manera más segura el producto.
FAMILIARÍCESE CON SU CARGADOR El uso seguro de este producto requiere la comprensión de la información del producto y del manual de usuario, así como el conocimiento de la tarea que intenta realizar. Antes de utilizar este producto, familiarícese con las características de funcionamiento y normas de seguridad.
FUNCIONAMIENTO Este dispositivo cumple con la Parte 15 de las Reglas de FCC. La operación es sujeta a las dos condiciones siguientes: (1) Este dispositivo puede no causar la interferencia dañosa. (2) Este dispositivo debe aceptar cualquier interferencia recibida, incluso la interferencia que puede causar la operación indeseada.
FUNCIONAMIENTO PROCEDIMIENTO DE CARGA NOTA: La batería no se envía completamente cargada. Se recomienda cargarla completamente antes de usarla por primera vez para garantizar que se pueda obtener el máximo tiempo de funcionamiento. Esta batería de ión de litio no desarrolla memoria y se le puede cargar en cualquier momento.
FUNCIONAMIENTO MONTAJE DEL CARGADOR rR ep ro du ct io n 1. Este cargador se puede instalar en una pared atornillándolo con dos #8 tornillos (no incluidos). 2. Localice el lugar en el que quiere colgar el cargador. 3. Si la pared es de madera, utilice dos tornillos especiales para madera (no incluidos). 4. Taladre dos hoyos en el centro, a una distancia de 11,43 cm, y asegúrese de que estén alineados verticalmente. 5.
MANTENIMIENTO A D V E R T E N C I A Para evitar lesiones corporales serias, siempre retire el paquete de pilas de la herramienta al limpiarla o darle mantenimiento. A D V E R T E N C I A n Cuando realice el mantenimiento, solo utilice piezas de repuesto de Briggs & Stratton idénticas. El uso de otras piezas puede generar un peligro o dañar el producto. ro du ct io A D V E R T E N C I A No se recomienda el uso de aire comprimido seco como método de limpieza del cargador.
SOLUCIÓN DE PROBLEMAS CAUSA El paquete de baterías o el cargador están defectuosos o hay una mala conexión entre el paquete de baterías y el cargador. SOLUCIÓN 1. Intente retirar el paquete de baterías y volver a instalarlo en el cargador. 2. Intente cargar un paquete de baterías diferente. 3. Desconecte el cargador y espere hasta que el LED de color rojo se apague, luego vuelva a conectar el enchufe al suministro eléctrico. Deje que el paquete de baterías alcance una temperatura normal.
GARANTÍA LIMITADA n Briggs & Stratton se compromete a que, durante el período de garantía especificado a continuación, reparará o sustituirá, de manera gratuita, cualquier pieza con defectos de material o fabricación, o de ambos. El comprador deberá correr con los gastos de transporte del producto que envíe para reparación o reemplazo al amparo de esta garantía. Esta garantía tiene vigencia y está sujeta a las condiciones que se establecen más adelante.
GARANTÍA LIMITADA ACERCA DE LA GARANTÍA El servicio de garantía solo está disponible a través de los distribuidores de servicio autorizados de Briggs & Stratton. La mayor parte de las reparaciones bajo garantía se atienden de manera rutinaria, pero algunas veces las solicitudes de reparaciones bajo garantía podrían no ser apropiadas Esta garantía SÓLO cubre defectos en materiales y mano de obra.
n ro du ct io ep rR fo ot N Briggs & Stratton Power Products Group, LLC P.O.
n ro du ct io 82VDC 144Wh Rechargeable Li-ion Battery 1760266 (BSB2AH82) N ot fo rR ep 82V RECHARGEABLE LITHIUM-ION BATTERY 82VDC 288Wh Rechargeable Li-ion Battery 1760265 (BSB4AH82) Owner’s Manual TOLL-FREE HELPLINE: 1-800-743-4115 www.briggsandstratton.com Read all safety rules and instructions carefully before operating this tool.
CONTENTS Product Specifications.......................................................................................................... 2 Important Safety Instructions ............................................................................................... 3 Symbols................................................................................................................................ 4 Know Your Battery.........................................................................................
IMPORTANT SAFETY INSTRUCTIONS WA R N I N G Read all safety warnings and instructions. Failure to follow the warnings and instructions may result in electric shock, fire and/or serious injury. WA R N I N G n For use only with Briggs & Stratton Li-ion Battery Charger (BSRC82). • Keep battery out of reach of children. ro du ct io • When charging, make sure temperature is between 6-40°C(43-104°F), -14-45°C(6.8-113°F) for discharge. • Do not use a damp cloth or detergent on the battery or battery charger.
SYMBOLS Some of the following symbols may be used on this product. Please study them and learn their meaning. Proper interpretation of these symbols will allow you to operate the product better and safer. NAME DESIGNATION/EXPLANATION V Volts Voltage Hz Hertz Frequency (cycles per second) Watts Power Direct Current Type or a characteristic of current n W Wet Conditions Alert ro du ct io SYMBOL Do not expose to rain or use in damp locations.
KNOW YOUR BATTERY ro du ct io n The safe use of this product requires an understanding of the information on the product and in this operator’s manual as well as a knowledge of the project you are attempting. Before using this product, familiarize yourself with all operating features and safety rules.
OPERATION C A U T I O N Risk of Fire and Burns. Do Not Open, Crush, Heat Above 100°C(212°F) or Incinerate. Follow Manufacturer’s Instructions. C A U T I O N C A U T I O N ro du ct io n When battery pack is not in use, keep it away from other metal objects, like paper clips, coins, keys, nails, screws or other small metal objects, that can make a connection from one terminal to another. Shorting the battery terminals together may cause burns or a fire.
OPERATION CHECKING BATTERY CAPACITY Note: The battery is not shipped fully charged. It is recommended to fully charge before first use to ensure that maximum run time can be achieved. This lithium-ion battery will not develop a memory and may be charged at any time. n Press the battery capacity indicator (BCI) button. The lights will illuminate according to the batteries capacity level.
OPERATION CHARGING THE BATTERY PACK Battery packs are shipped in a low charge condition to prevent possible problems. Therefore, you should charge prior to first use. If the charger does not charge the battery pack under normal circumstances, return both the battery pack and charger to your nearest Authorized Service Center for electrical check. • Charge the battery pack only with the recommended charger. n • Connect the charger to a power supply.
MAINTENANCE WA R N I N G To avoid serious personal injury, always remove the battery pack from the tool when cleaning or performing any maintenance. WA R N I N G ro du ct io WA R N I N G n When servicing, use only identical Briggs & Stratton replacement parts. Use of any other parts may create a hazard or cause product damage. It is not recommended to use compressed dry air as cleaning method of the charger.
TROUBLESHOOTING CAUSE The battery pack has automatically performed selfmaintenance to extend its life. SOLUTION Fully recharge the battery pack before use. N ot fo rR ep ro du ct io n PROBLEM The battery pack charge is reduced after more than one month of non-use.
ENVIRONMENTALLY SAFE BATTERY DISPOSAL The following toxic and corrosive materials are in the batteries used in this battery pack: Lithium-Ion, a toxic material. n WA R N I N G WA R N I N G ro du ct io All toxic materials must be disposed of in a specified manner to prevent contamination of the environment. Before disposing of damaged or worn out Lithium-Ion battery packs, contact your local waste disposal agency, or the local Environmental Protection Agency for information and specific instructions.
LIMITED WARRANTY Briggs & Stratton warrants that, during the warranty period specified below, it will repair or replace, free of charge, any part that is defective in material or workmanship or both. Transportation charges on product submitted for repair or replacement under this warranty must be borne by purchaser. This warranty is effective for and is subject to the time periods and conditions stated below. For warranty service, find the nearest Authorized Service Dealer in our dealer locator map at www.
LIMITED WARRANTY ABOUT YOUR WARRANTY Warranty service is available only through Briggs & Stratton Authorized Service Dealers. This warranty covers only defects in materials or workmanship. It does not cover damage caused by improper use or abuse, improper maintenance or repair, normal wear and tear, or stale or unapproved fuel. ro du ct io n Improper Use and Abuse - The proper, intended use of this product is described in the Operator’s Manual.
n ro du ct io ep rR fo ot N Briggs & Stratton Power Products Group, LLC P.O.
n ro du ct io Batterie lithium-ion rechargeable 144 Wh 82 V C.C. 1760266 (BSB2AH82) N ot fo rR ep BATTERIE LITHIUM-ION 82 V DE RECHANGE Batterie lithium-ion rechargeable 288 Wh 82 V C.C. 1760265 (BSB4AH82) Guide d’utilisation LIGNE D’ASSISTANCE SANS FRAIS : 1-800-743-4115 www.briggsandstratton.com Avant d’utiliser le produit, veuillez lire et suivre toutes les consignes de sécurité et les instructions d’utilisation.
MATIÈRES Fiche Technique................................................................................................................... 2 Consignes De Sécurité Importantes .................................................................................... 3 Symboles.............................................................................................................................. 4 Familiarisez-vous Avec Votre Batterie...........................................................................
CONSIGNES DE SÉCURITÉ IMPORTANTES AV E R T I S S E M E N T Lisez tous les avertissements de sécurité et les consignes. Le non-respect des avertissements et des consignes peut entraîner des chocs électriques, un incendie ou de graves blessures. AV E R T I S S E M E N T À utiliser uniquement avec le chargeur de batterie Briggs & Stratton (BSRC82).
SYMBOLES Certains des symboles ci-après sont susceptibles de fi gurer sur cet appareil. Etudiez-les et apprenez leur signifi cation. Une interprétation correcte de ces symboles vous permettra d’utiliser votre appareil dans de meilleures conditions de sécurité et de manière plus adéquate.
FAMILIARISEZ-VOUS AVEC VOTRE BATTERIE rR Bouton indicateur ep ro du ct io n Pour utiliser ce produit en toute sécurité, vous devez comprendre les renseignements figurant sur l’outil et dans le présent guide d’utilisation, et vous devez avoir de bonnes connaissances au sujet du projet que vous allez entreprendre. Avant d’utiliser ce produit, familiarisez-vous avec toutes ses caractéristiques et avec les règles de sécurité qui s’y rapportent.
UTILISATION AT T E N T I O N Risque d’incendie et de brûlures N’essayez pas d’ouvrir, d’écraser, de chauffer au-delà de 100 °C (212 °F) ou d’incinérer la batterie. Veuillez suivre le mode d’emploi du fabricant.
UTILISATION VÉRIFICATION DE LA CHARGE DE LA BATTERIE Note : La pile n’est pas complètement chargée au moment de la livraison. Il est conseillé de la charger complètement avant la première utilisation pour permettre au temps d’exécution maximale d’être atteint. Cette pile au lithium-ion n’a aucune mémoire et peut être chargée en tout temps. CHARGE DE LA BATTERIE BOUTON INDICATEUR (BCI) ro du ct io n Appuyez sur le bouton de vérification de charge (BCI) de la batterie.
UTILISATION POUR CHARGER Les bloc-piles de cet outil ont été expédiées dans un état de charge faible pour éviter d’éventuels problèmes. Il est donc nécessaire de charger les bloc-piles avant d’utiliser l’outil. Si les bloc-piles ne se rechargent pas dans des conditions normales, les retourner, ainsi que le chargeur et le stand au centre de réparations agréé le plus proche pour une vérification électrique. • Ne recharger le piles qu’avec l’appareil recommandé.
ENTRETIEN AVERTISSEMENT Pour éviter des blessures graves, retirez toujours le blocpile avant de procéder à l’entretien ou au nettoyage de l’outil. AVERTISSEMENT ro du ct io n Lorsque vous procédez à l’entretien de l’article, utilisez uniquement des pièces de remplacement Briggs & Stratton identiques à celles d’origine. L’utilisation de toute autre pièce peut constituer un danger ou endommager le produit. AVERTISSEMENT Il n’est pas recommandé d’utiliser de l’air comprimé pour nettoyer le bloc-pile.
DÉPANNAGE CAUSE SOLUTION Le bloc-pile a effectué un auto- Rechargez complètement le entretien automatique pour bloc-pile avant de l’utiliser. prolonger sa durée de vie. N ot fo rR ep ro du ct io n PROBLÈME La charge du bloc-pile diminue lorsque vous ne l’utilisez pas pendant plus d’un mois.
MISE AU REBUT DE LA BATTERIE DE FAÇON ÉCOLOGIQUE Les matériaux toxiques et corrosifs suivants se trouvent dans les éléments composant la batterie de cet outil : Lithium-Ion, matériau toxique. n AVERTISSEMENT ro du ct io Tous les matériaux toxiques doivent être mis au rebut d'une manière particulière afin d'éviter de contaminer l'environnement.
GARANTIE LIMITÉE Briggs & Stratton garantit la réparation ou le remplacement gratuit, pendant la période de garantie spécifiée ci-dessous, de toute pièce présentant des vices de matériaux ou de fabrication. Les frais de transport du produit à réparer ou remplacer seront, dans le cadre de cette garantie, réglés par l’acheteur. Cette garantie court sur les périodes énoncées ci-dessous et est assujettie aux conditions énoncées ci-dessous.
GARANTIE LIMITÉE Conservez votre reçu d’achat comme preuve. Si vous n’avez pas de preuve de la date de l’achat initial au moment de la demande d’un service en vertu de la garantie, la date de fabrication du produit sera utilisée pour déterminer la période de garantie. L’enregistrement du produit n’est pas requis pour obtenir un service en vertu de la garantie pour les produits Briggs & Stratton.
n ro du ct io ep rR fo ot N Briggs & Stratton Power Products Group, LLC P.O.
n ro du ct io Batería recargable de iones de litio 144 Wh 82 VCC 1760266 (BSB2AH82) N ot fo rR ep BATERÍA RECARGABLE DE LITIO-IÓN DE 82V Batería recargable de iones de litio 288 Wh 82 VCC 1760265 (BSB4AH82) Manual del Propietario LÍNEA DE AYUDA GRATUITA: 1-800-743-4115 www.briggsandstratton.com Antes de hacer funcionar esta herramienta, lea cuidadosamente todas las reglas de seguridad y las instrucciones.
CONTENIDOS Especificaciones................................................................................................................... 2 Instrucción De Seguridad Importante .................................................................................. 3 Símbolos............................................................................................................................... 4 Conozca Su Batería..........................................................................................
INSTRUCCIÓN DE SEGURIDAD IMPORTANTE A D V E R T E N C I A Lea todas las instrucciones y advertencias de seguridad. El incumplimiento de las advertencias e instrucciones abajo puede provocar descargas eléctricas, incendios y/o lesiones graves. A D V E R T E N C I A Utilícese solo con el cargador de baterías de iones de litio Briggs & Stratton (BSRC82). N ot fo rR ep ro du ct io n • Para cargar, la temperatura debe ser 6- 40°C (43-104°F) e -14- 45°C (6.8-113°F) para descargar.
SÍMBOLOS Es posible que se empleen en este producto algunos de los siguientes símbolos. Le suplicamos estudiarlos y aprender su significado. Una correcta interpretación de estos símbolos le permitirá utilizar mejor y de manera más segura el producto.
CONOZCA SU BATERÍA Botón indicador ep ro du ct io n El uso seguro de este producto requiere la comprensión de la información del producto y del manual de usuario, así como el conocimiento de la tarea que intenta realizar. Antes de utilizar este producto, familiarícese con las características de funcionamiento y normas de seguridad.
FUNCIONAMIENTO P R E C A U C I Ó N Riesgo de incendios y quemaduras. No se debe abrir, aplastar, calentar por encima de los 212°F (100°C) o incinerar. Siga las instrucciones del fabricante. P R E C A U C I Ó N P R E C A U C I Ó N ro du ct io n Cuando la batería no está en uso, manténgala alejada de otros objetos metálicos como clips, monedas, llaves, clavos, tornillos u otros objetos metálicos pequeños que puedan crear una conexión desde una terminal a otra.
FUNCIONAMIENTO COMPROBACIÓN DE LA PILA Nota: La batería no se envía cargada. Se recomienda cargarla por completo antes de usarla por primera vez para garantizar un período de carga máximo. Esta batería de iones de litio no tiene memoria y se puede cargar en cualquier momento. n Pulse el indicador de capacidad de la batería (BCI). Las luces se encenderán según el nivel de capacidad de las baterías.
FUNCIONAMIENTO CÓMO CARGAR EL PAQUETE DE BATERÍAS Los paquetes de baterías se envían con carga baja para evitar posibles problemas. Por lo tanto, debe cargarlas antes de usarlas. Si el cargador no carga el paquete de baterías en circunstancias normales, regrese ambos, el paquete de baterías y el cargador, al centro de servicio autorizado de su preferencia, para que los revisen eléctricamente. • Sólo cargue el paquete de baterías con un cargador recomendado.
MANTENIMIENTO A D V E R T E N C I A Para evitar lesiones corporales serias, siempre retire el paquete de pilas de la herramienta al limpiarla o darle mantenimiento. A D V E R T E N C I A n Cuando realice el mantenimiento, solo utilice piezas de repuesto de Briggs & Stratton idénticas. El uso de otras piezas puede generar un peligro o dañar el producto. ro du ct io A D V E R T E N C I A No se recomienda el uso de aire comprimido seco como método de limpieza del cargador.
SOLUCIÓN DE PROBLEMAS CAUSA El paquete de baterías realizó la función de automantenimiento para extender su vida útil. SOLUCIÓN Antes de usarlo por primera vez, cargue completamente el paquete de baterías. N ot fo rR ep ro du ct io n PROBLEMA La carga del paquete de baterías se reduce si pasa más de un mes sin usarlo.
ELIMINACIÓN SEGURA DE LA BATERÍA Las baterías utilizadas en esta herramienta contienen los siguientes materiales tóxicos y corrosivos: Litio-ión, un material tóxico. n A D V E R T E N C I A ro du ct io Todos los materiales tóxicos deben ser desechados de forma específica para evitar contaminar el medio ambiente.
GARANTÍA LIMITADA n Briggs & Stratton se compromete a que, durante el período de garantía especificado a continuación, reparará o sustituirá, de manera gratuita, cualquier pieza con defectos de material o fabricación, o de ambos. El comprador deberá correr con los gastos de transporte del producto que envíe para reparación o reemplazo al amparo de esta garantía. Esta garantía tiene vigencia y está sujeta a las condiciones que se establecen más adelante.
GARANTÍA LIMITADA ACERCA DE LA GARANTÍA El servicio de garantía solo está disponible a través de los distribuidores de servicio autorizados de Briggs & Stratton. La mayor parte de las reparaciones bajo garantía se atienden de manera rutinaria, pero algunas veces las solicitudes de reparaciones bajo garantía podrían no ser apropiadas Esta garantía SÓLO cubre defectos en materiales y mano de obra.
n ro du ct io ep rR fo ot N Briggs & Stratton Power Products Group, LLC P.O.