
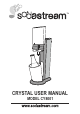
User's Manual


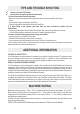

EASY STEPS TO MAKE REFRESHING SPARKLING WATER
STEP 1: Press rear cover release button downwards and remove back cover (Diagram 4).
STEP 2: Unscrew the empty cylinder.
STEP 3: Remove the valve seal and plastic cap from the new cylinder valve. Screw the new
cylinder firmly into the cylinder holder, and replace the back cover (Diagram 5).
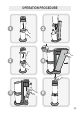
ASSEMBLING YOUR DRINKSMAKER
STEP 1: Turn the flask lever to the right, to the unlocked position (machine head will rise
automatically) (Diagram 1).
STEP 2: Tilt glass bottle flask forward and remove glass bottle (Diagram 2).
STEP 3: Return glass bottle flask to upright position, push and hold the machine head down and
turn the flask lever left, to the locked position (Diagram 3).
Insert the gas cylinder:
STEP 4: Press rear cover release button downwards and remove back cover (Diagram 4).
STEP 5: Remove the valve seal and plastic cap from the cylinder valve. Screw the cylinder
firmly into the cylinder holder, and replace the back cover (Diagram 5).
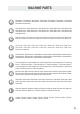
REPLACING THE GAS CYLINDER
For ideal carbonation make sure to use cold water.
Fill your glass carbonating bottle with cold water up to the level indicated on the bottle.
Turn the flask lever right, to the unlocked position (machine head will rise automatically)
(Diagram 1).
Tilt glass bottle flask forward and insert glass bottle (Diagram 2).
Return glass bottle flask to upright position, push the machine head down and turn the flask
lever left, to the locked position (Diagram 3).
Press the carbonating button in short presses until you hear a buzz (Release the button
between presses) (Diagram 6). Three buzzes will produce a standard fizz; additional
presses will produce a stronger drink. NEVER PRESS FOR MORE THAN 5 BUZZES.
Turn the flask lever right to the unlocked position until the machine head starts to rise
(Diagram 1). Excess gas in the bottle will be heard escaping from the machine as you turn
the lever right.
Tilt glass bottle flask forward and remove glass bottle (Diagram 2). Enjoy!
1.
2.
3.
4.
5.
6.
7.
7