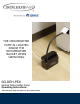
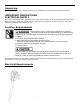
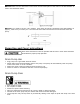
THE DEHUMIDIFIER PUMP IS LOCATED INSIDE THE DEHUMIDIFIER BUCKET WHEN UNPACKING SG-DEH-PEX Vertical Dehumidifier Pump Operating Instructions The actual pump design may differ from the image on manual.
Operating Instructions Please read and save these instructions. Read carefully before attempting to assemble, install, operate or maintain the product described in this manual. Protect yourself and others by observing all safety information. Failure to comply with instructions may result in personal injury and/or property damage. Retain instructions for future reference.
General Safety Information Carefully read and follow all safety instructions in this manual and on the included pump. Keep safety labels in good condition. Replace missing or damaged safety labels if possible. This product contains chemicals known to the state of California to cause cancer and birth defects or other reproductive harm. Risk of electric shock. This pump has not been tested for use in swimming pool areas. Meets United States National Electrical Code and local codes for wiring.
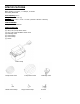
SPECIFICATIONS UL and cUL Listed Motor Rating:115 V AC , 0.12amps, 10 watts Thermally Protected Tank Capacity: 0.6 L Weight: 2.5lbs (1.15 kg) Dimensions: 4.75" x 3.75" x 7.125" (125mm×96mm×181mm) TOOLS NEEDED Phillips Head Screwdriver PARTS SUPPLIED (1) Drain Pump (2) 3M (9.75') Pump Drain Hose (3) 1M (3.
Unpacking When unpacking the unit ,inspect carefully for any damage that may have occurred during transit. IMPORTANT PRECAUTIONS ELECTRICAL SUPPLY The motor voltage and phase indicated on the motor product label should be checked against the actual electrical supply. Check your power source. Check electrical supply for correct fusing ,wire size, and adequate grounding and transformer size.
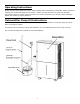
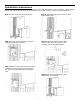
Installation Instructions Using the diagrams below to connect the pump hose to the dehumidifier. After installation, please ensure the bucket is correctly placed in the dehumidifier. The bucket must be in place for proper operation.
Connect the Drain Hose to the Pump NOTE: It may be necessary to raise dehumidifier a few inched off the floor to ensure proper water flow into the pump.
Connect the Drain Hose to the Pump—Continued Step 1: Attach the water pump to a wall or other perpendicular flat surface with the included screws for security. Step 2: Attach the Small Drain Hose clamp onto the Drain Hose Step 3: Attach the 3m drain hose to the connector on the pump. Step 4: Push the small hose clamp forward to secure the drain hose to the drain connector Step 5: Insert the 1m dehumidifier drain hose into the water pump tank.
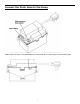
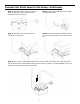
NOTICE: Make sure the drain hose is lower than the horizontal plane of the drain on the dehumidifier as seen in the illustration below. NOTICE: If you need to cut the 3.25" (1Meter) drain hose (previously connected to the dehumidifier on page 6), make sure you make your cut on the flat end of the hose and not the end that fits inside the pump. CUT CUT Pump Use and Care Instructions Drain hose should be as short as possible and all kinks in drain hose should be eliminated for proper pump operation.
WARRANTY One Year Limited Warranty Soleus International, Inc. warrants the accompanying Soleus Air Powered by Gree Dehumidifier Pump to be free of defects in material and workmanship for the applications specified in its operation instruction for a period of ONE (1) year from the date of original retail purchase in the United States.
Con potencia LA BOMBA DESHUMIDIFICADORA ESTA LOCALIZADA ADENTRO DEL CUBO DEL DESHUMIDIFICADOR CUANDO DESEMPAQUE LA UNIDAD SG-DEH-PEX Bomba Deshumidificadora Vertical Instrucciones de Uso el diseno actual de la bomba podria diferir de la instrucciones
Instrucciones de Uso Por favor lea y guarde estas instrucciones. Lea cuidadosamente antes de intentar ensamblar, instalar, operar, o dar mantenimiento al producto indicado en este manual. Tome todas las precauciones necesarias como se indica en la información de seguridad para protegerse tanto usted como a otras personas. El no cumplimiento de las instrucciones podría resultar en daños personales y/o daños a la propiedad. Guarde estas instrucciones para referencia futura.
Información General de Seguridad Cuidadosamente lea y siga todas las instrucciones en este manual y en la bomba incluida. Mantenga las etiquetas de seguridad en buena condición. De ser posible, reemplace las etiquetas faltantes o dañadas. ADVERTENCIA Este producto contiene químicos reconocidos en el estado de California de ser causantes de cáncer, causar defectos de nacimiento así como otros daños relacionados con la reproducción. ADVERTENCIA Riesgo de descarga eléctrica.
ESPECIFICACIONES Listado en UL & cUL Clasificación del Motor:115 V AC , 0.12amperios, 10 vatios Térmicamente Protegido Capacidad del Tanque: 0.6 L Peso: 2.5lbs (1.15 kg) Dimensiones: 4.75" x 3.75" x 7.125" (125mm×96mm×181mm) Herramientas Requeridas Destornillador de estrella PARTES INCLUIDAS (1) Bomba de Drenaje (2) 3M (9.75') Manguera de Drenaje para la Bomba (3) 1M (3.25') Manguera de Drenaje para el Deshumidificador (4) Conexión de Drenaje (5) Abrazadera pequeña para manguera.
Desempacando Cuando desempaque la unidad, inspecciónela cuidadosamente por cualquier daño que podría haber ocurrido durante del transporte. PRECAUCIONES IMPORTANTES SUMINISTRO ELECTRICO La fase y el voltaje indicados en la etiqueta del producto debe ser revisada y comparada con la información referente al suministro eléctrico. Revise su fuente de suministro eléctrico.
Instrucciones para Instalación Use los diagramas a continuación para conectar la manguera de la bomba al deshumidificador. Después de la instalación, por favor asegúrese de que le contenedor de agua esta colocado correctamente en el deshumidificador. El contenedor de agua debe estar en su lugar correctamente para el funcionamiento apropiado. Paso 1: Remueva el contenedor de agua. Paso 3: Asegure la conexión de drenaje al conector de drenaje continuo .
Conecte la Manguera de Drenaje a la Bomba Entrada de Manguera del Deshumidificador Conexión de Salida NOTA: De ser necesario, eleve el deshumidificador unas pulgadas del piso para asegurar el fluido apropiado de agua hacia la bomba.
Conecte la Manguera de Drenaje a la Bomba— Continuación Paso 1: Asegure la bomba de agua a una pared o a alguna otra superficie perpendicular plana utilizando los tornillos incluidos para mayor seguridad. Paso 2: Coloque la abrazadera pequeña a la manguera de drenaje. Paso 3: Inserte la manguera de 3M de drenaje al conector en la bomba. Paso 4: Empuje la abrazadera de manguera pequeña hacia adelante para asegurar la manguera de drenaje al conector de drenaje.
AVISO: Asegúrese de que la manguera de drenaje esta mas abajo que la parte plana horizontal del drenaje del deshumidificador como se ve in la ilustración de abajo. Limite de Manguera de 1M de Drenaje del Deshumidificador AVISO: Si usted necesita cortar la manguera de drenaje de (1 Metro) 3.25” (previamente conectada al deshumidificador siguiendo las instrucciones en la pagina 6), asegúrese que usted corta la parte final plana de la manguera, no el lado que encaja dentro de la bomba.
GARANTIA Un Año de Garantía Limitada Soleus International, Inc. garantiza que la Bomba Deshumidificadora de Soleus Air con potencia Gree adjunto esta libre de defectos en materiales y manufactura para las aplicaciones especificas en sus instrucciones de operación por un periodo de UN (1) año de la fecha de compra original en los Estados Unidos. Si la unidad muestra un defecto por uso normal, Soleus International Inc.