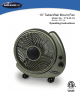
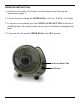
0” Table/Wall Mount Fan Model No.: FT2-25-03 Ref No.
Thank you for choosing a Soleus Air Table Fan. This owner’s manual will provide you with valuable information necessary for the proper care and maintenance of your new product. Please take a few moments to thoroughly read the instructions and familiarize yourself with all the operational aspects of your new fan. For your own records, please attach a copy of your sales receipt to this manual.
This product employs overload protection (fuse). A blown fuse indicates an overload or short-circuit situation. If the fuse blows, unplug the product from the outlet. Replace the fuse per the instructions below and check the product. If the replacement fuse blows, a short-circuit may be present and the product should be discarded or returned to an authorized service facility for examination and/or repair. HOW TO REPLACE THE FUSE 1. Unplug the fan from the outlet. Place the plug on a firm, flat surface.
WARNING: This fan is equipped with a polarized plug (one blade is wider than the other). The plug is intended to fit into a power outlet only one way, with the wide blade in the wide slot. This is a safety feature; if you are unable to insert the plug fully into the outlet, try reversing the plug. If the plug still does not fit, contact a qualified electrician. DO NOT DEFEAT THE SAFETY PURPOSE OF THE POLARIZED PLUG.
OPERATING INSTRUCTIONS 1. Set the fan on a stable, level surface or wall mount the fan following the instructions on page 5. 2. Turn the fan on by turning the SPEED DIAL to 1 (Low), 2 (Med), or 3 (High). 3. To increase air circulation, press the OSCILLATION BUTTON on the fan to the ON position. This feature rotates the fan grill to circulate air throughout the room. 4. To turn the fan off, turn the SPEED DIAL to the OFF position.
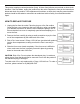
WALL MOUNTING 1. To mount your Soleus Air fan on the wall, place the included mounting screws 7 5/8” apart from each other on the wall. You may need to use dry wall anchors if you do not attach the fan to a stud in the wall. 2. Once the screws are in the wall, turn the fan sideways (see image on the right) and slide the screw slots on the fan feet over the screw heads on the wall. 3. After the fan is mounted you can plug in the power cord and begin using the fan. 4.
WARRANTY One Year Limited Warranty Soleus International Inc. warrants the accompanying Soleus Air Table Fan to be free of defects in material and workmanship for the applications specified in its operation instruction for a period of ONE (1) year from the date of original retail purchase in the United States. If the unit exhibits a defect in normal use, Soleus International Inc.