
User Manual


Adjusting The Snooze Time
The default snooze time setting is 9 minutes but you may adjust the snooze time between 1
minute and 30 minutes as desired. To adjust the snooze time:
• Press and hold the SNOOZE Button (8) for four seconds. The clock display will show
the default snooze time ‘9’. Release the snooze button
• Press the “SLOW“ Button (7) to adjust the snooze time to the desired setting, from 1
minute to 30 minutes.
• When the display is showing the desired snooze time, it will return to the normal clock
mode after 3 seconds. The new snooze time setting becomes the new default and
remains in the memory until you change it again.
Shutting Off the Alarm –
Alarm can be shut off temporary for the day or permanently shut off.
1) When alarm goes off, press the “ALARM OFF“ (7) button to turn off for the day and come
back on at the same time the next day, if alarm settings have not changed.
2) To shut the alarm off permanently, slide the “ Alarm Function Switch“ (8) down to the
OFF position. The alarm will not come on until the “ Alarm Function Switch“ (8) is set to
“VIB/BUZZ“, “VIB“, or “BUZZ“ position.
NOTE: The Alarm Off function of Alarm 1 and Alarm 2 is independent of each other.
Dimmer Operation
There is a 5-level brightness control for the LED display. Press the SNOOZE button once
to change the display brightness. The brightness will cycle from 5-4-3-2-1-2-3-4-5 (from
bright to dim then from dim to bright).
*NOTE*: The dimmer function will not work, when the clock is in snooze mode.
Volume Control –
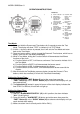
1) To adjust the volume, rotate VOLUME wheel (4) located on the lower right corner of the
clock.
Tone Control –
1) To adjust the TONE, turn the TONE wheel (14) located on the top right corner of the clock.
Bed Shaker / Vibrator –
1) Attach the bed shaker jack to the back of clock at “VIBRATOR INPUT“ (15).
2) To turn on vibrator slide “Alarm Function Switch“ (8) to “VIB/BUZZ“ or “VIB“ position.
3) Place vibrator between mattress and box spring.
Battery Backup –
To use the battery backup, you can install a 9-volt alkaline battery in the back of the clock located
under the Battery Compartment Cover (11). The battery needs to be purchased separately.
Note the LED display will not show during power failure but the clock will still be running
and keeping proper time until the power comes back. During a power failure, the alkaline
battery can only keep the clock IC running for up to 30 days. (During a Power failure, the LED
display will not show the time.)
NOTE: For the best results it is recommended that the battery be changed every 6 months. If the
clock is not used for a while, it is recommended to remove the battery to avoid damage to the
clock from battery leakage.
DC 9V Power Input –
Attach the “DC POWER INPUT“ (13) to the back of DC9V IN next to “VIBRATOR
INPUT“ (15); it is the smaller input of the two.
NOTE: IMPORTANT: do not confuse “DC POWER INPUT“ (13) with the “VIBRATOR
INPUT“ (15)