Please read the following instructions carefully and use the product accordingly. Please keep this manual and hand it over when you transfer the product. This summary may not include every detail of all variations and considered steps. Please contact us when further information and help are needed. Notes Personal injury and/or damage to the product may occur i products are used outside of their intended purposes and/or if products have been changeability from their original design.
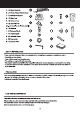
A (1) Main Umbrella B (1) Plastic Water Tillable Stand C (1) Swivel Mechanism D(1) Base Pole E (1) Swivel Cover F -{1) Allen Wrench G2 (8) Stainless Bolt { M8 x0.63IN Washer 1(1) Threaded Knob J(1) Crank Handle K(1) Umbrella Cover L(1) Connector M(1) Lower Pole SAFETY INFORMATION Please read and understand this entire manual before attempting to assemble or install the product. = Assemble on level ground. «Keep children away from assembly area. Two adults are required for safe assembly.
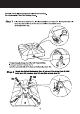
Carefully check all packaging materials before discarding. Do not assemble if there are missing pieces. Step 1 Place the stand (part B) on a level ground where you intend to locate your umbrella. Open the cap on the top of the stand and fill the stand with water. Then tighten the cap. The stand is quite heavy when filled with water (220lbs) . In case you want to move the stand, open the cap on the side of the stand and release the water first.
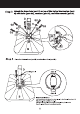
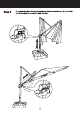
Step 3 Attach the Base Pole (part D) on top of the Swivel Mechanism (part C) with bolts (part G2), washers (part H), and Allen wrench (part F). Important Notice : Pay attention to the size of the middle hole in the Swivel Cover (part E). Side Ais 1.6” and Side Side B on the Swivel Cover (part E) and the locking hole on the Base Pole (part D) must be on the same side.
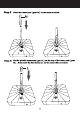
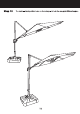
bel Step 5 Place the lower pole ( part M) on the base as sector ( part L ) on the top of the lower pole ( part the sam the two holes are on M) .
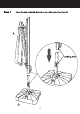
S 8 Insert the Crank Handle (part J) into the square hole on the Main Umbrella (part A). te Pp Screw the Threaded Knob (part I) into the locking hole on the Main Umbrella (part A). ATTENTION: MAKE SURE ALL BOLTS AND SCREWS ARE FULLY TIGHTENED BEFORE USING THE UMBRELLA.
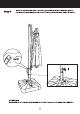
Ste p 9 Squeezing the trigger before attempting to raise the crank house. Turn the Crank handle clockwise to extend the umbrella fully .
Step T0 The umbrella has 6 position holes on the main pole to lock the canopy at different angles .
Ste p 11 Squeezing the trigger before attempting to lower the crank house. Turn the Crank handle counter-clockwise to close the umbrella. Step 12 This umbrella has a 360 degree swivel mechanism . Before attempting to turn the umbrella, close the umbrella first and squeeze down the lever with your foot to release the mechanism.