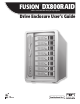
FUSION DX800RAID ™ 8-Drive Serial ATA Disk Array Storage System Drive Enclosure User’s Guide For Windows
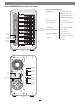
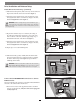
Fusion DX800RAID Enclosure Specs and Features Enclosure Specifications Compatibility Drive Module (Bay 1) computers with Sonnet RAID controller installed Drive Module (Bay 2) Drive Module (Bay 3) Drive Module (Bay 4) Drive Activity (Blue) and Identification/Fault (Red) Indicator LEDs Drive Module (Bay 5) Enclosure Link LED Drive Module (Bay 6) SCSI Enclosure Services LED Drive Module (Bay 7) 2 x mini-SAS Drives Supported 3 & 1.5 Gb/s Serial ATA; 3.
Safety Precautions and Disclaimers SAFETY PRECAUTIONS Drive Usage (continued) 500GB Models • Hitachi Ultrastar A7K1000, # HUA721050KLA330 • Seagate Barracuda ES, # ST3500630NS • Seagate Barracuda ES.2, # ST3500320NS(1) • Seagate Constellation ES, # ST3500514NS Please read this section carefully before proceeding. These precautions explain the correct and safe use of this device, thereby helping to prevent injury to you or others, and also help you to minimize the risk of damaging the device.
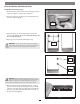
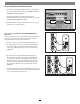
Drive Installation and Enclosure Setup Install Drives Into Drive Trays 1. Remove the Fusion drive enclosure from its packaging, and place it near the computer to which it will be connected. 2. Pull a drive tray’s lever out until it stops, and then pull the tray out of the enclosure. (Figure 3). Pull lever out until it stops Figure 3 3. Using wire cutters, cut off the shipping support between the drive tray rails (Figure 4). Be sure to cut the plastic flush; do not leave a rough cut (Figure 5). 4.
Drive Installation and Enclosure Setup Install Drives Into Drive Trays (continued) 6. With the lever facing the left, slide a drive tray over the drive and align its holes with the screw holes in the drive (Figure 7). drive 7. Using three of the supplied screws, secure the drive tray to the drive; tighten each screw to secure the tray snugly to the drive; do not overtighten the screws (Figure 7).
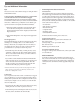
Drive Installation and Enclosure Setup 2. Connect the data cables’ remaining connectors to the mini-SAS ports on the Sonnet RAID controller card; verify the connectors are plugged in securely (Figure 11). 3. Connect the supplied power cable between the Fusion DX800RAID enclosure and a grounded wall outlet or power strip; verify the cable is plugged in securely. 4. Push the switch on the back of the enclosure to the on position, and then power on your computer.
Tips and Additional Information Tips Contacting Sonnet Customer Service This section covers some common sense tips for using the Fusion DX800RAID enclosure. USA Customers The Sonnet Web site located at www.sonnettech.com has the most current support information and technical updates. Before you call Sonnet Customer Service, please check our Web site for the latest updates and online support files, and check this User’s Guide for helpful information.
©2010 Sonnet Technologies, Inc. All rights reserved. Sonnet, the Sonnet logotype, Simply Fast, the Simply Fast logotype, Creativity Stored Here, and Fusion are trademarks of Sonnet Technologies, Inc. Mac, the Mac logo, and Mac OS are trademarks of Apple Inc., registered in the United States and other countries. Other product names are trademarks of their respective owners. Product specifications subject to change without notice. Printed in the USA.