
User Manual


Drive Installation and Enclosure Setup
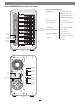
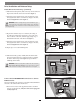
Figure 3
Install Drives Into Drive Trays
1. Remove the Fusion drive enclosure from its packaging, and place
it near the computer to which it will be connected.
2. Pull a drive tray’s lever out until it stops, and then pull the tray
out of the enclosure. (Figure 3).
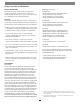
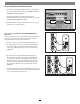
3. Using wire cutters, cut off the shipping support between the
drive tray rails (Figure 4). Be sure to cut the plastic flush; do not
leave a rough cut (Figure 5).
4. Repeat steps 2 and 3 with each remaining drive tray.
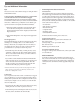
5. Remove a SATA drive from its packaging and set it on edge on
a flat, level surface with the label facing away from you and the
connectors to the right. Open the supplied tube of threadlocker
and apply a single drop inside each of the three screw holes on
the side of the drive (Figure 6).
Figure 4
Figure 5
4
Pull lever out
until it stops
Figure 6
screw hole screw hole screw hole
flush cut
GOOD!
rough cut
NO
GOOD!
WARNING: When handling computer products, take care to
prevent components from being damaged by static electricity;
avoid working in carpeted areas. Handle hard drives only by their
edges and avoid touching connector traces and component pins.
WARNING: If you do not cut off the edges of the shipping
support flush with the drive tray rails, the drive tray will not fit
properly in the enclosure, and the storage system may not work
reliably.
shipping
support