4-120-891-11(1) z To find out useful hints, tips and information about Sony products and services please visit: www.sony-europe.
WARNING To reduce the risk of fire or electric shock, do not expose this apparatus to rain or moisture. To avoid electrical shock, do not open the cabinet. Refer servicing to qualified personnel only. Batteries or batteries installed apparatus shall not be exposed to excessive heat such as sunshine, fire or the like. CAUTION The use of optical instruments with this product will increase eye hazard.
The manufacturer of this product is Sony Corporation, 1-7-1 Konan Minato-ku Tokyo, 108-0075 Japan. The Authorized Representative for EMC and product safety is Sony Deutschland GmbH, Hedelfinger Strasse 61, 70327 Stuttgart, Germany. For any service or guarantee matters please refer to the addresses given in separate service or guarantee documents. Precautions • This unit operates on 220 V – 240 V AC, 50 Hz/60 Hz. Check that the unit’s operating voltage is identical with your local power supply.
• Do not place heavy or unstable objects on the player. • Do not place any objects other than discs on the disc tray. Doing so may cause damage to the player or the object. • When you move the player, take out any discs. If you don’t, the disc may be damaged. • When you move the player, disconnect the AC power cord (mains lead) and all other cables from the player.
About this manual • In this manual, “disc” is used as a general reference for the BDs, DVDs, or CDs unless otherwise specified by the text or illustrations. • Icons, such as BD , listed at the top of each explanation indicate what kind of media can be used with the function being explained. For details, see “Playable Discs” (page 59). • Instructions in this manual describe the controls on the remote. You can also use the controls on the player if they have the similar symbols as those on the remote.
Table of Contents WARNING . . . . . . . . . . . . . . . . . . . . . . . . . . . . . . . . . . . . . . . . . . . . . . . . . . . . 2 Precautions . . . . . . . . . . . . . . . . . . . . . . . . . . . . . . . . . . . . . . . . . . . . . . . . . . . 3 Guide to Parts and Controls . . . . . . . . . . . . . . . . . . . . . . . . . . . . . . . . . . . . . . 8 Hookups and Settings Hooking Up the Player . . . . . . . . . . . . . . . . . . . . . . . . . . . . . . . . . . . . . . . . .
Additional Information Troubleshooting . . . . . . . . . . . . . . . . . . . . . . . . . . . . . . . . . . . . . . . . . . . . . . . 54 Self-Diagnosis Function . . . . . . . . . . . . . . . . . . . . . . . . . . . . . . . . . . . . . . . . . 58 Playable Discs . . . . . . . . . . . . . . . . . . . . . . . . . . . . . . . . . . . . . . . . . . . . . . . . 59 Video Output Resolution . . . . . . . . . . . . . . . . . . . . . . . . . . . . . . . . . . . . . . . . 62 Audio Output Signals . . . . . . . . . . . . .
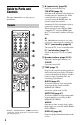
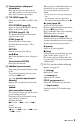
A Z (open/close) (page 30) Guide to Parts and Controls For more information, see the pages in parentheses. Remote Opens or closes the disc tray. THEATRE (page 16) Switches to the optimum video mode for watching movies automatically. When connected with an AV amplifier (receiver) using the HDMI cable, the speaker output also switches automatically. Press the button again to return to the original setting.
D Colour buttons (red/green/ yellow/blue) Short cut keys for selecting items on some BD’s menus (can also be used for BD’s Java interactive operations). E TOP MENU (page 32) When you press and hold the button, fast forward/fast reverse continues at the selected speed until you release the button. * Search speed does not change when playing CDs. Speed multiple values are approximate. Opens or closes the BD’s or DVD’s Top Menu. – To resume normal playback, press N.
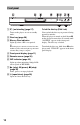
Front panel A [/1 (on/standby) (page 27) Turns on the player, or sets to standby mode. Lights up when a BD is recognised. You can lock the disc tray to prevent it being opened by mistake. When the player is turned on, hold down X on the player for more than 10 seconds until “LOCKED” appears in the front panel display. The disc tray is locked. z When the player is turned on for the first time, the Blu-ray Disc indicator lights up, then turns off when Easy Setup is complete.
Front panel display A N, X Lights up during playback or pause. B HD (page 42) Lights up when outputting 720p/1080i/ 1080p video signals from the HDMI OUT jack or 720p/1080i video signals from the COMPONENT VIDEO OUT jacks. F Network connection indicator Lights up when downloading the player’s software. For details on downloading the player’s software, see page 40. C HDMI (page 16) Lights up when an HDMI device is connected. D EXT (page 23) Lights up when the external memory is recognised.
Rear panel A COMPONENT VIDEO OUT (Y, PB/CB, PR/CR) jacks (page 17) E Ventilation holes B LINE OUT (S VIDEO) jack (page 18) F EXT slot (page 23) C LINE OUT (R-AUDIO-L) jacks (page 18, 22) D AC IN terminal (page 25) The ventilation fan is inside the player.
Hooking Up the Player Follow steps 1 through 7 to hook up and adjust the settings of the player. Do not connect the mains lead until you reach “Step 5: Connecting the Mains Lead” (page 25). Hookups and Settings Check that you have the following items.
Step 1: Connecting to Your TV About video/HDMI OUT jacks The player has the following video jacks. Connect the player to your TV according to the input jack on your TV. When connecting the player to your TV using the HDMI cable, you can enjoy high quality digital pictures and sound through the HDMI OUT jack. Jack type High quality Video resolution Hookup Digital High Definition: See “Connecting to an 1080/24p, 1080p, HDMI jack” 1080i, 720p (page 15).
Connecting to an HDMI jack Blu-ray Disc/DVD player Hookups and Settings Connect the player and your TV using an HDMI cable to enjoy high quality digital pictures and sound through the HDMI OUT jack. If you connect a Sony TV that is compatible with the “Control for HDMI” function (page 16), refer to the operating instructions supplied with the TV. If you connect a 1080/24p- or 1080p-compatible TV, use a High Speed HDMI cable.
About indicators for HDMI connection When connecting an HDMI compatible component, the HDMI indicator lights up in the front panel display. b • Consumers should note that not all high definition television sets are fully compatible with this product and may cause artifacts to be displayed in the picture. In the case of 480i/480p/576p/720p/ 1080i/1080p scan picture problems, it is recommended that the user switch the connection to the ‘standard definition’ output.
Connecting to component video jacks (Y, PB/CB, PR/CR) Connect the COMPONENT VIDEO OUT jacks of the player and your TV using a component video cable or three video cables (not supplied) of the same kind and length. You can enjoy high-quality pictures. Be sure to connect to the LINE OUT (R-AUDIO-L) jacks using the audio/video cable.
Connecting to an audio/video or S VIDEO jack Connect the LINE OUT (VIDEO, R-AUDIO-L) jacks of the player and your TV using the audio/video cable. You can enjoy standard quality pictures and sound. Blu-ray Disc/DVD player or (yellow) (red) S-video cable (not supplied) (white) Audio/video cable (supplied) (yellow) (red) (white) Match the colour of the plug to that of the jack.
Step 2: Connecting to Your AV Amplifier (Receiver) About audio/HDMI OUT jacks The player has the following audio jacks. Connect the player to your AV amplifier (receiver) according to the input jack on your AV amplifier (receiver). Hookup Digital See “Connecting to an HDMI jack” (page 20). See “Connecting to digital jacks (OPTICAL/ COAXIAL)” (page 21). Analogue Hookups and Settings Jack type See “Connecting to audio L/R jacks” (page 22).
Connecting to an HDMI jack If your AV amplifier (receiver) has an HDMI input, you can enjoy surround sound. If you connect a Sony AV amplifier (receiver) that is compatible with the “Control for HDMI” function (page 16), refer to the operating instructions supplied with the AV amplifier (receiver).
Connecting to digital jacks (OPTICAL/COAXIAL) If your AV amplifier (receiver) has a Dolby*1 Digital, Dolby Pro Logic, or DTS*2 decoder and a digital input jack, you can enjoy Dolby Digital (5.1ch), Dolby Pro Logic (4.0ch), or DTS (5.1ch) surround effects. Blu-ray Disc/DVD player Hookups and Settings or Optical digital cable (not supplied) Coaxial digital cable (not supplied) AV amplifier (receiver) : Signal flow 1 Connect the digital jack of the player and your AV amplifier (receiver).
Connecting to audio L/R jacks If your AV amplifier (receiver) only has L and R audio input jacks, use this connection. Blu-ray Disc/DVD player (red) (white) Audio/video cable (supplied) (red) (white) Match the colour of the plug to that of the jack.
b Step 3: Inserting the External Memory Insert the external memory in the V direction into the EXT slot as far as it will go. Check that the EXT indicator lights up in the front panel display when turning the player on. Rear of the player Sony USM1GH (not supplied) With the terminal side up Hookups and Settings To enjoy additional content (such as BonusView/BD-Live) on certain Blu-ray Disc titles, you will need to use external memory.
Step 4: Connecting to the Network Connect the LAN (100) terminal of the player to your Internet source using a network cable to update the player’s software. You can also enjoy the BD-Live function (page 33). 1 Blu-ray Disc/DVD player Connect the LAN (100) terminal of the player to your Internet source.
When connecting via a wireless LAN router Blu-ray Disc/DVD player Step 5: Connecting the Mains Lead Hookups and Settings After all of the other connections are complete, connect the supplied mains lead (AC power cord) to the AC IN terminal of the player. Then plug the player and TV mains leads (AC power cords) into the mains.
Step 6: Preparing the Remote You can control the player using the supplied remote. Insert two R6 (size AA) batteries by matching the 3 and # ends on the batteries to the markings inside the battery compartment. When using the remote, point it at the remote sensor on the player (page 10). Controlling TVs with the remote You can control the volume, input source, programme position, and power switch of your Sony TV with the supplied remote.
To control other TVs with the remote You can control the volume, input source, programme position, and power switch of non-Sony TVs as well. If your TV is listed in the table below, set the appropriate manufacturer’s code. If you enter a new code number, the code number previously entered will be erased. 1 While holding down TV [/1, enter the TV’s manufacturer code using the number buttons. For instance, to enter “09,” press “0” then “9.
4 Select a language for the on-screen displays using M/m, and press ENTER. 7 Select a video output resolution for the connected TV, and press ENTER. For details about the video output resolution, see page 43. When you select “HDMI” in step 6 The initial settings message appears. 5 Select “Start,” and press ENTER. 6 Select the cable type used to connect the player and your TV, and press ENTER. Select “HDMI” when connecting your TV using the HDMI cable, and go to step 7.
b 8 Select an aspect ratio that matches your TV, and press ENTER. 10 Select “Allow” to allow Internet connections from BD contents, and press ENTER. Select “Do not allow” to not allow Internet connections from BD contents. 11 Select “Quick Start” to shorten the Hookups and Settings If the picture is distorted or no picture appears, wait for about 30 seconds without pressing any buttons. The display returns to the resolution setting screen.
Playing BDs/DVDs BD DVD Z Number buttons
4 5 6 Press HOME. Select “Video” using
Available OPTIONS 1 Press OPTIONS. The options menu appears. 2 Select an item using M/m, and press ENTER. The available items differ depending on the disc type or player situation. Items Details A/V Settings Adjusts settings for picture and sound. • Video Settings (page 35) • Audio Settings (page 35) Title List Displays the title list. Play Plays the title from the point where you pressed x. Play from start Plays the title from the beginning.
Enjoying BonusView/BD-Live BD Some BD-ROMs have bonus contents and other data that can be downloaded to the external memory (local storage) for enjoyment. Turn the player off. Insert the external memory (not supplied) into the EXT slot on the rear of the player. The external memory is used as the local storage. Make sure that the external memory is properly inserted into the player (page 23). 3 Connect the player to a network (page 24). 4 5 Turn the player on.
To cancel Scene Search mode Press SCENE SEARCH, ENTER, N, or X. Playback starts from the point you pressed the button. Displaying the playing time and play information BD b • The Scene Search function is available for titles longer than 100 seconds and shorter than 100 hours. • The Scene Search function may not be available depending on the disc. Searching for a Title/Chapter BD DVD You can check the title information, including the video transmission rate, etc. Press DISPLAY.
b Adjusting pictures and sound for videos BD DVD To adjust the picture Press OPTIONS during playback. The options menu appears. 2 Select “A/V Settings” using M/m, and press ENTER. 3 4 Select “Video Settings” using M/m, and press ENTER. The “Video Settings” screen appears. To adjust the audio characteristics 1 Press OPTIONS during playback. The options menu appears. 2 Select “A/V Settings” using M/m, and press ENTER. 3 Select “Audio Settings” using M/m, and press ENTER.
b • The “Audio Filter” function does not work for digital audio signals output from the HDMI OUT/ DIGITAL OUT (OPTICAL/COAXIAL) jacks. • There may be little effect by changing the “Audio Filter” setting depending on the disc or playback environment. Playing CDs CD 1 Insert a CD. The Music Player screen appears. 2 Press N. Playback starts. To select a track 1 2 3 Press HOME. 4 Select a track using M/m. To play the selected track, press N or ENTER. Select (Music) using
Various music playback operations Buttons Operations N Starts playback from the point where you pressed x. Stops playback. X Pauses playback. ./> Skips to the beginning of the current or next track. To go to the previous track press . twice. m/M Fast reverse/fast forwards when pressed during playback. TIME Switches time information on the screen and the front panel display (page 11).
Available OPTIONS during playback Buttons Operations x RETURN Stops a slideshow. X Pauses a slideshow. ./> Displays the previous or next photo. To view best quality images DISPLAY Displays the file information. 1 Press OPTIONS during playback. The options menu appears. 2 Select an item using M/m, and press ENTER. The available items differ depending on the situation. Items Details Slideshow Speed Changes the slideshow speed. • Fast • Normal • Slow Stop Stops a slideshow.
Using the Settings Displays Select (Setup) on the home menu when you need to change the settings of the player. 1 2 Press HOME. 3 Select the setup category icon to change using M/m, and press ENTER. Select (Setup) using
Setting list Network Update You can setup the following options. Icon Explanation Network Update (page 40) Updates the software of the player. Video Settings (page 41) Makes the video settings according to the type of connecting jacks. Audio Settings (page 44) Makes the audio settings according to the type of connecting jacks. BD/DVD Viewing Settings (page 47) Makes detailed settings for BD/ DVD playback. You can update and improve the functions of the player.
To update the software using an update disc You can update and improve the functions of the player using an update disc provided by Sony dealer or local authorised Sony service facility. Insert the update disc. The display asks for confirmation. 2 Select “OK,” and press ENTER. Software update starts. When updating finishes, “FINISH” appears for 5 seconds in the front panel display, then the disc tray automatically opens. 3 Remove the disc. The player automatically turns off.
DVD Aspect Ratio Selects the display configuration for playback of 16:9 screen pictures on a 4:3 screen TV (selectable when “TV Type” is set to “4:3” and “Screen Format” is set to “Fixed Aspect Ratio”). Letter Box Pan & Scan Displays a wide picture with black bands on the top and bottom. Output Video Format Selects the jack type to output video signals (“TV Connection Method”) and output resolution (“HDMI Resolution”/“Component Resolution”).
b BD-ROM 1080/24p Output Sets to output 1920 × 1080p/24 Hz video signals when playing film-based materials on BD-ROMs (720p/24 Hz or 1080p/24 Hz). 1920 × 1080p/24 Hz video signals can be output when all of the following conditions are met. – You connect a 1080/24p-compatible TV using the HDMI OUT jack, – “Output Video Format” is set to “HDMI,” and – “HDMI Resolution” is set to “Auto” or “1080p.” The 24P indicator lights up when outputting 1920 × 1080p/24 Hz video signals.
YCbCr/RGB (HDMI) Sets the colour setting for video signals output from the HDMI OUT jack. Select the setting that matches the connected TV type. Auto Automatically detects the type of external device, and switches to the matching colour setting. YCbCr (4:2:2) Outputs YCbCr 4:2:2 video signals. The default settings are underlined. Audio Output Priority Selects the jack type to output audio signals. 2-channel linear PCM signals are output at 48 kHz maximum from output jacks other than the priority jacks.
BD Audio Setting Selects whether to mix or not mix interactive audio and secondary audio (commentary) when playing a BD that contains such audio. Mix Direct Outputs the audio obtained by mixing the interactive audio and secondary audio to the primary audio. DTS Selects the audio signals output when playing DTS discs. This setting affects the output from the DIGITAL OUT (COAXIAL/ OPTICAL) jack. Converts to output Linear PCM signals.
Audio DRC Downmix Selects the dynamic range (compression level of the sound) setting when playing a BD or DVD that conforms to “Audio DRC.” Auto Performs playback at the dynamic range specified by the disc (BD-ROM only). Other discs are played back at the “Standard” level. Standard Performs playback at a compression level between “TV Mode” and “Wide Range.” TV Mode Sounds are compressed heavily. Low sounds are easier to hear. Wide Range No compression works. A more dynamic sound is produced.
BD/DVD Viewing Settings The default settings are underlined. BD Parental Control Playback of some BD-ROMs can be limited according to the age of the users. Scenes may be blocked or replaced with different scenes. Select “BD Parental Control” in “BD/ DVD Viewing Settings,” and press ENTER. 2 Enter your four-digit password using the number buttons. 3 4 Select “OK,” and press ENTER. BD/DVD Menu Selects the default menu language for BDROMs or DVD VIDEOs.
DVD Parental Control Parental Control Region Code Playback of some DVD VIDEOs can be limited according to the age of the users. Scenes may be blocked or replaced with different scenes. Playback of some BD-ROMs or DVD VIDEOs can be limited according to the geographic area. Scenes may be blocked or replaced with different scenes. 1 Select “DVD Parental Control” in “BD/ DVD Viewing Settings,” and press ENTER. 1 Select “Parental Control Region Code” in “BD/DVD Viewing Settings,” and press ENTER.
Password Photo Settings Sets or changes the password for the Parental Control function. A password allows you to set a restriction on BD-ROM or DVD VIDEO playback. If necessary, you can differentiate the restriction levels for BDROMs and DVD VIDEOs. Select “Password” in “BD/DVD Viewing Settings,” and press ENTER. 2 Enter your four-digit password using the number buttons. 3 Select “OK,” and press ENTER. To change the password 1 After step 3, enter a new password using the number buttons.
System Settings The default settings are underlined. Auto Display On Automatically displays information on the screen when changing the viewing titles, picture modes, audio signals, etc. Off Displays information only when you press DISPLAY. OSD Selects your language for the player onscreen displays. Screen Saver Dimmer Adjusts the lighting of the front panel display. Bright Bright lighting. Dark Low lighting. Off Turns off the lighting during playback. Low lighting other than during playback.
b Network Settings Internet Settings 1 Select “Internet Settings” in “Network Settings,” and press ENTER. 2 Select “IP Address Acquisition,” and press ENTER. 3 Select an item, and press ENTER. Use DHCP Use Static IP Address Select this when DHCP (Dynamic Host Configuration Protocol) server settings are available from your Internet service provider. The network settings necessary for the player will be assigned automatically.
To enter characters The display for entering characters appears when you select “Proxy Server” in “Proxy Settings.” 1 2 3 52 Press a number button repeatedly to select a character. Example: Press the number 3 button once to enter “D.” Press the number 3 button three times to enter “F.” Press ,, and enter the next character. Press the blue button (“Finish”) to finish. Available buttons Buttons Details Red button (Letter Type) Switches the keyboard between alphabet and numbers.
Easy Setup Re-runs the Easy Setup to make the basic settings. Resetting You can reset the player settings to the factory default by selecting the group of settings. All the settings within the group will be reset. 1 Select “Easy Setup,” and press ENTER. 2 Select “Start” using
Troubleshooting If you experience any of the following difficulties while using the player, use this troubleshooting guide to help remedy the problem before requesting repairs. Should any problem persist, consult your nearest Sony dealer. Power The power does not turn on. , Check that the mains lead is connected securely. , It takes a short while before the player turns on. The message “A new software version has been found on the network. Perform update under "Network Update.
Picture See also “Connecting to an HDMI jack” (page 15) when connecting equipment using the HDMI cable. There is no picture/picture noise appears. No picture appears when the video output resolution selected in “Output Video Format” is incorrect. , Press x on the player for more than 10 seconds to reset the video output resolution to the lowest resolution. The picture does not fill the screen, even though the aspect ratio is set in “DVD Aspect Ratio” under “Video Settings.
The interactive audio is not output. , Set “BD Audio Setting” to “Mix” in the “Audio Settings” setup (page 45). HDMI There is no picture or no sound when connected to the HDMI OUT jack. , Try the following: 1Turn the player off and on again. 2Turn the connected equipment off and on again. 3Disconnect and then reconnect the HDMI cable. There is no picture or picture noise appears when connected to the HDMI OUT jack.
A message indicating that the local storage does not have enough space appears on the screen. The disc tray does not open and “LOCKED” or “TLK ON” appears in the front panel display. , Delete unnecessary data in the external memory (page 33). , When “LOCKED” appears, the player is locked. To cancel the Child Lock, hold down X on the player until “UNLOCK” appears in the front panel display (page 10). , When “TLK ON” appears, contact your Sony dealer or local authorized Sony service facility.
Self-Diagnosis Function When the self-diagnosis function is activated to prevent the player from malfunctioning, an error code appears in the front panel display, or just appears without any messages on the entire screen. In these cases, check the following. When an error code appears in the front panel display Error code Corrective action Exxxx SYS ERR Contact your nearest Sony dealer or local authorised Sony service facility and give the error code.
Playable Discs Type Disc Logo Icon used in this manual Characteristics BD-ROMs and BD-REs/BD-Rs in BDMV and BDAV mode, including 8 cm discs (single layer) and DL discs BD DVD VIDEO DVD Discs such as movies that can be purchased or rented DVD DVD+RWs/DVD+Rs in +VR mode or DVD-RWs/DVD-Rs in video and VR mode, including 8 cm discs (single layer) and DVD+R DL/DVD-R DL discs DATA DVD DVD+RWs/DVD+Rs/DVD-RWs/ DVD-Rs containing JPEG* image files CD Music CDs or CD-Rs/CD-RWs in music CD format DVD DA
Discs that cannot be played b • • • • • • • • • • Notes about BD-REs/BD-Rs, DVD+RWs/ DVD+Rs, DVD-RWs/DVD-Rs, or CD-Rs/ CD-RWs Some BD-REs/BD-Rs, DVD+RWs/DVD+Rs, DVD-RWs/DVD-Rs, or CD-Rs/CD-RWs cannot be played on this player due to the recording quality or physical condition of the disc, or the characteristics of the recording device and authoring software. A CD or DVD disc will not play if it has not been correctly finalised.
About playback of discs recorded in AVCHD format This player can play AVCHD format discs. TM What is the AVCHD format? *1 A high-definition specification which utilizes 1080 effective scanning lines and the interlace system. *2 A high-definition specification which utilizes 720 effective scanning lines and the progressive system.
Video Output Resolution Output resolution differs depending on the “Output Video Format” setting in the “Video Settings” setup (page 41).
Audio Output Signals The audio output differs as follows, depending on the source, output jack, and the selected settings. Jacks/ settings*1 Disc/source BD CD *2 *3 *4 *5 LINE OUT (R-AUDIO-L) jacks Auto*3 2ch PCM*3 Bitstream*4 PCM LPCM 2ch LPCM 2ch LPCM 2ch LPCM 2ch LPCM 2ch 2ch LPCM 5.1ch LPCM 5.1ch LPCM 2ch LPCM 2ch LPCM 2ch 2ch LPCM 7.1ch LPCM 7.1ch LPCM 2ch LPCM 2ch LPCM 2ch 2ch LPCM 2ch 2ch Dolby Digital LPCM 5.
Specifications System Laser: Semiconductor laser Inputs and outputs (Jack name: Jack type/Output level/Load impedance) LINE OUT R-AUDIO-L: Phono jack/2 Vrms/10 kilohms DIGITAL OUT (OPTICAL): Optical output jack/–18 dBm (wave length 660 nm) DIGITAL OUT (COAXIAL): Phono jack/0.5 Vp-p/75 ohms HDMI OUT: HDMI 19-pin standard connector COMPONENT VIDEO OUT (Y, PB/CB, PR/CR): Phono jack/Y: 1.0 Vp-p/ PB/CB, PR/CR: 0.7 Vp-p/75 ohms LINE OUT VIDEO: Phono jack/1.0 Vp-p/75 ohms LINE OUT S VIDEO: 4-pin mini DIN/ Y: 1.
Language Code List For details, see page 47. The language spellings conform to the ISO 639: 1988 (E/F) standard. Number, Language (BD Language Code/DVD Language Code) Additional Information not specified Parental Control/Area Code For details, see page 47.
3. Automatic Update Terms and Conditions of Use and End User License Agreement The Sony Blu-ray Disc player (“Product”) and associated software (“Software”) are provided and maintained by Sony Corporation and its affiliates (“Sony”). Sony also provides and maintains associated service (the “Service”), including any subsite accessible through the Service’s Internet homepage (the “Site”).
5. Changes to Service Sony reserves the right to discontinue one, some, or all of the features of the Service you receive at any time at its discretion. Sony may, at its discretion and from time to time change, add or remove features and functionality, upgrade or modify the Service, Site and/or Software without notice. You may, at Sony’s discretion, receive messages regarding these changes and new features/functionality.
11. General Provisions This Agreement, the limited warranty accompanying the Product, plus any additional terms posted on the Service or Site, together constitute the entire agreement between Sony and you with respect to your use of the Product, Service, Site, Content, and Software. Any notice by Sony hereunder may be made by letter, email, or posting on the Service or Site.
Pop-up menu (page 32) Dolby TrueHD is a lossless coding technology that supports up to 8 channels of multi-channel surround sound for the next generation optical discs. The reproduced sound is true to the original source bit-for-bit. An enhanced menu operation available on BD-ROMs. The pop-up menu appears when POP UP/MENU is pressed during playback, and can be operated while playback is in progress. DTS-HD High Resolution Audio (page 63) x.v.
Index Words in quotations appear in the on-screen displays.