4-130-029-13(1) Home Theatre System Operating Instructions HT-SF100 HT-SS100 ©2009 Sony Corporation
WARNING To reduce the risk of fire or electric shock, do not expose this apparatus to rain or moisture. To reduce the risk of fire, do not cover the ventilation opening of the apparatus with newspapers, tablecloths, curtain, etc. Do not place the naked flame sources such as lighted candles on the apparatus. To reduce the risk of fire or electric shock, do not expose this apparatus to dripping or splashing, and do not place objects filled with liquids, such as vases, on the apparatus.
About This Manual • The instructions in this manual are for model HT-SF100 and HT-SS100. In this manual, models of area code CEL is used for illustration purposes unless stated otherwise. Any difference in operation is clearly indicated in the text, for example, “Models of area code CEK only”.
Table of Contents Description and location of parts...................5 Tuner Operations Getting Started 1: Installing the speakers .............................12 2: Connecting the speakers ..........................15 3: Connecting the TV ..................................16 4: Connecting the audio/video components.............................................17 5: Connecting the antennas..........................21 6: Preparing the receiver and the remote .....
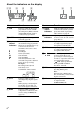
Description and location of parts Receiver Front view MASTER VOLUME INPUT SELECTOR ACTIVE STANDBY 1 2 3 Name Function A ?/1 (on/standby) Press to turn the receiver on or off (page 22, 29, 52). B ACTIVE STANDBY lamp Lights up in amber when the Control for HDMI is set to on and the receiver is on standby mode. Note If the ACTIVE STANDBY lamp is flashing, see page 59. C Display The current status of the selected component or a list of selectable items appears here (page 6).
About the indicators on the display 12 3 qs 4 5 6 qa q; 9 8 7 Name Function Name Function A LFE Lights up when the disc being played back contains an LFE (Low Frequency Effect) channel and the LFE channel signal is actually being reproduced. F Preset station indicators Lights up when using the receiver to tune in radio stations you have preset. For details on presetting radio stations, see page 41. B SLEEP Lights up when the sleep timer is activated (page 50).
Rear panel 1 2 3 4 L L R R 5 DC5V TV DIGITAL ANTENNA AM AUTO AUDIO IN AUDIO IN AUDIO IN SA-CD/CD CAL MIC VIDEO 1 TV SPEAKERS 6 COAX IN OPT IN VIDEO 2 SAT OPT IN 700mA MAX HDMI FRONT R FRONT L SUR R SUR L CENTER SUBWOOFER A SPEAKERS section BD IN B DMPORT Connects to a DIGITAL MEDIA PORT adapter (page 17). HDMI IN/ OUT jacks Connects to the supplied optimizer microphone for the Auto Calibration function (page 24).
Basic operations Remote commander Remote Button Function You can use the supplied RM-AAU058 Remote Commander to operate the receiver and to control the Sony audio/video components that the remote is assigned to operate (page 51). B ?/1 (on/standby) RM-AAU058 Saving the power in standby mode 1 TV ?/1 DMPORT AV ?/1 When “CONTROL FOR HDMI” is set to “CTRL ON” and “P.SAVE” is set to “SAVE ON” (page 35).
Tuner operations Common operations Remote Button Function Remote Button Function H ENTER Press to enter the selection. M MENU/HOME Press to display the menu. A TV ?/1 AV ?/1 (on/standby) N PRESET +/– Press to select preset stations. Press to turn on or off the Sony audio/video components that the remote is assigned to operate (page 51). Press ?/1 (B) and TV ?/1/ AV ?/1 (A) at the same time to turn off the receiver and other components that the remote is assigned to operate (SYSTEM STANDBY).
Remote Button Function Remote Button Function J TOOLS/ OPTIONS Press to enable you to access various viewing options and change/make adjustments according to the source and screen format. V K Press to turn off the sound. (Muting) L Press to adjust the volume. +*/– / (Input select/ Text hold) In TV mode: Press to select input. In Analogue Text mode: Press to hold the current page.
To control the DVD player/ Blu-ray Disc player To control the SAT Remote Button Function Remote Button F Press to display the guide menu. Function M MENU/HOME Press to display the menu. N ./> Press to skip chapters. M MENU/HOME Press to display the menu. Press to jump backward. Q Press to select a menu item and enter the selection. < < m/M Press to jump forward. Press to fast reverse or to fast forward the disc when pressed during playback. H (playback)/ Play mode buttons.
Getting Started 1: Installing the speakers This receiver allows you to use a 5.1 channel speaker system. To fully enjoy theater-like multi channel surround sound, be sure to connect all the speakers (two front speakers, a center speaker, and two surround speakers) and a subwoofer (5.1 channel). You can place your speakers as shown below.
Installing the speakers on the speaker stand Before you install the speakers and subwoofer, be sure to attach the supplied foot pads to prevent vibration or movement as shown in the illustration below. For greater flexibility in positioning the speakers, you are recommended to use the speaker stand as below. Example of HT-SS100 front speaker Model Speaker stand HT-SF100 Supplied. For details, refer to the supplied speaker stand installation guide.
Installing the speakers on the wall For the surround speakers of HT-SF100 You can install your speakers on the wall. 1 Prepare screws (not supplied) that are suitable for the hook on the back of each speaker. See the illustrations below. 100 mm 5 mm to 7 mm For the front speakers and surround speakers of HT-SS100 4 mm more than 25 mm 5 mm to 7 mm 4.6 mm 3 10 mm Hook on the back of the speaker 2 Hang the speakers on the screws. 4.6 mm Fasten the screws to the wall.
Note on speaker cords The connector of the speaker cords are the same color as the speaker jack to be connected. When connecting a speaker cord, be sure to match the colored connector to the speaker jack on the receiver: Before connecting the cords, be sure to disconnect the AC power cord.
Notes 3: Connecting the TV You can watch the selected input image when you connect the HDMI OUT jack to a TV. It is not necessary to connect all the cords. Connect audio and video cords according to the jacks of your components. Before connecting the cords, be sure to disconnect the AC power cord.
TV Getting Started 4: Connecting the audio/ video components B How to hook up your components DIGITAL MEDIA PORT adapter This section describes how to hook up your components to this receiver. Before you begin, see “Component to be connected” below for the pages which describe how to connect the audio/video components. Before connecting the cords, be sure to disconnect the AC power cord. After hooking up all your components, proceed to “5: Connecting the antennas” (page 21).
Notes on connecting DIGITAL MEDIA PORT adapter • Do not connect or disconnect the DIGITAL MEDIA PORT adapter while the receiver is turned on. • Be sure to make DMPORT connections firmly, insert the connector straight in. • As the connector of the DIGITAL MEDIA PORT adapter is fragile, be sure to handle with care when placing or moving the receiver. • When connecting the DIGITAL MEDIA PORT adapter, be sure the connector is inserted with the arrow mark facing towards the arrow mark on the DMPORT jack.
Notes on HDMI connections TV, etc. C L L R B TV DIGITAL A ANTENNA R AM AUDIO IN AUDIO IN AUDIO IN COAX IN OPT IN VIDEO 1 TV SA-CD/CD VIDEO 2 SAT OPT IN mA MAX HDMI BD IN RT A DVD IN SAT IN A OUT A Audio/video signals Audio/video signals Audio/video signals Blu-ray disc player DVD recorder, DVD player* Satellite tuner/ Set-top box A HDMI cable (not supplied) We recommend that you use a Sony HDMI cable.
Notes Connecting video components The following illustration shows how to connect video components such as DVD player, DVD recorder, VCR, etc. It is not necessary to connect all the cords. Connect audio and video cords according to the jacks of your components. DVD recorder, DVD player Satellite tuner, Set-top box Audio signal Audio signal B • To input multi channel digital audio from the DVD player, set the digital audio output setting on the DVD player.
6: Preparing the receiver and the remote Connect the supplied AM loop antenna and FM wire antenna. Before connecting the antennas, be sure to disconnect the AC power cord. Connecting the AC power cord Connect the AC power cord to a wall outlet.
Performing initial setup operations Inserting batteries into the remote Before using the receiver for the first time, initialize the receiver by performing the following procedure. This procedure can also be used to return settings you have made to their factory defaults. Be sure to use the buttons on the receiver for this operation. Insert two R6 (size-AA) batteries in the RM-AAU058 Remote Commander. Observe the correct polarity when installing batteries.
(AUTO CALIBRATION) This receiver is equipped with DCAC (Digital Cinema Auto Calibration) Technology which allows you to perform automatic calibration as follows: • Check the connection between each speaker and the receiver. • Adjust the speaker level. • Measure the distance of each speaker from your listening position. • Measure the frequency characteristics.* * The measurement result is not utilized for signals with a sampling frequency of more than 96 kHz.
Example: HT-SS100 L L R R DC5V TV DIGITAL ANTENNA AM AUTO AUDIO IN AUDIO IN AUDIO IN SA-CD/CD CAL MIC VIDEO 1 TV SPEAKERS COAX IN OPT IN VIDEO 2 SAT OPT IN Optimizer microphone Performing Auto Calibration 700mA MAX HDMI FRONT R FRONT L SUR R SUR L CENTER SUBWOOFER DMPORT BD IN DVD IN SAT IN OUT TV ?/1 DMPORT AV ?/1 ?/1 ?/1 switch SYSTEM STANDBY VIDEO1 VIDEO2 SAT TV BD DVD SA-CD/CD TUNER BD/DVD TOP MENU MENU F1 F2 AUDIO THEATRE DIGITAL ANALOG 1 2 4 5 6 7 8 9
2 Note Press V/v repeatedly to select the item. Then, press . Item Explanation SAVE Saves the measurement results and exits the setting process. WRN CHK Displays warning concerning the measurement results. See “When you select “WRN CHK”” (page 26). DIST Displays the measurement result for speaker distance. LEVEL Displays the measurement result for speaker level. EXIT Exits the setting process without saving the measurement results.
Error code Cause and remedies ERROR SR33 Either the surround left or surround right speaker is not connected. Check that the surround speakers are connected properly. ERROR SW33 The subwoofer may be damaged. Contact your Sony dealer or local authorized Sony service facility. Note The measurement result of a speaker will not appear if the receiver does not recognize that the speaker is connected. When you have finished Disconnect the optimizer microphone from the receiver.
6 The test tone is emitted from the speaker that is being adjusted only. • FL LVL: adjusts the front left speaker level. • CNT LVL: adjusts the center speaker level. • FR LVL: adjusts the front right speaker level. • SR LVL: adjusts the surround right speaker level. • SL LVL: adjusts the surround left speaker level. • SW LVL: adjusts the subwoofer level. (TEST TONE) You can adjust the speaker levels while listening to the test tone from your listening position.
When a test tone is not output from the speakers • The speaker cords may not be connected securely. • The speaker cords may have the short-circuit problem. Playback Selecting a component TV ?/1 DMPORT AV ?/1 Note The test tone signals are not output from the HDMI OUT jack.
Components that can be played back TV [TV] TV, etc., connected to the TV jack SA-CD/CD [SA-CD/CD] Super Audio CD/CD player, etc., connected to the SA-CD/CD jack Enjoying sound/images from the components connected to the receiver TV ?/1 DMPORT AV ?/1 TUNER Built-in radio tuner [FM or AM band] 2 3 Playback Selected input [Display] ?/1 ?/1 SYSTEM STANDBY Turn on the component and start playback.
Tips • When you connect a Sony TV, the audio input of the TV is switched and the image from the TV tuner is displayed on the TV screen automatically by pressing the TV button. To change this setting, see “Changing the input button assignments” (page 51). • The sound may be output from the TV’s speaker. In this case, turn the volume of the TV’s speaker down to the minimum. Enjoying Blu-ray disc/DVD 1 2 Turn on the TV. 3 Press DVD or BD.
Enjoying a VCR Turn on the TV. 3 Press VIDEO1 or VIDEO2. Turn on the VCR player and the receiver. You can also use INPUT SELECTOR on the receiver to select “VIDEO 1” or “VIDEO 2”. 4 Change the TV input. For details, refer to the operating instructions of the TV. 5 1 Press DMPORT. You can also use INPUT SELECTOR on the receiver to select “DMPORT”. 2 Start playback of the connected component.
To return to the previous display Amplifier Operations Press B. Navigating through menus To exit the menu Press AMP MENU. By using the amplifier menus, you can make various adjustments to customize the receiver. 4 5 6 7 8 9 CLEAR 0 SOUND FIELD AMP MENU ENTER AMP MENU TOOLS/ OPTIONS DISPLAY V/v/B/b, RETURN/EXIT 1 MENU/HOME Press AMP MENU. “SET HDMI” appears on the display. 2 Press V/v repeatedly to select the menu you want. 3 Press menu.
Overview of the menus The following options are available in each menu. For details on navigating through menus, see page 32. Parameters [Display] Settings Initial setting HDMI setting [SET HDMI] (page 35) Control for HDMIa)b) [CONTROL FOR HDMI] CTRL ON, CTRL OFF CTRL ON Volume Limita) [VOL LIM] LIM MAX, LIM 39…LIM 1, LIM MIN LIM MAX Power Savea) [P.SAVE] SAVE ON, SAVE OFF SAVE ON Auto Calibration setting [A.
Menu [Display] Parameters [Display] Settings Initial setting Level setting [LEVEL] (page 37) Test tonea) [T. TONE] T. TONE Y, T. TONE N T. TONE N Front left speaker level [FL LVL] FL –6.0 dB to FL +6.0 dB (0.5 dB step) FL 0.0 dB Center speaker level [CNT LVL] CNT –6.0 dB to CNT +6.0 dB (0.5 dB step) CNT 0.0 dB Front right speaker level [FR LVL] FR –6.0 dB to FR +6.0 dB (0.5 dB step) FR 0.0 dB Surround right speaker level [SR LVL] SR –6.0 dB to SR +6.0 dB (0.5 dB step) SR 0.
Settings for the HDMI (SET HDMI menu) (A.CAL menu) SET HDMI menu parameters You can use the A.CAL menu to make settings for the Auto Calibration function to suit your preference. Select “A.CAL” in the amplifier menus. For details on adjusting the parameters, see “Navigating through menus” (page 32) and “Overview of the menus” (page 33). x CONTROL FOR HDMI (Control for HDMI) A.CAL menu parameters Lets you turn the Control for HDMI function on or off.
Settings for the speaker x SR DIST (Surround right speaker distance) (SP SETUP menu) x SL DIST (Surround left speaker distance) You can use the SP SETUP menu to set the distance of the speakers connected to this receiver. Select “SP SETUP” in the amplifier menus. For details on adjusting the parameters, see “Navigating through menus” (page 32) and “Overview of the menus” (page 33). Lets you set the distance from your listening position to the surround speakers.
Adjusting the tone (LEVEL menu) (TONE menu) You can use the LEVEL menu to adjust the level of each speaker. Select “LEVEL” in the amplifier menus. For details on adjusting the parameters, see “Navigating through menus” (page 32) and “Overview of the menus” (page 33). You can use the TONE menu to adjust the tonal quality (bass/treble level) of the speakers. Select “TONE” in the amplifier menus.
Custom settings (CUSTOM menu) You can use the CUSTOM menu to make various settings to suit your preference. Select “CUSTOM” in the amplifier menus. For details on adjusting the parameters, see “Navigating through menus” (page 32) and “Overview of the menus” (page 33). CUSTOM menu parameters x AUD. DRC (Audio dynamic range compression) Lets you compress the dynamic range of the sound track. This may be useful when you want to watch movies at low volumes late at night.
. Enjoying Surround Sound 4 5 6 7 8 9 CLEAR 0 ENTER SOUND FIELD SOUND FIELD AMP MENU Selecting the sound field Press SOUND FIELD repeatedly to select the sound field you want. This receiver can create multi channel surround sound. You can select one of the optimized sound fields from the system’s preprogrammed sound fields For details, see “Types of sound field available” (page 39). Types of sound field available Sound field [Display] Effect A.F.D.
Notes • The effects provided by the virtual speakers may cause increased noise in the playback signal. • When listening with sound fields that employ the virtual speakers, you will not be able to hear any sound coming directly from the surround speakers. • Multi channel Linear PCM is not available for “P. AUDIO”. • This function does not work when: – signals with a sampling frequency of more than 48 kHz is input. – the multi channel Linear PCM signals are received via an HDMI IN jack.
2 Press TUNING + or TUNING –. Press TUNING + to scan from low to high; press TUNING – to scan from high to low. The receiver stops scanning whenever a station is received. To stop the Auto Tuning manually, press TUNING + or TUNING –. Presetting radio stations You can preset up to 20 FM stations and 10 AM stations. Then you can easily tune in the stations you often listen to.
5 Press or b. A preset number appears in the display. 6 7 Naming preset station You can select the preset number directly by pressing the numeric buttons. You can enter a name for preset stations. These names (for example, “XYZ”) appear in the display when a station is selected. Note that no more than one name can be entered for each preset station. Press 1 Press V/v repeatedly to select the preset number you want. . “COMPLETE” appears in the display and the station is stored.
Viewing the station name or frequency in the display When the receiver is set to “FM” or “AM”, you can check the frequency using the display. Press DISPLAY. Each time you press DISPLAY, the display changes as shown. Station namea) t Frequencyb) a) This is displayed if you have entered a name for a preset station. b) Returns to the original display when several seconds have elapsed.
Note “BRAVIA” Sync Features What is “BRAVIA” Sync? “BRAVIA” Sync is compatible with Sony TV, Blu-ray Disc/DVD player, AV amplifier, etc., that is equipped with the Control for HDMI function.
Preparing for the “BRAVIA” Sync To use the “BRAVIA” Sync, turn the Control for HDMI function on for both the receiver and the connected component. The receiver is compatible with the “Control for HDMI-Easy Setting” function.
Notes • When you unplug the HDMI cable or change the connection, perform the steps given in “When your TV is compatible with the “Control for HDMIEasy Setting” function” (page 45) or “When your TV is not compatible with the “Control for HDMIEasy Setting” function” (page 45). • You cannot perform One-Touch Play and System Audio Control during Control for HDMI-Easy Setting operation. • Before you do the Control for HDMI-Easy Setting from the TV, be sure to turn on the TV, connected components and receiver.
Enjoying the TV sound from the speakers connected to the receiver (System Audio Control) Notes • If System Audio Control does not function according to your TV setting, refer to the operating instructions of the TV. • When you connect a TV that does not have System Audio Control function, the System Audio Control function does not work. • If the TV is turned on before turning on the receiver, the TV sound will not be output for a moment.
Turning off the receiver with the TV Using the Power Saving function (System Power Off) (Power Save) When you turn the TV off by using the POWER button on the TV’s remote, the receiver and the connected components turn off automatically. You can also use the receiver’s remote to turn off the TV. You can reduce the receiver’s power consumption when you connect a “BRAVIA” Sync-compatible TV to this receiver. During active standby mode, if the TV is turned off, the HDMI signal transmission will stop.
Notes • The power saving function may not work for some TVs compatible with the “BRAVIA” Sync. In this case, set “P.SAVE” to “SAVE OFF.” • Depending on your components, it may take time before image or sound is output. • This function is available only when the Control for HDMI function is set to on. Other Operations Changing the brightness of the display (DIMMER) You can change the brightness of the display. 1 Press AMP MENU. “SET HDMI” appears on the display.
Changing the display setting (DISPLAY) You can change the display setting. 1 Press AMP MENU. “SET HDMI” appears on the display. 2 Press V/v repeatedly until “CUSTOM” appears, then press or b. 3 Press V/v repeatedly until “DISPLAY” appears, then press or b. 4 Press V/v repeatedly to change the display setting, then press . Using the Sleep Timer (SLEEP) You can set the receiver to turn off automatically at a specified time. 1 “SET HDMI” appears on the display.
Switching the audio input mode (IN MODE) You can select the audio input mode setting when you connect satellite tuner or set-top box to both HDMI IN jack and optical digital input jack on the receiver and SAT input has been selected. 1 Press AMP MENU. “SET HDMI” appears on the display. 2 Press V/v repeatedly to select “CUSTOM”. 3 Press menu. 4 Press V/v repeatedly to select “IN MODE”. 5 6 Press or b to enter the parameter. Press V/v repeatedly to select the audio input mode you want, then press .
2 Referring to the following table, press the corresponding button for the category you want. Example: Press 3. Now you can use the DVD button to control the Blu-ray disc player. Categories and the corresponding buttons for BD, DVD and SAT Categories and the corresponding buttons for TV Categories Press TVd) 5 e) 6 TV d) The default setting of the TV (white) button.
x DTS Digital Surround Additional Information Glossary x Digital Cinema Sound (DCS) A unique sound reproduction technology for home theater developed by Sony, in cooperation with Sony Pictures Entertainment, for enjoying the exciting and powerful sound of movie theaters at home. With this “Digital Cinema Sound” developed by integrating a DSP (Digital Signal Processor) and measured data, the ideal sound field intended by filmmakers can be experienced at home.
x TSP (Time Stretched Pulse) A TSP signal is a highly precise measuring signal that utilizes impulse energy, measuring a wide band, from low to high, in a short period. The amount of energy used to measure signals is important to ensure measurement accuracy in a normal indoor environment. Using TSP signals makes it possible to measure signals effectively. x x.v.Colour x.v.Colour is a more familiar term for the xvYCC standard proposed by Sony, and is a trademark of Sony.
On placement • Place the receiver in a location with adequate ventilation to prevent heat buildup and prolong the life of the receiver. • Do not place the receiver near heat sources, or in a place subject to direct sunlight, excessive dust, or mechanical shock. • Do not place anything on top of the cabinet that might block the ventilation holes and cause malfunctions. • Do not place the receiver near equipment such as a TV, VCR, or tape deck.
Troubleshooting If you experience any of the following difficulties while using the receiver, use this troubleshooting guide to help you remedy the problem. Audio There is no sound, no matter which component is selected, or only a very low-level sound is heard. • Check that the speakers and components are connected securely. • Check that both the receiver and all components are turned on. • Check that MASTER VOLUME is not set to “VOL MIN”. • Press to cancel the muting function.
Dolby Digital or DTS multi channel sound is not reproduced. • Check that the DVD, etc. you are playing is recorded in Dolby Digital or DTS format. • When connecting the DVD player, etc., to the digital input jacks of this receiver, check the audio setting (the settings for the audio output) of the connected component. There is no sound from the component connected to the DIGITAL MEDIA PORT adapter. • Adjust the volume of this receiver.
No sound is output from the receiver and TV speaker while using the System Audio Control function. • Make sure the TV is compatible with the System Audio Control function. • If you cannot listen to the sound of a component connected to the receiver – Select the appropriate input when you want to watch a program on a component connected via HDMI connection to the receiver. – Change the TV channel when you want to watch a TV broadcast.
Remote control The remote does not function. • For receiver operation, you can only use the DISPLAY button when the TUNER input is selected. • Point the remote at the remote sensor on the receiver. • Remove any obstacles in the path between the remote and the receiver. • Replace all the batteries in the remote with new ones, if they are weak. • Make sure you select the correct input on the remote.
AM tuner section Specifications Amplifier section Models of area code CEL, CEK Power Output1) Stereo mode (rated) 108 W + 108 W (3 ohms at 1 kHz, THD 1%) Surround mode (reference) RMS Output (3 ohms at 1 kHz, THD 10%) FRONT2): 143 W/ch CENTER2): 143 W SUR2): 143 W/ch (1.
Speaker section • Subwoofer (SS-WP36) Speaker unit 160 mm, cone type Enclosure type Bass reflex Rated impedance 1.5 ohms Dimensions (w/h/d) (Approx.) 220 × 395 × 325 mm (with foot) Mass (Approx.) 5.
Supplied speakers Front speaker (2) Center speaker (1) Surround speaker (2) Subwoofer (1) Supplied accessories Operating Instructions (this manual) Quick Setup Guide (1) Speaker Stand Installation Guide (HT-SF100 only) (1) FM wire antenna (1) AM loop antenna (1) Remote commander (RM-AAU058) (1) R6 (size-AA) batteries (2) Optimizer microphone (ECM-AC2) (1) Speaker cords (5) Foot pads • Speakers – HT-SS100 only (20) – HT-SF100 only (4) • Subwoofer (4) Screws (small) (HT-SF100 only) (12) Screws (large) (HT-SF
Index Numerics I T 5.1 channel 12 IN MODE 51 Initial setup 22 TEST TONE 27 Tuner connecting 21 Tuning automatically 40 to preset stations 42 TV connecting 16, 18 playback 29 A AUTO CALIBRATION 23 B Blu-ray disc player connecting 18 playback 30 “BRAVIA” Sync preparing 45 C CD player connecting 17 playback 31 D E Error messages 59 H HDMI connecting 18 Menu A.
(1) Sony Corporation Printed in Malaysia