
DVD Home Theatre System Operating Instructions
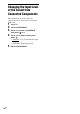

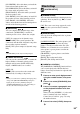
Table Of Contents
- WARNING
- Precautions
- About These Operating Instructions
- Playable Discs/Files on a USB Device
- Package Contents
- Index to Parts and Control
- Guide to the Control Menu
- Getting Started
- Playback
- Playing a Disc
- Playing Files on a Disc/ USB Device
- Other Playback Operations
- Playback operation buttons on the remote
- Playing a specific title/ chapter/track/scene, etc.
- Changing angles
- Displaying subtitles
- Changing the audio
- Using the DVD’s menu
- Selecting an original title or edited title on a DVD-VR
- Selecting a playback area for a Super Audio CD
- Changing a playback layer for a hybrid Super Audio CD
- Selecting the Playback Mode
- Displaying the Information of a Disc/ USB Device
- Enjoying the Audio/Video of the Connected Component
- Tuner
- Sound Effect
- Convenient Functions
- Using the Control for HDMI Function for “BRAVIA” Sync
- Preparing the Control for HDMI function
- Turning the system off in sync with your TV
- Watching a DVD by a single button press
- Using the Theatre Mode
- Enjoying TV sound from the speakers by this system
- Limiting the volume level of TV sound from the system’s speakers
- Operating the system via the TV remote
- Changing the language for the system’s on-screen display in sync with your TV
- Transferring Songs onto a USB Device
- Using the sleep timer
- Adjusting the Delay Between the Picture and Sound
- Changing the Input Level of the Sound from Connected Components
- Using the Control for HDMI Function for “BRAVIA” Sync
- Settings
- Additional Information

54
GB
Changing the Input Level
of the Sound from
Connected Components
The sound distortion of the connected
component may be improved by reducing the
input level.
1 Press TV.
2 Press SYSTEM MENU.
3 Press X/x to select “ATTENUATE,”
then press or c.
4 Press X/x to select a setting, then
press .
• “ATT ON”: You can attenuate the input
level.
• “ATT OFF”: Normal input level.
5 Press SYSTEM MENU.