4-269-995-14(2) LCD Digital Colour TV Operating Instructions Getting Started Using Your BRAVIA TV Network Setup Additional Information KDL-55EX72x / 46HX72x / 46EX72x / 46EX52x / 46CX52x / 40HX72x / 40EX72x / 40EX52x KDL-40CX52x / 37EX72x / 37EX52x / 32EX72x / 32EX52x / 32EX42x / 32CX52x / 26EX32x KDL-24EX32x / 22EX32x
NOTICE FOR CUSTOMERS IN THE UNITED KINGDOM A moulded plug complying with BS1363 is fitted to this equipment for your safety and convenience. Should the fuse in the plug supplied need to be replaced with the same rating of fuse approved by ASTA or BSI to BS 1362 (i.e., marked with or ) must be used. When an alternative type of plug is used it should be fitted with the same rating of fuse, otherwise the circuit should be protected by a 10 AMP FUSE at the distribution board.
TV Wireless System Regulation Information Precautions For Customers in Italy • Some people may experience discomfort (such as eye strain, fatigue, or nausea) while watching 3D video images or playing stereoscopic 3D games. Sony recommends that all viewers take regular breaks while watching 3D video images or playing stereoscopic 3D games. The length and frequency of necessary breaks will vary from person to person. You must decide what works best.
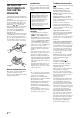
backlight LCD TV). Follow your local ordinances and regulations for disposal. Handling and cleaning the screen surface/cabinet of the TV set Be sure to unplug the mains lead connected to the TV set from mains socket before cleaning. To avoid material degradation or screen coating degradation, observe the following precautions. • To remove dust from the screen surface/ cabinet, wipe gently with a soft cloth.
GB
Table of Contents Getting Started Checking the accessories ........................................................................................................ 8 Inserting batteries into the remote............................................................................................ 8 1: Attaching the Table-Top Stand ............................................................................................ 9 2: Adjusting the viewing angle of the TV ...............................................
After setting up your BRAVIA TV and learning basic operations with this manual, see the built-in manual (i-Manual) for further explanation of the features of your TV. This TV has a built-in manual (i-Manual). To access the i-Manual, press i-MANUAL on the remote, and select an item. For details, see page 18 of this manual. Contents of the i-Manual may differ depending on the model/region/area. Contents of the i-Manual * Some models do not have this feature.
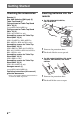
Getting Started Checking the accessories Remote (1) Size AAA batteries (R03 type) (2) Table-Top Stand (1)*1 Fixing screws for Table-Top Stand (M5 x 16) (3) (except KDL-26/24/22EX32x) Fixing screws for Table-Top Stand (M4 x 12) (2) (KDL-26/24/22EX32x only) Assembling screws for Table-Top Stand (M6 x 14) (4) (KDL-55/46EX72x, KDL-46HX72x, KDL-46EX52x, KDL-46CX52x only) Assembling screws for Table-Top Stand (M6 x 14) (3) (KDL-40HX72x, KDL-40/37/32EX72x, KDL-40/37/32EX52x, KDL-40/32CX52x, KDL-32EX42x only) Assem
1: Attaching the Table-Top Stand 1 Refer to the supplied Table-Top Stand leaflet for proper attachment for some TV models. 2 Place the TV set on the Table-Top Stand. Getting Started B For KDL-55/46/40/37/32EX72x, KDL-46/40HX72x, KDL-46/40/37/32EX52x, KDL-46/40/32CX52x, KDL-32EX42x B For KDL-55/46/40/37/32EX72x, KDL-46/40HX72x, KDL-46/40/37/32EX52x, KDL-46/40/32CX52x, KDL-32EX42x B For KDL-26/24/22EX320 Guide pins ~ • Align the TV from the top, slide it in until the guide pins cannot be seen.
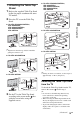
• Be sure the TV is on the vertical position before switching on. TV set must not powered on with LCD panel face down to avoid uneven picture uniformity. B For KDL-55/46/40/37/32EX72x, KDL-46/40HX72x, KDL-46/40/37/32EX52x, KDL-46/40/32CX52x, KDL-32EX42x 2: Adjusting the viewing angle of the TV This TV can be adjusted within the angles as illustrated.
~ • Ensure that there are no objects in front of the TV. Connecting a Set Top Box/recorder (e.g. DVD recorder) with HDMI IR Sensor 3D Sync Transmitter (KDL-55/46/40/37/32EX72x, KDL-46/40HX72x only) Presence Sensor (except KDL-46/40/32EX520, KDL-40/32EX523) Getting Started • Do not expose the Presence Sensor to direct sunlight or other strong light, as malfunction may occur. 3: Connecting an antenna (aerial)/Set Top Box/ recorder (e.g. DVD recorder) Connecting a Set Top Box/recorder (e.g.
5: Preventing the TV from toppling over 6: Organising the AC power cord (mains lead)/ Bundling the cables B KDL-46/40/32CX52x AC power cord B Except KDL-46/40/32CX52x ~ • Before bundling the cables, remove the cable holder from the AC cover (see step 1 and 2). Reuse the cable holder (see step 3) to bundle the other cables (see step 4). • Do not bundle the AC power cord (mains lead) together with other cables.
7: Performing the initial set-up Except KDL-46/40/ 32CX52x KDL-46/40/32CX52x provider. If no channel is found using “Quick Scan”, try “Full Scan” (though it may take some time). ~ • “Full Scan” may not be available depending on your region/country. Programme Sorting: Changes the order of analogue channels stored in the TV. Press F/f to select the channel you want to move to a new position, then press . 2 Press F/f to select the new position for the channel, then press .
Using Your BRAVIA TV Watching the TV 1 Turn on the TV. 2 Select a mode. 3 Select a TV channel. Press 1 on the TV to turn on the TV. 1 2 GUIDE 3 z • The number 5, N, PROG + and AUDIO buttons on the remote have a tactile dot. Use the tactile dots as a reference when operating the TV. 14 GB To use Digital Electronic Programme Guide Press GUIDE in digital mode to display the programme guide. Use with 0-9 to select digital channels. For channel numbers 10 and above, press the next digit quickly.
Parts and controls of the remote Use the supplied remote to control your TV. Basic remote operations are explained here. For details on all of the remote function, press i-MANUAL and see the built-in manual (i-Manual) (page 18). 1 :/1 Press to turn the TV on and off from standby mode. 2 i-MANUAL Displays the built-in manual (i-Manual). 4 F/f/G/g/ Moves the on-screen cursor, and confirm the item. 5 OPTIONS Displays a list of convenient functions and menu shortcuts.
Selecting various functions and settings (Home Menu) You can select all the features from the Home menu. See page 17 for the Home menu map. 1 Press HOME. 2 Press F/f/G/g/ 2 1, 3 to select items. To select items in the Home menu (e.g., selecting “Settings”) 1 Press G/g to select “Settings”. The contents of “Settings” are displayed on the right. 2 Press F/f to select “Display”. 3 Press to launch the menu. According to the screen instruction, press F/f/G/g to select items and press to confirm.
Home menu map After pressing HOME on the remote, following icons are displayed as categories. The categories are available depending on your TV model, region, country and broadcasting conditions. You can select a list of TV channels, or a programme guide. Media You can enjoy photo/music/video content via USB devices or the home network. Inputs You can select equipment connected to the TV.
Displaying Operating Instructions (i-Manual) Operating instructions are built into your BRAVIA TV and can be displayed on the screen. To learn more about your TV features, access your i-Manual with the touch of a button. 1 Press i-MANUAL. 2 Press F/f/G/g/ 1 to select items. 2 To select items in the i-Manual 1 Press F/f to select an item. The contents in the item are displayed on the right as the second layer. 2 Press g to move to the second layer. 3 Press F/f to select an item from the second layer.
Description of the i-Manual screen Press G to go back to the previous page Press f to go to the next page Page number/Total page number Press RETURN to go back to the previous page Press to launch the function ~ • This will be displayed only when the function is available. The i-Manual has a bookmark function. Pages can be bookmarked with coloured buttons, according to the instructions at the bottom of the screen.
Network Setup When you connect this TV to the Internet, you can enjoy multiple functions: displaying a photograph that shows its location on the map, enjoying Internet video, etc. For details on the functions, refer to the i-Manual. ~ • You will need to contract with an Internet service provider to connect to the Internet.
Setting up the Internet connection Using the network feature you can connect the TV to the Internet. The set-up procedure differs depending on the type of network and LAN router. Before setting up the Internet connection, be sure to set up a LAN router. Check your wireless LAN environment using the following chart. For security purpose, “WPS (PIN)” provides a PIN code for your router. PIN code is renewed every time you select “WPS (PIN)”. 1 Press HOME, then select > “Network” > “Network Set-up”.
Type 3: Unsecured network with any type of wireless LAN router To set up a wireless LAN, SSID (wireless network name) will be required. 1 Press HOME, then select > “Network” > “Network Set-up”. 2 3 Select “Wireless Set-up”. 4 Follow the instructions on the set-up screen. Select “Scan”, then select a network from the list of scanned wireless networks. ~ • Security key (WEP or WPA key) will not be required because you do not need to select any security method in this procedure.
Additional Information Troubleshooting When the 1 (standby) indicator is flashing, count how many times it flashes (interval time is three seconds). Press 1 on the TV to turn it off, disconnect the AC power cord (mains lead), and inform your dealer or Sony service centre of how the indicator flashes (number of flashes). When the 1 (standby) indicator is not flashing, check the items in the tables as follows. Also refer to “Troubleshooting” in the i-Manual.
Specifications System Panel system LCD (Liquid Crystal Display) Panel TV system Analogue: Depending on your country/area selection: B/G/H, D/K, L, I, M Digital: DVB-T2 (KDL-55EX723/46HX723/46EX724/46EX723/46EX524/40HX723/40EX724/ 40EX723/40EX524/40EX523/40CX523/37EX723/37EX524/32EX724/32EX723/32EX524/ 32EX523/32EX424/32CX523 only) DVB-T/DVB-C Colour/video system Analogue: PAL, PAL60 (only video input), SECAM, NTSC3.58, NTSC4.43 (only video input) Digital: MPEG-2 MP@ML/HL, H.
Model name KDLPower and others Power requirements Energy Efficiency Class Screen size (measured diagonally) Power in “Home”/ consumption “Standard” mode in “Shop”/ “Vivid” mode Average annual energy consumption*1 Standby power consumption*2 55EX72x 46HX72x 46EX72x 46EX52x 220 V – 240 V AC, 50 Hz A A A A Approx. 138.8 cm/ 55 inches Approx. 116.8 cm/ 46 inches Approx. 116.8 cm/ 46 inches Approx. 116.8 cm/ 46 inches 113 W 83.0 W 81.0 W 68.
Model name KDLPower and others Power requirements Energy Efficiency Class Screen size (measured diagonally) Power in “Home”/ consumption “Standard” mode in “Shop”/ “Vivid” mode Average annual energy consumption*1 Standby power consumption*2 40CX52x 37EX72x Display resolution 1,920 dots (horizontal) × 1,080 lines (vertical) 37EX52x 220 V – 240 V AC, 50 Hz C A A B Approx. 101.6 cm/ 40 inches Approx. 94.0 cm/ 37 inches Approx. 94.0 cm/ 37 inches Approx. 80.1 cm/ 32 inches 120 W 56.0 W 56.
Model name KDL- 26EX321 26EX320 24EX32x 22EX32x Power and others Power requirements 220 V – 240 V AC, 50 Hz Energy Efficiency Class B B B B Screen size (measured diagonally) Approx. 66.1cm/ 26 inches Approx. 66.1 cm/ 26 inches Approx. 61.0 cm/ 24 inches Approx. 54.8 cm/ 22 inches Power in “Home”/ consumption “Standard” mode 38.0 W 38.0 W 35.0 W 32.
Installing the Accessories (Wall-Mount Bracket) To Customers: When using the SU-WL500 and SU-WL100 Wall-Mount Bracket, the space between the wall and the TV will be 6 cm. Use this space to route cables to the TV. 6cm Wall For product protection and safety reasons, Sony strongly recommends that installing of your TV be performed by Sony dealers or licensed contractors. Do not attempt to install it yourself.
SU-WL500, SU-WL100 For KDL-55/46/40/37/32EX72x, KDL-46/40HX72x, KDL-46/40/37/32EX52x, KDL-46/40/32CX52x, KDL-32EX42x SU-WL500 Screw (+PSW 6 × 16) Mounting Hook × For KDL-26/24/22EX32x SU-WL100 Screw (+PSW 4 × 12) Mounting Hook 4 Soft cloth ~ • Attach the Mounting Hook using the four screws supplied with the Wall-Mount Bracket. • When attaching the Table-Top Stand again, be sure to fasten the screws (previously removed) to the original holes on the rear of the TV.
SU-WL500 Screw location When installing the Mounting Hook on the TV. Hook location When installing the TV onto the Base Bracket. a b c SU-WL100 Hook location When installing the TV onto the Base Bracket.
TV installation dimensions table 1 SU-WL500 F E A C B D H G Screen centre point 2 SU-WL100 A F Additional Information 125 E C B G D H Screen centre point Unit: cm Model Name KDL- Display dimensions A 1 SU-WL500 126.9 55EX72x 107.8 46HX72x 107.8 46EX72x 107.8 46EX52x 112.2 46CX52x 94.3 40HX72x 94.3 40EX72x 94.3 40EX52x 99.1 40CX52x 87.8 37EX72x 87.7 37EX52x 75.5 32EX72x 32EX52x/ 75.5 32EX42x 79.9 32CX52x 2 SU-WL100 63.1 26EX32x 58.3 24EX32x 52.
Safety Information Installation/Set-up Install and use the TV set in accordance with the instructions as follows in order to avoid any risk of fire, electrical shock or damage and/or injuries. Ventilation Mains lead • Never cover the ventilation holes or insert anything in the cabinet. • Leave space around the TV set as shown below. • It is strongly recommended that you use a Sony wall-mount bracket in order to provide adequate air-circulation.
Environment: For children • Places that are hot, humid, or excessively dusty; where insects may enter; where it might be exposed to mechanical vibration, near flammable objects (candles, etc). The TV set shall not be exposed to dripping or splashing and no objects filled with liquids, such as vases, shall be placed on the TV. • Do not place the TV in a humid or dusty space, or in a room with oily smoke or steam (near cooking tables or humidifiers). Fire, electric shock, or warping may result.
Keep this Instruction manual safe you’ll need it Television in the UK is going digital, bringing us all more. Please see overleaf to find out when your area switches to digital. Digital UK is the independent, non-profit organisation leading the process of digital TV switchover in the UK. Digital UK provides impartial information on what people need to do to prepare for the move to digital, and when they need to do it.
How to re-tune: 1 Press "HOME" on the remote 2 Press G/g to select "Settings" 3 Press F/f to select "Digital Set-up", then press 4 Press 5 Press G to select "Yes" then press 6 Follow the on screen instructions. to select "Digital Auto Tuning" to start "Digital Auto Tuning" If you are missing any channels, it may be that they are not available in your area, or that your aerial needs upgrading.
For useful information about Sony products 4-269-995-14(2) © 2011 Sony Corporation