
Digital Camera User Manual

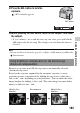

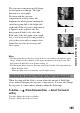


Table Of Contents
- Notes on using your camera
- Table of Contents
- Preparing the camera
- Before your operation
- Shooting images
- Using the shooting function
- Selecting the focus method
- Using autofocus
- Shooting with your desired composition (Focus-lock)
- Selecting the focus method to suit the movement of the subject (Autofocus Mode)
- Selecting the focus area (AF area)
- Adjusting the focus manually (Manual focus)
- Composing your shot using the image sensor (Focus check Live View)
- Checking the focus by enlarging the image
- Detecting faces
- Using the flash
- Adjusting the brightness of the image (Exposure, Flash compensation, Metering)
- Shooting with fixed brightness (AE Lock)
- Using brightness compensation for the entire image (Exposure compensation)
- Adjusting the amount of flash light (Flash Compensation)
- Selecting the flash control mode to set the amount of flash light (Flash control)
- Selecting the method for measuring the brightness of a subject (Metering Mode)
- Setting ISO
- Compensating for the brightness and contrast automatically (D-Range)
- Image processing
- Adjusting the color tones (White balance)
- Selecting the drive mode
- Selecting the focus method
- Using the viewing function
- Changing your setup
- Viewing images on a computer
- Printing images
- Others
- Index

110
Notes
• The setting is fixed to [Off] when [Sunset], [Night View], [Night Portrait], or [Hand-
held Twilight] is selected in Scene Selection. The setting is fixed to [Auto] when
other modes are selected in Scene Selection.
• When shooting with the D-Range optimizer, the image may be noisy. Select the
proper level by checking the recorded image, especially when you enhance the
effect.
* _Ev displayed with is the step currently selected.
• Since the shutter is released three times for one shot, be careful about the
following:
– Use this function when the subject is motionless or does not blink.
– Do not recompose.
– When you photograph people, we recommend that you use the Live
View mode.
Notes
• When [Image: Quality] is set to [RAW] or [RAW & JPEG], this function cannot be
used.
Compensating automatically with rich gradation (Auto High
Dynamic Range)
1 D-RANGE button t (Auto HDR)
2 Select an optimal level with b/B on the controller.
(Auto Exposure
Diff.)
Corrects the exposure difference automatically.
(Exposure
Difference Level)*
Sets the exposure difference, based on the contrast of the
subject. Select the optimal level between 1.0Ev (weak) and
6.0Ev (strong).
For example: When 2.0Ev is selected, three images are
overlaid: an image with –1.0Ev, an image with the correct
exposure, and an image with +1.0Ev.
Shooting technique