
Digital Camera User Manual
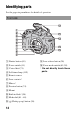
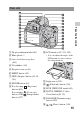

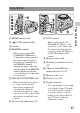

Table Of Contents
- Notes on using your camera
- Table of Contents
- Preparing the camera
- Before your operation
- Shooting images
- Using the shooting function
- Selecting the focus method
- Using autofocus
- Shooting with your desired composition (Focus-lock)
- Selecting the focus method to suit the movement of the subject (Autofocus Mode)
- Selecting the focus area (AF area)
- Adjusting the focus manually (Manual focus)
- Composing your shot using the image sensor (Focus check Live View)
- Checking the focus by enlarging the image
- Detecting faces
- Using the flash
- Adjusting the brightness of the image (Exposure, Flash compensation, Metering)
- Shooting with fixed brightness (AE Lock)
- Using brightness compensation for the entire image (Exposure compensation)
- Adjusting the amount of flash light (Flash Compensation)
- Selecting the flash control mode to set the amount of flash light (Flash control)
- Selecting the method for measuring the brightness of a subject (Metering Mode)
- Setting ISO
- Compensating for the brightness and contrast automatically (D-Range)
- Image processing
- Adjusting the color tones (White balance)
- Selecting the drive mode
- Selecting the focus method
- Using the viewing function
- Changing your setup
- Viewing images on a computer
- Printing images
- Others
- Index

17
Preparing the camera
A HDMI terminal (136)
B (USB) terminal (164)
C Speaker
D REMOTE terminal
• When connecting the RM-
S1AM/RM-L1AM Remote
Commander (sold separately) to
the camera, insert the plug of
the Remote Commander into
the REMOTE terminal,
aligning the guide of the plug
with the guide of the REMOTE
terminal. Make sure that the
cord of the Remote Commander
faces forward.
E MIC (PLUG IN POWER) jack
• When an external microphone
is connected, the internal
microphone is turned off
automatically. When the
external microphone is a plug-
in-power type, the power of the
microphone is supplied by the
camera.
F Hooks for shoulder strap (33)
G DC IN terminal
• When connecting the AC-
PW10AM AC Adaptor (sold
separately) to the camera, turn
the camera off, then plug the
connector of the AC Adaptor to
the DC IN terminal on the
camera.
H Memory card switch
I SD memory card insertion slot
(27)
J “Memory Stick PRO Duo”
media insertion slot (27)
K Memory card cover
L Battery cover (22)
M Tripod receptacle
• Use a tripod with a screw length
of less than 5.5 mm (7/32 inch).
You will be unable to firmly
secure the camera to tripods
having screws longer than 5.5
mm (7/32 inch), and may
damage the camera.
Sides/Bottom