2-055-301-12(1) Professional Disc for DATA Unit BW-RS101/BW-RU101 Professional Disc for DATA Unit User’s Guide GB Guides de l’tilisateur FR Benutzerhandbücher DE Guías del usuario ES Guie dell’utente IT BW-RS101 BW-RU101 © 2004 Sony Corporation
Safety Regulations Owner’s Record Information The model and serial numbers are located on the bottom of the units. Record the serial number in the space provided below. Refer to them whenever you call upon your Sony dealer regarding these products. Model No. BW-RS101, BW-RU101 Serial No._________________________ You are cautioned that any changes or modifications not expressly approved in this manual could void your authority to operate this equipment.
WARNING To prevent fire or shock hazard, do not expose the units to rain or moisture. To avoid electrical shock, do not open the cabinet. Refer servicing to qualified personnel only. Caution As the laser beams used in the BW-RS101 and BW-RU101 are harmful to the eyes, do not attempt to disassemble the units. Refer servicing to qualified personnel only. The use of controls or adjustments or performance of procedures other than those specified herein may result in hazardous radiation exposure.
Table of Contents Safety Regulations ......................................................2 Owner’s Record .............................................................. 2 Information...................................................................... 2 Declaration of Conformity .............................................. 2 WARNING ..................................................................... 3 Chapter 1 Introduction Overview....................................................................
Introduction Chapter Overview Features The Sony BW-RS101/BW-RU101 “Professional Disc for DATA” Unit comes with the following features. • The “Professional Disc for DATA” external optical disc unit uses a shortwave blue violet laser with a wavelength of 405 nm. • The powerful objective lens used for focusing the laser beam has a numerical aperture of 0.85, resulting in a track pitch of only 0.32 µm. This makes writing as much as 23.3 GB of data on one side of a disc possible. • A 0.
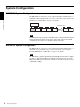
System Configuration BW-RS101 System Configuration Chapter 1 Introduction The BW-RS101 is connected to a host computer through its SCSI interface. A maximum of fifteen peripheral devices can be connected in a daisy chain on the SCSI bus. See “SCSI Cables” on page 13 for details. Host computer SCSI cable 12 m ID=0 BW-RS101 ID=1 ID=2 ID=3 ID=4 ID=5 ID=14 ID=15 SCSI peripheral devices Note The BW-RS101 supports single-ended (SE) and low-voltage differential (LVD) SCSI configurations.
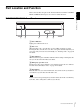
Part Location and Function This section describes the parts of the “Professional Disc for DATA” units BWRS101 and BW-RU101 and gives an overview of their functions. BW-RS101/BW-RU101 Front Panel Chapter 1 Introduction 1 2 3 4 5 A Power indicator Lights green when the unit is on. B Slot cover When inserting a disc, open this slot cover by pulling it toward you. After inserting the disc, close the slot cover. The cover opens automatically when you eject a disc, but you need to close it manually.
BW-RS101 Rear Panel Chapter 1 Introduction 1 2 3 4 5 6 A Function switches Use these switches to set the SCSI ID and unit functions. See “BW-RS101 Function Settings” on page 15 for details B SCSI connectors Connect SCSI cables (sold separately) to these connectors to link the host computer and/or other SCSI devices. C Air duct Air is sucked through the duct for cooling the unit. Note Make sure that you do not block the air duct or impede the air flow. D F.
BW-RU101 Rear Panel 2 3 4 Chapter 1 Introduction 1 5 6 A Function switches Use these switches to set the unit functions. See “BW-RU101 Function Settings” on page 18 for details B USB connector Connect the USB cable supplied to link the host computer and/or the USB Hub. C Air duct Air is sucked through the duct for cooling the unit. Note Make sure that you do not block the air duct or impede the air flow. D F.
Getting Started Chapter Component and Accessory Checklist Upon opening the unit package, make sure that all the components and accessories listed below are present. If you find any missing and/or damaged items, contact your dealer.
BW-RU101 Accessory Checklist • BW-RU101 “Professional Disc for DATA” Unit • Disc (PDDRW23) • Formatting Utility • Guide to Safe Use (Safety Precautions) • Protection cushion sheet • USB 2.
When using the unit placed vertically Be sure to stick the supplied protection cushion sheets to the four points as illustrated bellow before using the unit. Using the unit placed vertically without sticking the cushion sheets may cause scratch the unit and/or unstable operations. How to Stick the Protection Cushion Sheet Stick the protection cushion sheet to the four indentations on the base of the unit.
Connecting the Unit Connecting the BW-RS101 You can connect the unit to one host computer through a SCSI bus that has up to 15 devices connected in a daisy chain. Note Before connecting the unit, make sure to turn off the unit and all the other devices on the SCSI chain. Connect a SCSI cable to the SCSI connecter of the unit to connecting a host computer or another SCSI device.
Connecting the BW-RU101 Connect the unit to the host computer through a USB cable. You can use a USB Hub to connect up to 127 USB devices. Because BW-RU101 supports hot-plug, you can plug in, use, and unplug BW-RU101 without having to shut down the host computer. Note Before connecting the unit, make sure that it is off. 1 Connect the USB cable to the USB connector of the unit. 2 Connect the AC power cord to the AC IN connector of the unit.
Setting Functions/SCSI ID BW-RS101 Function Settings Use the function switches A to P on the rear panel of the unit to set the unit’s functions and SCSI ID according to the host computer and software that you are using. Make sure that the unit is off before setting the switches. ABCDFFGH I J KLMNOP I O Function 1 0 A Terminator Power Supply POWER to the Supply POWER to the terminator enabled terminator disabled B Force CAV All operations are performed in CAV seek mode. Optimum mode enabled.
• Background Formatting This unit is equipped with a background formatting function. To improve the reliability of writing data, executing a physical format before using an unused disc is highly recommended. If you disable the background formatting function, you can start the physical format in the foreground by issuing the FORMAT command. During the format, the unit scans whole sectors of the disc to detect any defect sectors and register them as defective sectors. It takes around 80 minutes to complete.
BW-RS101 SCSI ID Settings Use function switches M to P to set the SCSI ID.
BW-RU101 Function Settings Use function switches B to H on the rear panel of the unit to select the unit's functions according to the host computer and software that you are using. Make sure that the unit is off before setting the switches. ABCDFFGH I J KLMNOP Function 1 I O Switch 0 Chapter 2 Getting Started A Reserved B Force CAV All operations are performed in CAV seek mode. — Optimum mode enabled.
• Background Formatting This unit is equipped with a background formatting function. To improve the reliability of writing data, executing a physical format before using an unused disc is highly recommended. If you disable the background formatting function, you can start the physical format in the foreground by issuing the FORMAT command. During the format, the unit scans whole sectors of the disc to detect any defect sectors and register them as defective sectors. It takes around 80 minutes to complete.
Using Discs Inserting a Disc 1 Turn on the unit. Press the power switch on the rear panel of the unit. Press this mark on the power switch. Chapter 2 Getting Started 2 Start the host computer. Refer to the documentation of the host computer for details. 3 Open the slot cover. Automatic opening Press the eject button to open the slot cover.
Manual opening Open the slot cover by pulling it toward you as illustrated. Chapter 2 Getting Started Note Gently open the slot cover without applying any excessive force. 4 Insert a disc. Insert the disc in the direction illustrated. Note Inserting the disc in the wrong direction may damage the disc and/or unit.
5 Close the slot cover. After confirm the disc is loaded completely, close the slot cover with your finger. Chapter 2 Getting Started Note To prevent dust from entering the unit, be sure to keep the slot cover closed when not inserting or ejecting a disc. 6 Read and/or write data on the disc. Use SCSI commands or software on the host computer to read and/or write data on the disc. The BUSY indicator lit amber except when data is being read/written.
Ejecting a Disc Note Even after data write on the host computer has finished, the BUSY indicator may lit amber to indicate data is being written to the drive. In this case, do not press the eject button. 1 Eject the disc with the EJECT command or by pressing the eject button. 2 Chapter 2 Getting Started The unit automatically opens the slot cover when ejecting the disc. Close the slot cover with your finger after removing the disc from the unit.
What to Do when You Cannot Eject a Disc Emergency Eject Hole If you cannot eject the disc with the eject button or EJECT command, turn off the unit and then use a Phillips precision screwdriver in the emergency-eject hole to eject the disc. Chapter 2 Getting Started 1 Remove the emergency eject hole cover. 2 Insert the Phillips precision screwdriver (diameter of 5 mm) into the emergency-eject hole and turn it counterclockwise while pushing it forward.
About Handling Discs How to Protect Disc Data Chapter 2 Getting Started • Do not drop the disc cartridge or subject it to any violent shocks or vibrations. • Do not disassemble the disc cartridge. It is a precision component that was carefully adjusted prior to shipment. • Do not open the disc cartridge shutter manually or touch the disc inside. The shutter is designed to open automatically when the disc cartridge is inserted into the devices.
Usage Precautions Chapter Unit Usage Precautions Power Supply • Be sure to use 100 to 240 V AC. • Do not share the AC outlet with any other power-consuming equipment such as copying machines or shredders. Handling the Power Cable • Take care not to place or drop anything heavy on the power cable or to damage the cable. Using a damaged cable is dangerous. • Be sure to hold the plug when disconnecting the power cable from the outlet. Pulling the cable may damage the cable.
Ventilation Care should be exercised to prevent the internal mechanisms of the unit from overheating. Be careful not to clog or block the vent, or place the unit in an area with poor ventilation. The unit may stop operating altogether if the internal temperature becomes too high. Moving the unit Be sure to remove the disc cartridge when the unit is not being used. Also never move or transport the unit with the disc cartridge still inserted. While in operation, the disc rotates at a high speed.
Specifications Chapter Specifications Note Specifications are subject to change without notice. Disc Specifications The BW-RS101 and BW-RU101 are compatible with two types of disc. Capacity of the data zone 23.3 GB/disc (2048 bytes/sector) User data transfer rate Sustained write 9 MB/s (CLV) 4.5 to 9.0 MB/s (CAV) Sustained read 10.8 MB/s (CLV) 4.5 to 10.
Controller Block Specifications Host interface BW-RS101 Ultra 160 LVD/SE SCSI SCSI parallel interface-3 (SPI-3) [ANSI NCITS.336:2000] BW-RU101 Hi-Speed USB(USB 2.
Règlements de sécurité Précaution La prise secteur de cet appareil doit être utilisée pour débrancher l’alimentation secteur. S’assurer que les prises sont installées à proximité de l’équipement et qu’elles sont facilement accessibles.
Sommaire Règlements de sécurité ..............................................2 Chapter 1 Introduction Aperçu ..........................................................................4 Caractéristiques ............................................................... 4 Disques compatibles...................................................5 Configuration du système ..........................................5 BW-RS101 Configuration du système............................ 5 BW-RU101 Configuration du système ...
Introduction Chapitre Aperçu Caractéristiques L’unité « Professional Disc for DATA » BW-RS101/BW-RU101 de Sony présente les caractéristiques suivantes. • Le disque optique externe « Professional Disc for DATA » utilise un laser bleu-violet à courte longueur d’onde de 405 nm. • La lentille puissante de l’objectif utilisé pour la focalisation du faisceau laser est dotée d’une ouverture numérique de 0,85, résultant en un entre-axe de pistes de 0,32 µm seulement.
Disques compatibles Les disques BW-RS101 et BW-RU101 sont compatibles avec les deux types de disques. Type Capacité Diamètre du disque PDDRW23 Réinscriptible 23,3 Go 120 mm PDDWO23 Écriture en une fois 23,3 Go 120 mm Chapitre 1 Introduction Nom du disque Configuration du système BW-RS101 Configuration du système Le BW-RS101 est connecté à un ordinateur hôte par son interface SCSI. Jusqu’à quinze périphériques peuvent être connectés en guirlande au bus SCSI.
Localisation et fonction des pièces Cette section décrit les pièces des unités « Professional Disc for DATA » BWRS101 et BW-RU101 avec un aperçu de leurs fonctions. BW-RS101/BW-RU101 Panneau avant Chapitre 1 Introduction 1 2 3 4 5 A Témoin d’alimentation S’allume en vert à la mise sous tension. B Couvercle de la fente d’insertion Pour insérer un disque, ouvrir le couvercle de la fente en le tirant vers soi. Après l’insertion du disque, refermer le couvercle de la fente.
BW-RS101 Panneau arrière 2 3 4 Chapitre 1 Introduction 1 5 6 A Sélecteurs de fonctions Utiliser ces sélecteurs pour définir l’ID SCSI et les fonctions de l’unité. Voir « BW-RS101 Réglages des fonctions », page 13 pour de plus amples informations B Connecteurs SCSI Brancher les câbles SCSI (vendus séparément) à ces connecteurs pour raccorder l’ordinateur hôte et les autres dispositifs SCSI. C Manche à air L’air est aspiré par la manche à air pour permettre le refroidissement de l’unité.
BW-RU101 Panneau arrière Chapitre 1 Introduction 1 2 3 4 5 6 A Sélecteurs de fonctions Utiliser ces sélecteurs pour définir les fonctions de l’unité. Voir « BW-RU101 Réglages des fonctions », page 16 pour de plus amples informations B Connecteur USB Raccorder le câble USB fourni à l’ordinateur hôte. C Manche à air L’air est aspiré par la manche à air pour permettre le refroidissement de l’unité. Remarque S’assurer que la conduite permettant la circulation de l’air n’est ni bloquée ni obstruée.
Démarrage Chapitre Liste de contrôle des composants et accessoires Ouvrir le carton de l’appareil et vérifier que tous les composants et accessoires indiqués ci-dessous s’y trouvent. Si des éléments sont absents ou endommagés, prière de contacter le point d’achat.
Liste de contrôle des accessoires pour BW-RU101 Chapitre 2 Démarrage • Cordon d’alimentation secteur • Unité « Professional Disc for DATA » BW-RU101 • Disque (PDDRW23) • Utilitaire de formatage • Guide d’utilisation de sécurité (Précautions de sécurité) • Feuille rugueuse de protection • Câble USB 2.0 • Mode d’emploi (ce document) Quand l’unité est utilisée en position verticale Avant d’utiliser l’unité, coller la feuille matelassée protectrice à la base de l’unité.
Connexion de l’unité Connexion du BW-RS101 Vous pouvez raccorder l’unité à un ordinateur hôte par un bus SCSI qui peut avoir jusqu’à 15 périphériques connectés en guirlande. Remarque Avant toute connexion, s’assurer que l’unité et tous les autres dispositifs de la chaîne SCSI sont hors tension Connecter un câble SCSI à l’un des connecteurs SCSI de l’appareil.
Connexion du BW-RU101 Raccorder l’unité à l’ordinateur hôte par un câble USB. Un concentrateur USB peut être utilisé pour brancher jusqu’à 127 périphériques USB. De plus, il est possible de brancher et débrancher le câble USB lorsque l’ordinateur est sous tension car le BW-RU101 prend en charge la connexion sous tension. Remarque Avant de connecter l’unité, s’assurer qu’elle est hors tension. 1 Connecter un câble USB à l’un des connecteurs USB de l’appareil.
Définition des fonctions/de l’ID SCSI BW-RS101 Réglages des fonctions Utiliser les sélecteurs de fonctions A à P situés sur le panneau arrière pour définir les fonctions de l’appareil et l’ID SCSI conformément à l’ordinateur hôte et au logiciel utilisés. S’assurer que l’appareil est hors tension avant de modifier les réglages des sélecteurs de fonctions.
Remarque • Réservé* Ne jamais positionner l’un des sélecteurs réservés sur 1. Le changement de réglage des sélecteurs réservés peut entraîner une panne de l’unité. Chapitre 2 Démarrage • Formatage à l’arrière-plan Cette unité est munie d’une fonction de formatage d’arrière plan. Il est recommandé de procéder à un formatage physique avant d’utiliser un disque neuf afin d’améliorer la fiabilité de l’écriture des données.
BW-RS101 Réglages des ID SCSI Utiliser les sélecteurs de fonctions M à P pour régler les ID SCSI.
BW-RU101 Réglages des fonctions Utiliser les sélecteurs de fonctions B à H situés sur le panneau arrière pour sélectionner les fonctions de l’appareil conformément à l’ordinateur hôte et au logiciel utilisés. S’assurer que l’appareil est hors tension avant de modifier les réglages. ABCDFFGH I J KLMNOP I O Sélecteur Fonction 1 0 Chapitre 2 Démarrage A Réservé B Force le mode CAV Toutes les opérations sont effectuées en mode de recherche CAV. Mode optimum activé.
• Formatage à l’arrière-plan Cette unité est munie d’une fonction de formatage d’arrière plan. Il est recommandé de procéder à un formatage physique avant d’utiliser un disque neuf afin d’améliorer la fiabilité de l’écriture des données. Si la fonction de formatage en arrière-plan est désactivée, le formatage physique en arrièreplan peut être lancé avec la commande FORMAT. Au cours du formatage, l’unité balaie l’intégralité du disque pour en détecter les secteurs défectueux et les marquer comme défectueux.
Utilisation des disques Insertion d’un disque 1 Mettre l’unité sous tension. Appuyer sur l’interrupteur d’alimentation situé à l’arrière de l’unité. Appuyer sur cette marque sur l’interrupteur d’alimentation. Chapitre 2 Démarrage 2 Démarrer l’ordinateur hôte. Consulter la documentation de l’ordinateur hôte pour de plus amples informations. 3 Ouvrir le couvercle de la fente d’insertion. Ouverture automatique Appuyer sur le bouton d’éjection pour ouvrir le couvercle de la fente d’insertion.
Ouverture manuelle Ouvrir le couvercle de la fente en le tirant vers soi comme illustré. Chapitre 2 Démarrage Remarque Ouvrir le couvercle de la fente sans forcer. 4 Insérer un disque. Insérer le disque dans le sens indiqué. Remarque L’insertion du disque dans le mauvais sens peut endommager le disque ou l’unité.
5 Fermer le couvercle de la fente d’insertion. Une fois le disque complètement inséré, refermer le couvercle de la fente. Chapitre 2 Démarrage Remarque Pour empêcher la saleté et la poussière de pénétrer dans l’unité, tenir le couvercle de la fente fermé quand un disque n’est pas inséré ou éjecté. 6 Lire et/ou écrire les données sur le disque. Utiliser les commandes SCSI ou du logiciel sur l’ordinateur hôte pour la lecture et/ou l’écriture des données sur le disque.
Éjection d’un disque Remarque Même après la fin de l’écriture des données sur l’ordinateur hôte, les témoins d’occupation (BUSY) peuvent rester allumés en orange pour indiquer que les données sur en cours d’écriture sur le lecteur. Dans ce cas, ne pas appuyer sur le bouton d’éjection. 1 Éjecter le disque en utilisant la commande EJECT ou en appuyant sur le bouton d’éjection. Chapitre 2 Démarrage L’appareil ouvre automatiquement le couvercle de la fente d’insertion pour éjecter le disque.
Que faire quand le disque ne s’éjecte pas Trou d’éjection de secours Si le disque ne s’éjecte pas après l’appui sur le bouton d’éjection ou le lancement de la commande EJECT, mettre l’unité hors tension et insérer un tournevis de précision Phillips dans le trou d’éjection de secours pour éjecter le disque. Chapitre 2 Démarrage 1 Retirer le couvercle du trou d’éjection de secours.
Manutention des disques Comment protéger les données des disques Chapitre 2 Démarrage • Ne pas laisser tomber la cartouche disque et ne pas la soumettre à des chocs ou des vibrations violents. • Ne pas démonter la cartouche disque. C’est un composant de précision qui a été soigneusement ajusté avant l’expédition. • Ne pas ouvrir l’obturateur de la cartouche disque et ne pas toucher le disque à l’intérieur.
Précautions d’utilisation Chapitre Précautions d’utilisation de l’unité Alimentation • Utiliser toujours 100 à 240 V ca. • Ne pas partager la prise secteur avec un équipement à la consommation électrique élevée comme les photocopieurs ou les machines à détruire les documents. Manutention du câble d’alimentation • Faire attention de ne placer ou laisser tomber d’objets lourds sur le câble d’alimentation ou de ne pas endommager le câble de toute autre façon.
Ventilation Toutes les précautions doivent être prises pour empêcher la surchauffe des mécanismes internes de l’unité. Faire attention de ne pas bloquer ni obstruer les bouches de ventilation et de ne pas placer l’unité dans un endroit mal ventilé. L’unité peut complètement s’arrêter de fonctionner si la température interne devient trop élevée. Déplacement de l’unité Sortir la cartouche disque quand l’unité n’est pas utilisée. Ne jamais déplacer ou transporter l’unité avec la cartouche disque insérée.
Spécifications Chapitre Spécifications Remarque Les spécifications sont sujettes à changement sans préavis.
Spécifications du bloc contrôleur Interface hôte BW-RS101 Ultra 160 LVD/SE SCSI SCSI Parallel Interface-3 (SPI-3) [ANSI NCITS.336:2000] BW-RU101 Hi-Speed USB (USB 2.
Sicherheitsvorschriften WARNUNG Zur Vermeidung von Bränden oder der Gefahr eines elektrischen Schlages darf das Gerät weder Regen noch Feuchtigkeit ausgesetzt werden. Zur Vermeidung eines elektrischen Schlages darf das Gehäuse des Gerätes nicht geöffnet werden. Wartungsarbeiten dürfen nur von qualifiziertem Fachpersonal ausgeführt werden. Achtung Die in den Geräten BW-RS101 und BW-RU101 verwendeten Laserstrahlen können das Auge schädigen. Zerlegen Sie daher die Einheiten unter keinen Umständen.
Inhaltsverzeichnis Sicherheitsvorschriften ..............................................2 WARNUNG.................................................................... 2 Chapter 1 Einführung Überblick ......................................................................4 Eigenschaften .................................................................. 4 Kompatible Discs ........................................................5 Systemkonfiguration...................................................
Einführung Kapitel Überblick Eigenschaften Die Sony BW-RS101/BW-RU101 „Professional Disc for DATA“-Einheit zeichnet sich durch die folgenden Eigenschaften aus: • Das externe optische Speichergerät „Professional Disc for DATA“ verwendet einen Blau-Violett-Kurzwellenlaser mit einer Wellenlänge von 405 nm. • Die leistungsstarke Objektivlinse zur Fokussierung des Laserstrahls weist eine numerische Blende von 0,85 auf, wodurch ein Spurabstand von nur 0,32 µm erreicht wird.
Kompatible Discs Die Modelle BW-RS101 und BW-RU101 sind kompatibel mit zwei Typen von Discs. Typ Kapazität Durchmesser der Disc PDDRW23 Wiederbeschreibbar 23,3 GB 120 mm PDDWO23 Einmal beschreibbar 23,3 GB 120 mm Kapitel1 Einführung Name der Disc Systemkonfiguration BW-RS101 Systemkonfiguration Das ModellBW-RS101 wird über die SCSI-Schnittstelle an einen Hostcomputer angeschlossen. An den SCSI-Bus können bis zu fünfzehn Peripheriegeräte in einer Daisy Chain angeschlossen werden.
Position und Funktion der Komponenten Dieser Abschnitt beschreibt die Komponenten der „Professional Disc for DATA“ -Einheiten BW-RS101 und BW-RU101 gibt einen Überblick über ihre Funktionen. Kapitel1 Einführung BW-RS101/BW-RU101 Frontblende 1 2 3 4 5 A Betriebsanzeige Leuchtet grün, wenn die Einheit eingeschaltet ist.
BW-RS101 Rückseitenblende 2 3 4 Kapitel1 Einführung 1 5 6 A Funktionsschalter Verwenden Sie diese Schalter zum Einstellen der SCSI-ID und der Gerätefunktionen. Einzelheiten hierzu finden Sie im Abschnitt „BW-RS101 Funktionseinstellungen“ auf Seite 13. B SCSI-Anschlüsse Schließen Sie hier (separat erhältliche) SCSI-Kabel an, um das Gerät mit dem Hostcomputer und anderen SCSI-Geräten zu verbinden. C Lüftungsöffnungen Zur Kühlung des Gerätes wird Luft durch die Lüftungsöffnung angesaugt.
BW-RU101 Rückseitenblende Kapitel1 Einführung 1 2 3 4 5 6 A Funktionsschalter Verwenden Sie diese Schalter zum Einstellen der Gerätefunktionen. Einzelheiten hierzu finden Sie im Abschnitt „BW-RU101 Funktionseinstellungen“ auf Seite 16. B USB-Anschluss Schließen Sie hier das mitgelieferte USB-Kabel an, um das Gerät mit dem Hostcomputer zu verbinden. C Lüftungsöffnungen Zur Kühlung des Gerätes wird Luft durch die Lüftungsöffnung angesaugt.
Erste Schritte Kapitel Checkliste Komponenten und Zubehör Überprüfen Sie beim Öffnen der Verpackung, dass sämtliche im Folgenden aufgeführten Komponenten und Zubehörteile vorhanden sind. Wenden Sie sich an den Verkäufer, wenn Teile fehlen oder beschädigt sein sollten.
BW-RU101 Zubehör Kapitel2 Erste Schritte • Netzkabel • BW-RU101 „Professional Disc for DATA“-Einheit • Disc (PDDRW23) • Formatierungs-Dienstprogramm • Sicherheitshinweise • Schutzpolster • USB 2.0-Kabel • Benutzerhandbuch (dieses Dokument) Beim Verwenden der Einheit in aufrechter Position Kleben Sie vor der Verwendung der Einheit das mitgelieferte Schutzpolster auf den Boden der Einheit, um ein Verkratzen zu verhindern und Funktionsstörungen durch einen instabilen Stand zu vermeiden.
Anschließen der Einheit Anschließen des Modells BW-RS101 Sie können die Einheit über einen SCSI-Bus mit bis zu 15 in einer Daisy-ChainKonfiguration angeschlossenen Geräten an einen Hostcomputer anschließen. Hinweis Stellen Sie vor dem Anschließen der Einheit sicher, dass die Einheit und alle anderen Geräte der SCSI-Kette abgeschaltet sind. Verbinden Sie ein SCSI-Kabel mit einem der SCSI-Anschlüsse der Einheit.
Anschließen des Modells BW-RU101 Schließen Sie Einheit über ein USB-Kabel an den Host-Computer an. Über einen USB können Sie bis zu127 USB-Geräte anschließen. Das USB-Kabel kann bei eingeschaltetem Hostcomputer angeschlossen und getrennt werden, da BW-RU101 hotplug-fähig ist. Hinweis Stellen Sie vor dem Anschließen sicher, dass die Einheit abgeschaltet ist. 1 Schließen Sie ein USB-Kabel an den USB-Anschluss der Einheit an. 2 Schließen Sie ein Netzkabel an den Netzanschluss der Einheit an.
Einstellen der Funktionen/SCSI-ID BW-RS101 Funktionseinstellungen Stellen Sie mit den Funktionsschaltern A bis P auf der Rückseite des Gerätes die Gerätefunktionen und die SCSI-ID entsprechend dem verwendeten Hostcomputer und der verwendeten Software ein. Stellen Sie sicher, dass die Einheit abgeschaltet ist, ehe Sie Änderungen an den Stellungen der Funktionsschalter vornehmen.
• Formatierung im Hintergrund Die Einheit ist mit einer Funktion zur Formatierung im Hintergrund ausgestattet. Es wird empfohlen, noch nicht verwendete Discs vor dem Gebrauch physisch zu formatieren, um die Zuverlässigkeit der Schreibvorgänge zu erhöhen. Wenn Sie die Formatierung im Hintergrund deaktivieren, können Sie die physische Formatierung mit dem Befehl FORMAT starten. Bei der Formatierung überprüft die Einheit alle Sektoren der Disc. Defekte Sektoren werden erkannt und als defekt registriert.
BW-RS101 SCSI-ID-Einstellungen Verwenden Sie zum Einstellen der SCSI-ID die Funktionsschalter M bis P.
BW-RU101 Funktionseinstellungen Stellen Sie mit den Funktionsschaltern B bis H auf der Rückseite des Gerätes die Gerätefunktionen entsprechend dem verwendeten Hostcomputer und der verwendeten Software ein. Stellen Sie sicher, dass die Einheit abgeschaltet ist, ehe Sie Änderungen an den Schalterstellungen vornehmen. ABCDFFGH I J KLMNOP Funktion 1 I O Schalter 0 Kapitel2 Erste Schritte A Reserviert B CAV erzwingen Alle Vorgänge werden Optimaler Modus im CAV-Suchmodus aktiviert. ausgeführt.
• Formatierung im Hintergrund Die Einheit ist mit einer Funktion zur Formatierung im Hintergrund ausgestattet. Es wird empfohlen, noch nicht verwendete Discs vor dem Gebrauch physisch zu formatieren, um die Zuverlässigkeit der Schreibvorgänge zu erhöhen. Wenn Sie die Formatierung im Hintergrund deaktivieren, können Sie die physische Formatierung mit dem Befehl FORMAT starten. Bei der Formatierung überprüft die Einheit alle Sektoren der Disc. Defekte Sektoren werden erkannt und als defekt registriert.
Verwenden von Discs Einlegen eines Mediums 1 Schalten Sie die Einheit ein. Betätigen Sie den Netzschalter auf der Rückseite der Einheit. Auf diese Seite des Netzschalters drücken. Kapitel2 Erste Schritte 2 Schalten Sie den Hostcomputer ein. Einzelheiten hierzu finden Sie in der Dokumentation des Hostcomputers. 3 Öffnen Sie die Laufwerksabdeckung. Automatische Öffnung Drücken Sie die Auswurftaste, um die Laufwerksabdeckung zu öffnen.
Manuelle Öffnung Öffnen Sie die Laufwerksabdeckung, indem Sie diese, wie in der Abbildung gezeigt, zu sich heranziehen. Kapitel2 Erste Schritte Hinweis Öffnen Sie die Laufwerksabdeckung vorsichtig, ohne übermäßig viel Kraft anzuwenden. 4 Legen Sie ein Medium ein. Legen Sie das Medium entsprechend der Abbildung ein. Hinweis Richtungsverkehrtes Einlegen des Mediums kann das Medium oder die Einheit beschädigen.
5 Schließen Sie die Laufwerksabdeckung. Schließen Sie die Laufwerksabdeckung, nachdem Sie das Medium vollständig eingelegt haben. Kapitel2 Erste Schritte Hinweis Um das Eindringen von Schmutz und Staub in die Einheit zu verhindern, halten Sie die Laufwerksabdeckung geschlossen, solange Sie kein Medium einlegen oder auswerfen. 6 Lesen und/oder schreiben Sie Daten auf das Medium. Lesen und/oder schreiben Sie Daten mit SCSI-Befehlen -oder Software auf dem Hostcomputer auf das Medium.Während des Lese- bzw.
Auswerfen eines Mediums Hinweis Auch wenn der Schreibvorgang der Daten auf dem Hostcomputer abgeschlossen ist, leuchtet möglicherweise die Aktivitätsanzeige orange auf, da noch Daten auf dem Laufwerk geschrieben werden. Drücken Sie in diesem Fall nicht die Auswurftaste. 1 Werfen Sie die Disc mit dem Befehl EJECT oder durch Drücken der Auswurftaste aus. Kapitel2 Erste Schritte Die Einheit öffnet beim Auswerfen der Disc automatisch die Laufwerksabdeckung.
Wenn sich ein Medium nicht auswerfen lässt Notauswurföffnung Wenn sich die Disc nicht mit der Auswurftaste oder dem SCSI-Befehl „EJECT“ auswerfen lässt, schalten Sie die Einheit ab und werfen Sie die Disc mit einem Feinmechanik-Kreuzschlitzschraubendreher aus. Kapitel2 Erste Schritte 1 Entfernen Sie die Abdeckung für die Notauswurföffnung. 2 Führen Sie den Feinmechanik-Kreuzschlitzschraubendreher(Durchmesser 5 mm) in die Notauswurföffnung ein und drehen Sie ihn unter Druck entgegen dem Uhrzeigersinn.
Umgang mit Medien Schützen der Daten auf einem Medium Kapitel2 Erste Schritte • Lassen Sie Disc Cartridges nicht fallen und schützen Sie sie vor Erschütterungen und Vibrationen. • Zerlegen Sie Disc Cartridges nicht. Disc Cartridges sind Präzisionskomponenten, die vor der Auslieferung sorgfältig eingestellt wurden. • Öffnen Sie auf keinen Fall manuell die Abdeckung der Disc Cartridge und berühren Sie nicht den Datenträger im Inneren der Cartridge.
Vorsichtsmaßnahmen Kapitel Vorsichtsmaßnahmen beim Gebrauch der Einheit Stromversorgung • Verwenden Sie eine Netzspannung von 100 bis 240 V Wechselstrom. • Schließen Sie keine weiteren Verbraucher wie Kopierer oder Schalter an die Steckdose an. Umgang mit dem Stromkabel • Achten Sie darauf, keine schweren Gegenstände auf das Kabel zu stellen oder Stromkabel fallen zu lassen, da dies das Kabel beschädigen kann. Die Verwendung eines beschädigten Kabels ist gefährlich.
Belüftung Die inneren Mechanismen der Einheit sind vor Überhitzung zu schützen. Achten Sie darauf, dass die Lüftungsöffnung nicht verdeckt wird, und stellen Sie die Einheit nur an gut belüfteten Orten auf. Bei zu hoher Innentemperatur unterbricht die Einheit den Betrieb. Transportieren der Einheit Entnehmen Sie stets die Disc Cartridge, wenn das Laufwerk nicht verwendet wird. Transportieren oder bewegen Sie die Einheit niemals mit eingelegter Disc Cartridge.
Spezifikationen Kapitel Spezifikationen Hinweis Die Spezifikationen können ohne vorherige Ankündigung geändert werden. Disc-Spezifikationen Die Modelle BW-RS101 und BW-RU101 sind kompatibel mit zwei Typen von Discs.
Spezifikationen des Controllerblocks Hostschnittstelle BW-RS101 Ultra 160 LVD/SE SCSI SCSI-Parallelschnittstelle -3 (SPI-3) [ANSI NCITS.336:2000] BW-RU101 Hi-Speed USB (USB 2.0) Burst-Datenrate BW-RS101 160 MB/s Synchron (max.) BW-RU101 480 MB/s (max.
Normas de seguridad Precaución Para desconectar la corriente se debe utilizar el enchufe del cable de alimentación de este equipo. Asegúrese de que las tomas de corriente estén instaladas cerca del equipo y que sean de fácil acceso.
Tabla de contenido Normas de seguridad..................................................2 Chapter 1 Introducción Descripción general ....................................................4 Características ................................................................. 4 Discos compatibles.....................................................5 Configuración del sistema..........................................5 Configuración del sistema para la unidad BW-RS101 ...
Introducción Capítulo Descripción general Características La unidad “Professional Disc for DATA” BW-RS101/BW-RU101 de Sony se entrega con las características siguientes. • La unidad de disco óptico externo “Professional Disc for DATA” utiliza un láser azul violeta de onda corta con una longitud de onda de 405 nm. • La potente lente objetiva que se utiliza para enfocar el rayo de láser dispone de una apertura numérica de 0,85, lo que permite una distancia entre pistas de sólo 0,32 µm.
Discos compatibles Los modelos BW-RS101 y BW-RU101 son compatibles con dos tipos de discos. Tipo Capacidad Diámetro del disco PDDRW23 Regrabable 23,3 GB 120 mm PDDWO23 Una sola grabación 23,3 GB 120 mm Capítulo 1 Introducción Nombre del disco Configuración del sistema Configuración del sistema para la unidad BW-RS101 La unidad BW-RS101 se conecta a un ordenador principal mediante su interfaz SCSI. Se puede conectar un máximo de quince dispositivos periféricos en cadena al bus SCSI.
Ubicación y función de los componentes En esta sección se describen los componentes de las unidades “Professional Disc for DATA” BW-RS101 y BW-RU101, y se ofrece una descripción general de sus funciones. Capítulo 1 Introducción Panel frontal de la unidad BW-RS101/BW-RU101 1 2 3 4 5 A Indicador de alimentación Se ilumina en verde cuando la unidad está encendida. B Cubierta de la ranura Al insertar un disco, abra esta cubierta de la ranura empujándola hacia usted.
Panel posterior de la unidad BW-RS101 2 3 4 Capítulo 1 Introducción 1 5 6 A Conmutadores de función Utilice estos conmutadores para ajustar la identificación SCSI y las funciones de la unidad. Consulte “Configuración de las funciones de la unidad BWRS101” en la página 13 para obtener más información. B Conectores SCSI Conecte los cables SCSI (se venden por separado) a estos conectores para enlazar el ordenador principal con otros dispositivos SCSI.
Panel posterior de la unidad BW-RU101 Capítulo 1 Introducción 1 2 3 4 5 6 A Conmutadores de función Utilice estos conmutadores para ajustar las funciones de la unidad. Consulte “Configuración de las funciones de la unidad BW-RU101” en la página 16 para obtener más información. B Conector USB Conecte el cable USB suministrado para enlazar con el ordenador principal. C Conducto de aire El aire se aspira a través del conducto de refrigeración de la unidad.
Procedimientos iniciales Capítulo Lista de componentes y accesorios Cuando abra el paquete de la unidad, asegúrese de que estén presentes todos los componentes y accesorios que se indican a continuación. Si existen daños o falta algún accesorio, póngase en contacto con el lugar de adquisición.
Lista de accesorios de la unidad BW-RU101 Capítulo 2 Procedimientos iniciales • Cable de alimentación de ca • Unidad “Professional Disc for DATA” BW-RU101 • Disco (PDDRW23) • Utilidad de formateo • Guía para un uso seguro (precauciones de seguridad) • Lámina de protección • Cable USB 2.0 • Guía del usuario (este documento) Si utiliza la unidad en posición vertical Antes de utilizar la unidad, pegue la lámina de protección suministrada en la base de la unidad.
Conexión de la unidad Conexión de la unidad BW-RS101 Puede conectar la unidad a un ordenador principal mediante un bus SCSI que tenga hasta 15 dispositivos conectados en cadena. Nota Antes de conectar la unidad, asegúrese de que ésta y los demás dispositivos de la cadena SCSI estén apagados. Conecte un cable SCSI a uno de los conectores SCSI de la unidad.
Conexión de la unidad BW-RU101 Conecte la unidad al ordenador principal mediante un cable USB. Puede utilizar un concentrador USB para conectar hasta 127 dispositivos USB. Además, puede conectar y desconectar el cable USB mientras el ordenador principal esté encendido ya que BW-RU101 admite hot plugging. Nota Antes de conectar la unidad, asegúrese de que esté apagada. 1 Conecte un cable USB al conector USB de la unidad. 2 Conecte el cable de alimentación de ca al conector CA IN de la unidad.
Configuración de las funciones/SCSI ID Configuración de las funciones de la unidad BW-RS101 Utilice los conmutadores de función A a P del panel posterior de la unidad para ajustar las funciones de la misma y la identificación SCSI según el ordenador principal y el software que utilice. Asegúrese de que la unidad esté apagada antes de modificar la posición de los conmutadores de función.
Nota • Reservado* No ajuste ninguno de los conmutadores reservados en 1. Si se cambia la configuración de los conmutadores reservados podría provocar el fallo de la unidad. Capítulo 2 Procedimientos iniciales • Formateo en segundo plano Esta unidad está equipada con una función de formateo en segundo plano. Para mejorar la fiabilidad de escritura de datos, se recomienda encarecidamente ejecutar un formateo físico antes de utilizar un disco por primera vez.
Configuración de la identificación SCSI de la unidad BW-RS101 Utilice los conmutadores de función M a P para definir la identificación SCSI.
Configuración de las funciones de la unidad BW-RU101 Utilice los conmutadores de función B a H del panel posterior de la unidad para seleccionar las funciones de la unidad según el ordenador principal y el software que utilice. Asegúrese de que la unidad esté apagada antes de modificar la posición de los conmutadores. ABCDFFGH I J KLMNOP I O Conmutador Función 1 0 Capítulo 2 Procedimientos iniciales A Reservado B Forzar CAV Todas las operaciones se realizan en el modo de búsqueda CAV.
• Formateo en segundo plano Esta unidad está equipada con una función de formateo en segundo plano. Para mejorar la fiabilidad de escritura de datos, se recomienda encarecidamente ejecutar un formateo físico antes de utilizar un disco por primera vez. Si desactiva la función de formateo en segundo plano, podrá iniciar el formateo físico en segundo plano mediante el comando FORMAT.
Utilización de los discos Inserción de un disco 1 Encienda la unidad. Pulse el interruptor de alimentación que se encuentra en el panel posterior de la unidad. Capítulo 2 Procedimientos iniciales Pulse esta marca del interruptor de alimentación. 2 Inicie el ordenador principal. Consulte la documentación del ordenador principal para obtener los detalles. 3 Abra la cubierta de la ranura. Apertura automática Pulse el botón de expulsión para abrir la cubierta de la ranura.
Apertura manual Abra la cubierta de la ranura tirando de ella hacia usted, como se muestra en la ilustración. Capítulo 2 Procedimientos iniciales Nota Abra suavemente la cubierta de la ranura sin ejercer una fuerza excesiva. 4 Inserte un disco. Inserte el disco en la dirección indicada. Nota Si inserta el disco en la dirección equivocada, puede provocar daños en el mismo o en la unidad.
5 Cierre la cubierta de la ranura. Cuando el disco esté completamente insertado, cierre la cubierta de la ranura. Capítulo 2 Procedimientos iniciales Nota Para evitar que entre suciedad o polvo en la unidad, asegúrese de mantener la cubierta de la ranura cerrada mientras no inserte o expulse un disco. 6 Leer y/o escribir datos en el disco. Utilice comandos SCSI o software del ordenador principal para leer y/o escribir datos en el disco.
Expulsión de un disco Nota Aunque haya finalizado la escritura de datos en el ordenador principal, el indicador de ocupado puede iluminarse en naranja para indicar que se están escribiendo datos en la unidad. En este caso, no pulse el botón de expulsión. 1 Para expulsar el disco, utilice el comando EJECT o pulse el botón de expulsión. 2 Capítulo 2 Procedimientos iniciales La unidad abre automáticamente la cubierta de la ranura al expulsar el disco.
Qué hacer si el disco no se expulsa Orificio de expulsión de emergencia Si no es posible expulsar el disco mediante el botón de expulsión o el comando EJECT, apague la unidad y, a continuación, utilice un destornillador de precisión Phillips en el orificio de expulsión de emergencia para expulsar el disco. Capítulo 2 Procedimientos iniciales 1 Retire la cubierta del orificio de expulsión de emergencia.
Acerca del manejo de los discos Cómo proteger los datos del disco Selector de protección contra escritura Capítulo 2 Procedimientos iniciales • No deje caer el cartucho de disco ni lo someta a golpes violentos o vibraciones. • No desmonte el cartucho de disco. Se trata de un componente de precisión que se ha ajustado cuidadosamente antes de su envío. • No abra manualmente el cierre del cartucho de disco ni toque el interior del disco.
Precauciones de uso Capítulo Precauciones de uso de la unidad Fuente de alimentación • Asegúrese de utilizar ca de 100 a 240 V. • No comparta la toma de corriente de ca con otro equipo que consuma energía como, por ejemplo, copiadoras o trituradoras. Manejo del cable de alimentación • Procure no colocar ni dejar caer ningún objeto pesado sobre el cable de alimentación, ni provocar daños en el mismo. Es peligroso utilizar un cable dañado.
Ventilación Deberá tenerse cuidado para evitar que los mecanismos interiores de la unidad se calienten excesivamente. No tape ni bloquee los orificios de ventilación ni coloque la unidad en lugares con ventilación escasa. La unidad puede dejar de funcionar si la temperatura interna aumenta demasiado. Traslado de la unidad Asegúrese de extraer el cartucho de disco cuando no utilice la unidad. No la mueva ni la transporte con ningún cartucho de disco en el interior.
Especificaciones Capítulo Especificaciones Nota Estas especificaciones pueden estar sujetas a cambios sin previo aviso. Especificaciones de los discos Los modelos BW-RS101 y BW-RU101 son compatibles con dos tipos de discos. Capacidad de la zona de datos 23,3 GB/disco (2.
Especificaciones del bloque del controlador Interfaz del ordenador principal BW-RS101 Ultra SCSI 160 LVD/SE Interfaz paralelo SCSI 3 (SPI-3) [ANSI NCITS.336:2000] BW-RU101 Hi-Speed USB (USB 2.
Norme di sicurezza Precauzioni Per scollegare l’alimentazione, è necessario utilizzare le apposite spine elettriche del dispositivo. Verificare che le prese elettriche siano installate nei pressi del dispositivo e che siano facilmente accessibili.
Sommario Norme di sicurezza......................................................2 Chapter 1 Introduzione Descrizione generale...................................................4 Caratteristiche ................................................................. 4 Dischi compatibili........................................................4 Configurazione di sistema..........................................5 Configurazione di sistema di BW-RS101....................... 5 Configurazione di sistema di BW-RU101 ..
Introduzione Capitolo Descrizione generale Caratteristiche L’unità Sony BW-RS101/BW-RU101 “Professional Disc for DATA” possiede le seguenti caratteristiche. • L’unità disco ottica esterna “Professional Disc for DATA” utilizza un laser blu-viola a onde corte con una lunghezza d’onda pari a 405 nm. • La lente del potente obiettivo utilizzata per dirigere il raggio laser possiede un’apertura numerica pari a 0,85, con una spaziatura tra le tracce di soli 0.32 µm.
Configurazione di sistema Configurazione di sistema di BW-RS101 Capitolo 1 Introduzione BW-RS101 è connesso a un computer host mediante la relativa interfaccia SCSI. Al bus SCSI è possibile collegare fino a quindici dispositivi in configurazione daisy chain. Per informazioni dettagliate, consultare “Cavi SCSI” a pagina 11.
Posizione e funzione delle parti Questa sezione descrive le parti delle unità “Professional Disc for DATA” BWRS101 e BW-RU101 e fornisce una descrizione generale delle relative funzioni. Pannello anteriore di BW-RS101/BW-RU101 Capitolo 1 Introduzione 1 2 3 4 5 A Indicatore di alimentazione Se l’unità è accesa, si illumina di luce verde. B Sportello dell’alloggiamento Per inserire un disco, aprire lo sportello dell’alloggiamento tirandolo verso di sé.
Pannello posteriore di BW-RS101 2 3 4 Capitolo 1 Introduzione 1 5 6 A Interruttori di funzione Utilizzare questi interruttori per impostare l’ID SCSI e le funzioni dell’unità. Per informazioni dettagliate, consultare “Impostazione delle funzioni di BWRS101” a pagina 13. B Connettori SCSI Collegare a questi connettori i cavi SCSI (in vendita separatamente) tra il computer host e gli altri dispositivi SCSI. C Condotto aria L’aria viene aspirata attraverso il condotto per raffreddare l’unità.
Pannello posteriore di BW-RU101 Capitolo 1 Introduzione 1 2 3 4 5 6 A Interruttori di funzione Utilizzare questi interruttori per impostare le funzioni dell’unità. Per informazioni dettagliate, consultare “Impostazione delle funzioni di BWRU101” a pagina 16. B Connettore USB Connettere il cavo USB in dotazione per collegare il computer host. C Condotto aria L’aria viene aspirata attraverso il condotto per raffreddare l’unità.
Guida introduttiva Capitolo Elenco componenti e accessori Dopo aver aperto l’imballaggio, verificare che siano presenti tutti i componenti e gli accessori elencati di seguito. Se alcuni componenti risultassero mancanti o danneggiati, contattare il rivenditore presso cui è stato effettuato l’acquisto.
Elenco accessori per BW-RU101 Capitolo 2 Guida introduttiva • Cavo di alimentazione • Unità “Professional Disc for DATA” BW-RU101 • Disco (PDDRW23) • Utility di formattazione • Guida all’uso (norme di sicurezza) • Strato protettivo • Cavo USB 2.0 • Istruzioni per l’uso (questo manuale) Utilizzo dell’unità in posizione verticale Prima di utilizzare l’unità, applicare sulla base lo strato protettivo fornito, per evitare che l’unità si graffi.
Collegamento dell’unità Collegamento del modello BW-RS101 Tramite un bus SCSI è possibile collegare l’unità a un computer host a cui sono collegati fino a 15 dispositivi in configurazione daisy chain. Nota Prima di collegare l’unità, verificare che questa e tutti gli altri dispositivi della catena SCSI siano spenti. Collegare un cavo SCSI a uno dei connettori SCSI dell’unità.
Collegamento del modello BW-RU101 Collegare l’unità al computer host con un cavo USB. Utilizzando un hub USB, è possibile collegare fino a 127 dispositivi USB. Il cavo USB può inoltre essere collegato e scollegato anche quando il computer host è in funzione, poiché BW-RU101 supporta la sostituzione a caldo. Nota Prima di collegare l’unità, verificare che questa sia spenta. 1 Collegare un cavo USB al connettore USB dell’unità. 2 Collegare il cavo di alimentazione al corrispondente connettore dell’unità.
Funzioni di impostazione/ID SCSI Impostazione delle funzioni di BW-RS101 Utilizzare gli interruttori di funzione da A a P presenti sul pannello posteriore dell’unità per impostare le relative funzioni e l’ID SCSI in base al computer host e al software in uso. Prima di modificare le impostazioni degli interruttori di funzione, verificare che l’unità sia spenta.
Nota • Dedicato* Evitare di impostare su 1 gli interruttori dedicati, perché la modifica di tale impostazione può causare danni all’unità. Capitolo 2 Guida introduttiva • Formattazione in background Questa unità è dotata di una funzione che consente la formattazione in background. Per aumentare l’affidabilità della scrittura dei dati, è consigliabile eseguire una formattazione fisica prima di registrare un qualsiasi disco non utilizzato.
BW-RS101 Impostazione dell’ID SCSI Utilizzare gli interruttori di funzione da M a P per impostare l’ID SCSI.
Impostazione delle funzioni di BW-RU101 Utilizzare gli interruttori di funzione da B a H presenti sul pannello posteriore dell’unità per selezionare le relative funzioni in base al computer host e al software in uso. Prima di modificare le impostazioni degli interruttori, verificare che l’unità sia spenta. ABCDFFGH I J KLMNOP Funzione 1 I O Interrutt ore 0 Capitolo 2 Guida introduttiva A Dedicato B CAV forzata Tutte le operazioni sono eseguite in modalità di ricerca CAV.
• Formattazione in background Questa unità è dotata di una funzione che consente la formattazione in background. Per aumentare l’affidabilità della scrittura dei dati, è consigliabile eseguire una formattazione fisica prima di registrare un qualsiasi disco non utilizzato. Se si disattiva la funzione di formattazione in background, è possibile avviare la formattazione fisica in primo piano inviando il comando di FORMATTAZIONE.
Utilizzo dei dischi Inserimento di un disco 1 Accendere l’unità. Premere il tasto di accensione situato nel pannello posteriore dell’unità. Premere questo simbolo sul tasto di accensione. Capitolo 2 Guida introduttiva 2 Avviare il computer host. Per informazioni dettagliate, consultare la documentazione fornita con il computer host. 3 Aprire lo sportello dell’alloggiamento. Apertura automatica Per aprire lo sportello dell’alloggiamento, premere il tasto di espulsione.
Apertura manuale Aprire il coperchio dell’alloggiamento tirandolo verso di sè, come illustrato. Capitolo 2 Guida introduttiva Nota Aprire delicatamente il coperchio dell’alloggiamento, senza esercitare una forza eccessiva. 4 Inserire un disco. Inserire il disco nella direzione illustrata. Nota L’inserimento del disco in direzione errata può danneggiare il disco stesso o l’unità.
5 Chiudere lo sportello dell’alloggiamento. Dopo aver completamente inserito il disco, chiudere lo sportello. Capitolo 2 Guida introduttiva Nota Per impedire a polvere e sporco di entrare nell’unità, accertarsi che il coperchio dell’alloggiamento sia sempre chiuso, tranne quando si inseriscono o si estraggono i dischi. 6 Lettura e/o scrittura dei dati sul disco. Per leggere e/o scrivere i dati su un disco, utilizzare i comandi SCSI o il software del computer host.
Espulsione di un disco Nota Anche se la scrittura dei dati sul computer host è terminata, è possibile che l’indicatore di unità OCCUPATA rimanga illuminato (arancione), per indicare che è in corso la scrittura dei dati sull’unità. In questo caso, non premere il tasto di espulsione. 1 Espellere il disco utilizzando il comando di ESPULSIONE o premendo l’apposito tasto. 2 Capitolo 2 Guida introduttiva Durante l’espulsione del disco, l’unità apre automaticamente lo sportello dell’alloggiamento.
Se la cartuccia disco non viene espulsa Foro per espulsione di emergenza Se utilizzando il tasto di espulsione o il comando corrispondente il disco non viene espulso, per estrarlo spegnere l’unità e inserire un cacciavite a croce di precisione nel foro per l’espulsione di emergenza.
Uso dei dischi Protezione dei dati su disco Protezione dei dati Capitolo 2 Guida introduttiva • Non lasciar cadere le cartucce e non esporle a vibrazioni o urti violenti. • Non smontare le cartucce. Si tratta infatti di componenti di precisione, tarati con estrema cura prima della spedizione. • Non aprire manualmente la finestrella della cartuccia e non toccare l’interno del disco. Tale finestrella è progettata per aprirsi automaticamente al momento dell’inserimento del disco nell’unità.
Precauzioni per l’uso Capitolo Precauzioni per l’uso dell’unità Alimentazione elettrica • Utilizzare corrente alternata con tensione compresa tra 100 e 240 V. • Non condividere la stessa presa di corrente con altre attrezzature elettriche, quali fotocopiatrici o distruggi-documenti. Uso del cavo di alimentazione • Non posizionare e non lasciar cadere oggetti pesanti sul cavo di alimentazione e prestare attenzione a non danneggiarlo. L’utilizzo di un cavo danneggiato può risultare pericoloso.
Ventilazione È necessario prestare attenzione a evitare il surriscaldamento dei meccanismi interni dell’unità. Evitare di ostacolare o bloccare l’apertura o posizionare l’unità in un’area con ventilazione insufficiente. Se la temperatura interna aumenta eccessivamente, l’unità potrebbe smettere di funzionare all’improvviso. Spostamento dell’unità Accertarsi di rimuovere le cartucce disco quando le unità non sono in uso.
Specifiche Capitolo Specifiche Nota Le specifiche sono soggette a modifiche senza preavviso. Specifiche dei dischi I modelli BW-RS101 e BW-RU101 sono compatibili con due tipi di disco. Capacità dell’area dati 23,3 GB/disco (2048 byte/settore) Velocità di trasferimento dati utente Scrittura continua 9 MB/s (CLV) Da 4,5 a 9 MB/s (CAV) Lettura continua 10,8 MB/s (CLV) Da 4,5 a 10,8 MB/s (CAV) Specifiche Prestazioni Velocità di rotazione disco Lettura continua CLV (interna) 5042 min–1 (giri/min.
Specifiche del blocco controller Interfaccia host BW-RS101 Ultra 160 LVD/SE SCSI Interfaccia parallela SCSI-3 (SPI-3) [ANSI NCITS.336:2000] BW-RU101 Hi-Speed USB (USB 2.
Printed on 100% recycled paper.