3-226-961-11 (1) FM/AM Compact Disc Player Operating Instructions Owner’s Record The model and serial numbers are located on the bottom of the unit. Record these numbers in the space provided below. Refer to these numbers whenever you call upon your Sony dealer regarding this product. Model No. CDX-CA660X/CA650X Serial No. For installation and connections, see the supplied installation/connections manual.
Warning Welcome ! This equipment has been tested and found to comply with the limits for a Class B digital device, pursuant to Part 15 of the FCC Rules. These limits are designed to provide reasonable protection against harmful interference in a residential installation. This equipment generates, uses, and can radiate radio frequency energy and, if not installed and used in accordance with the instructions, may cause harmful interference to radio communications.
Table of Contents Location of controls .................................................. 4 Precautions ................................................................ 6 Notes on discs ........................................................... 6 Getting Started Resetting the unit ................................................. 7 Detaching the front panel ................................... 8 Setting the clock ...................................................
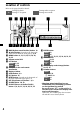
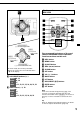
Location of controls Refer to the pages listed for details.
Card remote commander RM-X114 DSPL MODE PRESET + MENU SEEK– SOUN D DISC + SOURCE DISC – LIST SEEK+ ENTE R PRESET – OFF + ATT VOL – (DISC/PRESET) (+): to select upwards (SEEK) (+):to select rightwards /> (SEEK) (–): to select leftwards/ . (DISC/PRESET) (–): to select downwards In menu mode, the currently selectable button (s) of these four are indicated with a “M” in the display. The corresponding buttons of the card remote commander control the same functions as those on this unit.
Precautions Notes on discs •If your car was parked in direct sunlight, allow the unit to cool off before operating it. •Power antennas will extend automatically while the unit is operating. •Do not use the CUSTOM FILE feature while driving, or perform any other function which could divert your attention from the road. •To keep the disc clean, do not touch the surface. Handle the disc by its edge. •Keep your discs in their cases or disc magazines when not in use.
Notes on CD-R discs •You can play CD-Rs (recordable CDs) designed for audio use on this unit. Look for this mark to distinguish CD-Rs for audio use. Getting Started Resetting the unit This mark denotes that a disc is not for audio use. •Some CD-Rs (depending on the equipment used for its recording or the condition of the disc) may not play on this unit. •You cannot play a CD-R that is not finalized*. * A process necessary for a recorded CD-R disc to be played on the audio CD player.
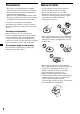
Detaching the front panel You can detach the front panel of this unit to protect the unit from being stolen. Attaching the front panel Place hole A of the front panel onto the spindle B on the unit, then lightly push the left side in. Press (SOURCE) (or insert a CD) to operate the unit. Caution alarm If you turn the ignition switch to the OFF position without removing the front panel, the caution alarm will beep for a few seconds.
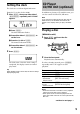
Setting the clock The clock uses a 12-hour digital indication. Example: To set the clock to 10:08 1 Press (MENU), then press either side of (DISC/PRESET) repeatedly until “CLOCK” appears. 1 Press (ENTER). The hour indication flashes. 2 Press either side of (DISC/PRESET) to set the hour. CD Player CD/MD Unit (optional) In addition to playing a CD with this unit, you can also control external CD/MD units.
(With optional unit) 1 Press (SOURCE) repeatedly to select “CD” or “MD.” 2 Press (MODE) repeatedly until the desired unit appears. Playback starts. To Skip discs – Disc selection Press (DISC/PRESET) (+/–) When the disc/track changes, any prerecorded title of the new disc/track is automatically displayed (if the Auto Scroll function is set to “ON,” names exceeding 8 characters will be scrolled (page 18)).
Labeling a CD — Disc Memo (For a CD unit with the CUSTOM FILE function) You can label each disc with a custom name (Disc Memo). You can enter up to 8 characters for a disc. If you label a CD, you can locate the disc by name (page 12). Caution Do not use the CUSTOM FILE feature while driving, or perform any other function which could divert your attention from the road. 1 Start playing the disc you want to label.
7 Press (MENU) twice. The unit returns to normal CD play mode. Notes • When the Disc Memo for a CD TEXT disc is erased, the original CD TEXT information is displayed. • If you cannot find the Disc Memo you want to erase, try selecting a different CD unit in step 2. Locating a disc by name — List-up (For a CD unit with the CD TEXT/ CUSTOM FILE function, or an MD unit) You can use this function for discs that have been assigned custom names*1 or for CD TEXT discs*2.
Playing specific tracks only You can select: •BANK-ON — to play the tracks with the ”PLAY” setting. •BANK-INV (Inverse) — to play the tracks with the ”SKIP” setting. Radio The unit can store up to 6 stations per band (FM1, FM2, FM3, AM1, and AM2). 1 During playback, press (MENU), then press either side of (DISC/PRESET) repeatedly until ”BANK-ON,” ”BANK-INV,” or ”BANK-OFF” appears. Caution When tuning in stations while driving, use Best Tuning Memory to prevent accidents.
Receiving the stored stations Storing only the desired stations 1 Press (SOURCE) repeatedly to select the radio. You can manually preset the desired stations on any chosen number button. 2 Press (MODE) repeatedly to select the band. 3 Press the number button ((1) to (6)) on which the desired station is stored. Tip Press either side of (DISC/PRESET) to receive the stations in the order they are stored in the memory (Preset Search function).
Storing station names — Station Memo You can assign a name to each radio station and store it in memory. The name of the station currently tuned in appears in the display. You can assign a name using up to 8 characters for a station. 5 Press (ENTER). Tips • Simply overwrite or enter “_” to correct or erase a name. • There is another way to start storing station names: Press (LIST) for 2 seconds instead of performing steps 2 and 3.
Locating a station by name — List-up 1 During radio reception, press (LIST). The name assigned to the station currently tuned appears in the display. Other Functions You can also control the unit with a rotary commander (optional). Using the rotary commander 2 Press either side of (DISC/PRESET) repeatedly until you find the desired station. If no name is assigned to the selected station, the frequency appears in the display. 3 Press (ENTER) to tune in the desired station.
*1 Only if the corresponding optional equipment is connected. *2 If your car has no ACC (accessory) position on the ignition key switch, be sure to press (OFF) for 2 seconds to turn off the clock indication after turning off the ignition. Changing the operative direction The operative direction of controls is factoryset as shown below.
Adjusting the sound characteristics Changing the sound and display settings — Menu You can adjust the bass, treble, balance, and fader. The bass and treble levels can be stored independently for each source. The following items can be set: 1 Select the item you want to adjust by pressing (SOUND) repeatedly. Each time you press (SOUND), the item changes as follows: BAS (bass) t TRE (treble) t BAL (left-right) t FAD (front-rear) 2 Adjust the selected item by pressing either side of (SEEK).
P/M (Play Mode) •LOCAL-ON/OFF (Local seek mode) (page 14) — Select “ON” to only tune into stations with stronger signals. •MONO-ON/OFF* (Monaural mode) (page 14) — Select “ON” to hear FM radio/TV stereo broadcast in monaural. Select “OFF” to return to normal mode. •IF AUTO/WIDE (page 14) * This function cannot change the TV sound setting if the optional TV tuner XT-40V is connected. 1 2 Press (MENU). To set A.SCRL, press (MENU) during CD/ MD Playback.
Setting the equalizer You can select an equalizer curve for seven music types (VOCAL, CLUB, JAZZ, NEW AGE, ROCK, CUSTOM, and XPLOD). You can store and adjust the equalizer settings for frequency and level. Selecting the equalizer curve 1 Press (SOURCE) to select a source (radio, CD, or MD). 2 Press (EQ7) repeatedly until the desired equalizer curve appears. Each time you press (EQ7), the item changes. Adjusting the equalizer curve 1 Press (MENU).
TV/Video (optional) You can connect an optional TV tuner and TV monitor to this unit. Storing TV channels automatically The unit selects the TV channels with the strongest signals and stores them in the order of their frequency. Caution Watching the TV 1 Press (SOURCE) repeatedly until “TV” appears. 2 Press either side of (DISC/PRESET) repeatedly to select the desired TV band. Watching a video 1 Press (SOURCE) repeatedly until “TV” appears. 2 Press (MODE) repeatedly to select “AUX.
Storing only the desired TV channels You can store up to 12 channels (6 each for TV1 and 2) on the number buttons in the order of your choice. 1 Press (SOURCE) repeatedly until “TV” appears. 2 Press either side of (SEEK) to tune in the TV channel that you want to store. 3 Watching the TV or video while listening to a CD or MD — Simultaneous Play The simultaneous play function does not work while you are listening to the radio.
Additional Information Notes • For safety, turn off the ignition before cleaning the connectors, and remove the key from the ignition switch. • Never touch the connectors directly with your fingers or with any metal device. Replacing the lithium battery Maintenance Fuse replacement When replacing the fuse, be sure to use one matching the amperage rating stated on the original fuse. If the fuse blows, check the power connection and replace the fuse.
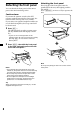
Removing the unit 1 Remove the front cover 1 Detach the front panel (page 8). 2 Press the clip inside the front cover with a thin screwdriver. 3 Repeat step 2 for the other side. 2 Remove the unit 1 Use a thin screwdriver to push in the clip on the left side of the unit, then pull out the left side of the unit until the catch clears the mounting. 4 mm (3/16 in.) 2 Repeat step 1 for the right side. 3 Slide the unit out of its mounting.
Specifications AUDIO POWER SPECIFICATIONS POWER OUTPUT AND TOTAL HARMONIC DISTORTION 23 watts per channel minimum continuous average power into 4 ohms, 4 channels driven from 20 Hz to 20 kHz with no more than 5% total harmonic distortion. CD player section Signal-to-noise ratio Frequency response Wow and flutter Laser Diode Properties Material Wavelength Emission Duration Laser output power 90 dB 10 – 20,000 Hz Below measurable limit GaAlAs 780 nm Continuous Less than 44.
Troubleshooting The following checklist will help you remedy problems you may encounter with your unit. Before going through the checklist below, check the connection and operating procedures. General No sound. •Rotate the volume control dial clockwise to adjust the volume. •Cancel the ATT function. •Set the fader control to the center position for a 2-speaker system. A disc cannot be loaded. •Another CD is already loaded. •The CD is forcibly inserted upside down or in the wrong way.
The “ST” indication flashes. •Tune in the frequency accurately. •The broadcast signal is too weak. t Set to the monaural reception mode (page 18). A program broadcast in stereo is heard in monaural. The unit is in monaural reception mode. t Cancel monaural reception mode (page 18). Interference occurs during FM reception. The wide mode is selected. t Set the IF mode to “IF AUTO” (page 18).
Sony Corporation Printed in Korea