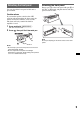
4-191-888-11(1) FM/AM Compact Disc Player Operating Instructions US Manual de instrucciones ES Owner’s Record The model and serial numbers are located on the bottom of the unit. Record these numbers in the spaces provided below. Refer to these numbers whenever you call upon your Sony dealer regarding this product. Model No. CDX-GT25MPW Serial No. To cancel the demonstration (DEMO) display, see page 4. Para cancelar la pantalla de demostración (DEMO), consulte la página 4.
Be sure to install this unit in the dashboard of the car for safety. For installation and connections, see the supplied installation/ connections manual. CAUTION The use of optical instruments with this product will increase eye hazard. For the state of california, USA only Warning This equipment has been tested and found to comply with the limits for a Class B digital device, pursuant to Part 15 of the FCC Rules.
Table of Contents Getting Started Additional Information Playable discs on this unit . . . . . . . . . . . . . . . . . 4 Canceling the DEMO mode . . . . . . . . . . . . . . . 4 Preparing the card remote commander . . . . . . . 4 Setting the clock . . . . . . . . . . . . . . . . . . . . . . . . 4 Detaching the front panel . . . . . . . . . . . . . . . . . 5 Attaching the front panel . . . . . . . . . . . . . . . 5 Precautions . . . . . . . . . . . . . . . . . . . . . . . . . . . Notes on discs . . . . . .
Getting Started Playable discs on this unit This unit can play CD-DA (also containing CD TEXT) and CD-R/CD-RW (MP3/WMA files (page 12)). Type of discs Preparing the card remote commander Remove the insulation film. Label on the disc CD-DA Tip For how to replace the battery, see page 13. MP3 WMA Setting the clock The clock uses a 12-hour digital indication. 1 Press and hold the select button. The setup display appears. 2 Rotate the control dial until “CLOCKADJ” appears, then press it.
Detaching the front panel You can detach the front panel of this unit to prevent theft. Attaching the front panel Engage part A of the front panel with part B of the unit, as illustrated, and push the left side into position until it clicks. Caution alarm If you turn the ignition switch to the OFF position without detaching the front panel, the caution alarm will sound for a few seconds. The alarm will only sound if the built-in amplifier is used. 1 Press and hold (SOURCE/OFF). The unit is turned off.
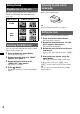
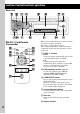
Location of controls and basic operations Main unit RM-X151 Card Remote Commander qh qj qk OFF SOURCE ATT SEL MODE wa ws qa + wd – ql w; SCRL DSPL 1 2 3 4 5 6 + VOL – wf wg This section contains instructions on the location of controls and basic operations. For details, see the respective pages. The corresponding buttons on the card remote commander control the same functions as those on the unit.
G AUX input jack page 11 To connect a portable audio device. H Z (eject) button To eject the disc. I J (front panel release) button page 5 (BACK) button To return to the previous display. K MODE button page 8 To select the radio band (FM/AM). L PTY button page 8 To select PTY in RDS. M Number buttons Radio: To receive stored stations (press); store stations (press and hold). CD: (1)/(2): ALBUM –/+ (during MP3/WMA playback) To skip albums (press); skip albums continuously (press and hold).
Radio Storing and receiving stations Caution When tuning in stations while driving, use Best Tuning Memory (BTM) to prevent an accident. RDS Overview FM stations with Radio Data System (RDS) service send inaudible digital information along with the regular radio program signal. Display items Storing automatically — BTM 1 Press (SOURCE/OFF) repeatedly until “TUNER” appears. To change the band, press (MODE) repeatedly. You can select from FM1, FM2, FM3, AM1 or AM2. 2 Press and hold the select button.
Type of programs NEWS (News), INFORM (Information), SPORTS (Sports), TALK (Talk), ROCK (Rock), CLS ROCK (Classic Rock), ADLT HIT (Adult Hits), SOFT RCK (Soft Rock), TOP 40 (Top 40), COUNTRY (Country), OLDIES (Oldies), SOFT (Soft), NOSTALGA (Nostalgia), JAZZ (Jazz), CLASSICL (Classical), R AND B (Rhythm and Blues), SOFT R B (Soft Rhythm and Blues), LANGUAGE (Foreign Language), REL MUSC (Religious Music), REL TALK (Religious Talk), PERSNLTY (Personality), PUBLIC (Public), COLLEGE (College), WEATHER (Weather)
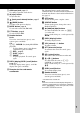
Other functions 1 Press and hold the select button. The setup display appears. 2 Rotate the control dial until the desired item appears, then press it. 3 Rotate the control dial to select the setting, then press it.* The setting is complete. Press the select button repeatedly until “BAL,” “FAD” or “SUB” appears. The item changes as follows: 4 Press (BACK). The display returns to normal reception/play mode.
LPF*3 (Low Pass Filter) Selects the subwoofer cut-off frequency: “OFF,” “80Hz,” “100Hz,” “120Hz,” “140Hz,” “160Hz.” SW PHASE*3 (Subwoofer Phase) Selects the subwoofer phase: “SUB NORM,” “SUB REV.” HPF (High Pass Filter) Selects the front/rear speaker cut-off frequency: “OFF,” “80Hz,” “100Hz,” “120Hz,” “140Hz,” “160Hz.” LOUDNESS Reinforces bass and treble for clear sound at low volume levels: “ON,” “OFF.” BTM (page 8) *1 When the unit is turned off. *2 When FM is received.
Additional Information Precautions • Cool off the unit beforehand if your car has been parked in direct sunlight. • Power antenna (aerial) extends automatically. – CD-R/CD-RW other than those recorded in music CD format or MP3 format conforming to ISO9660 Level 1/Level 2, Joliet/Romeo or multi-session.
Cleaning the connectors Maintenance Replacing the lithium battery of the card remote commander Under normal conditions, the battery will last approximately 1 year. (The service life may be shorter, depending on the conditions of use.) When the battery becomes weak, the range of the card remote commander becomes shorter. Replace the battery with a new CR2025 lithium battery. Use of any other battery may present a risk of fire or explosion.
Removing the unit 1 Specifications Remove the protection collar. AUDIO POWER SPECIFICATIONS 1 Detach the front panel (page 5). CEA2006 Standard Power Output: 17 Watts RMS 4 at 4 Ohms < 1% THD+N SN Ratio: 80 dBA (reference: 1 Watt into 4 Ohms) 2 Pinch both edges of the protection collar, then pull it out. Tuner section FM Tuning range: 87.5 – 107.
Supplied accessories: Card remote commander: RM-X151 Parts for installation and connections (1 set) Your dealer may not handle some of the above listed accessories. Please ask the dealer for detailed information. Design and specifications are subject to change without notice. Troubleshooting The following checklist will help you remedy problems you may encounter with your unit. Before going through the checklist below, check the connection and operating procedures.
Radio reception The stations cannot be received. The sound is hampered by noises. • The connection is not correct. t Connect a power antenna (aerial) control lead (blue) or accessory power supply lead (red) to the power supply lead of a car’s antenna (aerial) booster (only when your car has built-in FM/AM antenna (aerial) in the rear/side glass). t Check the connection of the car antenna (aerial). t If the auto antenna (aerial) will not go up, check the connection of the power antenna (aerial) control lead.
Error displays/Messages ERROR • The disc is dirty or inserted upside down. t Clean or insert the disc correctly. • A blank disc has been inserted. • The disc cannot play due to a problem. t Insert another disc. • Press Z (eject) to remove the disc. FAILURE The connection of speakers/amplifiers is incorrect. t See the installation/connections manual of this model to check the connection. L. SEEK +/– The local seek mode is on during automatic tuning. NO MUSIC The disc does not contain a music file.
Asegúrese de instalar esta unidad en el tablero del automóvil por razones de seguridad. Para realizar la instalación y las conexiones, consulte el manual de instalación y de conexiones suministrado. Windows Media es una marca comercial registrada o una marca comercial de Microsoft Corporation en los EE. UU. y otros países. Este producto está protegido por los derechos de propiedad intelectual de Microsoft Corporation.
Tabla de contenido Procedimientos iniciales Información complementaria Discos que se pueden reproducir en esta unidad . . . . . . . . . . . . . . . . . . . . . . . . . . . . . . . . 4 Cancelación del modo DEMO. . . . . . . . . . . . . . 4 Preparación del control remoto de tarjeta . . . . . 4 Ajuste del reloj . . . . . . . . . . . . . . . . . . . . . . . . . 4 Extracción del panel frontal. . . . . . . . . . . . . . . . 5 Colocación del panel frontal . . . . . . . . . . . . . 5 Precauciones . . . . . . . .
Procedimientos iniciales Discos que se pueden reproducir en esta unidad Preparación del control remoto de tarjeta Retire la lámina de aislamiento. Esta unidad permite reproducir discos CD-DA (incluidos CD TEXT) y CD-R/CD-RW (archivos MP3/WMA (página 12)). Tipos de discos Etiqueta del disco CD-DA Sugerencia Si desea obtener información adicional sobre cómo sustituir la pila, consulte la página 13. Ajuste del reloj MP3 WMA Cancelación del modo DEMO El reloj emplea una indicación digital de 12 horas.
Extracción del panel frontal Es posible extraer el panel frontal de la unidad para evitar que la roben. Colocación del panel frontal Fije la parte A del panel frontal en la parte B de la unidad, tal como muestra la ilustración, y presione el lado izquierdo hasta que encaje. Alarma de precaución Si gira el interruptor de la llave de encendido hasta la posición OFF sin haber extraído el panel frontal, la alarma de precaución sonará durante unos segundos.
Ubicación de los controles y operaciones básicas Unidad principal Control remoto de tarjeta RM-X151 qh qj qk OFF SOURCE ATT SEL MODE wa ws qa + wd – ql w; SCRL DSPL 1 2 3 4 5 6 + VOL – wf wg Este apartado contiene instrucciones acerca de la ubicación de los controles y las operaciones básicas. Consulte las páginas indicadas para obtener información detallada. Los botones correspondientes en el control remoto de tarjeta controlan las mismas funciones que los de la unidad.
E Ranura del disco Inserte el disco (con la etiqueta mirando hacia arriba) y se iniciará la reproducción. F Visualizador G Toma de entrada AUX página 11 Para conectar un dispositivo de audio portátil. H Botón Z (expulsar) Para expulsar el disco. I Botón (liberación del panel frontal) página 5 J Botón (BACK) Para volver a la pantalla anterior. K Botón MODE página 8 Para seleccionar la banda de radio (FM/AM). L Botón PTY página 8 Para seleccionar PTY en RDS.
Radio Almacenamiento y recepción de emisoras Sugerencia Si conoce la frecuencia de la emisora que desea escuchar, mantenga presionado (SEEK) +/– para localizar la frecuencia aproximada y, a continuación, presione (SEEK) +/– varias veces para ajustar la frecuencia deseada con mayor precisión (sintonización manual). Precaución Para sintonizar emisoras mientras maneja, utilice la función BTM (Memoria de la mejor sintonía) para evitar accidentes.
2 Gire el selector de control hasta que aparezca el tipo de programa deseado y, a continuación, presiónelo. La unidad comienza a buscar una estación que emita el tipo de programa seleccionado.
Otras funciones Cambio de los ajustes de sonido Ajuste de las características del sonido — BAL/FAD/SUB Puede ajustar el balance, el equilibrio y el volumen del altavoz potenciador de graves. 1 Presione el botón de selección varias veces hasta que aparezca “BAL”, “FAD” o “SUB”. El elemento cambia de la manera siguiente: LOW*1 t MID*1 t HI*1 t BAL (izquierdo-derecho) t FAD (frontal-posterior) t SUB (volumen del altavoz potenciador de graves)*2 t AUX*3 *1 Si está activado EQ3 (página 10).
M.DISPLAY (Desplazamiento de indicaciones) – “ON”: para desplazar los elementos. – “OFF”: para desactivar el desplazamiento de indicaciones. AUTO SCR (Desplazamiento automático) Permite desplazarse por los elementos de la pantalla automáticamente: “ON”, “OFF”. LOCAL (Modo de búsqueda local) – “ON”: para que se sintonicen solamente las emisoras de señal más intensa. – “OFF”: para ajustar la recepción normal.
Información complementaria Precauciones • Deje que la unidad se enfríe antes de usarla si el automóvil ha estado estacionado bajo la luz directa del sol. • La antena motorizada se extiende automáticamente. Condensación de humedad Si se produce condensación de humedad en el interior de la unidad, extraiga el disco y espere una hora aproximadamente hasta que se haya evaporado la unidad. De lo contrario, la unidad no funcionará correctamente.
Acerca de los archivos WMA • WMA, que significa Windows Media Audio, es un formato estándar de compresión de archivos de música. Comprime los datos de CD de audio a aproximadamente 1/22* de su tamaño original. • El indicador de WMA tiene 63 caracteres. • Al asignar un nombre a un archivo WMA, asegúrese de añadir la extensión “.wma” al nombre del archivo.
Extracción de la unidad 1 Especificaciones Extraiga el marco de protección. Sección del sintonizador 1 Extraiga el panel frontal (página 5). FM 2 Sujete el marco de protección por ambos bordes y extráigalo.
Accesorios suministrados: Control remoto de tarjeta: RM-X151 Componentes de instalación y conexiones (1 juego) Es posible que su distribuidor no comercialice algunos de los accesorios que figuran en la lista anterior. Pídale información detallada. El diseño y las especificaciones están sujetos a cambios sin previo aviso. Solución de problemas La siguiente lista de comprobación le ayudará a solucionar los problemas que puedan producirse con la unidad.
Recepción de radio No es posible recibir las emisoras. Hay ruidos que obstaculizan el sonido. • La conexión no es correcta. t Conecte un cable de control de la antena motorizada (azul) o un cable de fuente de alimentación auxiliar (rojo) al cable de fuente de alimentación del amplificador de señal de la antena del automóvil (solamente cuando el automóvil tenga una antena de FM/AM integrada en el cristal posterior o lateral). t Compruebe la conexión de la antena del automóvil.
Mensajes/indicaciones de error ERROR • El disco está sucio o se insertó al revés. t Límpielo o insértelo de forma correcta. • Se insertó un disco vacío. • No es posible reproducir el disco debido a un problema. t Inserte otro disco. • Presione Z (expulsar) para extraer el disco. FAILURE La conexión de los altavoces y amplificadores es incorrecta. t Consulte el manual de instalación/conexiones de este modelo para revisar la conexión. L.
If you have any questions/problems regarding this product, try the following: 1 Read Troubleshooting in these Operating Instructions. 2 Please contact (U.S.A. only); Call 1-800-222-7669 URL http://www.SONY.com http://www.sony.