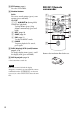
4-284-500-21(1) FM/AM Compact Disc Player Owner’s Record The model and serial numbers are located on the bottom of the unit. Record the serial number in the space provided below. Refer to these numbers whenever you call upon your Sony dealer regarding this product. Model No. CDX-GT40UW Serial No. To cancel the demonstration (DEMO) display, see page 4. Para cancelar la pantalla de demostración (DEMO), consulte la página 4.
Be sure to install this unit in the dashboard of the car for safety. For installation and connections, see the supplied installation/connections manual. Warning This equipment has been tested and found to comply with the limits for a Class B digital device, pursuant to Part 15 of the FCC Rules. These limits are designed to provide reasonable protection against harmful interference in a residential installation.
Table of contents Getting Started . . . . . . . . . . . . . . . . . . . . . . . . . . . . . . . . . . . . . . . . . . . . . . . . . . . . . 4 Canceling the DEMO mode . . . . . . . . . . . . . . . . . . . . . . . . . . . . . . . . . . . . . . . . . . . . . . . . 4 Setting the clock . . . . . . . . . . . . . . . . . . . . . . . . . . . . . . . . . . . . . . . . . . . . . . . . . . . . . . . . . . 4 Detaching the front panel . . . . . . . . . . . . . . . . . . . . . . . . . . . . . . . . . . . . . . . . . . .
Detaching the front panel Getting Started Canceling the DEMO mode You can cancel the demonstration display which appears during turning off. 1 Press and hold the select button. The setup display appears. 2 Rotate the control dial until “DEMO” appears, then press it. 3 Rotate the control dial to select “DEMO-OFF,” then press it. The setting is complete. 4 Press (BACK). The display returns to normal reception/ play mode. You can detach the front panel of this unit to prevent theft.
Location of controls Main unit This section contains instructions on the location of controls and basic operations. SEEK +/– buttons Radio: To tune in stations automatically (press); find a station manually (press and hold). CD/USB: To skip tracks (press); skip tracks continuously (press, then press again within about 1 second and hold); reverse/fast-forward a track (press and hold). (BROWSE) button page 11 To enter the Quick-BrowZer™ mode.
PTY button page 8 To select PTY in RDS. Number buttons Radio: To receive stored stations (press); store stations (press and hold). CD/USB: /: ALBUM / (during MP3/ WMA/AAC playback) To skip albums (press); skip albums continuously (press and hold). : REP* page 10 : SHUF page 10 : ZAP page 12 To enter ZAPPIN™ mode. : PAUSE To pause playback. To cancel, press again.
OFF button To turn off the power; stop the source. SOURCE button To turn on the power; change the source (Radio/CD/USB/AUX). ()/ () buttons To control Radio/CD/USB, the same as –/+ on the unit. Setup, sound setting, etc., can be operated by . (BACK) button Radio Storing and receiving stations Caution When tuning in stations while driving, use Best Tuning Memory (BTM) to prevent an accident. ENTER button To apply a setting.
Tuning automatically 1 Select the band, then press +/– to search for the station. Scanning stops when the unit receives a station. Repeat this procedure until the desired station is received. Tip If you know the frequency of the station you want to listen to, press and hold +/– to locate the approximate frequency, then press +/– repeatedly to fine adjust to the desired frequency (manual tuning).
CD Playing a disc This unit can play CD-DA (also containing CD TEXT) and CD-R/CD-RW (MP3/ WMA/AAC files (page 17)). 1 Insert the disc (label side up). Playback starts automatically. To eject the disc, press . Note When ejecting/inserting a disc, keep any USB devices disconnected to avoid damage to the disc. Changing display items Displayed items may differ depending on the disc type, recording format and settings. Press .
Notes • Do not use USB devices so large or heavy that they may fall down due to vibration, or cause a loose connection. • Do not detach the front panel during playback of the USB device, otherwise USB data may be damaged. Changing display items Displayed items may differ depending on the USB device, recording format and settings. Press . Notes • The maximum number of displayable data is as follows.
Searching a track by name — Quick-BrowZer™ You can search for a track in a CD or USB device easily by category. 1 Press (BROWSE)*. The unit enters the Quick-BrowZer mode, and the list of search categories appears. When the track list appears, press (BACK) repeatedly until the desired search category appears. * During playback, press (BROWSE) for more than 2 seconds to directly return to the beginning of the category list (USB only).
Searching a track by listening to track passages — ZAPPIN™ While playing back short track passages in a CD or USB device in sequence, you can search for a track you want to listen to. ZAPPIN mode is suitable for searching for a track in shuffle or shuffle repeat mode. 1 Press (ZAP) during playback. Playback starts from a passage of the next track. You can select the playback time (page 15). Track (ZAP) pressed. The part of each track to play back in ZAPPIN mode.
SW LEVEL*2 (Subwoofer Level) Adjusts the subwoofer volume level: “+10 dB” – “0 dB” – “–10 dB.” (“ATT” is displayed at the lowest setting.) AUX VOL*3 (AUX Volume level) Adjusts the volume level for each connected auxiliary equipment: “+18 dB” – “0 dB” – “–8 dB.” This setting negates the need to adjust the volume level between sources. *1 Hidden when “SET POSITION” is set to “OFF.” *2 When the audio output is set to “SUB-OUT” (page 15). Tip The equalizer curve setting can be memorized for each source.
Optimizing sound by Time Alignment — Listening Position The unit can simulate a natural sound field by delaying the sound output from each speaker to suit your position. The options for “POSITION” are indicated below. FRONT L (): Front left FRONT R (): Front right FRONT (): Center front ALL (): In the center of your car OFF: No position set You can also set the approximate subwoofer position from your listening position if: – the audio output is set to “SUB-OUT” (page 15).
Using rear speakers as subwoofer — Rear Bass Enhancer Rear Bass Enhancer enhances the bass sound by applying the low pass filter setting (page 16) to the rear speakers. This function allows the rear speakers to work as a subwoofer if one is not connected. 1 During reception/playback, press the select button. 2 Rotate the control dial until “RB ENH” appears, then press it. 3 Rotate the control dial to select from “1,” “2” or “3,” then press it. 4 Press (BACK).
LPF FREQ*2 (Low Pass Filter Frequency) Selects the subwoofer cut-off frequency: “50Hz,” “60Hz,” “80Hz,” “100Hz,” “120Hz.” LPF SLOP*2 (Low Pass Filter Slope) Selects the LPF slope: “1,” “2,” “3.” SW PHASE*3 (Subwoofer Phase) Selects the subwoofer phase: “NORM,” “REV.” HPF FREQ (High Pass Filter Frequency) Selects the front/rear speaker cut-off frequency: “OFF,” “50Hz,” “60Hz,” “80Hz,” “100Hz,” “120Hz.
• Discs that this unit CANNOT play Additional Information Precautions • Cool off the unit beforehand if your car has been parked in direct sunlight. • Do not leave the front panel or audio devices brought in inside the car, or it may cause malfunction due to high temperature in direct sunlight. • Power antenna (aerial) extends automatically.
Notes Maintenance Replacing the lithium battery of the remote commander When the battery becomes weak, the range of the remote commander becomes shorter. Replace the battery with a new CR2025 lithium battery. Use of any other battery may present a risk of fire or explosion. + side up 2 • For safety, turn off the ignition before cleaning the connectors, and remove the key from the ignition switch. • Never touch the connectors directly with your fingers or with any metal device.
General Outputs: Audio outputs terminal (rear/sub switchable) Power antenna (aerial)/Power amplifier control terminal (REM OUT) Inputs: Remote controller input terminal Antenna (aerial) input terminal AUX input jack (stereo mini jack) USB signal input connector Power requirements: 12 V DC car battery (negative ground (earth)) Dimensions: Approx. 178 × 50 × 179 mm (7 1/8 × 2 × 7 1/8 in) (w/h/d) Mounting dimensions: Approx. 182 × 53 × 162 mm (7 1/4 × 2 1/8 × 6 1/2 in) (w/h/d) Mass: Approx. 1.
During playback or reception, demonstration mode starts. If no operation is performed for 5 minutes with “DEMO-ON” set, demonstration mode starts. – Set “DEMO-OFF” (page 15). The display disappears from/does not appear in the display window. The dimmer is set to “DIM-ON” (page 15). The display disappears if you press and hold . – Press on the unit until the display appears. The connectors are dirty (page 18). The Auto Off function does not operate. The unit is turned on.
The USB device takes longer to play back. The USB device contains files with a complicated tree structure. NO NAME A disc/album/artist/track name is not written in the track. The sound is intermittent. The sound may be intermittent at a high-bitrate of more than 320 kbps. OFFSET There may be an internal malfunction. – Check the connection. If the error indication remains on in the display, consult your nearest Sony dealer. Error displays/Messages OVERLOAD USB device is overloaded.
Asegúrese de instalar esta unidad en el tablero del automóvil por razones de seguridad. Para realizar la instalación y las conexiones, consulte el manual de instalación y de conexiones suministrado. ZAPPIN y Quick-BrowZer son marcas comerciales de Sony Corporation. Windows Media es una marca comercial registrada o una marca comercial de Microsoft Corporation en los EE. UU. y otros países. Este producto contiene tecnología sujeta a ciertos derechos de propiedad intelectual de Microsoft.
Tabla de contenido Procedimientos iniciales . . . . . . . . . . . . . . . . . . . . . . . . . . . . . . . . . . . . . . . . . . . . . 4 Cancelación del modo DEMO . . . . . . . . . . . . . . . . . . . . . . . . . . . . . . . . . . . . . . . . . . . . . . 4 Ajuste del reloj . . . . . . . . . . . . . . . . . . . . . . . . . . . . . . . . . . . . . . . . . . . . . . . . . . . . . . . . . . . 4 Extracción del panel frontal . . . . . . . . . . . . . . . . . . . . . . . . . . . . . . . . . . . . . . . . . . . . .
Ajuste del reloj Procedimientos iniciales 1 Mantenga presionado el botón de selección. Aparecerá la pantalla de ajustes. 2 Gire el selector de control hasta que aparezca “CLOCK-ADJ” y, a continuación, presiónelo. La indicación de la hora parpadea. 3 Gire el selector de control hasta que aparezca “DEMO” y, a continuación, presiónelo. Gire el selector de control para ajustar la hora y los minutos. Para mover la indicación digital, presione –/+.
Extracción del panel frontal Es posible extraer el panel frontal de la unidad para evitar que la roben. 1 Mantenga presionado . La unidad se apagará. 2 Presione y, a continuación, extráigalo hacia usted. Colocación del panel frontal Fije la parte A del panel frontal en la parte B de la unidad, tal como muestra la ilustración, y presione el lado izquierdo hasta que encaje.
Ubicación de los controles Unidad principal Este apartado contiene instrucciones acerca de la ubicación de los controles y las operaciones básicas. Botones SEEK +/– Radio: Para sintonizar emisoras en forma automática (presionar); para localizar una emisora en forma manual (mantener presionado).
Botón (BACK) Presione para volver a la pantalla anterior. Receptor del control remoto Botón MODE página 8 Presione este botón para seleccionar la banda de radio (FM/AM). Botón PTY página 9 Para seleccionar PTY en RDS. Botones numéricos Radio: Para recibir las emisoras almacenadas (presionar); para almacenar emisoras (mantener presionado). CD/USB: /: ALBUM / (durante la reproducción de MP3/WMA/AAC) Para omitir álbumes (presionar); omitir álbumes continuamente (mantener presionado).
Botón OFF Para apagar la alimentación; para detener la fuente. Botón SOURCE Para activar la alimentación; para cambiar la fuente (Radio/CD/USB/ AUX). Botones ()/ () Para controlar la Radio/CD/USB, de la misma manera que con –/+ en la unidad. Es posible ajustar la configuración, los ajustes de sonido, etc. mediante . Botón (BACK) Botón ENTER Para aplicar un ajuste.
Recepción de las emisoras almacenadas Selección de PTY (Tipos de programa) 1 Muestra el tipo de programa que se recibe actualmente. Asimismo, busca el tipo de programa seleccionado. Seleccione la banda y, a continuación, presione un botón numérico (de a ). 1 Presione durante la recepción de FM. Si la emisora está transmitiendo datos PTY, aparece el nombre del tipo de programa actual.
Ajuste de CT (Hora del reloj) Los datos CT de la transmisión RDS ajustan el reloj. CD 1 Reproducción de un disco Ajuste “CT-ON” en la configuración (página 17). Nota Puede que la función CT no funcione correctamente a pesar de que se reciba una emisora RDS. Esta unidad permite reproducir discos CD-DA (incluidos CD TEXT) y CD-R/ CD-RW (archivos MP3/WMA/AAC (página 20)). 1 Inserte el disco (con la etiqueta orientada hacia arriba). La reproducción se inicia automáticamente.
Dispositivos USB Para extraer el dispositivo USB, detenga la reproducción del dispositivo USB y retire el dispositivo USB. • Es posible utilizar dispositivos USB de almacenamiento masivo (MSC) que cumplan con el estándar USB. • Los códecs correspondientes son MP3 (.mp3), WMA (.wma), AAC (.m4a) y AAC (.mp4). • Se recomienda realizar una copia de seguridad de los datos almacenados en los dispositivos USB.
Reproducción aleatoria Búsqueda y reproducción de pistas Reproducción de pistas en diversos modos Es posible escuchar las pistas varias veces (reproducción repetida) o en orden aleatorio (reproducción aleatoria). Los modos de reproducción disponibles varían en función de la fuente de sonido seleccionada. 1 Durante la reproducción, presione (REP) o (SHUF) varias veces hasta que aparezca el modo de reproducción deseado. La reproducción en el modo seleccionado puede demorar en iniciarse.
3 Repita el paso 2 hasta que se seleccione la pista deseada. Se inicia la reproducción. Para salir del modo Quick-BrowZer, presione (BROWSE). Nota Al acceder al modo Quick-BrowZer, se cancela el ajuste de reproducción repetida/aleatoria.
DM+ (página 16) Ajustes de sonido y Menú de configuración Cambio de los ajustes de sonido Ajuste de las características de sonido 1 Durante la recepción/reproducción, presione el botón de selección. 2 Gire el selector de control hasta que aparezca el elemento de menú deseado y, a continuación, presiónelo. 3 4 Gire el selector de control para seleccionar el ajuste y, a continuación, presiónelo.
2 Gire el selector de control hasta que aparezca “EQ7 PRESET” y, a continuación, presiónelo. 3 Gire el selector de control hasta que aparezca la curva de ecualizador deseada y, a continuación, presiónelo. 4 Presione 5 Gire el selector de control para seleccionar el rango de frecuencia y, a continuación, presiónelo. BAND1: 63 Hz BAND2: 160 Hz BAND3: 400 Hz BAND4: 1 kHz BAND5: 2,5 kHz BAND6: 6,3 kHz BAND7: 16,0 kHz (BACK). Para cancelar la curva de ecualizador, seleccione “OFF” en el paso 3.
Asimismo, puede configurar la posición aproximada del altavoz potenciador de graves desde su posición de escucha si: – la salida de audio se ajusta en “SUB-OUT” (página 18). – la posición de escucha se ajusta en una opción distinta de “OFF”. A continuación se indican las opciones para “SET SW POS”. NEAR (): cerca NORMAL (): normal FAR (): lejos 1 Durante la recepción/reproducción, presione el botón de selección.
Uso de los altavoces posteriores como altavoz potenciador de graves — Potenciador de sonidos graves posteriores Ajuste de los elementos de configuración 1 Mantenga presionado el botón de selección. Aparecerá la pantalla de ajustes. El Potenciador de sonidos graves posteriores mejora los sonidos graves, ya que aplica el ajuste del filtro de paso bajo (página 18) a los altavoces posteriores.
REAR/SUB*1 Permite cambiar la salida de audio: “SUB-OUT” (altavoz potenciador de graves), “REAR-OUT” (amplificador de potencia). HPF FREQ (Frecuencia de filtro de paso alto) Selecciona la frecuencia de corte del altavoz frontal/posterior: “OFF”, “50Hz”, “60Hz”, “80Hz”, “100Hz”, “120Hz”. DEMO (Demostración) Activa la demostración: “ON”, “OFF”.
Ajuste del nivel de volumen Uso de equipo opcional Asegúrese de ajustar el volumen de cada equipo de audio conectado antes de la reproducción. 1 2 Baje el volumen de la unidad. Equipo de audio auxiliar 3 Inicie la reproducción en el dispositivo de audio portátil con un volumen moderado. 4 5 Seleccione el volumen habitual en la unidad.
Información complementaria Precauciones • Deje que la unidad se enfríe antes de usarla si el automóvil ha estado estacionado bajo la luz directa del sol. • No deje el panel frontal ni los dispositivos de audio dentro del automóvil, puesto que pueden producirse fallas debidas a la alta temperatura de la luz directa del sol. • La antena motorizada se extiende automáticamente.
Orden de reproducción de los archivos MP3/WMA/AAC MP3/WMA/AAC Carpeta (álbum) Archivo MP3/ WMA/AAC (pista) ADVERTENCIA La pila puede explotar si no se emplea adecuadamente. No recargue la pila; tampoco la desmonte ni la arroje al fuego. Limpieza de los conectores Es posible que la unidad no funcione correctamente si los conectores entre ésta y el panel frontal están sucios. Para evitar esta situación, extraiga el panel frontal (página 5) y limpie los conectores con un hisopo de algodón.
Especificaciones Sección del sintonizador FM Rango de sintonización: de 87,5 a 107,9 MHz Terminal de antena: conector de antena externa Frecuencia intermedia: 25 kHz Sensibilidad útil: 8 dBf Selectividad: 75 dB a 400 kHz Relación señal-ruido: 80 dB (estéreo) Separación: 50 dB a 1 kHz Respuesta de frecuencia: 20 – 15 000 Hz AM Rango de sintonización: de 530 a 1 710 kHz Terminal de antena: conector de antena externa Frecuencia intermedia: 9 115 kHz ó 9 125 kHz/5 kHz Sensibilidad: 26 μV Sección del reproduct
Solución de problemas La siguiente lista de comprobación le ayudará a solucionar los problemas que puedan producirse con la unidad. Antes de consultarla, revise los procedimientos de conexión y de funcionamiento. Para obtener detalles sobre el uso del fusible y la extracción de la unidad del tablero, consulte el manual de instalación y conexiones suministrado con esta unidad. Si el problema no se resuelve, visite el sitio de soporte indicado en la cubierta posterior.
No es posible utilizar la sintonización programada. Almacene la frecuencia correcta en la memoria. La señal de emisión es demasiado débil. No es posible utilizar la sintonización automática. La señal de emisión es demasiado débil. – Use la sintonización manual. RDS PTY muestra “- - - - - - - -”. La emisora actual no es una emisora RDS. No se recibieron datos RDS. La emisora no especifica el tipo de programa. Reproducción de CD No es posible insertar el disco. Ya hay un disco insertado.
Mensajes/indicaciones de error CHECKING La unidad está confirmando la conexión de un dispositivo USB. – Espere mientras finaliza el proceso de confirmación de la conexión. ERROR El disco está sucio o se insertó al revés. – Límpielo o insértelo de forma correcta. Se insertó un disco vacío. No es posible reproducir el disco debido a un problema. – Inserte otro disco. El dispositivo USB no ha sido reconocido automáticamente. – Conéctelo nuevamente. Presione para extraer el disco.
Support site Sitio Web de soporte técnico en línea If you have any questions or for the latest support information on this product, please visit the web site below: Para resolver cualquier duda u obtener la información más reciente sobre el soporte técnico de este producto, visite el siguiente sitio Web: http://esupport.sony.com http://www.sony.com/mobileAV If you have any questions/problems regarding this product, try the following: 1 Read Troubleshooting in these Operating Instructions.