3-285-539-21 (1) FM/MW/LW Compact Disc Player Operating Instructions GB Bedienungsanleitung DE Mode d’emploi FR Istruzioni per l’uso IT Gebruiksaanwijzing NL To cancel the demonstration (DEMO) display, see page 14. Zum Deaktivieren der Demo-Anzeige (DEMO) schlagen Sie bitte auf Seite 15 nach. Pour annuler la démonstration (DEMO), reportez-vous à la page 14. Per annullare la dimostrazione (DEMO), vedere pagina 15. Om de demonstratie (DEMO) te annuleren, zie pagina 15.
For installation and connections, see the supplied installation/connections manual. This label is located on the bottom of the chassis. Notice for the customer in the countries applying EU Directives The manufacturer of this product is Sony Corporation, 1-7-1 Konan, Minato-ku, Tokyo, Japan. The Authorized Representative for EMC and product safety is Sony Deutschland GmbH, Hedelfinger Strasse 61, 70327 Stuttgart, Germany.
Table of Contents Welcome ! . . . . . . . . . . . . . . . . . . . . . . . . . . . . . 4 Other functions Getting Started Changing the sound settings . . . . . . . . . . . . . . Adjusting the sound characteristics . . . . . . Customizing the equalizer curve — EQ3 . . . . . . . . . . . . . . . . . . . . . . . . . . . . Adjusting setup items — SET . . . . . . . . . . . . Using optional equipment . . . . . . . . . . . . . . . . Auxiliary audio equipment. . . . . . . . . . . . . Rotary commander RM-X4S . . . .
Welcome ! Getting Started Thank you for purchasing this Sony Compact Disc Player. You can enjoy your drive with the following functions. • CD playback You can play CD-DA (also containing CD TEXT) and CD-R/CD-RW (MP3/WMA/AAC files (page 17)). Type of discs Label on the disc Resetting the unit Before operating the unit for the first time, or after replacing the car battery or changing the connections, you must reset the unit.
Tip You can set the clock automatically with the RDS feature (page 11). Press (SOURCE) on the unit (or insert a disc) to operate the unit. Detaching the front panel A B You can detach the front panel of this unit to prevent theft. Caution alarm If you turn the ignition switch to the OFF position without detaching the front panel, the caution alarm will sound for a few seconds. The alarm will only sound if the built-in amplifier is used. 1 Press (OFF). The unit is turned off. 2 Press (OPEN).
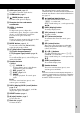
Location of controls and basic operations Main unit 1 23 4 5 6 7 OPEN OFF BROWSE SOURCE SEEK AUX SEEK BACK MODE PTY AF/TA ALBUM 1 REP SHUF 3 4 2 5 PAUSE SCRL 6 DSPL PUSH ENTER / SELECT 8 9 q; qa qs qd qf Front panel removed qg qh qj RESET Card remote commander RM-X151 1 4 qk OFF SOURCE ATT SEL MODE wa ws qa + ql w; 6 SCRL 1 2 3 4 5 6 + VOL – A OFF button To power off; stop the source.
F AUX input jack page 15 To connect a portable audio device. G OPEN button page 5 H (BACK) button page 8 To return to the previous display. I Receptor for the card remote commander J SEEK –/+ buttons CD/iPod: To skip tracks (press); skip tracks continuously (press, then press again within about 1 second and hold); reverse/fastforward a track (press and hold). Radio: To tune in stations automatically (press); find a station manually (press and hold).
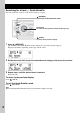
Searching for a track — Quick-BrowZer You can search for a track in a CD or iPod easily by category. (BROWSE): To enter/exit the Quick-BrowZer mode. OFF BROWSE SOURCE SEEK SEEK Control dial: To select the item (rotate); confirm the item (press). BACK MODE PUSH ENTER / SELECT (BACK): To return to the previous display. 1 Press (BROWSE). The unit enters the Quick-BrowZer mode, and the list of search categories appears. Display items differ, depending on the type of iPod or disc.
CD Radio Storing and receiving stations Display items Caution When tuning in stations while driving, use Best Tuning Memory (BTM) to prevent an accident. Storing automatically — BTM 1 A Source B Track number/Elapsed playing time, Disc/ artist name, Album number*, Album name, Track name, Text information, Clock Press (SOURCE) repeatedly until “TUNER” appears. To change the band, press (MODE) repeatedly. You can select from FM1, FM2, FM3, MW or LW.
RDS Setting AF and TA 1 Overview FM stations with Radio Data System (RDS) service send inaudible digital information along with the regular radio program signal. Display items Press (AF/TA) repeatedly until the desired setting appears. Select To AF-ON activate AF and deactivate TA. TA-ON activate TA and deactivate AF. AF, TA-ON activate both AF and TA. AF, TA-OFF deactivate both AF and TA.
2 Within 5 seconds, press again a number button of the local station. Repeat this procedure until the local station is received. Selecting PTY 1 Press and hold (AF/TA) (PTY) during FM reception. iPod Playing back iPod By connecting an iPod to the dock connector at the rear of the unit, you can listen on your car speakers, while controlling the iPod from the unit. Notes • When an iPod is connected to the dock connector, operation from the iPod cannot be performed.
Tips • When the iPod is connected to the dock connector, the mode changes to the Resuming mode. In Resuming mode, pressing (3) (REP) or (4) (SHUF) does not function. If you cancel the resuming mode by pressing (MODE) or (1)/(2) (ALBUM –/+) now function to change the play mode. • When the ignition key is turned to the ACC position, or the unit is on, the iPod will be recharged. • If the iPod is disconnected during playback, “NO IPOD” appears in the display of the unit.
Other functions Changing the sound settings Adjusting the sound characteristics 1 Press the select button repeatedly until the desired item appears. 2 Rotate the control dial to adjust the selected item. After 3 seconds, the setting is complete and the display returns to normal play/reception mode. The following items can be set (follow the page reference for details): “z” indicates the default settings.
Adjusting setup items — SET 1 Press and hold the select button. The setup display appears. 2 Press the select button repeatedly until the desired item appears. 3 Rotate the control dial to select the setting (example “ON” or “OFF”). 4 Press and hold the select button. The setup is complete and the display returns to normal play/reception mode. Note Displayed items will differ, depending on the source and setting.
Using optional equipment Auxiliary audio equipment By connecting an optional portable audio device to the AUX input jack (stereo mini jack) on the unit and then simply selecting the source, you can listen on your car speakers. The volume level is adjustable for any difference between the unit and the portable audio device. Follow the procedure below: Connecting the portable audio device 1 Turn off the portable audio device. 2 Turn down the volume on the unit. 3 Connect to the unit.
Changing the operative direction The operative direction of the controls is factoryset as shown below. To increase Additional Information Precautions • If your car has been parked in direct sunlight, allow the unit to cool off before operating it. • Power antenna (aerial) will extend automatically while the unit is operating. To decrease If you need to mount the rotary commander on the right hand side of the steering column, you can reverse the operative direction.
• Before playing, clean the discs with a commercially available cleaning cloth. Wipe each disc from the center out. Do not use solvents such as benzine, thinner, commercially available cleaners, or antistatic spray intended for analog discs. Playback order of MP3/WMA/AAC files (CD-R/RW) MP3/WMA/AAC Folder (album) MP3/WMA/ AAC file (track) Notes on CD-R/CD-RW discs • Some CD-Rs/CD-RWs (depending on the equipment used for its recording or the condition of the disc) may not play on this unit.
About AAC files • AAC, which stands for Advanced Audio Coding, is a music file compression format standard. It compresses audio CD data to approximately 1/11* of its original size. • AAC tag is 126 characters. • When naming an AAC file, be sure to add the file extension “.m4a” to the file name. • During playback or fast-forward/reverse of a VBR (variable bit rate) AAC file, elapsed playing time may not display accurately.
Cleaning the connectors The unit may not function properly if the connectors between the unit and the front panel are not clean. In order to prevent this, detach the front panel (page 5) and clean the connectors with a cotton swab. Do not apply too much force. Otherwise, the connectors may be damaged. Main unit Removing the unit 1 Remove the protection collar. 1 Detach the front panel (page 5). 2 Pinch both edges of the protection collar, then pull it out.
Specifications CD Player section Signal-to-noise ratio: 120 dB Frequency response: 10 – 20,000 Hz Wow and flutter: Below measurable limit Tuner section FM Tuning range: 87.5 – 108.0 MHz Antenna (aerial) terminal: External antenna (aerial) connector Intermediate frequency: 10.7 MHz/450 kHz Usable sensitivity: 9 dBf Selectivity: 75 dB at 400 kHz Signal-to-noise ratio: 67 dB (stereo), 69 dB (mono) Harmonic distortion at 1 kHz: 0.5 % (stereo), 0.
Troubleshooting The following checklist will help you remedy problems you may encounter with your unit. Before going through the checklist below, check the connection and operating procedures. General No power is being supplied to the unit. • Check the connection. If everything is in order, check the fuse. • If the unit is turned off and the display disappears, it cannot be operated with the remote commander. t Turn on the unit. The power antenna (aerial) does not extend.
Automatic tuning is not possible. • Setting of the local seek mode is not correct. t Tuning stops too frequently: Set “LOCAL-ON” (page 14). t Tuning does not stop at a station: Set “MONO-ON” (page 14). • The broadcast signal is too weak. t Perform manual tuning. During FM reception, the “ST” indication flashes. • Tune in the frequency accurately. • The broadcast signal is too weak. t Set “MONO-ON” (page 14). An FM program broadcast in stereo is heard in monaural. The unit is in monaural reception mode.
READ The unit is reading all track and album information on the disc/iPod. t Wait until reading is complete and playback starts automatically. Depending on the disc/iPod structure, it may take more than a minute. RESET The CD unit/iPod cannot be operated due to a problem. t Press the RESET button (page 4). “ ” or “ ” During reverse or fast-forward, you have reached the beginning or the end of the disc and you cannot go any further. “ ” The character cannot be displayed with the unit.
Wichtig! Bitte nehmen Sie sich etwas Zeit, um den Geräte-Pass vollständig auszufüllen. Dieser befindet sich auf der hinteren Umschlagseite dieser Bedienungsanleitung. Zur Installation und zum Anschluss siehe die mitgelieferte Installations-/Anschlussanleitung. Dieses Etikett befindet sich an der Unterseite des Gehäuses. Hinweis für Kunden in Ländern, in denen EU-Richtlinien gelten Der Hersteller dieses Produkts ist Sony Corporation, 1-7-1 Konan, Minato-ku, Tokio, Japan.
Inhalt Willkommen!. . . . . . . . . . . . . . . . . . . . . . . . . . . 4 Weitere Funktionen Vorbereitungen Ändern der Klangeinstellungen . . . . . . . . . . . 14 Einstellen der Klangeigenschaften . . . . . . . 14 Individuelles Einstellen der Equalizer-Kurve — EQ3 . . . . . . . . . . . . . . . . . . . . . . . . . . . . 14 Einstellen von Konfigurationsoptionen — SET . . . . . . . . . . . . . . . . . . . . . . . . . . . . . . 15 Verwenden gesondert erhältlicher Geräte. . . . 16 Zusätzliche Audiogeräte. . .
Willkommen! Danke, dass Sie sich für diesen CD-Player von Sony entschieden haben. Mit diesem Gerät stehen Ihnen im Auto die folgenden Funktionen zur Verfügung. • CD-Wiedergabe Wiedergabe von CD-DAs (auch solche mit CD TEXT) und CD-Rs/CD-RWs (MP3-/WMA-/ AAC-Dateien (Seite 18)). CD-Typ Beschriftung auf der CD Vorbereitungen Zurücksetzen des Geräts Bevor Sie das Gerät zum ersten Mal benutzen oder wenn Sie die Autobatterie ausgetauscht oder die Verbindungen gewechselt haben, müssen Sie das Gerät zurücksetzen.
5 Drücken Sie die Auswahltaste. Der Einstellvorgang ist damit abgeschlossen und die Uhr beginnt zu laufen. Zum Einblenden der Uhrzeit drücken Sie (DSPL). Drücken Sie (DSPL) erneut, um zur vorherigen Anzeige zurückzuschalten. Anbringen der Frontplatte Setzen Sie die Aussparung A an der Frontplatte am Stift B am Gerät an und drücken Sie dann die linke Seite behutsam hinein. Drücken Sie (SOURCE) am Gerät (oder legen Sie eine CD ein), um das Gerät einzuschalten.
Lage und Grundfunktionen der Teile und Bedienelemente Hauptgerät 1 23 4 5 6 7 OPEN OFF BROWSE SOURCE SEEK AUX SEEK BACK MODE PTY AF/TA ALBUM 1 2 REP SHUF 3 4 5 PAUSE SCRL 6 DSPL PUSH ENTER / SELECT 8 9 q; qa qs qd qf Mit abgenommener Frontplatte qg qh qj RESET Kartenfernbedienung RM-X151 1 4 qk OFF SOURCE ATT SEL MODE wa ws qa + wd A Taste OFF Ausschalten bzw. Stoppen der Tonquelle. wf B Taste (BROWSE) Seite 8 Aktivieren des Quick-BrowZer-Modus.
F AUX-Eingangsbuchse Seite 16 Anschließen eines tragbaren Audiogeräts. O Taste RESET Seite 4 G Taste OPEN Seite 5 P Taste Z (Auswerfen) Seite 5 Auswerfen der CD. H Taste (BACK) Seite 8 Zurückschalten zur vorherigen Anzeige. Q CD-Einschub Seite 5 Einlegen der CD. I Empfänger für die Kartenfernbedienung Die folgenden Tasten auf der Kartenfernbedienung unterscheiden sich außerdem hinsichtlich ihres Namens bzw. ihrer Funktion von denen am Gerät.
Suche nach einem Titel — Quick-BrowZer Sie können anhand der Kategorie mühelos nach einem Titel auf einer CD oder einem iPod suchen. (BROWSE): Aktivieren/Deaktivieren des Quick-BrowZer-Modus. OFF BROWSE SOURCE SEEK SEEK Steuerregler: Auswählen einer Option (drehen) bzw. Bestätigen der Option (drücken). BACK MODE PUSH ENTER / SELECT (BACK): Zurückschalten zur vorherigen Anzeige. 1 Drücken Sie (BROWSE). Das Gerät wechselt in den Quick-BrowZer-Modus und die Liste der Suchkategorien erscheint.
CD Radio Informationen im Display Speichern und Empfangen von Sendern Achtung Wenn Sie während der Fahrt Sender einstellen, sollten Sie die BTM-Funktion (Speicherbelegungsautomatik) verwenden. Andernfalls besteht Unfallgefahr. A Tonquelle B Titelnummer/Verstrichene Spieldauer, CD-/Interpretenname, Albumnummer*, Albumname, Titelname, Textinformationen, Uhrzeit Automatisches Speichern von Sendern — BTM 1 Drücken Sie (SOURCE) so oft, bis „TUNER“ erscheint.
Automatisches Einstellen von Sendern 1 Wählen Sie den Frequenzbereich aus und starten Sie mit (SEEK) –/+ die Suche nach dem Sender. Der Suchlauf stoppt, wenn ein Sender empfangen wird. Wiederholen Sie diesen Vorgang, bis das Gerät den gewünschten Sender empfängt. Tipp Wenn Sie die Frequenz des gewünschten Senders kennen, halten Sie (SEEK) –/+ gedrückt, bis die Frequenz in etwa erreicht ist, und drücken Sie (SEEK) –/+ dann so oft, bis die gewünschte Frequenz genau eingestellt ist (manuelle Sendersuche).
Speichern von RDS-Sendern zusammen mit der AF- und TAEinstellung Sie können zusammen mit den RDS-Sendern die AF/TA-Einstellung speichern. Mit der BTMFunktion werden nur RDS-Sender mit derselben AF/TA-Einstellung gespeichert. Beim manuellen Speichern von Sendern können Sie RDS- und Nicht-RDS-Sender mit unterschiedlicher AF/TA-Einstellung speichern. Auswählen des Programmtyps (PTY) 1 1 Stellen Sie AF/TA ein und speichern Sie die Sender dann mit BTM oder manuell ab.
iPod Wiedergabe mit einem iPod Wenn Sie einen iPod an den Dock-Anschluss an der Rückseite des Geräts anschließen, können Sie den Ton über die Lautsprecher des Fahrzeugs wiedergeben lassen und den iPod über dieses Gerät steuern. Hinweise • Solange der iPod an den Dock-Anschluss angeschlossen ist, können Sie den iPod selbst nicht bedienen. • Drehen Sie die Lautstärke an diesem Gerät herunter, bevor Sie den iPod an den DockAnschluss anschließen.
Einstellen des Wiedergabemodus 1 Drücken Sie während der Wiedergabe (MODE). Der Modus wechselt folgendermaßen: Album Mode t Track Mode t Podcast Mode* t Genre Mode t Playlist Mode t Artist Mode * Wird je nach iPod-Einstellung möglicherweise nicht angezeigt.
Weitere Funktionen Ändern der Klangeinstellungen *1 Wenn der Tuner als Signalquelle ausgewählt wird, ist die Standardeinstellung „OFF“. *2 Wenn EQ3 eingeschaltet ist. *3 Wenn als Audioausgang „SUB-OUT“ eingestellt ist (Seite 15). *4 Wenn die AUX-Tonquelle aktiviert ist. Einstellen der Klangeigenschaften 1 2 Drücken Sie die Auswahltaste so oft, bis die gewünschte Option angezeigt wird. Stellen Sie durch Drehen des Steuerreglers die ausgewählte Option ein.
Einstellen von Konfigurationsoptionen — SET 1 Halten Sie die Auswahltaste gedrückt. Die Einstellanzeige erscheint. 2 Drücken Sie die Auswahltaste so oft, bis die gewünschte Option angezeigt wird. 3 Wählen Sie durch Drehen des Steuerreglers die Einstellung aus (beispielsweise „ON“ oder „OFF“). 4 Halten Sie die Auswahltaste gedrückt. Die Einstellung ist damit abgeschlossen und im Display erscheint wieder die Anzeige für den normalen Wiedergabemodus bzw. Empfangsmodus.
*1 Bei ausgeschaltetem Gerät. *2 Wenn ein UKW-Sender empfangen wird. *3 Wenn als Audioausgang „SUB-OUT“ eingestellt ist (Seite 15). Verwenden gesondert erhältlicher Geräte Zusätzliche Audiogeräte Wenn Sie ein gesondert erhältliches tragbares Audiogerät an die AUX-Eingangsbuchse (Stereominibuchse) am Gerät anschließen und dann einfach die Tonquelle auswählen, können Sie den Ton über die Lautsprecher des Fahrzeugs wiedergeben lassen.
• Taste ATT (Dämpfen des Tons) Dämpfen des Tons. Zum Beenden der Funktion drücken Sie die Taste erneut. • Taste SEL (Auswählen) Diese Taste entspricht der Auswahltaste am Gerät. Im Quick-BrowZer-Modus steht (SEL) (Auswählen) nicht zur Verfügung. • Regler PRESET/DISC CD/iPod: Entspricht der Taste (1)/(2) (ALBUM –/+) am Gerät (drücken und drehen). Radio: Einstellen gespeicherter Sender (drücken und drehen). • Lautstärkeregler VOL Entspricht dem Steuerregler am Gerät (drehen).
– Die Audiodaten werden nicht korrekt gelesen (z. B. Tonsprünge bei der Wiedergabe, keine Wiedergabe), weil ein Etikett oder Aufkleber durch Wärmeeinwirkung geschrumpft ist und die CD sich verzogen hat. • CDs mit außergewöhnlichen Formen (z. B. herzförmige, quadratische oder sternförmige CDs) können mit diesem Gerät nicht wiedergegeben werden. Falls Sie es doch versuchen, kann das Gerät beschädigt werden. Verwenden Sie solche CDs nicht. • Single-CDs (8-cm-CDs) können ebenfalls nicht verwendet werden.
WMA-Dateien Der iPod • WMA steht für Windows Media Audio. Dabei handelt es sich um einen Formatstandard zum Komprimieren von Musikdateien. Hierbei werden Audio-CD-Daten auf etwa 1/22* ihrer ursprünglichen Größe komprimiert. • WMA-Tags bestehen aus 63 Zeichen. • Fügen Sie beim Benennen einer WMA-Datei unbedingt die Dateierweiterung „.wma“ zum Dateinamen hinzu. • Bei der Wiedergabe bzw.
Austauschen der Sicherung Wartung Austauschen der Lithiumbatterie der Kartenfernbedienung Unter normalen Bedingungen hält die Batterie etwa 1 Jahr. Die Lebensdauer der Batterie kann je nach Gebrauch des Geräts jedoch auch kürzer sein. Wenn die Batterie schwächer wird, verkürzt sich die Reichweite der Kartenfernbedienung. Tauschen Sie die Batterie gegen eine neue CR2025-Lithiumbatterie aus. Bei Verwendung einer anderen Batterie besteht Feuer- oder Explosionsgefahr.
Ausbauen des Geräts 1 Technische Daten Entfernen Sie die Schutzumrandung. CD-Player 1 Nehmen Sie die Frontplatte ab (Seite 5). Signal-Rauschabstand: 120 dB Frequenzgang: 10 – 20.000 Hz Gleichlaufschwankungen: Unterhalb der Messgrenze 2 Fassen Sie die Schutzumrandung mit den Fingern an den Seitenkanten und ziehen Sie sie heraus.
Ihr Händler führt unter Umständen nicht alle der oben genannten Zubehörteile. Fragen Sie Ihren Händler nach ausführlichen Informationen. MPEG Layer-3 Audiocodiertechnologie und Patente lizenziert von Fraunhofer IIS und Thomson. Dieses Produkt ist durch bestimmte gewerbliche Schutz- und Urheberrechte der Microsoft Corporation geschützt.
Die Anzeige wird ausgeblendet bzw. erscheint nicht im Display. • Der Dimmer ist auf „DIMMER-ON“ eingestellt (Seite 15). • Die Anzeige wird ausgeblendet, wenn Sie (OFF) gedrückt halten. t Halten Sie (OFF) am Gerät erneut gedrückt, bis die Anzeige eingeblendet wird. • Die Anschlüsse sind verschmutzt (Seite 20). Die Abschaltautomatik funktioniert nicht. Das Gerät ist eingeschaltet. Die Abschaltautomatik wird nach dem Ausschalten des Geräts aktiviert. t Schalten Sie das Gerät aus.
Bei der PTY-Funktion wird „- - - - - - - -“ angezeigt. • Der aktuelle Sender ist kein RDS-Sender. • Es wurden keine RDS-Daten empfangen. • Der Sender gibt den Programmtyp nicht an. Fehleranzeigen/Meldungen CHECKING Das Gerät überprüft die Verbindung mit einem iPod. t Warten Sie, bis das Überprüfen der Verbindung beendet ist. COM ERR (iPod-Kommunikationsfehler) Aufgrund einer falschen Verbindung wurden Daten zwischen dem Gerät und dem iPod nicht erfolgreich übertragen.
En ce qui concerne l’installation et les connexions, consulter le manuel d’installation/raccordement fourni. Cette étiquette est située sur la partie inférieure du châssis. Avis à l’attention des clients des pays appliquant les directives UE Le fabricant de ce produit est Sony Corporation, 1-7-1 Konan, Minato-ku, Tokyo, Japon. Son représentant autorisé concernant la CEM et la sécurité du produit est Sony Deutschland GmbH, Hedelfinger Strasse 61, 70327 Stuttgart, Allemagne.
Table des matières Félicitations ! . . . . . . . . . . . . . . . . . . . . . . . . . . . 4 Autres fonctions Préparation Modification des caractéristiques du son . . . . 13 Réglage des caractéristiques du son . . . . . . 13 Personnalisation de la courbe de l’égaliseur — EQ3 . . . . . . . . . . . . . . . . . . . . . . . . . . . . 14 Réglage des paramètres de configuration — SET . . . . . . . . . . . . . . . . . . . . . . . . . . . . . . 14 Utilisation d’un appareil en option . . . . . . . . .
Félicitations ! Nous vous remercions d’avoir fait l’acquisition de ce lecteur de disques compacts Sony. Vous pouvez profiter de votre trajet grâce aux fonctions ci-dessous. • Lecture de CD Vous pouvez lire des CD-DA (y compris ceux qui contiennent de informations CD TEXT) et des CD-R/CD-RW (fichiers MP3/WMA/AAC (page 18)).
5 Appuyez sur la touche de sélection. La configuration est terminée et l’horloge démarre. Pour afficher l’horloge, appuyez sur (DSPL). Appuyez de nouveau sur (DSPL) pour revenir à l’écran précédent. Conseil Vous pouvez régler l’horloge automatiquement au moyen de la fonction RDS (page 11). Installation de la façade Placez l’orifice A de la façade sur la tige B de l’appareil, puis poussez légèrement sur le côté gauche pour l’enclencher.
Emplacement des commandes et opérations de base Appareil principal 1 23 4 5 6 7 OPEN OFF BROWSE SOURCE SEEK AUX SEEK BACK MODE PTY AF/TA ALBUM 1 2 REP SHUF 3 4 5 PAUSE SCRL 6 DSPL PUSH ENTER / SELECT 8 9 q; qa qs qd qf Sans la façade qg qh qj RESET Mini-télécommande RM-X151 1 4 qk OFF SOURCE ATT SEL MODE wa ws qa + wd wf A Touche OFF Permet de mettre l’appareil hors tension ; d’arrêter la source.
E Fenêtre d’affichage F Prise d’entrée AUX page 15 Permet de raccorder un appareil audio portatif. G Touche OPEN page 5 H Touche (BACK) page 8 Permet de revenir à l’écran précédent.
Remarque Si vous mettez l’appareil hors tension et que l’affichage est désactivé, il ne peut plus être utilisé avec la mini-télécommande sauf si vous enfoncez la touche (SOURCE) de l’appareil ou si vous insérez un disque dans le lecteur pour l’activer. Recherche d’une plage — Quick-BrowZer Vous pouvez facilement rechercher une plage sur un CD ou un iPod par catégorie. (BROWSE) : Pour activer/désactiver le mode Quick-BrowZer.
CD Radio Rubriques d’affichage Mémorisation et réception des stations Attention Pour syntoniser des stations pendant que vous conduisez, utilisez la fonction de mémorisation des meilleurs accords (BTM) afin d’éviter les accidents.
Syntonisation automatique 1 Sélectionnez la bande, puis appuyez sur (SEEK) –/+ pour rechercher la station. Le balayage s’interrompt lorsque l’appareil capte une station. Répétez cette procédure jusqu’à ce que vous captiez la station souhaitée.
Mémorisation des stations RDS avec les réglages AF et TA Vous pouvez présélectionner les stations RDS avec les réglages AF/TA. Si vous utilisez la fonction BTM, seules les stations RDS sont mémorisées avec les mêmes réglages AF/TA. Si vous effectuez une présélection manuelle, vous pouvez présélectionner à la fois des stations RDS et non-RDS, avec leurs réglages AF/TA respectifs. Sélection de PTY 1 Le nom du type d’émission diffusé apparaît si la station transmet des données PTY.
iPod Lecture sur un iPod En raccordant un iPod au connecteur dock situé à l’arrière de l’appareil, vous pouvez écouter la musique via les haut-parleurs de votre voiture tout en commandant l’iPod à partir de l’appareil. Remarques • Lorsqu’un iPod est raccordé au connecteur dock, vous ne pouvez effectuer aucune opération à partir de l’iPod lui-même. • Baissez le volume de l’appareil avant de raccorder l’iPod au connecteur dock.
Réglage du mode de lecture 1 En cours de lecture, appuyez sur (MODE). Le mode change comme suit : Album Mode t Track Mode (plage) t Podcast Mode* t Genre Mode t Playlist Mode (liste de lecture) t Artist Mode (artiste) * Peut ne pas apparaître selon le réglage de l’iPod.
*1 Lorsque le syntoniseur est sélectionné comme source, le réglage par défaut est « OFF ». *2 Lorsque EQ3 est activé. *3 Lorsque la sortie audio est réglée sur « SUBOUT » (page 14). *4 Lorsque la source AUX est activée. Personnalisation de la courbe de l’égaliseur — EQ3 Le paramètre « CUSTOM » de EQ3 vous permet d’effectuer vos propres réglages de l’égaliseur. 1 Sélectionnez une source, puis appuyez plusieurs fois sur la touche de sélection pour sélectionner « EQ3 ».
DIMMER Pour modifier la luminosité de l’affichage. – « DIMMER-AT » (z) : pour réduire automatiquement la luminosité de l’affichage lorsque vous allumez les phares. – « DIMMER-OFF » : pour désactiver le régulateur de luminosité. – « DIMMER-ON » : pour réduire la luminosité de l’affichage. CONTRAST Pour régler le contraste de l’affichage. Le niveau du contraste est réglable en 7 positions. M.DSPL (Affichage animé) Pour sélectionner le mode Affichage animé. – « M.
Réglage du niveau de volume Avant de commencer la lecture, n’oubliez pas de régler le volume de chaque appareil audio connecté. 1 Baissez le volume de l’appareil. 2 Appuyez plusieurs fois sur (SOURCE) jusqu’à ce que « AUX » s’affiche. « AUX FRONT IN » apparaît. 3 Démarrez la lecture sur l’appareil audio portatif, à un niveau de volume moyen. 4 Réglez votre appareil sur le volume d’écoute habituel. 5 Réglez le niveau d’entrée (page 13).
Informations complémentaires Précautions • Si votre véhicule est resté garé en plein soleil, laissez l’appareil refroidir avant de l’utiliser. • L’antenne électrique se déploie automatiquement lorsque l’appareil est en fonctionnement. Condensation Par temps de pluie ou dans des régions très humides, de l’humidité peut se condenser à l’intérieur des lentilles et dans la fenêtre d’affichage de l’appareil. Si cela se produit, l’appareil ne fonctionne pas correctement.
Disques de musique encodés à l’aide d’une technologie de protection des droits d’auteur Cet appareil est conçu pour la lecture des disques conformes à la norme Compact Disc (CD). Dernièrement, certaines maisons de disques ont lancé sur le marché divers types de disques de musique encodés selon des technologies de protection des droits d’auteur. Notez que, parmi ces types de disques, certains ne sont pas conformes à la norme CD. La lecture de ces disques avec cet appareil peut être impossible.
A propos de l’iPod Cet appareil peut être utilisé avec les iPod, iPod photo, iPod mini et iPod nano à connecteur dock avec les versions logicielles suivantes. Le fonctionnement ne peut être garanti avec les versions antérieures à celles de la liste. – iPod quatrième génération : Ver.3.1.1 – iPod cinquième génération : Ver.1.2.1 – iPod photo : Ver.1.2.1 – iPod mini : Ver.1.4.1 – iPod nano première génération : Ver.1.3.1 – iPod nano deuxième génération : Ver.1.1.3 – iPod classic : Ver.1.
Nettoyage des connecteurs L’appareil peut ne pas fonctionner correctement si les connecteurs entre l’appareil et la façade sont souillés. Pour éviter cette situation, enlevez la façade (page 5) et nettoyez les connecteurs à l’aide d’un coton-tige. N’exercez pas une pression trop forte, sinon les connecteurs peuvent être endommagés. Appareil principal Retrait de l’appareil 1 Retirez le tour de protection. 1 Retirez la façade (page 5). 2 Pincez les deux bords du tour de protection, puis retirez-le.
Spécifications Lecteur CD Rapport signal/bruit : 120 dB Réponse en fréquence : 10 à 20 000 Hz Pleurage et scintillement : en dessous du seuil mesurable Radio FM Plage de syntonisation : 87,5 à 108,0 MHz Borne d’antenne : connecteur d’antenne externe Fréquence intermédiaire : 10,7 MHz/450 kHz Sensibilité utile : 9 dBf Sélectivité : 75 dB à 400 kHz Rapport signal/bruit : 67 dB (stéréo), 69 dB (mono) Distorsion harmonique à 1 kHz : 0,5 % (stéréo), 0,3 % (mono) Séparation : 35 dB à 1 kHz Réponse en fréquence :
Dépannage La liste de contrôles suivante vous aidera à remédier aux problèmes que vous pourriez rencontrer avec cet appareil. Avant de passer en revue la liste de contrôles ci-dessous, vérifiez les procédures de raccordement et d’utilisation. Généralités L’appareil n’est pas alimenté. • Vérifiez le raccordement. Si tout est en ordre, vérifiez le fusible. • Si vous mettez l’appareil hors tension et que l’affichage disparaît, vous ne pouvez pas le commander avec la mini-télécommande.
Réception radio Impossible de capter des stations. Le son comporte des parasites. • Raccordez un câble de commande d’antenne électrique (bleu) ou un câble d’alimentation d’accessoires (rouge) au câble d’alimentation de l’amplificateur d’antenne de la voiture (uniquement si votre voiture est équipée d’une antenne FM/MW (PO)/LW (GO) intégrée dans la vitre arrière/latérale). • Vérifiez le raccordement de l’antenne du véhicule. • L’antenne automatique ne se déploie pas.
NO SUPRT (iPod non pris en charge) • Un iPod troisième génération est raccordé. • Le raccordement de l’iPod a été interrompu pendant plus de 30 secondes pendant le transfert des données. NO TP L’appareil continue à rechercher les stations diffusant des programmes de radioguidage. OFFSET Il est possible qu’il y ait un problème de fonctionnement. t Vérifiez le raccordement. Si le message d’erreur reste affiché, contactez votre revendeur Sony le plus proche.
Si dichiara che l’apparecchio è stato fabbricato in conformità all’art.2, Comma l del D.M.28.08.1995 n.548. ’ Per l’installazione e i collegamenti, fare riferimento al manuale di istruzioni per l’installazione e i collegamenti in dotazione. Questa etichetta è posta nella parte inferiore esterna. Avviso per i clienti nei Paesi in cui sono in vigore le Direttive UE Il presente apparecchio è un prodotto di Sony Corporation, 1-7-1 Konan, Minato-ku, Tokyo, Giappone.
Indice Congratulazioni! . . . . . . . . . . . . . . . . . . . . . . . . 4 Altre funzioni Operazioni preliminari Modifica delle impostazioni audio . . . . . . . . . Regolazione delle caratteristiche dell’audio . . . . . . . . . . . . . . . . . . . . . . . . . . Personalizzazione della curva dell’equalizzatore — EQ3 . . . . . . . . . . . . . Regolazione delle voci di impostazione — SET . . . . . . . . . . . . . . . . . . . . . . . . . . . . . . Uso di apparecchi opzionali . . . . . . . . . . . . . .
Congratulazioni! Complimenti per l’acquisto del presente lettore CD Sony. Durante la guida, è possibile utilizzare le funzioni riportate di seguito. • Riproduzione di CD È possibile riprodurre CD-DA (contenenti inoltre CD TEXT), CD-R/CD-RW (file MP3/ WMA /AAC (pagina 19)).
5 Premere il tasto di selezione. L’impostazione è completata e l’orologio viene attivato. Per visualizzare l’orologio, premere (DSPL). Premere di nuovo (DSPL) per tornare al display precedente. Suggerimento È possibile regolare l’orologio automaticamente tramite la funzione RDS (pagina 11). Installazione del pannello anteriore Posizionare il foro A del pannello anteriore nel mandrino B dell’apparecchio, quindi spingere il lato sinistro verso l’interno evitando di esercitare eccessiva pressione.
Posizione dei comandi e operazioni di base Unità principale 1 23 4 5 6 7 OPEN OFF BROWSE SOURCE SEEK AUX SEEK BACK MODE PTY AF/TA ALBUM 1 2 REP SHUF 3 4 5 PAUSE SCRL 6 DSPL PUSH ENTER / SELECT 8 9 q; qa qs qd qf Pannello anteriore rimosso qg qh qj RESET Telecomando a scheda RM-X151 1 4 qk OFF SOURCE ATT SEL MODE wa ws qa + wd – ql w; 6 SCRL DSPL 1 2 3 4 5 6 + VOL – La presente sezione contiene le istruzioni riguardanti la posizione dei comandi e le
F Presa di ingresso AUX pagina 16 Per collegare un dispositivo audio portatile. P Tasto Z (espulsione) pagina 5 Per estrarre il disco. G Tasto OPEN pagina 5 Q Alloggiamento del disco pagina 5 Per inserire il disco. H Tasto (BACK) pagina 8 Per tornare al display precedente.
Ricerca di un brano — Quick-BrowZer È possibile ricercare un brano contenuto in un CD o nell’iPod in modo semplice, in base alla categoria. (BROWSE): Per impostare/annullare il modo Quick-BrowZer. OFF BROWSE SOURCE SEEK SEEK Manopola di controllo: Per selezionare una voce (ruotare); per confermare una voce (premere). BACK MODE PUSH ENTER / SELECT (BACK): Per tornare al display precedente. 1 Premere (BROWSE).
CD Radio Memorizzazione e ricezione delle stazioni Voci del display Attenzione Per la sintonizzazione delle stazioni durante la guida, utilizzare la funzione BTM (memorizzazione automatica delle emittenti con sintonia migliore) per evitare incidenti.
Sintonizzazione automatica 1 Selezionare la banda, quindi premere (SEEK) –/+ per ricercare la stazione. La ricerca si arresta non appena l’apparecchio riceve una stazione. Ripetere questa procedura fino alla ricezione della stazione desiderata.
1 Impostare AF/TA, quindi memorizzare la stazione mediante la funzione BTM o manualmente. Selezione del modo PTY 1 Ricezione dei notiziari di emergenza Tenere premuto (AF/TA) (PTY) durante la ricezione FM. Se è attivato il modo AF o TA, gli annunci di emergenza interrompono automaticamente la riproduzione della sorgente selezionata.
iPod Riproduzione tramite un iPod Se si collega un iPod al connettore dock situato sulla parte posteriore dell’apparecchio, è possibile ascoltare la musica tramite i diffusori dell’auto, controllando l’iPod dall’apparecchio stesso. Note • Se un iPod viene collegato al connettore dock, non è possibile effettuare le operazioni sull’iPod stesso. • Prima di collegare l’iPod al connettore dock, accertarsi di abbassare il volume dell’apparecchio.
Impostazione del modo di riproduzione 1 Durante la riproduzione, premere (MODE). Il modo cambia come riportato di seguito: Album Mode t Track Mode t Podcast Mode* t Genre Mode t Playlist Mode t Artist Mode Riproduzione ripetuta e in ordine casuale 1 Durante la riproduzione, premere più volte (3) (REP) o (4) (SHUF) fino a visualizzare l’impostazione desiderata. Selezionare Per riprodurre TRACK un brano in modo ripetuto. * È possibile che non venga visualizzato, a seconda dell’impostazione dell’iPod.
Altre funzioni Modifica delle impostazioni audio Regolazione delle caratteristiche dell’audio Personalizzazione della curva dell’equalizzatore — EQ3 1 Premere più volte il tasto di selezione fino a visualizzare la voce desiderata. L’opzione “CUSTOM” di EQ3 consente di effettuare impostazioni dell’equalizzatore personalizzate. 2 Ruotare la manopola di controllo per regolare la voce selezionata. Dopo 3 secondi, l’impostazione è completata e il display torna al modo di riproduzione/ ricezione normale.
Regolazione delle voci di impostazione — SET 1 Tenere premuto il tasto di selezione. Viene visualizzato il display di impostazione. 2 Premere più volte il tasto di selezione fino a visualizzare la voce desiderata. 3 Ruotare la manopola di controllo per selezionare l’impostazione (ad esempio “ON” o “OFF”). 4 Tenere premuto il tasto di selezione. L’impostazione è completata e il display torna al modo di riproduzione/ricezione normale.
LOUD (enfasi dei bassi) Per consentire un ascolto più chiaro a livelli di volume ridotti. – “LOUD-ON”: per enfatizzare i bassi e gli acuti. – “LOUD-OFF” (z) : per non enfatizzare i bassi e gli acuti. BTM (pagina 9) *1 Se l’apparecchio è spento. *2 Durante la ricezione FM. *3 Quando l’uscita audio è impostata su “SUB-OUT” (pagina 15).
Telecomando a rotazione RM-X4S Applicazione dell’etichetta Applicare l’etichetta delle indicazioni in base al modo in cui si desidera montare il telecomando a rotazione. Modifica della direzione operativa La direzione operativa dei comandi è impostata in fabbrica come illustrato di seguito. Per aumentare Per diminuire SEL MODE DSPL Se si desidera montare il telecomando a rotazione sul lato destro del piantone di guida, è possibile invertire la direzione operativa dei comandi.
Informazioni aggiuntive Precauzioni • Se l’auto è stata parcheggiata in un luogo esposto a luce solare diretta, attendere che l’apparecchio si raffreddi prima di utilizzarlo. • L’antenna elettrica si estende automaticamente durante il funzionamento dell’apparecchio. Formazione di condensa Nei giorni di pioggia o in zone estremamente umide, è possibile che all’interno delle lenti e del display dell’apparecchio si formi della condensa. Di conseguenza, l’apparecchio potrebbe non funzionare correttamente.
Nota sui DualDisc Un DualDisc è un disco a due lati che abbina materiale registrato su DVD su un lato e materiale audio digitale sull’altro. Tuttavia, poiché il lato del materiale audio non è conforme allo standard del Compact Disc (CD), la riproduzione su questo prodotto non è garantita.
Pulizia dei connettori Manutenzione Sostituzione della pila al litio del telecomando a scheda In condizioni normali, la pila dura circa 1 anno (il ciclo di vita può risultare più breve in funzione delle condizioni di utilizzo). Quando la pila si scarica, il raggio d’azione del telecomando a scheda risulta ridotto. Sostituire la pila con una pila al litio CR2025 nuova. L’uso di pile diverse potrebbe comportare il rischio di incendi o esplosioni.
Rimozione dell’apparecchio 1 Caratteristiche tecniche Rimuovere la cornice protettiva. Lettore CD 1 Rimuovere il pannello anteriore (pagina 5). Rapporto segnale-rumore: 120 dB Risposta in frequenza: 10 – 20.000 Hz Wow e flutter: al di sotto del limite misurabile 2 Afferrare entrambe le estremità della cornice di protezione, quindi estrarla.
Generali Uscite: Terminale delle uscite audio (possibilità di selezione tra anteriore, subwoofer/posteriore) Terminale di controllo del relè dell’antenna elettrica Terminale di controllo dell’amplificatore di potenza Ingressi: Terminale di controllo ATT del telefono Terminale di ingresso del telecomando Terminale di ingresso dell’antenna Presa di ingresso AUX (minipresa stereo) Terminale di ingresso dei segnali iPod (connettore dock) Comandi dei toni: Bassi: ±10 dB a 60 Hz (XPLOD) Medi: ±10 dB a 1 kHz (XPLO
La funzione di spegnimento automatico non è operativa. L’apparecchio è acceso. La funzione di spegnimento automatico si attiva dopo avere spento l’apparecchio. t Spegnere l’apparecchio. Il telecomando a scheda non funziona. Accertarsi che la protezione sia stata rimossa (pagina 4). La funzione DSO non è disponibile. A seconda del tipo di interni dell’auto o del tipo di musica, è possibile che la funzione DSO non produca l’effetto desiderato. Riproduzione di CD Non è possibile inserire un disco.
Messaggi e indicazioni di errore 24 CHECKING L’apparecchio sta verificando il collegamento di un iPod. t Attendere il termine del controllo. COM ERR (errore di comunicazione iPod) A causa di un collegamento errato, non è stato possibile trasferire correttamente i dati tra l’apparecchio e l’iPod. t Ricollegare l’iPod e selezionare l’iPod. ERROR • Il disco è sporco o è stato inserito in senso contrario. t Pulire il disco o inserirlo correttamente. • È stato inserito un disco vuoto.
Zie voor het monteren en aansluiten van het apparaat de bijgeleverde handleiding "Installatie en aansluitingen". Dit label bevindt zich aan de onderkant van het apparaat. Kennisgeving voor klanten in de landen waar EU-richtlijnen van toepassing zijn De fabrikant van dit product is Sony Corporation, 1-7-1 Konan, Minato-ku, Tokio, Japan. De geautoriseerde vertegenwoordiger voor EMC en productveiligheid is Sony Deutschland GmbH, Hedelfinger Strasse 61, 70327 Stuttgart, Duitsland.
Inhoudsopgave Welkom! . . . . . . . . . . . . . . . . . . . . . . . . . . . . . . 4 Andere functies Aan de slag De geluidsinstellingen wijzigen . . . . . . . . . . . De geluidskenmerken wijzigen . . . . . . . . . De equalizercurve aanpassen — EQ3 . . . . Instelitems aanpassen — SET. . . . . . . . . . . . . Optionele apparaten gebruiken . . . . . . . . . . . . Randapparatuur voor audio . . . . . . . . . . . . Bedieningssatelliet RM-X4S . . . . . . . . . . . Het apparaat opnieuw instellen . . . . . . . .
Welkom! Aan de slag Dank u voor de aankoop van deze Sony Compact Disc Player. U kunt tijdens het rijden genieten van de volgende functies. • CD's afspelen U kunt CD-DA's (ook met CD TEXT) en CD-R's/CD-RW's (MP3-/WMA-/ AAC-bestanden (pagina 18)) afspelen. Soorten discs Label op de disc Het apparaat opnieuw instellen Voordat u het apparaat voor het eerst gebruikt of na het vervangen van de accu of het wijzigen van de aansluitingen, moet u het apparaat opnieuw instellen.
5 Druk op de selectietoets. Het instellen is voltooid en de klok begint te lopen. Als u de klok wilt weergeven, drukt u op (DSPL). Druk nogmaals op (DSPL) om terug te keren naar het vorige scherm. Het voorpaneel bevestigen Plaats opening A van het voorpaneel op pin B van het apparaat en druk de linkerzijde voorzichtig naar binnen. Druk op (SOURCE) op het apparaat (of plaats een disc) om het apparaat te activeren. Tip U kunt de klok automatisch instellen met de RDSfunctie (pagina 11).
Bedieningselementen en algemene handelingen Hoofdeenheid 1 23 4 5 6 7 OPEN OFF BROWSE SOURCE SEEK AUX SEEK BACK MODE PTY AF/TA ALBUM 1 REP SHUF 3 4 2 5 PAUSE SCRL 6 DSPL PUSH ENTER / SELECT 8 9 q; qa qs qd qf Voorpaneel verwijderd qg qh qj RESET Kaartafstandsbediening RM-X151 1 4 qk OFF SOURCE ATT SEL MODE wa ws qa + wd – ql w; SCRL DSPL 1 2 3 4 5 6 + VOL – wf wg In dit gedeelte vindt u informatie over de locatie van bedieningselementen en instructi
F AUX-ingang pagina 16 Een draagbaar audioapparaat aansluiten. Q Discsleuf pagina 5 De disc plaatsen. G OPEN toets pagina 5 De volgende toetsen op de kaartafstandsbediening verschillen van de toetsen op het apparaat of hebben andere functies dan de toetsen op het apparaat. Verwijder het beschermende laagje vóór gebruik (pagina 4). H (BACK) toets pagina 8 Terugkeren naar het vorige scherm.
Zoeken naar een track — Quick-BrowZer U kunt gemakkelijk op categorie zoeken naar een track op een CD of iPod. (BROWSE): De Quick-BrowZer-stand openen/sluiten. OFF BROWSE SOURCE SEEK SEEK Regelknop: Het item selecteren (draaien); het item bevestigen (indrukken). BACK MODE PUSH ENTER / SELECT (BACK): Terugkeren naar het vorige scherm. 1 Druk op (BROWSE). De Quick-BrowZer-stand op het apparaat wordt geactiveerd en er wordt een lijst met zoekcategorieën weergegeven.
CD Radio Zenders opslaan en ontvangen Schermitems Let op Als u afstemt op zenders tijdens het rijden, moet u de BTM-functie (geheugen voor beste afstemming) gebruiken om ongelukken te vermijden. Automatisch opslaan — BTM 1 Druk herhaaldelijk op (SOURCE) tot "TUNER" wordt weergegeven. Druk herhaaldelijk op (MODE) om de band te wijzigen. U kunt FM1, FM2, FM3, MW of LW selecteren. * Het albumnummer wordt alleen weergegeven als het album wordt gewijzigd. 2 Houd de selectietoets ingedrukt.
Tip Als u de frequentie kent van de zender die u wilt beluisteren, houdt u (SEEK) –/+ ingedrukt tot de frequentie ongeveer is bereikt en drukt u vervolgens herhaaldelijk op (SEEK) –/+ om nauwkeurig af te stemmen op de gewenste frequentie (handmatig afstemmen). RDS Overzicht FM-zenders met de RDS-dienst (radiogegevenssysteem) sturen onhoorbare digitale informatie mee met het gewone radioprogrammasignaal.
Een regionaal programma beluisteren — REG Als de AF-functie is ingeschakeld: met de fabrieksinstelling van het apparaat wordt ontvangst tot een bepaalde regio beperkt, zodat er niet automatisch wordt overgeschakeld naar een andere regionale zender met een sterkere frequentie. Wanneer u het ontvangstgebied van het regionale programma verlaat, stelt u tijdens FM-ontvangst "REG-OFF" in bij de instellingen (pagina 15). Opmerking Deze functie werkt niet in het Verenigd Koninkrijk en bepaalde andere gebieden.
iPod Een iPod afspelen Door een iPod aan te sluiten op de dockconnector aan de achterkant van het apparaat, kunt u het geluid beluisteren via de autoluidsprekers, terwijl u de iPod bedient vanaf het apparaat. Opmerkingen • Wanneer een iPod is aangesloten op de dockconnector, kunnen er geen bewerkingen worden uitgevoerd op de iPod. • Zet het volume van het apparaat zachter voordat u de iPod aansluit op de dockconnector.
De weergavestand instellen 1 Druk tijdens het afspelen op (MODE). De stand wordt als volgt gewijzigd: Album Mode t Track Mode t Podcast Mode* t Genre Mode t Playlist Mode t Artist Mode * Wordt mogelijk niet weergegeven, afhankelijk van de iPod-instelling.
Andere functies De geluidsinstellingen wijzigen De geluidskenmerken wijzigen 1 2 Druk herhaaldelijk op de selectietoets tot het gewenste item wordt weergegeven. Draai de regelknop om het geselecteerde item aan te passen. Na 3 seconden is het instellen voltooid en keert het scherm terug naar de normale weergave-/ontvangststand. De volgende items kunnen worden ingesteld (volg de paginaverwijzing voor meer informatie): "z" geeft de standaardinstellingen aan.
Instelitems aanpassen — SET 1 Houd de selectietoets ingedrukt. Het installatievenster wordt weergegeven. 2 Druk herhaaldelijk op de selectietoets tot het gewenste item wordt weergegeven. 3 Draai de regelknop om de instelling (bijvoorbeeld "ON" of "OFF") te selecteren. 4 Houd de selectietoets ingedrukt. Het instellen is voltooid en het scherm keert terug naar de normale weergave-/ ontvangststand. Opmerking De weergegeven items zijn afhankelijk van de bron en de instelling.
Optionele apparaten gebruiken Randapparatuur voor audio Door een optioneel draagbaar audioapparaat aan te sluiten op de AUX-ingang (stereo miniaansluiting) op het apparaat en vervolgens de bron te selecteren, kunt u het audioapparaat beluisteren via de autoluidsprekers. Het volume kan worden aangepast voor elk verschil tussen het apparaat en het draagbare audioapparaat. Volg de onderstaande procedure: Een draagbaar audioapparaat aansluiten 1 Schakel het draagbare audioapparaat uit.
De werkingsrichting wijzigen De werkingsrichting van de bedieningselementen is in de fabriek ingesteld, zoals hieronder wordt aangegeven. Verhogen Verlagen Als u de bedieningssatelliet rechts op de stuurkolom moet monteren, kan de werkingsrichting worden omgekeerd. 1 Terwijl u de VOL regelaar indrukt, houdt u (SEL) ingedrukt. Aanvullende informatie Voorzorgsmaatregelen • Wanneer uw auto in de volle zon heeft gestaan, moet u eerst het apparaat laten afkoelen voordat u het gebruikt.
• Reinig een disc voor het afspelen altijd met een in de handel verkrijgbare reinigingsdoek. Veeg de disc van binnen naar buiten schoon. Gebruik geen oplosmiddelen zoals benzine, thinner en in de handel verkrijgbare reinigingsmiddelen of antistatische sprays voor grammofoonplaten.
Informatie over AAC-bestanden • AAC (Advanced Audio Coding) is een compressie-indeling voor muziekbestanden. Audio-CD-gegevens worden gecomprimeerd tot ongeveer 1/11* van de oorspronkelijke grootte. • Voor AAC-tag geldt een maximum van 126 tekens. • Wanneer u een AAC-bestand een naam geeft, moet u altijd de extensie ".m4a" aan de bestandsnaam toevoegen.
Aansluitingen schoonmaken De werking van het apparaat kan worden verstoord als de aansluitingen tussen het apparaat en het voorpaneel niet schoon zijn. U kunt dit voorkomen door het voorpaneel (pagina 5) los te maken en de aansluitingen te reinigen met een wattenstaafje. Gebruik hierbij niet teveel kracht. Anders kunnen de aansluitingen worden beschadigd. Hoofdeenheid Het apparaat verwijderen 1 Verwijder de beschermende rand. 1 Maak het voorpaneel los (pagina 5).
Technische gegevens CD-speler Signaal/ruis-afstand: 120 dB Frequentiebereik: 10 – 20.000 Hz Snelheidsfluctuaties: Minder dan meetbare waarden Tuner FM Afstembereik: 87,5 – 108,0 MHz Antenne-aansluiting: Aansluiting voor externe antenne Tussenfrequentie: 10,7 MHz/450 kHz Bruikbare gevoeligheid: 9 dBf Selectiviteit: 75 dB bij 400 kHz Signaal/ruis-afstand: 67 dB (stereo), 69 dB (mono) Harmonische vervorming bij 1 kHz: 0,5 % (stereo), 0,3 % (mono) Scheiding: 35 dB bij 1 kHz Frequentiebereik: 30 – 15.
Problemen oplossen De onderstaande controlelijst kan u helpen bij het oplossen van problemen die zich met het apparaat kunnen voordoen. Voordat u de onderstaande controlelijst doorneemt, moet u eerst de aanwijzingen voor aansluiting en gebruik controleren. Algemeen Het apparaat wordt niet van stroom voorzien. • Controleer de aansluiting. Controleer de zekering wanneer alles in orde is.
Radio-ontvangst De zenders kunnen niet worden ontvangen. Het geluid is gestoord. • Sluit de bedieningskabel van de elektrische antenne (blauw) of voedingskabel voor accessoires (rood) aan op de voedingskabel van de auto-antenneversterker (alleen als uw auto is uitgerust met een FM/MW/LWantenne in de achter- of zijruit). • Controleer de aansluiting van de auto-antenne. • De automatische antenne schuift niet uit. t Controleer de aansluiting van de antennebedieningskabel. • Controleer de frequentie.
NO TP Het apparaat blijft zoeken naar beschikbare TPzenders. OFFSET Er is wellicht een interne storing. t Controleer de aansluiting. Als de foutmelding in het scherm blijft staan, moet u de dichtstbijzijnde Sony-handelaar raadplegen. READ Alle track- en albuminformatie op de disc/iPod wordt gelezen. t Wacht totdat het lezen is voltooid en het afspelen automatisch wordt gestart. Afhankelijk van de disc-/iPod-structuur kan dit meer dan een minuut in beslag nemen.
Tragen Sie die Seriennummer (SERIAL NO.) in dem reservierten Feld ein. Sie finden diese auf einem Aufkleber, der auf dem Gerätegehäuse angebracht ist. Nehmen Sie den ausgefüllten Geräte-Pass anschließend unbedingt aus der Bedienungsanleitung heraus, falls Sie diese im Fahrzeug aufbewahren möchten. Bitte bewahren Sie den Geräte-Pass an einem sicheren Ort auf. Er kann im Falle eines Diebstahls zur ldentifikation lhres Eigentums dienen.