4-159-947-11 (1) FM/AM Compact Disc Player Operating Instructions US Mode d’emploi FR Owner’s Record The model and serial numbers are located on the bottom of the unit. Record the serial number in the space provided below. Refer to these numbers whenever you call upon your Sony dealer regarding this product. Model No. CDX-GT740UI Serial No. To cancel the demonstration (Demo) display, see page 6. Pour annuler l’affichage de démonstration (Demo), reportez-vous à la page 6.
Be sure to install this unit in the dashboard of the car for safety. For installation and connections, see the supplied installation/ connections manual. Warning This equipment has been tested and found to comply with the limits for a Class B digital device, pursuant to Part 15 of the FCC Rules. These limits are designed to provide reasonable protection against harmful interference in a residential installation.
Content providers are using the digital rights management technology for Windows Media contained in this device (“WM-DRM”) to protect the integrity of their content (“Secure Content”) so that their intellectual property, including copyright, in such content is not misappropriated. This device uses WM-DRM software to play Secure Content (“WM-DRM Software”).
Table of Contents Getting Started USB devices Playable discs on this unit . . . . . . . . . . . . . . . . . 6 Resetting the unit . . . . . . . . . . . . . . . . . . . . . . . . 6 Canceling the Demo mode . . . . . . . . . . . . . . . . 6 Preparing the card remote commander . . . . . . . 6 Setting the clock . . . . . . . . . . . . . . . . . . . . . . . . 6 Detaching the front panel . . . . . . . . . . . . . . . . . 7 Attaching the front panel . . . . . . . . . . . . . . . 7 Playing back a USB device. . . .
Support site If you have any questions or for the latest support information on this product, please visit the web site below: http://esupport.sony.com http://www.xplodsony.
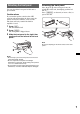
Getting Started Playable discs on this unit This unit can play CD-DA (also containing CD TEXT) and CD-R/CD-RW (MP3/WMA/AAC files (page 20)). Type of discs Preparing the card remote commander Remove the insulation film. Label on the disc CD-DA Tip For how to replace the battery, see page 21. MP3 WMA AAC Resetting the unit Before operating the unit for the first time, or after replacing the car battery or changing the connections, you must reset the unit.
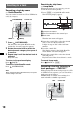
Detaching the front panel You can detach the front panel of this unit to prevent theft. Caution alarm Attaching the front panel Place the hole A of the front panel onto the spindle B on the unit, then lightly push the left side in. Press (SOURCE) on the unit (or insert a disc) to operate the unit. If you turn the ignition switch to the OFF position without detaching the front panel, the caution alarm will sound for a few seconds. The alarm will only sound if the built-in amplifier is used.
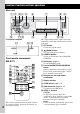
Location of controls and basic operations Main unit 1 2 34 5 OFF 8 9 7 PUSH ENTER/SOUND/ ZAP SEEK 6 OPEN MENU SOURCE MODE AUX SCRL SEEK q; qa qs REP SHUF 1 2 qd Front panel removed qj qk ql ALBUM 3 4 DM PAUSE 5 6 qf DSPL qg qh The corresponding buttons on the card remote commander control the same functions as those on the unit. A OFF button To turn off; stop the source. B RESET C SOURCE button*1 To turn on; change the source (Radio/CD/ USB/AUX).
K MODE button*1 page 11, 15, 16, 17 Press to select the radio band (FM/AM)/ select the play mode of iPod. Press and hold to enter/cancel the passenger control. L (LIST/BROWSE) button page 10, 12 To list up (Radio); enter the Quick-BrowZer mode (CD/USB). The following buttons on the card remote commander have also different buttons/functions from the unit. Remove the insulation film before use (page 6). w; < (.)/, (>) buttons To control CD/radio/USB, the same as (SEEK) –/+ on the unit.
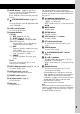
Searching for a track Searching a track by name — Quick-BrowZer You can search for a track in a CD or USB device easily by category. (LIST/BROWSE) OFF SEEK Searching by skip items — Jump mode When many items are in a category, you can search the desired item quickly. 1 Press (SEEK) + in Quick-BrowZer mode. The following display appears. A B Control dial ZAP SOURCE MODE SEEK SEEK +/– (BACK) 1 Press (LIST/BROWSE). The unit enters the Quick-BrowZer mode, and the list of search categories appears.
1 Press (ZAP) during playback. Playback starts from a passage of the next track. The passage is played for the set time, then a click sounds and the next passage starts. 2 ZAP 2 Storing and receiving stations Caution Track 1 Radio 3 4 The part of each track to playback in ZAPPIN mode. Press the control dial or (ZAP) when a track you want to listen is played back. The track that you select returns to normal play mode from the beginning. To search a track by ZAPPIN mode again, repeat steps 1 and 2.
Receiving a station through a list — LIST You can list up the frequency. 1 2 Select the band, then press BROWSE). The preset list appears. (LIST/ Rotate the control dial until the desired station appears. CD Playing a disc 1 2 3 Press (OPEN). Insert the disc (label side up). Close the front panel. Playback starts automatically. Ejecting the disc 3 Press the control dial to receive the station. The display returns to normal reception mode. 1 Press (OPEN). 2 Press Z. The disc is ejected.
Repeat and shuffle play 1 During playback, press (1) (REP) or (2) (SHUF) repeatedly until the desired setting appears. USB devices For details on the compatibility of your USB device, visit the support site. Select To play Support site Repeat Track track repeatedly. Repeat Album* album repeatedly. http://esupport.sony.com http://www.xplodsony.com/ Shuffle Album* album in random order. Shuffle Disc disc in random order. * When an MP3/WMA/AAC is played.
Removing the USB device 1 Stop the USB device playback. 2 Remove the USB device. If you remove your USB device during playback, data in the USB device may be damaged. Notes • Do not use USB devices so large or heavy that they may fall down due to vibration, or cause a loose connection. • Do not detach the front panel during playback of the USB device, otherwise USB data may be damaged. • This unit cannot recognize USB devices via a USB hub.
The tracks on the iPod start playing automatically from the point last played. If an iPod is already connected, to start playback press (SOURCE) repeatedly until “USB” or “iPod” appears. iPod For details on the compatibility of your iPod, see “About iPod” on page 21 or visit the support site. In these Operating Instructions, “iPod” is used as a general reference for the iPod functions on the iPod and iPhone, unless otherwise specified by the text or illustrations.
Setting the play mode Display items To change display items, press (DSPL). B A 1 During playback, press (MODE). The mode changes as follows: Album Mode t Track Mode t Podcast Mode* t Genre Mode t Playlist Mode t Artist Mode * May not appear depending on iPod setting.
Operating an iPod directly — Passenger control You can operate an iPod connected to the dock connector directly. 1 During playback, press and hold (MODE). “Mode iPod” appears and you will be able to operate the iPod directly. Other functions Changing the sound settings Adjusting the sound characteristics 1 2 Press the control dial. 3 Rotate the control dial to select the setting, then press it. 4 Press (BACK). The setting is complete and the display returns to normal play/reception mode.
Selectable “Q” settings in each range: Low: “0.5,” “1.0,” “1.5,” or “2.0” Mid: “0.75,” “1.0,” “1.25,” or “1.5” Hi: “0.75,” or “1.25” Fader & Balance Fader Adjusts the relative level: “Front:15”– “Center” – “Rear:15.” Balance Adjusts the sound balance: “Right:15”– “Center” – “Left:15.” AUX Level*2 Adjusts the volume level for each connected auxiliary equipment: “+18 dB” – “0 dB” – “–8 dB.” This setting negates the need to adjust the volume level between sources.
Adjusting setup items — SET 1 Press and hold the control dial. The setup display appears. 2 Rotate the control dial until the desired menu item appears, then press it. 3 Rotate the control dial to select the setting, then press it. The setting is complete. 4 Press (BACK). The display returns to normal play/reception mode. Note Displayed items will differ, depending on the source and setting.
Using optional equipment Auxiliary audio equipment By connecting an optional portable audio device to the AUX input jack (stereo mini jack) on the unit and then simply selecting the source, you can listen on your car speakers. The volume level is adjustable for any difference between the unit and the portable audio device. Follow the procedure below: Connecting the portable audio device 1 Turn off the portable audio device. 2 Turn down the volume on the unit. 3 Connect to the unit.
– CD-R/CD-RW other than those recorded in music CD format or MP3 format conforming to ISO9660 Level 1/Level 2, Joliet/Romeo or multi-session. Playback order of MP3/WMA/AAC files MP3/WMA/AAC Folder (album) MP3/WMA/ AAC file (track) Maintenance Replacing the lithium battery of the card remote commander Under normal conditions, the battery will last approximately 1 year. (The service life may be shorter, depending on the conditions of use.
Cleaning the connectors The unit may not function properly if the connectors between the unit and the front panel are not clean. In order to prevent this, detach the front panel (page 7) and clean the connectors with a cotton swab. Do not apply too much force. Otherwise, the connectors may be damaged. Main unit Removing the unit 1 Remove the protection collar. 1 Detach the front panel (page 7). 2 Pinch both edges of the protection collar, then pull it out.
Specifications AUDIO POWER SPECIFICATIONS CEA2006 Standard Power Output: 17 Watts RMS 4 at 4 Ohms < 1% THD+N SN Ratio: 82 dBA (reference: 1 Watt into 4 Ohms) Tuner section FM Tuning range: 87.5 – 107.
Troubleshooting The following checklist will help you remedy problems you may encounter with your unit. Before going through the checklist below, check the connection and operating procedures. If the problem is not solved, visit the following support site. Support site http://esupport.sony.com http://www.xplodsony.com/ General 24 No power is being supplied to the unit. • Check the connection or fuse. • If the unit is turned off and the display disappears, it cannot be operated with the remote commander.
CD playback The disc cannot be loaded. • Another disc is already loaded. • The disc has been forcibly inserted upside down or in the wrong way. The disc does not play back. • Defective or dirty disc. • The CD-Rs/CD-RWs are not for audio use (page 20). MP3/WMA/AAC files cannot be played back. The disc is incompatible with the MP3/WMA/AAC format and version. For details on playable discs and formats, visit the support site. MP3/WMA/AAC files take longer to play back than others.
Push Reset This unit or USB device cannot be operated due to a problem. t Press the RESET button (page 6). “ ” or “ ” During reverse or fast-forward, you have reached the beginning or the end of the disc and you cannot go any further. “ ” The character cannot be displayed with the unit. If these solutions do not help improve the situation, consult your nearest Sony dealer. If you take the unit to be repaired because of CD playback trouble, bring the disc that was used at the time the problem began.
Pour plus de sécurité, installez cet appareil dans le tableau de bord de votre véhicule. Pour de plus amples informations sur l’installation et les raccordements, reportez-vous au manuel d’installation et de raccordement fourni. Windows Media et le logo Windows sont des marques de commerce ou des marques déposées de Microsoft Corporation aux États-Unis et/ou dans d’autres pays. Avertissement iPod est une marque de commerce de Apple Inc., déposée aux États-Unis et dans d’autres pays.
Les fournisseurs de ce contenu utilisent la technologie de gestion des droits numériques pour Windows Media contenue dans cet appareil (« WM-DRM ») pour protéger l’intégrité de leur contenu (« Contenu sécurisé ») pour que la propriété intellectuelle, y compris les droits d’auteur, de ce contenu, ne soit pas détournée. Cet appareil utilise le logiciel WM-DRM pour lire le contenu sécurisé (« Logiciel WM-DRM »).
Table des matières Préparation Périphériques USB Disques pouvant être lus sur cet appareil . . . . . 6 Réinitialisation de l’appareil . . . . . . . . . . . . . . . 6 Annulation du mode Démo . . . . . . . . . . . . . . . . 6 Préparation de la mini-télécommande . . . . . . . . 6 Réglage de l’horloge . . . . . . . . . . . . . . . . . . . . . 6 Retrait de la façade . . . . . . . . . . . . . . . . . . . . . . 7 Installation de la façade . . . . . . . . . . . . . . . . 7 Lecture de périphériques USB . . . . .
Sites d’assistance Si vous avez des questions ou si vous souhaitez consulter les dernières informations d’assistance sur ce produit, visitez les sites Web suivants : http://esupport.sony.com http://www.xplodsony.
4 Préparation Disques pouvant être lus sur cet appareil Cet appareil peut lire des CD-DA (y compris ceux qui contiennent des informations CD TEXT) et des CD-R/CD-RW (fichiers MP3/WMA/AAC (page 21)). Type de disques Appuyez sur (BACK). L’appareil revient au mode de lecture/ réception normal. Préparation de la mini-télécommande Retirez la feuille de protection. Symbole indiqué sur le disque CD-DA Conseil Pour obtenir des informations sur la façon de remplacer la pile, reportez-vous à la page 22.
Retrait de la façade Vous pouvez retirer la façade de cet appareil pour le protéger du vol. Alarme d’avertissement Installation de la façade Placez l’orifice A de la façade sur la tige B de l’appareil, puis poussez doucement sur le côté gauche pour l’engager en position. Appuyez sur (SOURCE) sur l’appareil (ou insérez un disque) pour le faire fonctionner. Si vous mettez la clé de contact en position OFF sans ôter la façade, l’alarme d’avertissement retentit pendant quelques secondes.
Emplacement des commandes et opérations de base Appareil principal 1 2 34 5 OFF 8 9 7 PUSH ENTER/SOUND/ ZAP SEEK 6 OPEN MENU SOURCE MODE AUX SCRL SEEK q; qa qs REP SHUF 1 2 qd Sans la façade qj qk ql ALBUM 3 4 qf DM PAUSE 5 6 DSPL qg qh A Touche OFF Permet de mettre l’appareil hors tension ; d’arrêter la source. B Touche (BACK) Permet de revenir à l’écran précédent. C Touche SOURCE*1 Mise sous tension ; changement de la source (Radio/CD/USB/AUX).
Radio : Permettent de régler automatiquement les stations (appuyez) ; de rechercher manuellement une station (appuyez sur la touche et maintenez-la enfoncée). K Touche MODE*1 page 11, 15, 16, 17 Appuyez sur cette touche pour sélectionner la bande radio (FM/AM) ou pour sélectionner le mode de lecture de l’iPod. Appuyez et maintenez la pression pour activer et désactiver la commande passager.
Recherche d’une plage Recherche d’une plage par nom — Quick-BrowZer Vous pouvez facilement rechercher une plage sur un CD ou un périphérique USB par catégorie. (LIST/BROWSE) OFF SEEK Molette de réglage Recherche d’éléments par saut — Mode Jump Lorsqu’une catégorie contient de nombreux éléments, vous pouvez rechercher rapidement l’élément de votre choix. 1 Appuyez sur (SEEK) + en mode QuickBrowZer. L’écran suivant apparaît. A B ZAP SOURCE MODE SEEK SEEK +/– (BACK) 1 Appuyez sur (LIST/BROWSE).
Recherche d’une plage en écoutant des passages — ZAPPIN™ Radio Tout en écoutant successivement de courts passages de plages d’un CD ou d’un périphérique USB, vous pouvez rechercher une plage de votre choix. Le mode ZAPPIN est approprié pour rechercher une plage en mode de lecture aléatoire ou répétée aléatoire.
Syntonisation automatique CD 1 Lecture d’un disque Sélectionnez la bande, puis appuyez sur (SEEK) +/– pour rechercher la station. Le balayage s’interrompt lorsque l’appareil capte une station. Répétez cette procédure jusqu’à ce que vous captiez la station souhaitée.
Conseil Les rubriques d’affichage diffèrent selon le type de disque, le format d’enregistrement et les réglages. Lecture répétée et lecture aléatoire 1 Périphériques USB Pour plus de détails sur la compatibilité de votre périphérique USB, visitez nos sites d’assistance. Sites d’assistance En cours de lecture, appuyez plusieurs fois sur (1) (REP) ou (2) (SHUF) jusqu’à ce que le réglage souhaité apparaisse. Sélectionnez Pour lire Repeat Track une plage en boucle. Repeat Album* un album en boucle.
Si un périphérique USB est déjà raccordé, appuyez plusieurs fois sur (SOURCE) jusqu’à ce que l’indication « USB » s’affiche pour lancer la lecture. Appuyez sur (OFF) pour arrêter la lecture. Retrait du périphérique USB 1 Arrêtez la lecture du périphérique USB. 2 Retirez le périphérique USB. Si vous retirez votre périphérique USB pendant la lecture, les données stockées sur celui-ci peuvent être endommagées.
Les plages de l’iPod sont lues automatiquement à partir de l’endroit où la lecture s’était terminée. Si un iPod est déjà raccordé, appuyez plusieurs fois sur (SOURCE) jusqu’à ce que l’indication « USB » ou « iPod » s’affiche pour lancer la lecture. iPod Pour plus de détails sur la compatibilité de votre iPod, reportez-vous à la section « À propos de l’iPod » à la page 22 ou visitez notre site d’assistance.
Réglage du mode de lecture Rubriques d’affichage Appuyez sur (DSPL) pour modifier les rubriques d’affichage. 1 B A En cours de lecture, appuyez sur (MODE). Le mode change comme suit : Album Mode t Track Mode t Podcast Mode* t Genre Mode t Playlist Mode t Artist Mode * Peut ne pas apparaître selon le réglage de l’iPod.
Pour revenir au mode de lecture normal, sélectionnez « Repeat off » ou « Shuffle off ». Commander un iPod directement — Commande passager Vous pouvez commander directement un iPod raccordé au connecteur dock. 1 En cours de lecture, appuyez sur (MODE) et maintenez la touche enfoncée. L’indication « Mode iPod » apparaît et vous pouvez commander directement l’iPod. Pour quitter la commande passager Appuyez sur la touche (MODE) et maintenez-la enfoncée.
DSO (répartiteur dynamique du son émis) Permet de créer un champ sonore mieux réparti. Permet de sélectionner le mode DSO : « 1 », « 2 », « 3 » ou « off ». Plus le chiffre est élevé, plus l’effet est prononcé. Fader & Balance Fader Permet de régler le niveau relatif : « Front:15 » – « Center » – « Rear:15 ». Balance Permet de régler l’équilibre du son : « Right:15 » – « Center » – « Left:15 ».
Réglage des paramètres de configuration — SET 1 Maintenez la molette de réglage enfoncée. L’écran de configuration apparaît. 2 Tournez la molette de réglage jusqu’à ce que le paramètre de menu souhaité s’affiche, puis appuyez dessus. 3 Tournez la molette pour sélectionner le paramètre, puis appuyez dessus. Le réglage est terminé. 4 Appuyez sur (BACK). L’appareil revient au mode de lecture/ réception normal. Remarque Les rubriques affichées diffèrent selon la source et le réglage.
*1 Lorsque l’appareil est hors tension. *2 Lors d’une réception FM. *3 Dans ce cas, certaines émissions stéréo FM peuvent passer en réception mono, même si le mode de réception stéréo est activé. *4 Lorsque la source CD/USB/iPod est activée.
Informations complémentaires Précautions • Si votre véhicule est resté garé en plein soleil, laissez l’appareil refroidir avant de l’utiliser. • L’antenne électrique se déploie automatiquement. Condensation De l’humidité peut se condenser à l’intérieur de l’appareil, si cela se produit, l’appareil ne fonctionnera pas correctement. Dans ce cas, retirez le disque et attendez environ une heure que l’humidité se soit évaporée.
À propos de l’iPod • Cet appareil peut être raccordé aux iPod suivants. Mettez à jour vos iPod avec la dernière version logicielle avant de les utiliser.
Démontage de l’appareil 1 Caractéristiques techniques Retirez le tour de protection. Radio 1 Retirez la façade (page 7). FM 2 Pincez les deux bords du tour de protection, puis sortez-le.
Alimentation requise : batterie de véhicule 12 V CC (masse négative) Dimensions : environ 178 × 50 × 182 mm (7 1/8 × 2 × 7 1/4 po) (l/h/p) Dimensions de montage : environ 182 × 53 × 162 mm (7 1/4 × 2 1/8 × 6 1/2 po) (l/h/p) Poids : environ 1,3 kg (2 lb 14 oz) Accessoires fournis : Mini-télécommande : RM-X172 Composants destinés à l’installation et aux raccordements (1 jeu) Appareils/accessoires en option : Câble BUS (fourni avec un câble à broche RCA) : RC-61 (1 m), RC-62 (2 m) Sélecteur de source : XA-C40
En cours de lecture ou de réception, l’écran du mode de démonstration apparaît. Si aucune opération n’est effectuée pendant 5 minutes alors que le réglage « Demo on » est sélectionné, le mode de démonstration démarre. t Réglez « Demo off » (page 19). L’affichage disparaît de la fenêtre d’affichage ou il n’apparaît pas. • Le régulateur de luminosité est réglé à « Dimmer on » (page 19). • L’affichage est désactivé si vous maintenez la touche (OFF) enfoncée.
Le son saute. • L’installation est incorrecte. t Installez l’appareil suivant un angle de moins de 45° dans un endroit stable de la voiture. • Le disque est défectueux ou sale. Les touches de commande ne fonctionnent pas. Impossible d’éjecter le disque. Appuyez sur la touche RESET (page 6). Lecture USB Impossible de lire des éléments à l’aide d’un concentrateur USB. Cet appareil ne peut pas reconnaître les périphériques USB raccordés au moyen d’un concentrateur USB. Impossible de lire certains éléments.
Push Reset Impossible de commander l’appareil ou le périphérique USB en raison d’un problème. t Appuyez sur la touche RESET (page 6). « » ou « » En mode de retour ou d’avance rapide, vous avez atteint le début ou la fin du disque et vous ne pouvez pas aller plus loin. « » Le caractère ne peut pas être affiché sur l’appareil. Si ces solutions ne permettent pas d’améliorer la situation, contactez votre détaillant Sony le plus proche.
If you have any questions/problems regarding this product, try the following: 1 Read Troubleshooting in these Operating Instructions. 2 Reset the unit. Note: Stored data may be erased. 3 Please contact (U.S.A. only); Call 1-800-222-7669 URL http://www.SONY.com http://www.sony.