3-227-649-12 (1) FM/AM Compact Disc Player Operating Instructions GB Manual de instrucciones ES 使用說明書 CT For installation and connections, see the supplied installation/connections manual. Para obtener información sobre la instalación y las conexiones, consulte el manual de instalación/conexiones suministrado.
Welcome ! Thank you for purchasing this Sony Compact Disc Player.
Table of Contents Location of controls ............................................. 4 Precautions ............................................................ 6 Notes on discs ....................................................... 6 Getting Started Resetting the unit ................................................. 7 Detaching the front panel ................................... 8 Setting the clock ...................................................
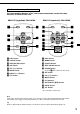
Location of controls Refer to the pages listed for details.
Card remote commander The corresponding buttons of the card remote commander control the same functions as those on this unit.
Precautions Notes on discs •If your car was parked in direct sunlight, allow the unit to cool off before operating it. •Power aerials will extend automatically while the unit is operating. •To keep the disc clean, do not touch the surface. Handle the disc by its edge. •Keep your discs in their cases or disc magazines when not in use. Do not subject the discs to heat/high temperature. Avoid leaving them in parked cars or on dashboards/rear trays.
Notes on CD-R/CD-RW discs •You can play CD-Rs (recordable CDs) designed for audio use on this unit. Look for this mark to distinguish CD-Rs for audio use. Getting Started Resetting the unit This mark denotes that a disc is not for audio use. Before operating the unit for the first time or after replacing the car battery, you must reset the unit. Remove the front panel and press the RESET button with a pointed object, such as a ballpoint pen.
Detaching the front panel You can detach the front panel of this unit to protect the unit from being stolen. Attaching the front panel Attach part A of the front panel to part B of the unit as illustrated and push the left side into position until it clicks. Caution alarm If you turn the ignition switch to the OFF position without removing the front panel, the caution alarm will beep for a few seconds. 1 Press (OFF)*. CD playback or radio reception stops (the key illumination and display remain on).
Setting the clock The clock uses a 12-hour digital indication. CD Player Example: To set the clock to 10:08 1 Press (DSPL) for 2 seconds. The hour indication flashes. Playing a disc Insert the disc (labelled side up). 1 Press either side of the volume +/– button to set the hour. 2 Press (SEL). The minute indication flashes. 3 Press either side of the volume +/– button to set the minute. 2 Playback starts automatically. Press (DSPL). The clock starts.
Display items When the disc/track changes, any prerecorded data of the new disc/track is automatically displayed. Music source Displayable items • Clock • Elapsed playing time Playing tracks repeatedly — Repeat Play The current track will repeat itself when it reaches the end. During playback, press (3) (REP) until “REP” indicator appears in the display. Repeat Play starts. To return to normal play mode, press (3) (REP) again.
Storing stations automatically Radio — Best Tuning Memory (BTM) The unit can store up to 6 stations per band (FM1, FM2, FM3, AM1, and AM2). Caution When tuning in stations while driving, use Best Tuning Memory to prevent accidents. Display items The following items can be displayed.
Receiving the stored stations 1 Press (SRC) repeatedly to select the radio. 2 Press (MODE) repeatedly to select the band. 3 Press the number button ((1) to (6)) on which the desired station is stored. If preset tuning does not work — Automatic tuning/ Local Seek Mode Automatic tuning: Press either side of (SEEK/AMS) to search for the station. Scanning stops when the unit receives a station. Press either side of (SEEK/AMS) repeatedly until the desired station is received.
Other Functions Quickly attenuating the sound Press (ATT). “ATT” appears in the display. Adjusting the sound characteristics To restore the previous volume level, press (ATT) again. You can adjust the bass, treble, balance, and fader. The bass and treble levels can be stored independently for each source. Canceling the beep sound 1 Press (6) while pressing (SEL) down. Select the item you want to adjust by pressing (SEL) repeatedly.
Selecting the sound position Boosting the bass sound — My Best sound Position (MBP) You can enjoy a clear and powerful bass sound. The D-bass function boosts the low frequency signal and high frequency signal with a sharper curve than conventional bass boost. You can hear the bass line more clearly even while the vocal volume remains the same. You can emphasize and adjust the bass sound easily with the (D) D-BASS button.
Additional Information Notes • For safety, turn off the ignition before cleaning the connectors, and remove the key from the ignition switch. • Never touch the connectors directly with your fingers or with any metal device. Replacing the lithium battery Maintenance Fuse replacement When replacing the fuse, be sure to use one matching the amperage rating stated on the original fuse. If the fuse blows, check the power connection and replace the fuse.
Removing the unit 1 Remove the front cover 1 Detach the front panel (page 8). 2 Press the clip inside the front cover with a thin screwdriver. 3 Repeat step 2 for the other side. 2 Remove the unit 1 Use a thin screwdriver to push in the clip on the left side of the unit, then pull out the left side of the unit until the catch clears the mounting. 4 mm 2 Repeat step 1 for the right side. 3 Slide the unit out of its mounting.
Specifications CD player section Signal-to-noise ratio Frequency response Wow and flutter 90 dB 10 – 20,000 Hz Below measurable limit Power amplifier section Outputs Speaker outputs (sure seal connectors) Speaker impedance 4 – 8 ohms Maximum power output 50 W × 4 (at 4 ohms) Tuner section General FM Tuning range FM tuning interval: 50 kHz/200 kHz switchable 87.5 – 108 MHz (at 50 kHz step) 87.5 – 107.9 MHz (at 200 kHz step) Aerial terminal External aerial connector Intermediate frequency 10.
Troubleshooting The following checklist will help you remedy problems you may encounter with your unit. Before going through the checklist below, check the connection and operating procedures. General No sound. •Press the volume control + button to adjust the volume. •Cancel the ATT function. •Set the fader control to the centre position for a 2-speaker system. The contents of the memory have been erased. •The RESET button has been pressed. t Store again into the memory.
A programme broadcast in stereo is heard in monaural. The unit is in monaural reception mode. t Cancel monaural reception mode (page 12). Error displays Error displays The following indications will flash for a while. E-04 A CD is dirty or inserted upside down. t Clean or insert the CD correctly. E-99 The CD unit cannot be operated because of some problem. t Press the RESET button on the unit. If these solutions do not help improve the situation, consult your nearest Sony dealer.
¡Bienvenido! Gracias por adquirir este reproductor de discos compactos Sony.
Índice Ubicación de los controles .................................. 4 Precauciones ......................................................... 6 Notas sobre discos ............................................... 6 Procedimientos iniciales Restauración de la unidad .................................. 7 Extracción del panel frontal ................................ 8 Ajuste del reloj ...................................................... 9 Otras funciones Ajuste de las características de sonido ............
Ubicación de los controles Consulte las páginas indicadas para obtener información detallada.
Mando a distancia de tarjeta Los botones correspondientes del mando a distancia de tarjeta controlan las mismas funciones que los de esta unidad.
Precauciones Notas sobre discos •Si aparca el automóvil bajo la luz solar directa, permita que la unidad se enfríe antes de utilizarla. •Las antenas motorizadas se extenderán automáticamente al encender la unidad. •Para mantener los discos limpios, no toque la superficie. Agarre los discos por los bordes. •Guarde los discos en sus cajas o en los cargadores de discos cuando no los utilice. No someta los discos al calor ni a altas temperaturas.
Notas sobre discos CD-R/CD-RW •Puede reproducir discos CD-R (discos compactos grabables) diseñados para uso de audio en esta unidad. Busque esta marca con el fin de distinguir los discos CD-R para uso de audio. Procedimientos iniciales Restauración de la unidad Esta marca indica que el disco no es para uso de audio. •Determinados discos CD-Rs (dependiendo del equipo utilizado para su grabación o la condición del disco) pueden no reproducirse en esta unidad.
Extracción del panel frontal Puede extraer el panel frontal de esta unidad para evitar su robo. Fijación del panel frontal Haga coincidir la parte A del panel frontal con la parte B de la unidad como muestra la ilustración y presione sobre el lado izquierdo hasta que encaje en su sitio. Alarma de precaución Si gira el interruptor de encendido hasta la posición OFF sin haber extraído el panel frontal, la alarma de precaución emitirá pitidos durante unos segundos.
Ajuste del reloj El reloj utiliza una indicación digital de 12 horas. Ejemplo: Para ajustar el reloj a las 10:08 1 Pulse (DSPL) durante 2 segundos. La indicación de hora parpadea. Reproductor de CD Reproducción de discos Inserte el disco (cara etiquetada hacia arriba). 1 Pulse cualquier lado de Botón de control de volumen +/– para ajustar la hora. 2 Pulse (SEL). La indicación de minutos parpadea. 3 Pulse cualquier lado de Botón de control de volumen +/– para ajustar los minutos. 2 Pulse (DSPL).
Elementos del visor Al cambiar el disco/pista, el elemento pregrabado del nuevo disco/pista aparece automáticamente. Fuente de música Elementos visualizables • Reloj • Tiempo de reproducción transcurrido Reproducción repetida de pistas — Reproducción repetida Cuando el tema actual finaliza, vuelve a reproducirse automáticamente desde el principio. Durante la reproducción, pulse (3) (REP) hasta que "REP" aparezca en el visor. Se inicia la reproducción repetida.
Almacenamiento automático de emisoras Radio — Memoria de la mejor sintonía (BTM) La unidad puede almacenar hasta 6 emisoras por banda (FM1, FM2, FM3, AM1 y AM2). Precaución Para sintonizar emisoras mientras conduce, utilice la función Memoria de la mejor sintonía para evitar accidentes. La unidad selecciona las emisoras de señal más intensa dentro de la banda seleccionada y las almacena por orden de frecuencia. 1 Pulse (SRC) varias veces para seleccionar la radio.
Recepción de las emisoras almacenadas 1 Pulse (SRC) varias veces para seleccionar Si la recepción de FM en estéreo es de mala calidad — Modo monofónico Durante la recepción de la radio, pulse (SENS) varias veces hasta que aparezca “MONO”. la radio. 2 Pulse (MODE) varias veces para seleccionar la banda. 3 Pulse el botón numérico ((1) a (6)) en el que esté almacenada la emisora deseada.
Otras funciones Atenuación del sonido Pulse (ATT). La indicación “ATT” aparece en el visor. Ajuste de las características de sonido Puede ajustar los graves, los agudos, el balance y el equilibrio entre los altavoces. Los niveles de graves y agudos pueden almacenarse por separado para cada fuente. 1 Seleccione el elemento que desee ajustar pulsando (SEL) varias veces.
Selección de la posición del sonido Refuerzo de los graves — Posición de mi mejor sonido (MBP) Es posible disfrutar de graves nítidos e intensos. La función D-bass refuerza las señales de baja y alta frecuencia con una curva más marcada que la del refuerzo de graves convencional. Es posible recibir la línea de graves con mayor nitidez aunque el volumen del sonido vocal no haya variado. Puede potenciar y ajustar los graves fácilmente con el botón (D) (D-BASS).
Información complementaria Mantenimiento Notas • Por razones de seguridad, apague el encendido antes de limpiar los conectores y extraiga la llave del interruptor de encendido. • No toque nunca los conectores directamente con los dedos o con algún dispositivo metálico. Sustitución de la pila de litio Sustitución del fusible Cuando sustituya el fusible, asegúrese de utilizar uno cuyo amperaje sea el mismo al especificado en el fusible original.
Extracción de la unidad 1 Extraiga la cubierta frontal 1 Extraiga el panel frontal (página 8). 2 Presione el clip del interior de la cubierta frontal con un destornillador fino. 3 Repita el paso 2 en el otro lado. 2 Extraiga la unidad 1 Utilice un destornillador fino para ejercer presión sobre el clip del lado izquierdo de la unidad, y después tire de dicho lado hasta que el retén libere la fijación. 4 mm 2 Repita el paso 1 en el lado derecho. 3 Deslice la unidad para extraerla del marco.
Especificaciones Sección del reproductor de CD Relación señal-ruido Respuesta de frecuencia Fluctuación y trémolo 90 dB 10 – 20.
Solución de problemas La siguiente lista de comprobaciones le ayudará a solucionar los problemas que puedan producirse con la unidad. Antes de consultar la siguiente lista, compruebe los procedimientos de conexión y empleo. Generales No se oye el sonido. • Pluse el botón de control de volumen + en el sentido de las agujas del reloj para ajustar el volumen. • Cancele la función ATT. • Ajuste el control de equilibrio en la posición central para un sistema de 2 altavoces.
No es posible recibir las emisoras. Los ruidos obstaculizan el sonido. • Conecte un cable de control de antena motorizada (azul) o un cable de fuente de alimentación auxiliar (rojo) al cable de suministro de alimentación del amplificador de antena del automóvil. (Sólo si el automóvil dispone de una antena de FM/ AM incorporada en el cristal trasero/lateral.) • Compruebe la conexión de la antena del automóvil. • La antena automática no se extiende.
鳴謝惠顧! 感謝惠購 Sony CD 唱碟放音機。本機可讓您 利用下列控制器附件享用各種功能: • 提供的附件 (CDX-L470X) 卡片式遙控器 RM-X115 • 選購附件 (CDX-L450X) 卡片式遙控器 RM-X114 2
目錄 控制鍵的位置 ............................ 4 使用前須知事項 .......................... 6 CD 唱碟須知 ............................. 6 準備工作 復位本機 ................................ 7 拆卸前板 ................................ 7 設定時鐘 ................................ 8 其它功能 調節音響特性 ........................... 13 減弱音量 ............................... 13 取消“嘟嘟”警告聲功能 ................. 13 選擇收听位置 ─ 我的最佳音響位置 (MBP) ........... 14 增強低音 — D 式低音 ......................... 14 CD 放音機 收聽 CD ................................. 9 顯示項目 ...............
控制鍵的位置 詳細說明,請參見有關頁面。 : 播放 CD 中 RADIO : 聽收音機中 CD SOURCE MBP SRC D-BASS D MODE SEL OFF DISC RELEASE ATT SEEK AMS SENS 1 REP SHUF BL SKIP ATA MTL 3 4 5 6 BTM 2 DSPL CDX-L470X/L450X 1 音量 +/- 鍵 9, 13 qs ATT(減弱音量)鍵 2 卡片式遙控器的感受器 qd SENS 鍵 12 3 MODE 鍵 qf 號碼鍵 RADIO 11, 12 CD 4 SRC (SOURCE)(Radio/CD)鍵 9, 11, 12 5 SEL(選擇)鍵 9, 13, 14 6 顯示屏 (3) REP 10 (4) SHUF 10 RADIO 7 MBP(我的最佳音響位置)鍵 14 8 D (D-BASS) 鍵 13 14 9 Z(排出)鍵 9 0 RELEASE(前面板釋放)鍵 8 qa RESET (復位) 鍵(位於本機正面的前面板 內) 7 11, 12
卡片型遙控器 與本機上的按鈕具相同功能的卡片型遙控器的相當的按鈕。 RM-X115 (提供): CDX-L470X DSPL RM-X114 (選購): CDX-L450X MODE DSPL MODE PRESET + + MENU PRESET SEEK– SOURCE SEEK+ SEEK– SOUN D PRESET – DISC + SOURCE DISC – LIST SEEK+ R ENTE PRESET – OFF + ATT OFF VOL – – 1 DSPL 鍵 1 DSPL 鍵 2 SOURCE 鍵 2 MENU 鍵* 3 SEEK (
使用前須知事項 CD 唱碟須知 •若您的汽車停放在陽光直射的地方,則應使本機 冷卻後再使用。 •裝置打開後,動力伸縮天線將自動伸出。 •為了保持唱碟清潔,切勿触摸唱碟表面。 •請把閑置的光碟存放在它們的封套或碟片匣內。 勿使光碟受熱和高溫。避免把光碟遺留在停泊的 車內,儀表盤或後托架上。 若您有什麼疑問或您的機器有什麼問題,而 本說明書又沒有提及,請向您附近的 Sony 經銷 商諮詢。 濕氣凝結 逢雨天或地處非常潮濕的環境,濕氣可能會 凝結在本機的透鏡和顯示窗內。如發生這种情 況,裝置將無法正常工作。此時請取出光碟,并 等待約一小時,直至凝結的濕氣蒸發。 保養高音質 喝果汁或其他軟飲料時請當心,勿讓液體濺 到本機或光碟上。 •請勿在碟面貼標簽,或播放沾染粘性印墨或殘余 粘膠的光碟。一旦使用此類光碟,會導致裝置故 障或損坏光碟。 •形狀特殊的光碟(心形,八邊形光碟等)不能在 本機播放。作如此嘗試將可能損坏機器。切勿使 用該類光碟。 •您不能播放8cm規格的CD。 •播放前,請用市場銷售的清洁布清洁碟面。請從 中央起由內及外地擦拭每張光碟。切勿使用酒精, 稀釋劑,市場銷售的清洁劑,或留聲機唱片專用
CD-R/CD-RW 唱碟須知 •您能夠用本機播放用於音頻的CD-R光碟(可刻錄 光碟)。 •請尋找該標志,以識別用於音頻的CD-R光碟。 準備工作 復位本機 本標志表示,該光碟不能用於音頻。 •某些CD-R光碟(視刻錄光碟的設備或光碟的狀況 而定)可能無法用本機播放。 使完成刻錄的CDR光碟能在CD播放機上播放的一個必需步驟。 •未定稿的*CD-R 是不能播放的。 * 使完成刻錄的CD-R光碟能在CD播放機上播放的一個必需 步驟。 •本機不能用於播放CD-RW(可重寫的CD)。 在第一次使用本機前或更換汽車電池後,必 須使本機復位。 拆卸前板,然後用帶尖頭的物體,如圓珠 筆,按壓RESET鍵。 RESET (復位) 鍵 註 • 按壓RESET鍵,將消除時鐘設定和某些已記憶的功能。 7
拆卸前板 安裝前板 您可拆卸本機前板,以防止本機被盜。 如圖所示,將前板的部件 A 安裝至本機的 部件 B,然後將前板左側推入,直至聽到“卡 嗒”一聲。 報警 若在不拆下前板的情況下將點火鑰匙開關轉 換在 OFF 檔上,則報警器將發出幾秒鐘的嘟嘟 聲。 不使用裝在機器中的功率放大器時,注意警 告音將不起作用的。 1 按壓 (OFF) 鍵*。 停掉 CD 的放音或 FM/AM 的收音(鍵照 明和顯示器仍保持開著)。 按住 (OFF) 2 秒以便完全關掉機器電源。 A B 註 如果汽車的點火鑰匙開關沒有 ACC 位置,便 須按住 (OFF) 2 秒完全關掉機器電源以免浪費電 池。 2 註 按壓 (RELEASE) 鍵,然後將它朝前方拉出。 (OFF) (RELEASE) 註 • 若在本機接通電源時拆卸前板,電源將自動關閉,以防 止揚聲器被損壞。 • 切勿摔落或猛按本機的前面板及顯示窗。 • 切勿使前面板受熱和高溫或受潮。避免將前面板遺留在 停泊的車廂內,儀表盤或後托架上。 要領 • 當您要攜帶前板時,請將它放在附送的前板盒內。 8 切勿將任何物件擱置於前面板的內表面。
設定時鐘 時鐘採用 12 小時數字顯示。 CD 放音機 例如:將時鐘設定為 10 : 08 1 按住 (DSPL) 鍵兩秒鐘。 點鐘顯示閃爍。 收聽 CD 裝入 CD。標籤面朝上 1 按下音量鍵的一側以設定小時。 2 按下(SEL) 鍵。 分鐘顯示閃爍。 3 按下音量鍵的一側以設定分鐘。 2 按下 (DSPL) 鍵。 播放即自動開始。 若已經裝入 CD,即請反覆按壓 (SRC) 鍵直 至出現“CD”以開始播放。 時鐘啟動。當時鐘設定完成後,即顯示正常播 放模式。 要 按壓 停止播放 Z 鍵或 (OFF) 鍵 退出 CD Z 鍵 跳躍樂曲 (SEEK/AMS) (.
顯示項目 反覆播放曲目 換光碟/樂曲時,新光碟/樂曲的任何預先錄 制之資料將被自動顯示。 — 反覆播放功能 當前樂曲播放結束時,即刻又重新開始此樂 曲的播放。 顯示項目 • 時鐘 • 已放音時間 音源 播放中,反復按 (3) (REP) 至顯示器中出現 “REP”。 要回到普通方式時,再次按壓 (3) (REP) 鍵 即可。 曲號 以任意順序播放曲目 要 切換顯示項 按壓 (DSPL) — 任選播放 您能夠播放以任意順序在當前光碟上選擇的 樂曲。 播放中,反復按 (4) (SHUF) 至顯示器中出現 “SHUF”。 要回到普通方式時,再次按壓 (4) (SHUF) 鍵即可。 10
自動記憶電臺 收音機 — 最佳調諧記憶功能(BTM) 在每一波段上(FM1,FM2,FM3,AM1, 和 AM2)最多可存儲 6 個電臺。 本機可選擇信號最強的電臺,並按照它們的 頻率順序加以記憶。 告誡 1 反覆按下 (SRC) 鍵,選擇調諧器。 當在駕車過程中調諧電臺時,務請使用最佳 調諧記憶功能,以免發生事故。 2 反覆按下 (MODE) 鍵,選擇波段。 3 按住(BTM)鍵兩秒鐘。 本機按照電臺的頻率順序將電台存儲在數字鍵 上。 存入了設定時,將響起“嘟嘟”聲。 顯示項目 以下項目可以被顯示。 顯示項目 • 時鐘 • 頻率 波段 註 • 本機不能夠存儲信號微弱的電臺。若僅接收到少數幾 個電臺,則某些數字鍵仍將保留其以前的設定。 • 當顯示屏上已顯示一個數字時,本機即將從現在顯示 的數字按順序開始存儲電臺。 預設號 要 按壓 切換顯示項 (DSPL) 11
收聽所記憶的電臺 1 反覆按下 (SRC) 鍵,選擇調諧器。 2 反覆按下 (MODE) 鍵,選擇波段。 3 按下存儲有所要電臺的數字按鈕((1) 至 (6))。 如果預設的調諧無效 — 自動調諧/本地尋找模式 自動調諧: 按下 (SEEK/AMS) 鍵的一側以搜索電臺(自 動 調 諧 )。 當本機接收到電臺時,掃描即停止。按下 (SEEK/AMS) 鍵的一側,至接收到所要的電 臺。 若 FM 立體聲的收音狀況不良 — 單聲道模式 收音机接收廣播中,反覆按下鍵 (SENS) 直 至“MONO”出現。 “MONO”指示顯示。 聲音狀況得到改善,但變成單聲道(“ST”顯 示消失)。 要回到普通方式時,再次按壓 (SENS) 鍵 即可。 僅記憶所要的電臺 您可以將所需的電台手動預設在任何一個所 選的數字按鈕上。 本地尋找模式: 若自動調諧停止過于頻繁,請反覆按下 (SENS) 鍵直至“LCL”出現。 “LCL”指示顯示。 1 反覆按下 (SRC) 鍵,選擇調諧器。 2 反覆按下 (MODE) 鍵,選擇波段。 3 按下 (SEEK/AMS) 鍵的一側,調入您想要存 儲在數字鍵上的電
其它功能 調節音響特性 您可以調節低音,高音,平衡和音量漸減。 每個聲源均可獨自存儲低音和高音電平。 1 按下 (ATT) 鍵。 “ATT”指示出現在顯示屏上。 若要恢復原先的音量水平,再按下(ATT) 一次。 取消“嘟嘟”警告聲功能 反覆按下 (SEL) 鍵,選擇要調節的項目。 每次按下 (SEL) 鍵,項目顯示變化如下: BAS(低音)t TRE(高音)t BAL(左-右)t FAD(前-後) 2 減弱音量 按下音量鍵的一側,調節所選擇的項目。 項目選好後,應在 3 秒鐘之內進行調節。 按壓 (SEL) 鍵的同時按壓 (6) 鍵。 要再獲得“嘟嘟”警告聲功能時,再次按壓 這些鍵即可。 註 若您連接選購的功率放大器而不使用內置放大器, 則“嘟嘟”警告聲功能將失去作用。 註 項目選好後,應在 3 秒鐘之內進行調節。 13
選擇收听位置 ─ 我的最佳音響位置 (MBP) 增強低音 當單人駕車時,您可以通過“我的最佳音響 位置”享受舒适的音樂環境。 “我的最佳音響位置”有兩种預設,即調節 平衡和音量控制器的聲音等級。您可以用 MBP 鍵很容易地選擇其中之一。 您能享受清皙而強勁的低音。D 式低音功能 比傳統的增強低音更能增強帶有銳曲線的低頻和 高頻信號。 即使歌聲處於同一音量上,您也能更清皙地 聽到低音線,您可以很容易地用 (D) (D-BASS) 鍵加強和調整低音。 顯示窗 平衡等級 音量控制器等級 右 左 前 后 MBP-A – 4dB 0 0 – 4dB MBP-B 0 – 4dB 0 – 4dB MBP-OFF 0 0 0 0 電 平 — D 式低音 D.BASS-3 D.BASS-2 D.BASS-1 D.BASS-3 D.BASS-2 D.
註 • 為了安全起見,在清潔連接器之前,應關閉發動機並從 點火開關上取出鑰匙。 • 千萬不要用手指直接觸摸連接器或任何金屬裝置。 附加資訊 更換鋰電池 保養 更換保險絲 更換保險絲時,必須確保所使用的保險絲與 原保險絲的安培數相配。若保險絲燒斷,請檢查 電源連接並再更換保險絲。若保險絲更換後又被 燒斷,則可能是內部故障。在這種情況下,請向 您附近的 Sony 經銷商諮詢。 一般情況下,電池能維持大約一年的時間。 (使用壽命可能會變短,這取決於電池的使用狀 況。) 電池變弱時,卡片型遙控器的能控制範圍將 縮短。此時即請更換一個新的 CR2025 鋰電池。 保險絲(10 A) x + 標記面朝上 警告 切勿使用額定安培數超過本機附帶保險絲安 培數的保險絲。否則,將會損壞本機。 清潔連接器 若本機與前板之間的連接器不乾淨,則本機 可能不能正常工作。為防止這種情況發生,請按 壓 (RELEASE) 鍵,然後拆卸前板,用蘸有酒精 的棉花籤清潔連接器。切勿用力過大。否則,連 接器可能會被損壞。 鋰電池須知 • 鋰電池必須放在小兒拿不到的地方。萬一誤吞了 電池,必須立即看醫生。 • 電池在安裝前,請用乾
拆卸本機 1 2 卸下前蓋 1 拆卸前板(第 8 頁) 2 使用薄型螺絲刀按壓前蓋裡的鎖緊搭扣 3 左側,同樣請反復步驟 2 的操作。 拆卸本機 1 使用薄型螺絲刀插入本機左側的鎖緊搭扣, 然後拉出本機左側直至鎖鐶脫離安裝位置。 4 mm 16 2 同法對於右側也請重複步驟 1的操作。 3 將本機從安裝位置拉出。
規格 功率放大器部分 CD 放音機部分 信噪比 頻率嚮應 抖晃度 90 dB 10 – 20,000 Hz 可測限度以下 調諧器部分 天線終端 中頻 可用靈敏度 選擇度 信噪比 諧波失真,1 kHz 時 分離度 頻率嚮應 FM 調諧間隔: 50 kHz/200 kHz 可切換 87.5 – 108 MHz (50 kHz 步進時) 87.5 – 107.9 MHz (200 kHz 步進時) 外接天線連接器 10.7 MHz 11 dBf 75 dB(400 kHz 時) 65 dB(立體聲), 68 dB(單耳聲) 0.7 %(立體聲), 0.
故障排除 下列檢查表有助於解決您使用本機時可能遇 到的問題。 在使用下面的檢查表之前,請檢查連接和操 作步驟是否正確。 概述 無聲。 • 按下音量 (+) 按鈕調節音量。 • 取消 ATT 功能 • 將雙路揚聲器系統的顯隱控制鍵設定在中心 位置。 記憶功能內容被消除。 • RESET鍵被按壓了 t 再將設定存入記憶功能。 • 電源線或電池已被斷開。 • 電源連接線未被正确連接。 無“嘟嘟”警告聲。 • “嘟嘟”警告聲功能被取消了(第 11 頁)。 • 如果接用了一選購件放大器而不用內裝放大 器時,嘟聲即被去激活(變成無效)。 指示項從顯示屏上消失/未出現在顯示平上。 • 如果您按住 (OFF) 按鈕兩秒,時鐘顯示將 失。 t 再次按住 (OFF) 按鈕兩秒可使時鐘顯 示。 • 卸下前蓋,清洁連接裝置。細節請參見“清 洁連接裝置”(第15頁)。 儲存之電台及正确走時被消除。 保險絲已熔斷。 點火匙處於ON,ACC或OFF位置時,裝置會產生噪 聲。 導線与汽車的附件電源連接器未正确匹配。 裝置無供電。 • 檢查電源的連接。如果一切正常,檢查保險 絲。 • 汽車不具有ACC位。 t 按下 (SRC) 按鈕(或裝入
“ST”指示閃爍。 • 精確地調諧電臺頻率。 • 廣播信號太弱。 t 設定在 “MONO ”模式(第 12 頁)。 立体聲廣播節目被以單聲道收听。 裝置工作在單聲道模式。 t 取消單聲道模式(見第 12 頁)。 出錯顯示 出錯顯示 下述指示將閃爍 一段時間。 E-04 CD 髒了或 CD 裝反了面。 t 將 CD 擦拭乾淨或正確地裝入 CD。 E-99 因某些原因 CD 放音機無法工作。 t 按壓RESET鍵。 若上述解決方法無助於改善狀況,請向您附 近的 Sony 經銷商諮詢。 19
Sony Corporation Printed in Korea