3-233-649-14(1) n o i e t Us ica Mobile Telephone l n ia u c r m e m Operating Instructions m o m C o ile C or Mob f t o N on s ics r E B A s The instructions in this manual are for the two models CMD-J7, CMD-J70. The CMD-J7 is the model used for illustration purposes. Otherwise, the model name is indicated in the illustrations. Any differences in operation are clearly indicated in the text, for example “CMD-J7 only”.
My CMD-J7/J70 Information For easy reference, please record the following identification numbers for your phone and SIM Card. This information will assist you in customer inquiries to your retail dealer, manufacturer or Network Operator/ Service Provider. In case of loss or theft of your phone and/or SIM Card, call your Network Operator/Service Provider immediately to prevent misuse. Explanation of the icons (Instruction purpose only.
y n So Your Sony CMD-J7/J70 Basic Operation n o i e t Us ica l n ia u c r m e m m o m C o ile C or Mob f t o N on s ics r E Getting Started B A s • Use only Sony Ericsson Mobile Communications AB-approved CMD-J7/ J70 batteries and accessories with your phone. • Do not touch the External Antenna Connector. Use always Sony Ericsson Mobile Communications AB original accessories. • Do not put your mobile phone in a microwave oven; this may cause damage either to the oven or the phone.
Warning • Unauthorised batteries, chargers, and accessories will invalidate any approvals and warranty given for your phone and may be dangerous. • For use in the car, please connect your GSM mobile phone to an external antenna. The external antenna can be connected to your mobile phone via the appropriate accessory, e.g. Hands-free Kit. Please contact your car manufacturer concerning the appropriate position of the external antenna on your car.
Getting Started. . . . . . . . . . . . . . . . 12 Inserting the Battery Pack . . . . . . . . . . . . . . . . . 12 Inserting the SIM Card . . . . . . . . . . . . . . . . . . . . 12 Charging the Battery Pack . . . . . . . . . . . . . . . . . 13 Switching on Your Phone . . . . . . . . . . . . . . . . . . 15 Connecting to the Network . . . . . . . . . . . . . . . . . 15 y n So Phonebook . . . . . . . . . . . . . . . . . . . 23 Phonebook Organisation . . . . . . . . . . . . . . . . . .
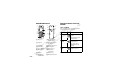
Menu Operations . . . . . . . . . . . . . . .28 Messaging . . . . . . . . . . . . . . . . . . . . . . . . . . . . . . 28 Sounds . . . . . . . . . . . . . . . . . . . . . . . . . . . . . . . . . 33 Settings . . . . . . . . . . . . . . . . . . . . . . . . . . . . . . . . 35 Divert . . . . . . . . . . . . . . . . . . . . . . . . . . . . . . . . . . 42 Call History . . . . . . . . . . . . . . . . . . . . . . . . . . . . . 44 Extras . . . . . . . . . . . . . . . . . . . . . . . . . . . . . . . . . . 45 Clock . .
The hand strap is not included in your kit. y n So Plug shape differs from country to country. Your Sony CMD-J7/J70 Getting Started Attach a hand strap to the phone as illustrated below. Basic Operation n o i e t Us ica l n ia u c r m e m m o m C o ile C or Mob f t o N on s ics r E The kit should include one mobile phone, one standard battery, one charger and this manual. If one of these parts is missing, please contact your retail dealer immediately.
Quick Reference 1 0 qf Basic Features of Your Phone B A s The Jog Dial qa n o i e t Us ica l iaRotate un Scrolls through menu c r options. m e Opens Phonebook in m m o Standby Mode. m C 1 Ear piece 9 Keypad (Alphao Opens Menu in numeric C Keys)bile Press (Click) Standby Mode. r 2 Jog Dial 0 External Antenna Selects an option o Connector o f (highlighted) in the M t 3 Send Keyo qa Headset Connector display.
Manner Mode • Press the Centre Key in standby mode to access the WAP mode if WAP settings are configured. • In standby mode, press and hold to activate/deactivate the manner modes. sound by pressing the Centre Key. Basic Operation Menu Operation n o i e t Us ica • Press and hold the Centre Key to access l network-specific service (SIM Application n ia u Toolkit).
Keypad Lock In standby mode, press the Centre Key followed by to lock/unlock your keypad (including the Jog Dial). It is still possible to make emergency calls (112) as well as answer/reject an incoming call (by pressing / ) when the keypad is locked. After the call ends, the keypad will lock again automatically.
Messaging page 28 Read Create Settings Local Area Info Sounds WAP Ringer Set Sound Scheduler Settings page 54 Home Favourites Settings page 33 page 52 page 35 Calendar Preferences Security Call Data Call Settings Divert Extras page 42 All Calls If Not Reachable If No Reply If Busy All Fax All Data Cancel All Phonebook page 23 Phonebook Menu Voicemail Search page 45 Clock Calculator Games E-Mail Call History Outgoing Calls Incoming Calls Missed Calls Delete All page 44 Getting Star
Getting Started B A First power off and wait until the display sthe knobgoesof n blank. Remove the cover and pull o 1 Unwrap the battery pack. i battery. the batterye up to removetthe s a 2 Press (indentation) and slide the battery l U nic cover down to remove. a i u 3 Align the claws of the battery with those rc m e of the phone and press down (make sure m the SIM Card that the battery label is facing up).
B A s As supplied, your battery pack will not be fully charged. n o i e t 2 Plug the charger Us intoictheabottom (jack) of the lphone. n ia u c r m e m m o m C 3 Close the tray with the SIM card o inserted le C and slide the SIM card holder to the left to i r b lock. o Mo f t 4 Replace the battery o pack. on N s To remove the SIM card s Follow steps 1 to 4 above removing the SIM c i card from the tray inrstep 3.
Removing the charger from the phone: 1 • Use only the Sony-specified CMD-J7/J70 battery pack and charger. • Disposal advice: Take special care in the disposal of the battery, using special facilities where available. B A s n o i e t a is flashes When your pack nearly empty, the Usiconbattery c battery in theidisplay and a beep l n a indicates that approximately 1 minute of talk i u rc time remains.
Your Sony CMD-J7/J70 n o i e t Enter your PIN using the Us ica number keys (the PIN l n appears in code as ****) ia u c and press the Jog Dial (or r m e ) to confirm. m m o m If you do not enter a PIN C o ileThe following indicates the strength of the code, your phone will automatically switch C off after a few minutes. It is possible but network signal. If the signal is very r notob received o recommended to disable the PIN code prompt weak, there is a risk of losing service. f M (see page 37).
If you cannot obtain service • If you cannot obtain network service the reception strength may be too weak. Move to a higher elevation, a window or an open space and make sure that there is nothing obstructing the antenna. n o i e t • Once you have switched on your phone do Us ica not cover the internal antenna area above l n the finger Stop with your hand.
If the Auto Redial option is on (see page 41) and the number you have called is engaged, your phone automatically displays the Auto Redial option. To search the Phonebook, press an alphanumeric key on the keypad to advance to that letter in the Phonebook. (E.g. to advance to entries beginning with “M”, press .
Answering/Ending Calls Press the Jog Dial (or incoming call. ) to accept an n o i e t Us ica l n ia u c r m e m m o m C o ile to end a phone call. C or Mob f t o N on s ics r E If you do not wish to answer the call, press or press the Centre Key and select Busy while the phone is ringing. The call will then be rejected (the caller will hear a busy tone (network dependant) or will be diverted if a divert has been set). If a call is not answered, appears on the top line of the display.
Use your phone as a Notepad by entering a phone number during a call. Enter a number and press the Centre Key. When ending the call, the number entered will reappear on the display. Use the Jog Dial to save the number in the Phonebook or to call the number. One active call 1 Press the Centre Key and select Call Hold. By pressing or using the Notepad to make a second call, you can put a call on hold automatically.
Send DTMF Choose this option for sending DTMF tones, e.g. when using Voicemail or other services. Press and hold to clear the number and then press again to exit this option. 2 } Swap to put the active call on hold and connect the waiting call (in case of one active call and one waiting call) or } Busy to indicate to the calling party that your line is engaged. or } Replace to end the active call and retrieve the call waiting. B A s n o i e t Us ica Turn the loudspeaker on/off.
Proceed as in Create (see page 30), then • Press to shift among: lower case letters permanently upper case letter and then revert back to lower case upper case letters permanently numbers to activate/deactivate the T9 • Press and hold function (see page 22). to clear the character or number just • Press before the cursor. To clear the entire text, press and hold . Your Sony CMD-J7/J70 1 Basic Operation n o i e • Standard Text Entry using the Jog Dial t 2 Press s. A charactercoranumber appears.
T9 Text Entry Sample entry with T9 Text Entry: 1 Proceed as in Create (see page 30), then 2 In step 3, press and hold to switch to T9 mode if does not appear (or press the Centre Key and select T9). If the word you intended to type does not appear in the list, press and hold to switch to multi-tap mode and type the word using the standard text entry method (see page 21). When finished, press and hold to return to T9 mode.
* * Please note that saving Customised Phonebook entries from the Phonebook Menu (New Entry) is not available. To save a Customised Phonebook entry, select a desired customised entry (1-9) directly from the Phonebook and press the Jog Dial, then follow steps 3-5 in “Creating Entries” (see page 24). See page 17 “Basic Operation – Making Calls (Saving Phonebook Entries)” and page 24 “Creating Entries in the Phonebook”.
Phonebook Menu Own Number The first entry in the Phonebook Menu is a place holder for your own numbers, where you can make one or more entries to store your own mobile number, etc. Depending on your SIM card, you can save multiple own number entries (including 3 numbers in the phone). Call, Edit, Delete, Copy Own Number See page 26 “Editing the Phonebook”.
This section may contain Fixed Dialling Numbers (SIM card dependant). To add an entry to the Fixed numbers rotate the Jog Dial down to New Entry in the FDN Phonebook and proceed as in Creating Entries in the Phonebook. You can call, edit, delete and copy the FDN Phonebook (see “Editing the Phonebook”). You need the PIN2 code to edit, delete and copy. Getting Started Basic Operation • The FDN Phonebook and Service Dialling Numbers are SIM card dependant. • The Service Dialling Numbers cannot be modified.
Voicemail Press and hold Voicemail. Search for quick access to your B A s } ‘ Phonebook } „ Search It is possible to search By Name or By Group. n o i e t editing, deleting or Use thiss option for calling, a 1 } ‘ Phonebook U copying phonebook entries. editing of c iby Name, The } § Voicemail l is possible entries Number or by n a i 2 Enter the number at rc Note. mu the prompt. e m a Name/Number Editing m 3 Press the Jog Dial to o m 1 } ‘ Phonebook C confirm your entry.
1 Follow steps 1-3 in “Editing a Name/ Number” (see page 26). Your Sony CMD-J7/J70 n o i e t s a 2 SelectU the Note entry you want to edit. } Copy Entry to copy the entry from one c l the Jog Dialnfori a menu of editing memory location to another. 3 iPress a u • Number editing options: rc options. m e } View } Call to call the number. mto view the content. m o } View to display the number. m e C} Edit Icon to change the icon. o } Edit Type to change the type of C il } Edit Text to change the content.
Menu Operations option on option off 1 B A s } “ Messaging } Read } Inbox (} Outbox to read sent messages.) n o i e t s a This feature offers U c l correspondence options to ni a i u read, write and send short the Jog Dial for options to Delete, rc 3 Press messages (SMS). m Reply, Forward or Call Back the number e m in the text. m o Read Message m eC When a new message o arrives, you will hear a beepC which soundsil “ different from the singlerbeep of the ringer omode.
To Forward a Message 1 Follow steps 1-3 in “Read Message” (see page 28) and select Forward. After selecting the message you want to delete, select Yes. To Reply or Edit a Message Basic Operation n o i e tMessage” (see s 1-3 in “Read a 1 Follow steps U c i Back. page 1 Follow steps 1-3 in “Read Message” (see nCall al 28) and select page 28) and select Reply.
Create Choose Create to create and send a message. 1 } “ Messaging } Create 5 Press the Jog Dial to confirm. Select Enter Number or choose one of the names from the Phonebook. Before sending, you are given the following options: n o i e Send t s 3 Create your message. a Save U c l Cancel ni } Text Only: Enter the message text. a i u } Text, Attach: Add an attachment and rc m e enter the message text.
Validity Period } “ Messaging } Settings Specify how long messages are stored in the service center by selecting: 1 Hour, 6 Hours, 24 Hours, 1 Week, 4 Weeks. The default validity period is 1 Week (Network dependant). Memory Class Result Report Message Format Service Centre Basic Operation Reply Cost Menu Operation n o i e t Select Settings from the Messaging menu, s a U then select a Settings option using the Jog c Select On if you would like to pay the i message.
Local Area Info } “ Messaging } Local Area Info Receive Cell broadcast messages or general messages like weather reports, traffic reports, etc. broadcast to a group of phones in a certain area. Some of these options may be network dependant. n o i e t s a U c l 1 } “ Messaging } Local Area Info ni a i u 2 Select one of the following options: rc m e m } Received to view cell broadcast m o messages. m C o ile } Select Channel to add C or delete a broadcast channel.
Ringer Volume • appears in standby mode to remind you when the ringer is turned off. • Quickly turn the ringer on/off by pressing the Centre Key (see page 9). Adjust the ringer volume during an incoming call (while ringing) by rotating the Jog Dial. Getting Started n o i e t It is possible tos record own a U c ringer sounds using the Ringer lmicrophone.
Set Sound Error Tone } ” Sounds } Set Sound Choose Set Sound to access the following sound options: Select Error Tone to assign a sound to the error tone. Choose from a default error tone or recorded sounds (only if you have sounds stored under My Sounds). B A s n o i e t own sounds using s Sounds tocrecord Select My a U the phone's microphone. i Choose the l n a respective icons to Record ( ), Stop ( ), i u ( ) or Delete ( ) a sound.
y n So Greeting Off Wallpaper ** 36 n 36io e t36 s a Backlight On U c l 0 ni 36 a LCD Contrast i u rcNetwork Auto m Select 36 e m m o List SIM dependent 36 m Preferred C o Memory Info – 36 e l C i 37 or Mob Factory Reset – f t o N on s ics r E B A s * default language depends on language of the Network Operator. ** default wallpaper depends on Network Operator/ Service Provider.
Language Select Network } † Settings } Preferences } Language Select the appropriate language. This feature gives you the option to select a network automatically when you turn on your phone, or manually from a list of available networks. • As a short cut, you can also select the language by pressing *#00(country code)#. • Select your default language by pressing *#0000#. B A s n o i e t Chooses Preferred Lista to edit the automatic U c network selection priority i list. This feature is l a helpful e.
PIN2 Code PIN Code Basic Operation n o i e t s a U c Security l ni a i } † Settings } Security u The Security options allow you to control who rc m e uses your phone as well as their calling m o privileges. However, emergency calls (SOS) m PIN2 is a code provided by your Network C are always possible regardless of the om Provider and is required for eOperator/Service restrictions/codes you set. l C i access to some features such as FDN r b Phonebook or Call Cost.
Call Barring Barring PWD Limit calls made from your phone which can be useful e.g. if you lend your phone to someone else but to not want them to make international calls. The restrictions in the Call Barring menu require the barring password. Some of the restrictions in the Security menu are controlled in the network e.g. Call Barring. Your Network Operator/Service Provider provides a (Network) password if you register for one or more of these network call restrictions (Call Barring).
Track or control how long you are on the phone and the cost of calls made. So that Call costs can be used as a security measure e.g. when you lend your phone to someone, you must use your PIN2 as a security code when you set or change options. • Charge Rate Select Charge Rate to set the currency and price per unit which will be used to calculate the call cost. Enter your PIN2 code at the prompt. Enter a currency and the price per unit (to enter a decimal point, press ).
Call Settings } † Settings } Call Settings Some of the following features may not be supported by some networks. To make a line selection in standby mode, press and hold and use the Jog Dial to make your selection. 1 or 2 will appear so that you know which line is active. It is also possible to make the line selection using the Call Settings menu option.
Auto Answer Answer a call by pressing any key on the keypad. Select Any Key Answer and use the Jog Dial to select On or Off. Automatic answer of an incoming call. Only works together with the Handsfree car kit accessory. Data Services Show Call Time Basic Operation Auto Redial Menu Operation DTMF tones are emitted when pressing a key during menu prompts (e.g. during Voicemail, etc.). Select On/Off to activate/deactivate this function.
Divert You may need to register for this service with your Network Operator/Service Provider. • In step 3, you also have the option to cancel or check status. Select Cancel to cancel the divert; then wait for the network response. B A s • Select the option Check status to check the divert settings. Wait for the network response and then you can view the current status on the display. n o i e 1 } ° Divert t s a U c 2 Select a Divert option using the Jog Dial.
Your Sony CMD-J7/J70 Getting Started Basic Operation n o i e } If Not Reachable t s a Divert incoming calls when your phone is U c l switched off or out of network coverage. ni a i u rc } If No Reply m e Divert incoming calls if you do not answer the m m o call after a certain period of time. m C o ile } If Busy C Divert incoming calls when your or are onMtheob f phone (line engaged). t o n } All Fax N o s Divert all fax calls (the phone will not even ring).
Call History Provides a record and quick access of up to 10 of the last outgoing calls, up to 10 of the last incoming calls and up to 10 missed calls. (This feature is dependent on your Network Operator/Service Provider.) • Caller ID (Caller Line Identification) is required to support Call History entries. • When the Call History reaches its capacity, the oldest number is deleted automatically to provide space for the newest entry.
Timer World Clock The volume of the alarm/timer is determined by the ringer volume setting. If the ringer volume is off, the alarm/timer will ring at the minimum volume. The alarm/timer will still ring even during a call. Clock Format Basic Operation n o i e t s } ‡ Extras } Clock a U c land stop the timer ni at a certain time. a To start i u Press the Jog Dial to select c the timermis on, appears in the rWhen a city from the map e display in standby mode.
Clock Chime 1 } ‡ Extras } Calculator Choose from the following Clock Chime options: Beep, 8h-20h, Off. 2 Enter a number. 3 Press to select the mathematical function and then enter another number. 4 Press Set Date/Time B A s n o to select = for a result. i e t s a U c l ni a i u can also use the rc You m e calculator m as a currency Calculator m converter. o } ‡ Extras } Calculator m(+), e C 1 Enter a number into The Calculator can perform addition o l C(×) and division the calculator screen.
Games 1 } ‡ Extras } Games Select Games from the Extras menu. During a game, press the Centre Key to stop/start the background sound. Press the End Key to end the game. Press the Jog Dial to confirm the currency and the display will automatically show the next setting. Basic Operation Bananas Menu Operation n o i e t – Home Currency to set the home s a U c currency. l nvs.i Twoia monkeys (player – Foreign Currency to set the foreign u c are in am fight armed currency.
Sand Art Test your artistic ability with the Jog Dial as your paintbrush and the CMDJ7/J70, your canvas. Choose one of four sand colours using the keypad (1-4). Use the Jog Dial to control the position of the sand nozzle at the top of the screen (up=right, down=left). Press the Jog Dial to open or close the sand nozzle.
Reading E-mail } ‡ Extras } E-mail You can send and read E-mail by accessing to your office E-mail server or your Internet service provider on the Internet (POP3 and SMTP are supported). You will need the specific parameters from your internet service provider in order to complete the setup. Contact your service provider or operator directly for complete details for setting information, as some service provider or operators do not provide this service.
Sending E-mail Settings After selecting E-mail from the Extras menu, select Send and you can compose an E-mail. To send and receive E-mail you need to set the following. Enter your E-mail address correctly as indicated by your mail-server manager or your provider. To: Enter the address of the person you want to send the E-mail. Subject: Enter the subject of your E-mail. Body: Compose the text of your E-mail. Press the Jog Dial and select Send to send the E-mail after entering the text.
n o i e t s a U c l ni a i u rc m POP3 Port: The number of the port for the e m mail server for the POP3 port. It m o is not necessary to change from m C the regular 110. o ile C SMTP Port: The number of the port for the r b mail server for o the SMTP port.o It f is not necessary to change from t25. n M o the regular N o allowed to Timeout: Set the amount ofstime s connect to your mail server. icfor DNS (Domain DNS Server:The settings r EServer) server.
Scheduler } ™ Scheduler Display the calendar, save your daily schedule and set alarms for important tasks. The monthly calendar appears as follows: Event List The following options are available if you select an event. B A s n o i e t s a U c Select from a range of icons to be added to the i l event entry. n a i u : An event is scheduled for that day. rc m e mto Enter a new event or a new oEditmthe Time of the event.
n o i e t s a U c } Go l To ... ni Select Complete if you have completed the a i u To Do item. The To Do entry is ticked. It is r}cList All m still possible to View, undo complete e (= Incomplete) and to edit this entry. m om m C o ile} Delete C Edit the To Do entry. or Mob f Delete the To Do entry.t No son ics r E y n So View View details of the To Do entry. Select OK if the entry is correct. } Today B A s To return the cursor to the Today window. Complete To go to the desired date.
WAP Browser With WAP (Wireless Application Protocol) it is possible to access a variety of information such as news or weather reports from around the world including mobile internet sites. With this phone you can access various HTML or WML internet sites. • As a safety measure, a Security Code may be necessary to use your browser. Use the code that is set as your Security Code (see page 38). • Internet access is limited to the sites providing HTML or WML content.
Select Provider to set the following parameters specified by your Network Operator/Service Provider: Dial Up Number: +12 345 67 890 (number to access the gateway) ISP User Name: abc ISP Password: sony Data Call Type: Automatic Your Sony CMD-J7/J70 n o i e t s a 2 Select the first field labeled Empty and U c l then select Edit. ni a i u 3 Enter the Security Code (default 0000) at rc m the prompt (see also page 38). e m m o 4 Select Name to enter a name that will be m C 9 Select displayed for your site.
12 Select Details and then Timeout to enter the default timeout value in seconds specified by your Network Operator/ Service Provider (if your Network Operator/Service Provider does not specify a value, 120 seconds should be sufficient for most Network Operators/ Service Providers). Timeout: 120 The Browser Menu Choose WAP from the Main Menu using the Jog Dial or simply press the Centre Key from standby mode once you have completed the WAP setup in Settings.
Basic Operation Settings Menu Operation n o i e t s a U c l } ® WAP } † Settings ni a i u Configure the settings to access WAP rc m services. Be sure to make these settings e m before using WAP. Navigation m When obrowsing a WAP site, press to The icon indicates the site that you have m C set as your home site. To change youro home scroll through the option of a selection field e l site, select Set Home from the menu after you i (form field). Press the Jog Dial to select one rSeeCalso b or more items.
Appendix Troubleshooting B A s n o i e t s (see page Unable to Empty battery Charge the battery 13). a U c switch on l the battery. nNotei that after several years, Defective battery Replace a i gradual c declinemisunormal. r e The icon Weak signal Move to m an open space or nearer to a window. m appears o Outside GSM coverage m areaeCheck C operator coverage map. o l SIM not valid C bi Call your service provider. r o Network f accessMnotoallowed Try manual network search (see page 36).
Reconnection, or connection to another operator is automatic. Switching phone off and on may accelerate this. n o i e t s a U c i lyour servicenprovider. SIM error Damaged SIM card Please contact a i u rccontact yourm SIM card not Network does not recognize Please service provider. e registered the SIM card m m o call barring settings (see page 38). m Not able to Call barring set Check incoming C o Check receive calls C ilecall divert settings (see page 42).
Unblocking the SIM Card If you enter the PIN code incorrectly 3 times, the SIM card is blocked. Technical Specifications E-GSM 900 Mobile Telephone B A s Class 4 (2 Watts) Classn 1 (1 Watt) o i e t 2 Enter the new PIN (4-8 digits) and press Us Rangeica 880-915 MHz and Frequency the Jog Dial (or press ). l n 1710-1785 MHz ia(Transmission) u 3 Enter the new Pin code again and press c r Frequency MHz and m Range 925-960 the Jog Dial (or press ). e (Reception) 1805-1880 MHz m The SIM is unblocked.
Basic Operation n o i e t s of Conformity a Declaration U c i of Conformity J7” l 62 “Declaration See page n a i and page 63 “Declaration of Conformity J70”. u 0168 rc m e m om m C o ile C or MABob f Sony Ericsson Mobile Communications t reserves the right to o make changesn or improvements toN any of the products o sprior notice. described in this guide without s c i T9™ text input isE ar registered trademark of Tegic Communications and the T9™ text yis providedInc.
y n So 62 GB n o i e t s a U c l ni a i u rc m e m m o m C o ile C or Mob f t o N on s ics r E B A s
y n So Appendix Menu Operation Basic Operation Getting Started n o i e t s a U c l ni a i u rc m e m m o m C o ile C or Mob f t o N on s ics r E Your Sony CMD-J7/J70 B A s 63 GB
Important Notice Effective 1st October 2001, Sony Ericsson Mobile Communications AB was established. This product is manufactured for, by, or under license from, Sony Corporation and/or Sony Ericsson Mobile Communications AB. n o i e t s a Sony Ericsson Mobile Communications AB U c l agrees that it shall honor the consumer ni a i u guarantee applicable for this product to the c same extent, and in the same manner as, Sonyr m e Corporation.
Backlight Battery Pack Charging Inserting 13 12 Calculator Currency Converter Call Cost Call History Call Hold Call Time Call Waiting Caller ID Centre Key Ciphering Clock Alarm Set So ny J Jog Dial 46 46 39 44 19 39 20, 40 40 9 18 Data Services Divert DTMF E-mail Emergency Calls Error Tone Event Sounds Factory Reset 41 42 20 49 10, 37, 38 34 34 K Key Click Keypad Lock 34 10 Language LCD Contrast Local Area Info Loudspeaker 36 36 32 20 Memory Info Microphone On/Off 36 20 37 Network 15, 16
P Phonebook Creating Entries FDN Phonebook Grouping Making Calls Note Own Number Saving Entries Search Service Dialling Numbers PIN PIN2 Preferences Preferred List R y n So 66 GB Scheduler Event To Do Security Code 40 36 16 15 9 9 V Vibra Alert Voicemail n o i e t s a U c l ni a i u rc m e m m o m C o ile C or Mob f t o N on s ics r E Ringer Type Ringer Volume Adjusting Roaming S 24 25 25 23 27 24 23 26 Select Line Select Network Selection Signal Strength Silent Mode SIM Application Toolkit SIM C
01GB05BAC-AE4.fm Seite 67 Montag, 25.
01GB05BAC-AE4.fm Seite 68 Montag, 25. Februar 2002 10:33 10 y n So n o i e t s a U c l ni a i u rc m e m m o m C o ile C or Mob f t o N on s ics r E Made from chlorine-free, recycled paper Sony Ericsson Mobile Communications AB www.SonyEricssonMobile.