U DVD AUDIO / VIDEO SA-CD CHANGER LECTEUR DE DVD AUDIO / VIDEO SA-CD CHANGEUR DV-C6770 OWNER’S MANUAL MODE D’EMPLOI 0
IMPORTANT SAFETY INSTRUCTIONS CAUTION RISK OF ELECTRIC SHOCK DO NOT OPEN CAUTION: TO REDUCE THE RISK OF ELECTRIC SHOCK, DO NOT REMOVE COVER (OR BACK). NO USER-SERVICEABLE PARTS INSIDE. REFER SERVICING TO QUALIFIED SERVICE PERSONNEL.
FCC INFORMATION (for US customers) 1. IMPORTANT NOTICE: DO NOT MODIFY THIS UNIT! This product, when installed as indicated in the instructions contained in this manual, meets FCC requirements. Modifications not expressly approved by Yamaha may void your authority, granted by the FCC, to use the product. 2. IMPORTANT: When connecting this product to accessories and/or another product use only high quality shielded cables. Cable/s supplied with this product MUST be used. Follow all installation instructions.
CAUTION: READ THIS BEFORE OPERATING YOUR UNIT. 1 2 3 4 5 6 7 8 9 10 11 12 13 iii To assure the finest performance, please read this manual carefully. Keep it in a safe place for future reference. Install this sound system in a well ventilated, cool, dry, clean place — away from direct sunlight, heat sources, vibration, dust, moisture, or cold. In a cabinet, allow about 2.5cm (1 inch) of free space all around this unit for adequate ventilation.
Contents Region Codes .......................................................................... 2 Supplied accessories............................................................... 2 Notes about discs................................................................... 2 Cleaning discs .......................................................................... 2 Patent information.................................................................. 2 Functional Overview Front Panel.............................
Introduction Thank you for purchasing this unit. This Owner’s Manual explains the basic operation of this unit. – Do not use a disc printed on its surface by a commercially available label printer. Cleaning discs Region Codes DVD discs must be labeled for ALL regions, Region 1 (U.S.A model) or Region 4 (Australia model) in order to play on this Player. You cannot play Discs that are labeled for other regions. ALL 1 4 • When a disc becomes dirty, clean it with a cleaning cloth.
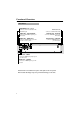
Functional Overview English Front Panel STANDBY/ON – turns on this unit or sets it to the standby mode Disc tray – load up to 5 discs on the disc tray DISPLAY – shows the current status of the player LEDs – LED lights up when the corresponding feature is set to ON DISC (1, 2, 3, 4, 5)/LEDs – to select and directly playback the preferred disc / each LED flashes green when button is selected / OPEN/CLOSE – to open/close the disc tray S/Q – search backward* / go to a previous chapter or track R/T – search
Functional Overview Rear Panel COMPONENT video outputs – connect to an AV receiver with Y PB/ CB PR/CR inputs AC Power Cord – connect to a standard AC outlet AUDIO OUT - 6CH DISCRETE – connect to 6CH INPUT inputs of your AV receiver DIGITAL OUT - OPTICAL – connect to OPTICAL input of your AV receiver AUDIO OUT - MIXED 2CH – connect to AUDIO inputs of your AV receiver or stereo system DIGITAL OUT - COAXIAL – connect to COAXIAL input of your AV receiver VIDEO OUT - VIDEO – connect to VIDEO (composite)
Functional Overview DISC SKIP – select another disc PAGE – turns pages of the DVDAudio still pictures DIMMER – select 3 different brightnesses for the display SOUND MODE – selects the required sound mode: Stereo, Virtual Surround or Multi-channel / change SA-CD playback area TOP MENU/RETURN – display the top-level disc menu (DVD) / go back to previous menu (VCD) MENU – access menu of a disc (DVD) / switch PBC on/off (VCD) 1 2 3 4 – (left/right/up/down) select an item in the menu ENTER/OK – acknowledge menu
Preparation General Notes on connections Never make or change connections with the power switched on. • Depending on the equipment you wish to connect, there are various ways you could connect this unit. Possible connections are shown in the following drawings. • Please refer to the manuals of other equipment as necessary to make the best connections. • Do not connect this unit via your VCR. The video quality could be distorted by the copy protection system.
Preparation Use audio/video cable supplied with this player to connect the L (left) and R (right) jacks to corresponding input jacks of your audio equipment such as Stereo amplifier. You can connect a subwoofer to the SUBWOOFER jack. Receiver (and TV) with S-video input is required. English MIXED 2CH jacks Composite Video terminal Use audio/video cable supplied with this unit when connecting the player to a TV.
Getting Started Step1: Inserting batteries into the Remote Control 3 1 2 1 Open the battery compartment. 2 Insert two batteries type R06 or AA, following the indications (+ –) inside the compartment. 3 Close the cover. Using the remote control Remote control sensor Point the remote control at the sensor, within approximately 6 m (20 feet) of the unit. 30° 30° Step2: Turning on the power 1 Connect the AC power cord to the power outlet. 2 Turn on the TV and your AV receiver.
Getting Started Helpful Hint: – Before changing the current TV Standard setting, ensure that your TV supports the ‘selected TV Type’ system. – If there is not proper picture on your TV, wait for 15 seconds for auto recover. CHANGING PAL TO NTSC 1. ENSURE THAT YOUR TV SYSTEM SUPPORTS NTSC STANDARD. 2. IF THERE IS A DISTORTED PICTURE DISPLAYED ON THE TV, WAIT 15 SECONDS FOR AUTO RECOVER. OK TIPS: CANCEL Step4: Setting language preference You can select your own preferred language settings.
Getting Started Setting the Audio, Subtitle and Disc menu language PREFERENCE PAGE AUDIO SUBTITLE DISC MENU PARENTAL PBC MP3/JPEG NAV PASSWORD DEFAULT ENGLISH CHINESE(SIMP) FRENCH SPANISH PORTUGUESE POLISH ITALIAN TURKISH 1 Press STOP 9 twice, then press SETUP. 2 Press 2 repeatedly to select {PREFERENCE PAGE}. 3 Press 34 to highlight one of the options below at a time, then press 2.
Getting Started {SUBWOOFER} ON When a subwoofer is connected. OFF When no subwoofer is connected. {SPEAKERS VOLUME} Volume level setting for individual speakers (–6 dB ~ +6 dB). {SPEAKERS DELAY} Delay times setting in relation to the listening position/distance for center and surround speakers (0 MS~15 MS). SPEAKERS DELAY SETUP CENTER 0 MS SURROUND L SURROUND R 0 MS 0 MS 6 Press 1 2 to adjust the setting that best suit your surround sound needs. 7 Press ENTER/OK to confirm.
Disc Operations IMPORTANT! – If the inhibit icon ( or X) appears on the TV screen when a button is pressed, it means the function is not available on the current disc or at the current time. – Depending on the DVD or VIDEO CD, some operations may be different or restricted. – Do not push on the disc tray or put any objects other than disc on the disc tray. Doing so may cause the disc player malfunction. Basic Playback 1 Press STANDBY/ON on the front panel.
Disc Operations TRACK Repeat REPEAT OFF Repeat chapter/title/disc (DVD-V) Each time you press REPEAT, the front display changes as follows; CHAPTER REPEAT OFF ALL DISC TITLE DISC CHAPTER*: repeat the current chapter TITLE: repeat the current title DISC*: repeat the entire disc ALL DISC: repeat all discs loaded on the tray REPEAT OFF: exit repeat mode * This feature may not be available with some discs.
Disc Operations Shuffle (not for DVD/VCD/ SVCD) With the Shuffle function, you can play tracks in random order. 1 During playback, press SHUFFLE repeatedly to select SHUFFLE DISC, SHUFFLE ALL DISC, or SHUFFLE OFF. ➜ The selected mode appears on the display for several seconds. • In SHUFFLE DISC mode, all tracks on the disc currently playing are played in random order. For Hybrid SA-CDs, tracks on the SA-CD layer are played by default (see page 18).
Disc Operations OSD menu shows the disc playback information (for example, title or chapter number, elapsed playing time, audio/ subtitle language), a number of operations can be done without interrupting disc playback. 1 During playback, press ON SCREEN. ➜ A list of available disc information appears on the TV screen. DVD MENU TITLE CHAPTER AUDIO SUBTITLE 02/14 02/14 5.
Disc Operations Special DVD Features Playing a Title 1 Press MENU. ➜ The disc title menu appears on the TV screen. 2 Use 1 234 or numeric keypad (0-9) to select a play option. 3 Press ENTER/OK to confirm. Camera Angle • Press ANGLE repeatedly to select different desired angle. If you want to skip the index menu and playback directly from the beginning, • Press MENU on the remote control to switch to PBC off. Preview Function 1 Press SCAN.
Disc Operations To quit preview function • Use 1 234 to highlight {EXIT} and press ENTER/OK to confirm. To return to preview menu • Use 1 234 to highlight {MENU} and press ENTER/OK to confirm. For CD • At stop mode, press SCAN on the remote control. ➜ Each track will be played for a few seconds. DVD-Audio features The DVD-Audio is developed for the sole purpose of creating high quality pure sound with Linear PCM and Packed PCM (Lossless coding) in up to six audiochannels.
Disc Operations Playing a disc SA-CD (Super Audio CD) The SA-CD standard is based on Direct Stream Digital (DSD) technology. This new direct-stream digital format comprises a 1-bit system that has a digital sampling frequency that is 64 times higher than that of conventional audio CD. There are three types of SA-CD discs: single-layer, dual-layer and hybrid discs. Each type may contain two areas of recorded information: a High Quality Stereo area and a High Quality Multichannel area.
Disc Operations Playing a disc During playback, you can; • Press S / T to select another track/file in the current folder. • Press PAUSE ; to pause playback. English Audio CD 1 Load a disc. ➜ Playback starts automatically. ➜ The TV screen will display the number of tracks for selection and current playing status. Helpful Hint: – It may not be possible to play certain MP3/ JPEG/DivX disc due to the configuration and characteristics of the disc or condition of the recording.
Disc Operations Special picture disc features 1 Load a Picture disc (Kodak Picture CD, JPEG). ➜ For Kodak disc, the slide show will begin. ➜ For JPEG disc, the picture menu appears on the TV screen. 2 Press PLAY B to start the slide-show playback. Preview Function (JPEG) This function shows the content of the current folder or the whole disc. 1 Press STOP 9 during playback. ➜ 12 thumbnail pictures will appear on the TV screen.
Setup Menu General Setup menu 1 Press SETUP. 2 Press 1 2 to select ‘General Setup’ icon. 3 Press ENTER/OK to confirm. GENERAL SETUP PAGE DVD-AUDIO DISC LOCK PROGRAM OSD LANGUAGE SCREEN SAVER SLEEP DIVX(R) VOD CODE Selecting DVD-Audio/Video mode 1 In ‘GENERAL SETUP PAGE’, press 34 to highlight {DVD-AUDIO}, then press 2. DVD-AUDIO MODE Select this for normal playback. DVD-VIDEO MODE Select this to playback the DVD-Video contents.
Setup Menu To input your favorite tracks/chapter 3 Use the numeric keypad (0-9) to enter a valid track/chapter number. 4 Use 1 234 to move the cursor to the next position. ➜ If the track number is more than ten, press T to open the next page and proceed with programming or, ➜ Use 1 234 to highlight {NEXT} on the program menu, then press ENTER/ OK. 5 Repeat steps 3–4 to input another track/ chapter number. If you want to remove a track 6 Use 1 234 to move the cursor to the track you want to remove.
Setup Menu Screen Saver This function is used to turn the screen saver on or off. 1 In ‘GENERAL SETUP PAGE’, press 34 to highlight {SCREEN SAVER}, then press 2. ON Select this if you wish to turn off the TV screen when disc playback is stopped or paused for more than 15 minutes. OFF Select this to disable the screen saver function. 2 Press 34 to select a setting, then press ENTER/OK to confirm your selection.
Setup Menu Setting the Digital output Audio Setup Menu 1 Press SETUP. 2 Press 1 2 to select ‘Audio Setup’ icon. 3 Press ENTER/OK to confirm. AUDIO SETUP PAGE ANALOG OUTPUT DIGITAL AUDIO SPEAKER SETUP CD UPSAMPLING NIGHT MODE Setting the analog output Set Analog Output to match your DVD Player’s playback capability. 1 In ‘AUDIO SETUP PAGE’, press 34 to highlight {ANALOG OUTPUT}, then press 2.
Setup Menu Speaker Setup This menu contains setup options for your audio output which makes the speaker setup system reproduce high quality surround sound. For details, see page 10. CD Upsampling This feature allows you to convert your music CD to a higher sampling rate using sophisticated digital signal processing for better sound quality. If you have activated the upsampling, the player will automatically switch to stereo mode.
Setup Menu Setting the TV Display Set the aspect ratio of the DVD Player according to the TV you have connected. The format you select must be available on the disc. If it is not, the setting for TV display will not affect the picture during playback. 1 In ‘VIDEO SETUP PAGE’, press 34 to highlight {TV DISPLAY}, then press 2. 2 Press 34 to highlight one of the options below: 4:3 PAN SCAN Select this if you have a normal TV and want both sides of the picture to be trimmed or formatted to fit your TV screen.
Setup Menu This DVD Player provides three predefined sets of picture color settings and one personal setting which you can define yourself. 1 In ‘VIDEO SETUP PAGE’, press 34 to highlight {PICTURE SETTING}, then press 2. STANDARD Select this for standard picture setting. BRIGHT Select this will make the TV picture brighter. SOFT Select this will make the TV picture softer. PERSONAL Select this to personalize your picture color by adjusting the brightness, contrast, tint and color (saturation).
Setup Menu 1 In ‘VIDEO SETUP PAGE’, press 34 to highlight {CLOSED CAPTION}, then press 2. ON To enable Closed Caption function. OFF To disable Closed Caption function. 2 Press 34 to select a setting, then press ENTER/OK to confirm your selection. Preference Setup Menu 1 Press STOP 9 twice to stop playback (if any), then press SETUP. 2 Press 1 2 to select the ‘Preference Setup’ icon. 3 Press ENTER/OK to confirm.
Setup Menu You can set the PBC to ON or OFF. This feature is available only on Video CD 2.0 with playback control (PBC) feature. For details, see page 16. MP3/JPEG Menu 2 Press ENTER/OK to enter the ‘Password Change Page’. OLD PASSWORD NEW PASSWORD CONFIRM PWD OK MP3/JPEG Navigator can be set only if the disc is recorded with menu. It allows you to select different display menus for easy navigation. 1 In ‘PREFERENCE PAGE’, press 34 to highlight {MP3/JPEG NAV}, then press 2.
Language Code These pages can be used to select other languages.This does not affect the options in “AUDIO”, “SUBTITLE” or “DISC MENU”.
Language Code Maori Marathi Marshallese Moldavian Mongolian Nauru Navaho, Navajo Navajo; Navaho Ndebele, North Ndebele, South Ndonga Nepali Northern Sami North Ndebele Norwegian Norwegian Bokmål; Bokmål, Norwegian Nynorsk; Nyanja; Chichewa; Chewa Nynorsk, Norwegian; Occitan (post 1500); Proven Old Bulgarian; Old Slavonic; Old Church Slavonic; Old Old Slavonic; Church Oriya Oromo Ossetian; Ossetic Ossetic; Ossetian Pali Panjabi Persian Polish Portuguese Provençal; Occitan (post) Pushto Quechua Raeto-Romance
Troubleshooting Refer to the chart below when this unit does not function properly. If the problem you are experiencing is not listed below or if the instruction below does not help, set this unit to the standby mode, disconnect the power cord, and contact the nearest authorized YAMAHA dealer or service center. Problem 32 Solution No power – Check if the AC power cord is properly connected. – Press the STANDBY/ON on the front of the DVD system to turn on the power.
Troubleshooting Solution The player does not respond to the Remote Control – Aim the Remote Control directly at the sensor on the front of the player. – Reduce the distance to the player. – Replace the batteries in the Remote Control. – Re-insert the batteries with their polarities (+/– signs) as indicated. Buttons do not work – To completely reset the player, unplug the AC cord from the AC outlet for 5-10 seconds. Player does not respond to some operating commands during playback.
Glossary Analog: Sound that has not been turned into numbers. Analog sound varies, while digital sound has specific numerical values. These jacks send audio through two channels, the left and right. Aspect ratio: The ratio of vertical and horizontal sizes of a displayed image. The horizontal vs. vertical ratio of conventional TVs. is 4:3, and that of widescreens is 16:9. AUDIO OUT Jacks: Jacks on the back of the DVD System that send audio to another system (TV, Stereo, etc.).
Specifications AUDIO PERFORMANCE DVD-Video DVD-Audio SA-CD multichannel and SA-CD stereo Video CD & SVCD CD PICTURE CD CD-R, CD-RW DVD+R, DVD+RW DVD-R, DVD-RW DA Converter 24bit, 192kHz Signal-Noise (1 kHz) 105dB Dynamic range (1 kHz) 95dB DVD fs 96 kHz 2Hz- 44kHz fs 48 kHz 2Hz- 22kHz SVCD fs 48 kHz 2Hz- 22kHz fs 44.1kHz 2Hz- 20kHz CD/VCD fs 44.1kHz 2Hz- 20kHz Distortion and Noise (1 kHz) 0.
©2004 YAMAHA YAMAHA YAMAHA YAMAHA YAMAHA YAMAHA YAMAHA ELECTRONICS CORPORATION, USA 6660 ORANGETHORPE AVE., BUENA PARK, CALIF. 90620, U.S.A. CANADA MUSIC LTD. 135 MILNER AVE., SCARBOROUGH, ONTARIO M1S 3R1, CANADA ELECTRONIK EUROPA G.m.b.H. SIEMENSSTR. 22-34, 25462 RELLINGEN BEI HAMBURG, F.R. OF GERMANY ELECTRONIQUE FRANCE S.A. RUE AMBROISE CROIZAT BP70 CROISSY-BEAUBOURG 77312 MARNE-LA-VALLEE CEDEX02, FRANCE ELECTRONICS (UK) LTD.