2-021-509-12(1) CD/DVD Player Operating Instructions DVP-LS755P © 2004 Sony Corporation
WARNING To prevent fire or shock hazard, do not expose the unit to rain or moisture. To avoid electrical shock, do not open the cabinet. Refer servicing to qualified personnel only. The mains lead must only be changed at a qualified service shop. Welcome! Precautions Safety • This unit operates on 220 – 240 V AC, 50/60 Hz. Check that the unit’s operating voltage is identical with your local power supply.
On adjusting volume Precautions On safety • Should any solid object or liquid fall into the cabinet, unplug the player and have it checked by qualified personnel before operating it any further. On power sources • The player is not disconnected from the AC power source (mains) as long as it is connected to the wall outlet, even if the player itself has been turned off. • If you are not going to use the player for a long time, be sure to disconnect the player from the wall outlet.
Table of Contents WARNING . . . . . . . . . . . . . . . . . . . . . . . . . . . . . . . . . . . . . . . . . . . . . . . . . . . . 2 Welcome! . . . . . . . . . . . . . . . . . . . . . . . . . . . . . . . . . . . . . . . . . . . . . . . . . . . . . 2 Precautions . . . . . . . . . . . . . . . . . . . . . . . . . . . . . . . . . . . . . . . . . . . . . . . . . . . 3 About This Manual . . . . . . . . . . . . . . . . . . . . . . . . . . . . . . . . . . . . . . . . . . . . . .
Playing a DATA CD . . . . . . . . . . . . . . . . . . . . . . . . . . . . . . . . . . 51 About MP3 Audio Tracks and JPEG Image Files . . . . . . . . . . . . . . . . . . . . . 51 Playing a DATA CD With MP3 Audio Tracks or JPEG Image Files . . . . . . . 52 Enjoying JPEG Images as a Slide Show . . . . . . . . . . . . . . . . . . . . . . . . . . . 55 Using Various Additional Functions . . . . . . . . . . . . . . . . . . . . . . . 59 Locking Discs (CUSTOM PARENTAL CONTROL, PARENTAL CONTROL). . . . . . . . .
About This Manual • Instructions in this manual describe the controls on the remote. You can also use the controls on the player if they have the same or similar names as those on the remote. • “DVD” may be used as a general term for DVD VIDEOs, DVD+RWs/DVD+Rs and DVD-RWs/DVD-Rs.
Example of discs that the player cannot play The player cannot play the following discs: • CD-ROMs/CD-Rs/CD-RWs other than those recorded in the formats listed on the previous page. • CD-ROMs recorded in PHOTO CD format. • Data part of CD-Extras. • DVD-ROMs. • DVD Audios. • HD layer on Super Audio CDs. Also, the player cannot play the following discs: • A DVD VIDEO with a different region code. • A disc that has a non-standard shape (e.g., card, heart). • A disc with paper or stickers on it.
Notes About the Discs • To keep the disc clean, handle the disc by its edge. Do not touch the surface. • Do not expose the disc to direct sunlight or heat sources such as hot air ducts, or leave it in a car parked in direct sunlight as the temperature may rise considerably inside the car. • After pressing Z or A, do not leave the disc half ejected. Remove the disc completely from the player. • After playing, store the disc in its case.
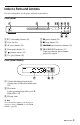
Index to Parts and Controls For more information, see the pages indicated in parentheses. Front panel A [/1 (on/standby) button (28) G X (pause) button (29) B Disc slot (28) H x (stop) button (29) C A (eject) button (29) I ./> (previous/next) buttons (38) D Front panel display (9) J PROGRESSIVE indicator (17) Lights up when the player outputs progressive signals.
Rear panel COMPONENT VIDEO OUT Y PB PR / / CB CR LINE OUT LINE (RGB) VIDEO NORMAL PROGRESSIVE PCM/ DTS/ MPEG/ DOLBY DIGITAL OPTICAL DIGITAL OUT COAXIAL R AUDIO L LINE OUT TV S VIDEO OUT A COMPONENT VIDEO OUT (Y, PB/ CB, PR/CR) jacks** (16) G DIGITAL OUT (COAXIAL) jack (21) (22) (23) B LINE OUT (VIDEO) jack* (16) H DIGITAL OUT (OPTICAL) jack (21) (22) (23) C LINE (RGB) - TV jack* (16) (25) D NORMAL/PROGRESSIVE switch** (18) E S VIDEO OUT jack* (16) F LINE OUT L/R (AUDIO) jacks (20) (21)
Remote A TV [/1 (on/standby) button (63) B Z (eject) button (29) C Number buttons (31) The number 5 button has a tactile dot.* D CLEAR button (33) E (subtitle) button (48) F (audio) button (45) G ./> (previous/next) buttons (29) H m/M (39) (scan/slow) buttons I X (pause) button (29) J H (play) button (28) The H button has a tactile dot.* K C/X/x/c buttons (31) L DISPLAY button (12) M TOP MENU button (31) N [/1 (on/standby) button (28) O 2 (volume) +/– buttons (63) The + button has a tactile dot.
Guide to the Control Menu Display (Magic Pad) Use the Control Menu to select a function and to view related information. Press DISPLAY repeatedly to turn on or change the Control Menu display as follows: , Control Menu display 1 m Control Menu display 2 (DATA CD only) m Control Menu display off Control Menu display The Control Menu display 1 and 2 will show different items depending on the disc type. For details about each item, see the pages in parentheses.
List of Control Menu items Item Item Name, Function, Relevant Disc Type TITLE (page 39)/SCENE (page 39)/TRACK (page 39) Selects the title, scene, or track to be played. CHAPTER (page 39)/INDEX (page 39) Selects the chapter or index to be played. TRACK (page 39) Selects the track to be played. ORIGINAL/PLAY LIST (page 31) Selects the type of titles (DVD-RW) to be played, the ORIGINAL one, or an edited PLAY LIST. TIME/TEXT (page 39) Checks the elapsed time and the remaining playback time.
MODE (MP3, JPEG) (page 54) Selects the data type; MP3 audio track (AUDIO), JPEG image file (IMAGE) or both (AUTO) to be played when playing a DATA CD. z Hint The Control Menu icon indicator lights up in green when you select any item t except “OFF.” (“PROGRAM,” “SHUFFLE,” “REPEAT,” “A-B REPEAT,” “SHARPNESS” only). The “ORIGINAL/PLAY LIST” indicator lights up in green when you select “PLAY LIST” (default setting).
Hookups Hooking Up the Player Hookups Follow steps 1 to 6 to hook up and adjust the settings of the player. Notes • • • • Plug cords securely to prevent unwanted noise. Refer to the instructions supplied with the components to be connected. You cannot connect this player to a TV that does not have a SCART (EURO AV) or video input jack. Be sure to disconnect the mains lead of each component before connecting.
Step 3: Connecting the Video Cords Connect this player to your TV monitor, projector, or AV amplifier (receiver) using a video cord. Select one of the patterns A through D, according to the input jack on your TV monitor, projector, or AV amplifier (receiver). In order to view progressive signal (525p or 625p) pictures with a compatible TV, projector, or monitor, you must use pattern A.
A If you are connecting to a monitor, projector, or AV amplifier (receiver) having component video input jacks (Y, PB/CB, PR/CR) Green Green Blue Blue Red Red Hookups Connect the component via the COMPONENT VIDEO OUT jacks using a component video cord (not supplied) or three video cords (not supplied) of the same kind and length. You will enjoy accurate colour reproduction and high quality images.
Notes • Do not connect a VCR, etc., between your TV and the player. If you pass the player signals via the VCR, you may not receive a clear image on the TV screen. If your TV has only one audio/video input jack, connect the player to this jack. VCR CD/DVD player TV Connect directly • Consumers should note that not all high definition television sets are fully compatible with this product and may cause artifacts to be displayed in the picture.
Step 4: Connecting the Audio Cords Refer to the chart below to select the connection that best suits your system. Be sure to also read the instructions for the components you wish to connect. Hookups Select a connection Select one of the following connections, A through Components to be connected D .
A Connecting to your TV This connection will use your TV’s speakers for sound. If you use the SCART (EURO AV) cord in pattern B of “Step 3: Connecting the Video Cords” (page 16), you do not have to connect audio cords to your TV.
B Connecting to a stereo amplifier (receiver) and 2 speakers/Connecting to an MD deck or DAT deck CD/DVD player COMPONENT OUT VIDEO PB Y / CB LINE OUT PR / LINE (RGB) VIDEO CR NORMAL PROGRESSIVE PCM/ DTS/ MPEG/ DOLBY DIGITAL OPTICAL R AUDIO L LINE OUT COAXIAL DIGITAL OUT TV S VIDEO OUT Optical digital cord (not supplied) Remove jack cap before connecting Stereo audio cord (not supplied) (white) B-2 PCM/ DTS/ MPEG/ DOLBY DIGITAL OPTICAL Hookups If the stereo amplifier (receiver) has audio
C Connecting to an AV amplifier (receiver) having a Dolby Surround (Pro Logic) decoder and 3 to 6 speakers You can enjoy Dolby Surround effects only when playing Dolby Surround audio or multichannel audio (Dolby Digital) discs. If your amplifier (receiver) has L and R audio input jacks only, use C-1 . If your amplifier (receiver) has a digital input jack, use C-2 .
D Connecting to an AV amplifier (receiver) with a digital input jack, and a decoder (Dolby Digital, MPEG audio or DTS), and 6 speakers This connection will allow you to use the Dolby Digital, MPEG audio or DTS decoder function of your AV amplifier (receiver).
Step 5: Connecting the Mains Lead Plug the player and TV mains lead (power cord) into a mains. Step 6: Quick Setup Follow the steps below to make the minimum number of basic adjustments for using the player. To skip an adjustment, press >. To return to the previous adjustment, press .. "/1 ./> X/x 1 Turn on the TV. 2 Press [/1. 3 Switch the input selector on your TV so that the signal from the player appears on the TV screen. “Press [ENTER] to run QUICK SETUP” appears at the bottom of the screen.
6 Press ENTER. 10Press ENTER. The Setup Display for selecting the aspect ratio of the TV to be connected appears. 16:9 16:9 4:3 LETTER BOX 4:3 PAN SCAN ON AUTO SCREEN SETUP TV TYPE: 16:9 SCREEN SAVER: ON BACKGROUND: JACKET PICTURE VIDEO LINE: COMPONENT OUT: VIDEO S-VIDEO MODE (PROGRESSIVE): RGB Hookups SCREEN SETUP TV TYPE: SCREEN SAVER: BACKGROUND: LINE: COMPONENT OUT: MODE (PROGRESSIVE): The Setup Display for selecting the type of video signal output from the LINE (RGB)-TV jack appears.
13Press X/x to select the type of jack (if any) you are using to connect to an amplifier (receiver), then press ENTER. 15Press ENTER. “DTS” is selected. AUDIO SETUP AUDIO ATT: OFF AUDIO DRC: STANDARD DOWNMIX: DOLBY SURROUND DIGITAL OUT: ON D-PCM DOLBY DIGITAL: MPEG: PCM DTS: OFF 48kHz/96kHz PCM: OFF ON Choose the item that matches the audio connection you selected on pages 20 to 23 ( A through D ). A • If you connect just a TV and nothing else, select “NO.
Enjoying the surround sound effects Hookups To enjoy the surround sound effects of this player or your amplifier (receiver), set the following items as described below for the audio connection you selected on pages 21 to 23 ( B through D ). Each of these is the default setting and does not need to be adjusted when you first connect the player. See page 65 for using the Setup Display. Audio Connection (pages 21 to 23) A • No additional settings are needed.
4 Slowly, insert the disc straight into the disc slot. Playing Discs Playing Discs Depending on the DVD or VIDEO CD, some operations may be different or restricted. Refer to the operating instructions supplied with your disc. [/1 H [/1 The labelled side (non-playback side) facing up 5 Press H. The player starts playback (continuous play). Adjust the volume on the TV or the amplifier (receiver). Depending on the disc, a menu may appear on the TV screen. For DVD VIDEOs, see page 31.
Additional operations Z CLEAR (instant replay) X H (instant advance) x Note You may not be able to use the Instant Replay or Instant Advance function with some scenes. Locking the disc slot (Child Lock) You can lock the disc slot to prevent children from ejecting the disc. Playing Discs ./> ZOOM / z Hints • The Instant Replay function is useful when you want to review a scene or dialogue that you missed.
Resuming Playback From the Point Where You Stopped the Disc (Multi-disc Resume) The player stores the point where you stopped the disc for up to 6 discs and resumes playback the next time you insert the same disc. If you store a resume playback point for the seventh disc, the resume playback point for the first disc is deleted. H x 1 While playing a disc, press x to stop playback. “RESUME” appears on the front panel display. 2 Press H.
Using the DVD’s Menu Some DVD-RWs in VR (Video Recording) mode have two types of titles for playback: originally recorded titles (ORIGINAL) and titles that can be created on recordable DVD players for editing (PLAY LIST). You can select the type of title to be played. Playing Discs A DVD is divided into long sections of a picture or a music feature called “titles.” When you play a DVD which contains several titles, you can select the title you want using the TOP MENU button.
Playing VIDEO CDs With PBC Functions (PBC Playback) PBC (Playback Control) allows you to play VIDEO CDs interactively by following the menu on the TV screen. ./> x ENTER O RETURN 1 Start playing a VIDEO CD with PBC functions. The menu for your selection appears. 2 Press the number buttons to select the item number you want. 3 Press ENTER. 4 Follow the instructions in the menu for interactive operations.
12(27) 18(34) T 1:32:55 OFF OFF SET ON Various Play Mode Functions (Programme Play, Shuffle Play, Repeat Play, A-B Repeat PLAY DVD VIDEO Play) 3 Press X/x to select “SET t,” then press ENTER. “TRACK” is displayed when you play a VIDEO CD or CD. PROGRAM Note ALL CLEAR 1. TITLE 2. TITLE – – 3. TITLE – – 4. TITLE – – 5. TITLE – – 6. TITLE – – 7. TITLE – – The play mode is cancelled when: – you eject the disc. – the player enters standby mode by pressing [/1.
Next, press X/x to select “03” under “C,” then press ENTER. PROGRAM ALL CLEAR 1. TITLE 0 2 – 0 3 2. TITLE – – 3. TITLE – – 4. TITLE – – 5. TITLE – – 6. TITLE – – 7. TITLE – – T –– 01 02 03 04 05 Selected title and chapter ◆ When playing a VIDEO CD or CD For example, select track “02.” Press X/x to select “02” under “T,” then press ENTER. 3 Follow step 5 for new programming. To cancel a programme, select “--” under “T,” then press ENTER.
2 Press X/x to select (SHUFFLE), then press ENTER. Playing repeatedly (Repeat Play) The options for “SHUFFLE” appear. 12(27) 18(34) T 1:32:55 PLAY DVD VIDEO OFF OFF TITLE CHAPTER Playing Discs 3 You can play all of the titles or tracks on a disc, or a single title, chapter, or track repeatedly. You can use a combination of Shuffle or Programme Play modes. Press X/x to select the item to be shuffled.
◆ When playing a VIDEO CD or CD • DISC: repeats all of the tracks. • TRACK: repeats the current track. Repeating a specific portion (AB Repeat Play) ◆ When playing a DATA CD with MP3 audio tracks or JPEG image files • DISC: repeats all of the albums. • ALBUM: repeats the current album. • TRACK (MP3 audio tracks only): repeats the current track. You can play a specific portion of a title, chapter or track repeatedly. (This function is useful when you want to memorize lyrics, etc.
4 During playback, when you find the starting point (point A) of the portion to be played repeatedly, press ENTER. The starting point (point A) is set. A 18 - 1:32:55 When you reach the ending point (point B), press ENTER again. The set points are displayed and the player starts repeating this specific portion. A 18 - 1:32:55 Playing Discs 5 B 18 - 1:33:05 B 18 - 1:34:30 To return to normal play Press CLEAR, or select “OFF” in step 3.
Locating a point quickly using the previous/next buttons Searching for a Scene Searching for a Particular Point on a Disc (Search, Scan, Slow-motion Play, Freeze Frame) You can quickly locate a particular point on a disc by monitoring the picture or playing back slowly. You can search for the next or previous chapter, track, or scene using ./> on the player. During playback, press > or . once briefly to go to the next or previous chapter/ track/scene. Or, press and hold > or .
Watching frame by frame (Slow-motion play) Press m or M when the player is in pause mode. To return to normal speed, press H. Each time you press m or M during Slow-motion play, the playback speed changes. Two speeds are available. With each press the indication changes as follows: 2 y1 You can search a DVD by title or chapter, and you can search a VIDEO CD/CD/DATA CD by track, index, or scene.
◆ When playing a VIDEO CD or Super VCD with PBC Playback 5 Press ENTER. The player starts playback from the selected number. SCENE ◆ When playing a CD TRACK ◆ When playing a DATA CD (MP3 audio) ALBUM TRACK To search for a scene using the time code (DVD VIDEO/DVD-RW only) 1 In step 2, select TIME/TEXT. “T **:**:**” (playing time of the current title) is selected. 2 Press ENTER. “T **:**:**” changes to “T --:--:--.” Input the time code using the number buttons, then press ENTER.
Searching by Scene (PICTURE NAVIGATION) You can divide the screen into 9 subscreens and find the desired scene quickly. The first scene of each chapter, title, or track appears as follows. 1 2 3 4 5 6 7 8 9 4 Press C/X/x/c to select a chapter, title, or track, and press ENTER. Playback starts from the selected scene. C/X/x/c ENTER To return to normal play during setting O RETURN Press O RETURN. 1 Press PICTURE NAVI during playback. The following display appears.
Viewing Information About the Disc Checking the Playing Time and Remaining Time You can check the playing time and remaining time of the current title, chapter, or track. Also, you can check the DVD/CD text or track name (MP3 audio) recorded on the disc.
To check DATA CD (MP3 audio) text By pressing TIME/TEXT while playing MP3 audio tracks on a DATA CD, the track name and album name appear. You can also display the audio bit rate (the amount of data per second of the current audio) on your TV screen. Bit rate T 17:30 Checking the information on the front panel display You can view the time information and text displayed on the TV screen also on the front panel display.
When playing a VIDEO CD (without PBC functions) or CD Playing time and number of the current track 1 Remaining time of the current track 1 Playing time of the disc 1 Remaining time of the disc 1 Text 1 z Hints • When playing VIDEO CDs without PBC functions, the track number and the index number are displayed after the text. • When playing VIDEO CDs with PBC functions, the scene number or the playing time are displayed.
Sound Adjustments Changing the Sound 1 Press ◆ When playing a DVD-RW The types of sound tracks recorded on a disc are displayed. The default setting is underlined. Example: • 1: MAIN (main sound) • 1: SUB (sub sound) • 1: MAIN+SUB (main and sub sound) ◆ When playing a VIDEO CD, CD, or DATA CD (MP3 audio) The default setting is underlined.
Checking the audio signal format You can check the audio signal format by pressing repeatedly during playback. The format of the current audio signal (Dolby Digital, DTS, PCM, etc.) appears as shown below. Example: Dolby Digital 5.1 ch Rear (L/R) 1:ENGLISH DOLBY DIGITAL 3 / 2 .
To cancel the setting L R Select “OFF” in step 2. ◆TVS DYNAMIC Creates one set of virtual rear speakers from the sound of the front speakers (L, R) without using actual rear speakers (shown below). This mode is effective when the distance between the front L and R speakers is short, such as with built-in speakers on a stereo TV.
Enjoying Movies Changing the Angles 1 Press (angle) during playback. The number of the angle appears on the display. Displaying the Subtitles If subtitles are recorded on the discs, you can change the subtitles or turn them on and off whenever you want while playing a DVD. 1 Press (subtitle) during playback. The following display appears. 2 1:ENGLISH 2 Press (angle) repeatedly to select an angle number. The scene changes to the selected angle.
Adjusting the Playback Picture (CUSTOM PICTURE MODE) You can adjust the video signal of the DVD, VIDEO CD, or DATA CD in JPEG format from the player to obtain the picture quality you want. Choose the setting that best suits the programme you are watching. • CINEMA 1: enhances details in dark areas by increasing the black level. • CINEMA 2: white colours become brighter and black colours become richer, and the colour contrast is increased.
Sharpening the Pictures (SHARPNESS) You can enhance the outlines of images to produce a sharper picture. ENTER X/x DISPLAY 1 Press DISPLAY during playback. The Control Menu appears. 2 Press X/x to select (SHARPNESS), then press ENTER. The options for “SHARPNESS” appear. 12(27) 18(34) T 1:32:55 DVD VIDEO OFF OFF 1 2 3 Press X/x to select a level. • 1: enhances the outline. • 2: enhances the outline more than 1. 4 Press ENTER. The selected setting takes effect.
Playing a DATA CD About MP3 Audio Tracks and JPEG Image Files What is MP3/JPEG? MP3 is audio compression technology that satisfies the ISO/MPEG regulations. JPEG is image compression technology. DATA CDs that the player can play * “Design rule for Camera File system”: Image standards for digital cameras regulated by JEITA (Japan Electronics and Information Technology Industries Association). Notes • The player will play any data with the extension “.MP3,” “.JPG,” or “.
When you insert a DATA CD and press H, the numbered tracks (or files) are played sequentially, from 1 through 7. Any subalbums/tracks (or files) contained within a currently selected album take priority over the next album in the same tree. (Example: C contains D so 4 is played before 5.) When you press MENU and the list of album names appears (page 53), the album names are arranged in the following order: A t B t C t D t F t G.
Selecting an album from a DATA CD 1 Selecting an MP3 audio track 1 Press MENU. The list of tracks in the album appears. The list of albums on the DATA CD appears. When an album is being played, its title is shaded. MY FAVOURITE SONG 1(256) WALTZ FOR DEBBY MY ROMANCE MILES TONES MY FUNNY VALENTINE AUTUM LEAVES ALL BLUES S O M E D A Y M Y P R I N C E W ...
Selecting a JPEG image file 1 After step 2 of “Selecting an album from a DATA CD,” press PICTURE NAVI. The image files in the album appear in 16 subscreens. A scroll box is displayed on the right. To rotate a JPEG image Press X/x while viewing the image. Each time you press X, the image rotates counterclockwise by 90 degrees. To return to normal view, press CLEAR. Note that the view also returns to normal if you press C/c to go to the next or previous image. Example: when X is pressed once.
To stop viewing the JPEG image Press x. z Hints • While viewing JPEG image files, you can set options such as “INTERVAL” (page 57), “EFFECT” (page 57), and “SHARPNESS” (page 50). • You can view JPEG images files without MP3 audio by setting “MODE (MP3, JPEG)” to “IMAGE (JPEG)” (page 56). • The date the picture was taken is displayed beside “DATE” in the Control Menu (page 12). Note that no date may appear depending on the digital camera.
3 Notes • The slide show stops when X/x or ZOOM is pressed.To resume the slide show, press H. • This function does not work if “MODE (MP3, JPEG)” is set to “AUDIO (MP3)” (page 56). • AUTO: plays both the JPEG image files and MP3 audio tracks in the same album as a slide show. • AUDIO (MP3): plays only MP3 audio tracks continuously. • IMAGE (JPEG): plays only JPEG image files continuously.
Setting the pace for a slide show (INTERVAL) You can set the time the slides are displayed on the screen. 4 Press ENTER. Note Some JPEG files, especially progressive JPEG files or JPEG files of 3,000,000 pixels or more, may take longer to display than others, which may make the duration seem longer than the setting you selected. Selecting the slides’ appearance (EFFECT) You can select the way the slides are displayed during a slide show. X/x ENTER DISPLAY 1 ENTER The Control Menu appears.
3 Press X/x to select a setting. The default setting is underlined. • MODE1: the image sweeps in from top to bottom. • MODE2: the image sweeps in from left to right. • MODE3: the image stretches out from the centre of the screen. • MODE4: the images randomly cycle through the effects. • MODE5: the next image slides over the previous image. • OFF: turns off this function. 4 58 Press ENTER.
3 Using Various Additional Functions Press X/x to select (PARENTAL CONTROL), then press ENTER. The options for “PARENTAL CONTROL” appear. Locking Discs (CUSTOM 12(27) 18(34) T 1:32:55 PARENTAL CONTROL, PARENTAL DVD VIDEO CONTROL) You can set two kinds of playback restrictions for a disc. • Custom Parental Control You can set playback restrictions so that the player will not play inappropriate discs.
To turn off the Custom Parental Control function 1 Follow steps 1 to 3 of “Custom Parental Control.” 2 Press X/x to select “OFF t,” then press ENTER. 3 Enter your 4-digit password using the number buttons, then press ENTER. Parental Control (limited playback) Playback of some DVD VIDEOs can be limited according to a predetermined level such as the age of the users. The “PARENTAL CONTROL” function allows you to set a playback limitation level.
6 PARENTAL CONTROL Press X/x to select a geographic area as the playback limitation level, then press ENTER. The area is selected. When you select “OTHERS t,” select and enter a standard code in the table on page 62 using the number buttons. Enter a new 4-digit password, then press ENTER . 7 Enter a 4-digit password using the number buttons, then press ENTER. The display for confirming the password appears. Press X/x to select “LEVEL,” then press ENTER. The selection items for “LEVEL” are displayed.
z Hint If you forget your password, remove the disc and repeat steps 1 to 3 of “Parental Control (limited playback).” When you are asked to enter your password, enter “199703” using the number buttons, then press ENTER. The display will ask you to enter a new 4-digit password. After you enter a new 4-digit password, replace the disc in the player and press H. When the display for entering your password appears, enter your new password.
Changing the password 1 Press DISPLAY while the player is in stop mode. Controlling Your TV With the Supplied Remote The Control Menu appears. 2 Press X/x to select (PARENTAL CONTROL), then press ENTER. You can control the sound level, input source, and power switch of your Sony TV with the supplied remote. The options for “PARENTAL CONTROL” appear. 3 Press X/x to select “PASSWORD t,” then press ENTER. TV [/1 Number buttons 2 t The display for entering the password appears.
Controlling other TVs with the remote You can control the sound level, input source, and power switch of non-Sony TVs as well. If your TV is listed in the table below, set the appropriate manufacturer’s code. 1 While holding down TV [/1, press the number buttons to select the manufacturer’s code for your TV (see the table below). 2 Release TV [/1. Code numbers of controllable TVs If more than one code number is listed, try entering them one at a time until you find the one that works with your TV.
3 Press X/x to select “CUSTOM,” Settings and Adjustments Using the Setup Display By using the Setup Display, you can make various adjustments to items such as picture and sound. You can also set a language for the subtitles and the Setup Display, among other things. For details on each Setup Display item, see pages from 66 to 71. Note Playback settings stored in the disc take priority over the Setup Display settings and not all of the functions described may work. then press ENTER.
Selected setting SCREEN SETUP 4:3 PAN SCAN TV TYPE: ON SCREEN SAVER: JACKET PICTURE BACKGROUND: LINE: VIDEO ON COMPONENT OUT: MODE (PROGRESSIVE): AUTO Setting the Display or Sound Track Language (LANGUAGE SETUP) “LANGUAGE SETUP” allows you to set various languages for the on-screen display or sound track. To enter the Quick Setup mode Select “QUICK” in step 3. Follow from step 5 of the Quick Setup explanation to make basic adjustments (page 24). Select “LANGUAGE SETUP” in the Setup Display.
Settings for the Display (SCREEN SETUP) Choose settings according to the TV to be connected. Select “SCREEN SETUP” in the Setup Display. To use the display, see “Using the Setup Display” (page 65). The default settings are underlined. SCREEN SETUP TV TYPE: 16:9 SCREEN SAVER: ON BACKGROUND: JACKET PICTURE LINE: VIDEO ON COMPONENT OUT: MODE (PROGRESSIVE): AUTO Note Depending on the DVD, “4:3 LETTER BOX” may be selected automatically instead of “4:3 PAN SCAN” or vice versa.
• When “LINE” is set to “RGB” in “SCREEN SETUP”, you cannot select “COMPONENT OUT” (the player outputs no component video signals). • When “COMPONENT OUT” is set to “ON” you cannot select “RGB.” ◆ COMPONENT OUT AUTO Automatically detects the software type (Film-based or Video-based) and selects the appropriate conversion mode. Normally select this position. VIDEO Fixes the conversion mode to the mode for Video-based software. Allows your TV to receive signals from the COMPONENT VIDEO OUT jacks.
Custom Settings (CUSTOM SETUP) ◆ PAUSE MODE (DVD VIDEO/DVD-RW only) Selects the picture in pause mode. AUTO The picture, including subjects that move dynamically, is output with no jitter. Normally select this position. FRAME The picture, including subjects that do not move dynamically, is output in high resolution. Use this to set up playback related and other settings. Select “CUSTOM SETUP” in the Setup Display. To use the display, see “Using the Setup Display” (page 65).
◆ DOWNMIX (DVD VIDEO/DVD-RW only) Settings for the Sound (AUDIO SETUP) “AUDIO SETUP” allows you to set the sound according to the playback and connection conditions. Select “AUDIO SETUP” in the Setup Display. To use the display, see “Using the Setup Display” (page 65). The default settings are underlined.
If you connect a component that is incompatible with the selected audio signal, a loud noise (or no sound) may be heard from the speakers, risking damage to your ears or speakers. ◆ DOLBY DIGITAL (DVD VIDEO/DVD-RW only) Selects the type of Dolby Digital signal. D-PCM DOLBY DIGITAL Select this when the player is connected to an audio component without a built-in Dolby Digital decoder.
Additional Information Troubleshooting If you experience any of the following difficulties while using the player, use this troubleshooting guide to help remedy the problem before requesting repairs. Should any problem persist, consult your nearest Sony dealer. Power The power is not turned on. , Check that the mains lead is connected securely. Picture There is no picture/picture noise appears. , Re-connect the connecting cord securely. , The connecting cords are damaged.
, While playing a Super VCD on which the audio track 2 is not recorded, no sound will come out when you select “2:STEREO,” “2:1/L,” or “2:2/R.” , When playing multi-channel MPEG audio sound tracks, only the Front (L) and Front (R) signals will be output from your two front speakers. Sound distortion occurs. , Set “AUDIO ATT” in “AUDIO SETUP” to “ON” (page 70). The sound volume is low. , The sound volume is low on some DVDs.
Some functions such as Stop, Search, Slow-motion Play, Repeat Play, Shuffle Play, or Programme Play cannot be performed. , Depending on the disc, you may not be able to do some of the operations above. Refer to the operating manual that comes with the disc. The language for the sound track cannot be changed. , Try using the DVD’s menu instead of the direct selection button on the remote (page 31). , Multilingual tracks are not recorded on the DVD being played.
Self-diagnosis Function (When letters/numbers appear in the display) When the self-diagnosis function is activated to prevent the player from malfunctioning, a five-character service number (e.g., C 13 50) with a combination of a letter and four digits appears on the screen and the front panel display. In this case, check the following table. C:13:50 Cause and/or corrective action C 13 The disc is dirty or recorded in a format that this player cannot play (page 7).
DVD VIDEO (page 6) A disc that contains up to 8 hours of moving pictures even though its diameter is the same as a CD. The data capacity of a single-layer and singlesided DVD is 4.7 GB (Giga Byte), which is 7 times that of a CD. The data capacity of a double-layer and single-sided DVD is 8.5 GB, a single-layer and double-sided DVD is 9.4 GB, and double-layer and double-sided DVD is 17 GB. The picture data uses the MPEG 2 format, a worldwide standard of digital compression technology.
Scene (page 9) On a VIDEO CD with PBC (playback control) functions, the menu screens, moving pictures and still pictures are divided into sections called “scenes.” Title (page 9) The longest section of a picture or music feature on a DVD, movie, etc., in video software, or the entire album in audio software. Track (page 9) Sections of a picture or a music feature on a VIDEO CD, CD or DATA CD (the length of a song). (“Track” in DATA-CD is an exclusive definition for this player.
Specifications System General Laser: Semiconductor laser Signal format system: PAL/NTSC Power requirements: 220 – 240 V AC, 50/60 Hz Power consumption: 12 W Dimensions (approx.): 430 × 46.5 × 240 mm (width/height/depth) incl. projecting parts Mass (approx.): 2.15 kg Operating temperature: 5 °C to 35 °C Operating humidity: 25 % to 80 % Audio characteristics Frequency response: DVD VIDEO (PCM 96 kHz): 2 Hz to 44 kHz (±1.0 dB)/DVD VIDEO (PCM 48 kHz): 2 Hz to 22 kHz (±0.5 dB)/CD: 2 Hz to 20 kHz (±0.
Language Code List For details, see pages 45, 48, 66. The language spellings conform to the ISO 639: 1988 (E/F) standard.
Index Numerics E P 16:9 67 4:3 LETTER BOX 67 4:3 PAN SCAN 67 48kHz/96kHz PCM 71 5.
V Video based software 76 VIDEO CD 6, 28 Z ZOOM 29, 54 81
Printed on 100% recycled paper using VOC (Volatile Organic Compound)-free vegetable oil based ink.