S ONY. ® Digital Color TV i. Operating the TV v Operating Instructions Using Features E Eire fe Mae 8 Using the Menus w Other Information 7 Sony Customer Support USA www.sony.comivsupport Canada: United States Canada 1.800.222. SONY 1.877 .889.
Owner's Record Tie model and serial numbers awe Stockaded ut ihe ide nd rear of the TV. Record these mes in the spaces provided teal. Refer 1 them whenever you call upon your San dealer sardine this TV. Model Name Serial No CAUTION To prevent electric sh this polarized AC plug with an extension cord.
Contents Introducing Your New BRAVIA® Welcome ta the World of ..4 Experiencing Stunning HD with Your BRA VIA. od The Four Steps to a Posturing HD Experience ..8 TV Feature Highlights Getting Started Setting Up Your TV Locating Inputs and Outputs. Connecting the TV Connecting Other Equipment , When Installing the TV Against a Wall or Enclosed Area . Securing the TV... Running Initial Setup... 17 Operating the TV Using the Remote Control. Remote Control Button Description TV Controls and Indicators...
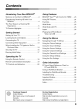
Introducing Your New BRAVIA® EEE EE Welcome to the World of BRAVIA® Thank you for choosing this Sony BRAVIA® high-definition television. Use the documentation listed below to get the most out of your TV. mn Safety Booklet mp Quick Setup Guide £ Contains precautionary L.7 Provides TV setup information with sample measures to keep you and connection diagrams. your TV safe. Read this information prior to setting up your TV. #7 Operating Instructions Provides the most detailed information to operate your TV.
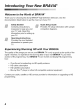
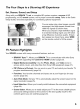
The Four Steps to a Stunning HD Experience Set, Source, Sound, and Setup Along with your BRA VIA TV set. a complete HD system requires a source of HD programming. an HD sound system. and a proper connection setup. Refer to the Quick Setup Guide, enclosed separately, for connecting optional equipment. You can enjoy crisp, clear images, smooth movement. and high-impact visuals from 1080 HD signals as shown here. ‘When you compare a high-definition signal to a standard analog signal.
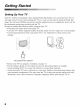
Getting Started Setting Up Your TV Some TV models are packaged with a detached Table-Top Stand so you can mount your TV to a wall right away. If vou are not mounting the TV tw a wall, you will need 0 attach the Table-Top Stand. You will need a Phillips screwdriver and the supplied resews to complete the task. Look for the attachment instructions provided with the TV. Be sure to consider the following while setting up your TV: + Disconnect all cables when carrying the TV.
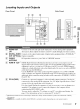
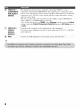
Locating Inputs and Outputs Rear Panel Side Panel = lem Bl BE AUDIO OUT UR o papers Bunion Hl = ne Continents to the left and right audio put jacks of your analog audio equipment. You can use these outputs 10 listen to your TV's audio through your stereo system. DIGITAL AUDIO Connects to he optical audio input of digital audio equipment thi is POM/Doloy>! OUT (OPTICAL) Digital compatible.
Hem [6] VIDEO IN 1/ COMPONENT (MONO) el This tout port can be used as a composite video input (VIDEO component video input (COMPONENT?. For composite nse, connect the yellow jack 10 Y for diver and use audio L (mono and R for audio signal. For component connection, use Y, Pr, Pr for video signals mid also connect the audio L {omen} and R for audio signal, This TV can alto detect and switch between the VIDEO 1 und COMPONENT when VIDEO | or COMPONENT is complected.
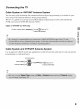
Connecting the TV Cable System or VHF/UHF Antenna System You can enjoy high-definition and standard-definition digital programming (if available in your area} along with standard-definition analog programming, This TV is capable of receiving unscrambled digital programming for both cable (QAM and 8VSB) and external VHF/UHF antenna (SCAT.
HD Cable Boxwood Satellite Box You can enjoy high-definition programming by subscribing to a high-definition cable service or a high-definition satellite service. For the best possible picture, make sure you connect this equipment to our TV via the HDMI or component video (with audio) input located on the back of your TV.
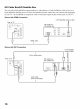
Shown with Component Connection CATV/Satellite antenna cable Rear of TV HD cable box! HD satellite box o AUDIO-R (red) AUDIO-L {white} Pp (rad) Py (blue) — ¥ (green) ——i Component video cattle J papers Bunion Audio cable yor incipient Be DY Enron aid no in HDS solemn connect the BV ant 1 the HOME INGE Gait DVT HOB cable oF adapter and consent the audition to dhe ALDAN) GPU Fil epi 1"
PC Use the TV as a monitor for our PC by connecting an HD13-HDIS cable connection as shown below, This TV can also be connected to u PC with a DVI or HDMI output.
Connecting Other Equipment Digital audio equipment {AV Receiver/Home ~~ CABLE/ Theater) ANTENNA VCR/Game system/ Camcorder Angelo audio Personal Digital recorder equipment computer (AV Receiver! Home Theater) Birthday Disc Player) DVD Digital satellite Digital Audio PSY player receiver cable box system a A ~ Refer woodlice Mekong Som Gide application) aha coming orbit encampment to sole TV, 13 papers Bunion | }
When Installing the TV Against a Wall or Enclosed Area Make sure that your TV has adequate ventilation. Allow enough below, Avoid operating the TV at temperatures below 41 °F (5 space around the TV as shown MN). Installed with stand Installed on the wall Vit / oem ioe ~ Leave at toast | ee this WHICH SPACE i Ta res 110 Fm around the set, Leave at [east this much space around tha sat. Never install the TV set as follows: Air circulation is blocked. Ar circulation is blocked.
Securing the TV Sony strongly recommends taking measures tw prevent the TV from toppling over. A Unsecured TVs muy topple and result in property damage, serious bodily injury or even death. Preventing the TV from Toppling Secure the TV to a wall and/or stud. Do nat allow children to play or climb on furniture and TV sets. Avoid placing or hanging items ou the TV, Never install the TV un + slippery, unstable candor uneven surfaces. + furniture that can easily be used as steps.
2 Secure the TV to the stand. se the optional hardware listed below (not supplied machine screw (screwed into the TV + A screw or similar (attach it to the TV stand). * Rope or chain {strong enough to support the weight of the TV). Make swe that there is no excess stack in the rope or chain. An alternative way to setscrew the TV is with an optional Sony Support Belt Kit. Table-Top Stand).
Running Initial Setup During initial setup, you will perform the following: + Set the language for the On Screen Display (OSD) text » Choose your viewing environment + Scan for digital and analog channels Complete your cable connections before beginning the Initial Setup. Refer to the Quick Setup Guide (supplied) for sample connection diagrams, © Air o 1 Turn on the TV. The Initial Setup screen will appear. 2 Use the remote control buttons described below to navigate through the Initial Setup.
Operating the TV IRE Using the Remote Control To Insert Batteries into the Remote Control Insert two size AA batteries (supplied) by matching €@ and @ on the batteries to the diagram inside the battery compartment of the remote control. * Point your remote control directly at the IR sensor located on your TV. * Make sure that no objects are blocking the path between the remote control and the IR sensor on our TV.
Remote Control Button Description oC <3 PS INPUT Description Press to display the list of External Inputs and TV made, Press repeatedly 10 waggle through the inputs. See pa [2] syn C MENU to display the BRA VIA Sync Menu and they connected HDMI equipment from HDMI Device Selection 18] Equipment Control These buttons are ted 0 control the equipment connected to the TV by using the Control for HDMI function (not available cu all Control for HDMI equipment).
Sullen ae [4] scene Be Description s picture and sound quality by selecting the theater. Sports: Presents realistic pictures and sound just like ina stadium Photo: Reproduces the texture and color of u printed pot Muse : Lets you experience dynamic and clear sound just like at a concert Game: Broadens your game-playing experience with superb picture and sound quality. Graphics: Eases prolonged monitor viewing with clearer detailed pictures. General: No optimized picture and sound quality for any ascetic.
Description a 0.9 Press 0-9 to select a channel [8] O Use with 0-9 w select digital channels. For example, to enter 2.0, press (23. (0, () and (5). [8 VOL (on) Press to adjust the goofiness. + MUTING Press to mute the sound. Press again or press VOL # restore the sound, reds to tum on and off the [13 POWER b doff the TV. Kh WIDE Press repeatedly wo cycle through the available Wide Mode settings. See page 23. ] DISPLAY Press once w display the gunner with channel/program ] = information you ar watching.
TV Controls and Indicators gs CH + CHS Light sensor Sen (IR) Infrared anything over the s Receiver Receives IR signal from the remote control BE (Picture Lights up in menu when the sleep timer/ Picture Frame is set, Off: Lights up in green when the Power Saving is set to Picture Of, {Timer} LED 3] (Y (Standby) Lights up in red when the TV is m standby mode. LED [4] T(Power) LED Lights up in green when the TV is turned on 5] (h{Power) Press tw turn on and off the TV.
Using Features BRAVIA® Sync™ with Control for HOMO With the Control for HDMI function, BRA VIA Sync helps to communicate with tic-compatible equipment using HDMI CEC (Consumer Electronics Control), se the following settings and tips wo help unify control of your connected equipment. 1 Press HOME and select Settings. then select the Setup settings. 2 Select the HDMI Settings, then highlight Control for HDMI, and set to On.
Using PIP Feature PIP (picture in picture) displays a picture from a connected PC in full screen, and a TY program or other external input (see below “To Enter PIP” table) in an inset window. (Closed Captions (CC} is not available with PIP mode.) Sub Window {Location of the . Sub Window Main can be moved Window by pressing {PC} FR To Enter Pl In main window In sub window PC TV channel CCABLE/ANTENNA). VIDEO IN 1/2, HDMI IN (video timing) TV channel (CABLE/ANTENNA), VIDEO IN 1/2.
Favorites Your favorite channels and external inputs can be accessed by pressing the HOME button once they are added to the list 1 Press HOME. 2 Press to select Favorites, then press The favorites list appears, 3 Press wo select a channel or input. then press (5). Adding to Favorites While tuned to the channel you want fo watch or viewing connected equipment, press HOME and select Favorites to display the list, Highlight Add to Favorites.
Wide Mode with PC Wide Mode is also available for the PC settings. When a PC is connected to the TV and PC input is selected, vou can change the PC Screen settings. Ls ie os ori Hon Alana To change the Wide Screen Mode for PC Timing Press WIDE repeatedly to cycle through the available modes while in the PC input mode.
Playing back Photo/Music/Video via USB You can enjoy photo/music/video files stored in a Sony digital still camera or camcorder through a USB cable or USB storage device on your TV. 1 Connect a supported USB device to the TV. 2 Press HOME. 3 Press 4/% to select Photo, Music, or Video. then press (3). The file or folder list appears. 4 Press 4/ then press (5. When you select # folder, select u file.
Using the Menus The HOME button allows you to access a variety of TV settings and USB media files. Navigating through TV Menus 1 Press 3 on the remote control to display the menu options. 2 Pre settings. 3 Press (3) to select or confirm. 4 Press ch w exit to navigate on the menu or adjust the The Favorites feature provides quick access to your frequently used items, such as preferred TV channels or external inputs (e.g. game console. DVD player).
[Zl Using the Picture Settings a Description Picture Mode Displays the options selected m the Scene Select sett Customized picture Select is set wo General, the options below can be selected, Vivid Select for enhanced picture contra snd sh {page 20). When Scene pes Standard elect for standard picture stings. Recommended for bone eerie. Custom Select tu store your preferred settings. Cinema Fox film-based content. Suitable in a theater-like environment.
Option Advanced Settings gE Gh Reset Resets the advice s Adv. Contrast Automatically adjusts back light and contrast to the most suitable Enhancer settings judging from the brightness of the screen. This setting is Iy effective for dark scenes. and will increase the contrast on of the darker picture scenes. Select from High, Medium. Low and Off. Black Enhances black areas of the picture for stronger contrast.
Using the Sound Settings ll Sound Mode Customized sound listening Reset Treble Bass Equalizer Balance Surround Volume Offset Custom.) Cara Sets a sound mode. Sound Mode insides options best su od for video and photographs, respectively. The available options depend on the scene select settings. Dynamic Enhances treble and by Standard Standard sound optimized for home use. Clear Voice Suitable for spoken dialog Custom Select 10 store your preferred settings.
Villa Can ch an tong the alternate audio streams. The Alternate Audio et an tong the able options fo Digital channels only program vou sre tuned to may be broadcaster in a different language in the alternate dio streams. Speakers TV Speakers Select 10 use the TV speakers, Audio System Select to use an external audio stein for the TV sound, By selecting this option you are disabling the TV speakers, <.
El Using the Screen Settings Wide Mode Wide Zoom Fills the screen with minimum distortion. Normal Select to display 4:3 picture in original size when the original source is 4:3. Full to engorge the picture horizontally to Fill the screen when the final soiree is 4:3 (Standard definition source). When the original source is 16:9 (Definitions source), select this mode tw display the 16:9 picture in its original size.
[sie Description PC Settings When a PC is connected to the TV and the PC input is selected, the PC settings screen appears stead of the Screen setting: You can also select the PIP feature which allows you 10 view two pictures simultaneously from OPTIONS button (page 24). Wide Mode Normal Select to display in the original impinge size, Full 1 Select 10 enlarge the picture to fll the disposal Keeping its original aspect ratio.
Ve LI using the Channel Settings Favorites Signal Type Auto Program Add Digital Channels Show/Hide Channels Select favorite channels and external puts (page 25). Cable “Select if you are receiving cable channels via Cable TV provider, Antenna Select if you are using an antenna, Autocratically sets up the channel Fist on the TV for all receivable channels. 1 Select Auto Program, 2 Select OK 10 start Auto Program. 1 Select Add Digital Channels 2 Select OK 10 add digital channels.
Ca Using the Parental Lock Settings Enter password The Parental Lock settings allow you fo set np the TV to block program lording to their content and rating levels. Use 0-8 on the remote control to enter a four-digit password, The first tine you create 1 password, confine the password by entering it again, Change Password Sel 4 : 26 Your password. Country USA ~ Select 10 use U S.A. ratings {page 37) Canada Select fo use Canadian ratings {page 38). Rating Off Tory Parental Lock off.
US Models: Selecting Custom Parental Lock Rating Options To select custom rating options for the U.S, select U.S.A. in the Country setting (page 36). Option [rear Movie Rating G All children and general audience. PG Parental guidance suggested. PG-13 Parental guidance for children sander 13. R Restricted vi nested for children under 17 NC-17 and X No one 17 or under allowed. 2.
Canadian Models: Selecting Custom Parental Lock Rating Options To select custom rating options for Canada, select Canada in the Country suing (page 36). Option Dec English Rating C All children. cs: Children 8 years and older. G [EE PG Parental guidance. 14+ Viewers 14 and older. 18+ TT Adult programming. French Rating G General programming. sans “Not recommended for young children, 13ans+ Not contender for ages under 13 16 ans+ Not recommended for ages under 16. 18 ans+ Programming restricted 10 adults.
# Using the Setup Settings USB Auto elect On tw start photo turned on and a digital still Start caner on they device cons ing photo files is complected tw the USB port then tuned on. Closed Allows you to select from several closed caption modes (for programmings that are broadest Captions with closed captioning). | A {€C) €C Display On Closed Captions (CC) is warned on Off 77 Closed Captions (CC) is muted off. On when Closed Captions {CC} is turned on when the TV is Muting muted.
Option eT Sleep Timer Language 1 1 HALES Set th Off, 120) that you would like the TV 10 remain on before shutting off automatically. en settings in your language of choice: English, Shopaholic, Select to display all on-sere Francis. Info Bani AV Setup ner Displays the malformation related to the pit signal you are watching Select Small to display minimal channel and program title or select Large to display detailed chine] and program information along with the TV icon if vou are viewing the TV.
HDMI Settings Communicates with equipment compatible with the Control for HDMI function. Picture Adjustments Lock Product Support Control for HDMI Links the operations of the TV Sc my equipment compatible with Control for HDMI. this setting is applied automatically to the connected equipment when set fo For specif On Device Auto Select Onto | Power Off Function power Select Off w disable this function.
| Setup when you first conned vou cant 10 select Initial Setup. Follow the instructions on the screen. Some settings such as Picture, Sound, and Parental Lock will not be affected by this Initial Setup. Tf you wish to return your TV wi factory settings, please see the Troubleshooting section on page 37. Start-up Select On to play sound when the TV is muted on. Select Off to disable it Sound
V% Using the Eco Settings ee Reset Power Saving Idle TV Standby Auto Sui Off Light Sensor Description Resets the current ECO settings to the def Select from OFF, Low, High. Picture Off to adjust your TV's power consumption. By selecting the High option. you will reduce the power consumption more thin the other available settings. ‘While Picture Off is set. pressing VOL or MUTING buttons will not disable this function. Press other buttons fo disable it.
Other Information EEE PC Input Signal Reference Chart for PC and HDMI IN After connecting the PC to the TV. set the output signal from the PC according to the chart below For VGA Ee) 480 SS VGA SAGA sin aon VASE Guidelines NGA i 8 VASE Guidelines GEWGAW 1.250 68 1230 417 @ For il si 31 fil NGA sin a6 SE) [0 VASE Guidelines 124 6H 35.1 fil VASE Guidelines 1.250 8 37.4 fil VASE 1.
Using a Wall-Mount Bracket Your TV can be mounted on a wall using a Wall-Mount Bracket (not supplied) out of the box as packaged. Some larger size TV may require removing the Table-Top Stand: refer 1 the instructions provided with the TV. Prepare the TV for the Wall-Mount Bracket before making cable connections.
Installing the Wall-Mount Bracket To Customers Your TV can be wall-mounted using SU-WL300 or SU-WLI00 Wall-Mount Bracket (sold separately) Please provide this installation information as well as the instruction supplied with SU-WL500 or SU-WLI00 Wall-Mount Bracket to your installer. To Sony Dealers and Licensed Contractors To avoid injury and property damage. read these instructions carefully. Periodic inspection and maintenance is highly recommended to ensure that TV is securely mounted.
For SU-WL500 (except Step 1: Checking the parts required for the installation Open the Wall-Mount Bracket package and check the contents for all required parts along with the Instructions. Step 2: Deciding on the installation location ant to install our TV, Refer to the TV installation dimensions table. sons for SU-WL508, Decide where you Refer to the Inst Dimension Table Screen center point Unit: am Bee Weight 3 (inches) KDL-46BX421 | 1.120 | 674 84 25 354 457 KDL-46BX420 | (4's | 26% | 03%) 39.01) (156.
Step 3: Installing the Base Bracket on the wall Refer to the Instructions for SU-WL300, Step 4: Preparing the TV for wall mount installation Fellow the steps below to prepare for installing the TV. 1 Disconnect all the cables from the TV. 2 Secure the Mounting Hook to the rear of the TV. Determine the screw locations und secure the Mounting Hooks to the rear of the TV. Refer to the “Screw and Hook Locations Disgruntle/ Table” shown below.
Screw location Hook location When installing the Mounting Hooks on the TV. When installing the TV onto Base Bracket. 3 Adjust the angle of the Mounting Hook. Refer to the Instructions for SU-WL500. 4 Remove the screws guided by the arrow marks # of the TV. Do not remove any other screws from the TV.
5 Lift the TV off the Table-Top Stand. Make sure that you carry out this task with at least two or three people (see page 6 for details), Po not attempt to ft the TV by yourself. Step 5: Installing the TV on the wall Refer to the Instructions for SU-WL300. « When you put the TV back on the Table-Top Stand. reverse the above steps. » When moving the TV, do not squeeze the bottom of the front panel too tight, + Remove the screws or install the Mounting Look on a stable and level surface.
For SU-WL100 only) Step 1: Checking the parts required for the installation Open the Wall-Mount Bracket package and check the contents for all required parts along with the Instructions. Step 2: Adjusting the position of the holders of the Base Plate Refer to the Instructions for SWILL 106, Step 3: Deciding on the installation location Decide where you want to install your TV, Refer to the TV installation dimensions table. Refer to the Instructions for SU-WL108.
Step 5: Preparing the TV for wall mount installation Follow the steps below to prepare for installing the TV. 1 Disconnect all the cables from the TV. 2 Align the holes on the left Mounting Hook with the corresponding holes on the rear of the TV. Secure them to the TV using two screws (supplied with SU-WL100).
3 Adjust the angle of the Mounting Hook. Mounting Hook 4 Align the holes on the right Mounting Hook with the corresponding holes on the rear of the TV. Secure them to the TV using two screws (supped with SUPERCILIOUS. Screw o dr PSW x12) gb Mounting Hook unruliness] JOY Eo ii Step 6: Installing the TV on the Base Plate Refer to the Instructions for SU-WL108. 1 Connect the cables to the corresponding inputs on the rear of the TV. For details on the cable connection.
Troubleshooting Many of the poor pictures and poor sound the Quick Setup Guide provided for Conn conditions an related to Improper connection of the cables; refer to sons. If you have questions. service seeds, or require technical assistance related to the use of your Sony TV even after you read this opening st ructions manual.
Cot oh Poor picture Picture quality not as good as viewed nt the store institutionalization » Picture quality depends on the signal content. See Quick Setup Guide (supplied) to display the best possible picture for tht signal, cast HI formats have poor quality + Content and sgl quality are controls by the signal provider. Many HIF channels and content are actually upscale versions of standardization broadcasts.
Cannot find connected « Make sure that the Control tor HOM) is set up un both the TV snd the BRA VIA Synge HDMI optimal device compatible with BRA VIA Synge (see page 23) device Second A/V receiver is not» Only one A/V receiver nay be used with the BRA VIA Sync and Hated on the Device List Control for HDMI functions at one time (see page 41).
oral Black bands appear at the edges of the screen antipollution ome wide screen programs are filmed i aspect ratios that are greater than 16:9 (this 1s especially common with theatrical releases). Your TV will show these programs with lick binds at the top and bottom of the screen. For move details, client the documentation that cane with our (or contact your program provider), Programs in 4:3 aspect ratio will have bands on left and right sides of the screen.
Important Notices Declaration of Conformity Rude Nar: SONY Nader: KDL-46BX42 1K DL-46BX420 KOL-ABXA2 DLA XAUVKDL28X21 Responsible Party: § Address: 16530 Via 2 complies with part 15 of the FCC rules. on is subject to the following twa conditions: {13 and (2) 4, Per “Phi device may mot cause harmful interfere this device must accept any interference 5 including interference that may cause undesired aeration.
SHE Ee KO Power and others Ee = an 228X301 o2BNas0 Purer requirement 710-240 V AC. 50/60 Hz (U8 A Can Adenoid Hay Peer consumption infuse HSW saw To Ala Sn 0.2% W with AC less than 135 ith 24 V | Lows fan 0.00 W with 120 V AC a with 240% AC Less than 0.
Index 0:9 buttons 21 £3 Default 33 A Adi Digital Channels 35 Advanced Settings 30 Alternate Audio 32 Analog Fine Tune 35 7 Auto Wide 33 AV Setup 40 B Back light 28 Balance Bass 31 Brightness 29 Cc CABLE/AN] CC button 21 SH ade bun 21, 22 ge Passion] 36 noel Bloch 36 notion 29 Closed Captions (CC) 39 Color Color Temperature 28 Colored bunions 2, NAT COMPONENT IN 8 Coupe 36 D DIGITAL AUDIO OUT 7 Display Area 33 DISPLAY bunion 21 Downloadable US.