2-670-907-12(1) LCD Digital Color TV Operating Instructions KDL-26S2000 KDL-32S2000 KDL-40S2000 © 2006 Sony Corporation
Owner’s Record The model and serial numbers are located at the rear of the TV. Record these numbers in the spaces provided below. Refer to them whenever you call upon your Sony dealer regarding this product. Model No. Serial No. Contacting Sony If, after reading the following instructions, you have additional questions related to the use of your Sony® TV, please call one of the following numbers.
WARNING NOTIFICATION To reduce the risk of fire or electric shock, do not expose this apparatus to rain or moisture. This equipment has been tested and found to comply with the limits for a Class B digital device, pursuant to Part 15 of the FCC Rules. These limits are designed to provide reasonable protection against harmful interference in a residential installation.
Trademark Information TruSurround XT, SRS and ( ) symbol are trademarks of SRS Labs, Inc. TruSurround XT technology is incorporated under license from SRS Labs, Inc. Manufactured under license from BBE Sound, Inc. Licensed by BBE Sound, Inc. under one or more of the following US patents: 5510752, 5736897. BBE and BBE symbol are registered trademarks of BBE Sound, Inc. Macintosh is a trademark licensed to Apple Computer, Inc., registered in the U.S.A and other countries.
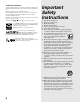
Use For the unit with a three-wire grounding type AC power cord plug (Class 1 unit) This unit must be connected to an AC power socket outlet with a protective earthing connection. Wall outlet Do not use a poor fitting outlet. Insert the plug fully into the outlet. If it is loose, it may cause arcing and result in a fire. Contact your electrician to have the outlet changed. AC power cord If you damage the AC power cord, it may result in a fire or an electric shock.
Broken pieces Do not throw anything at the unit. The screen glass may break by the impact and cause serious injury. Cable wiring Take care not to catch your feet on the cables. It may damage the unit. Volume adjustment s s Adjust the volume so as not to trouble your neighbors. Sound carries very easily at night time. Therefore, closing the windows or using headphones is suggested. When using headphones, adjust the volume so as to avoid excessive levels, as hearing damage may result.
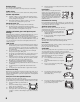
Installing on a level surface When installing the unit on the wall, allow this much space. 30 cm (117/8 inches) 10 cm (4 inches) Placing on a stable surface If you place the unit on an unstable surface, the unit may fall and cause injury or damage. 10 cm (4 inches) Fall 10 cm (4 inches) When installing the unit using a stand, allow this much space. 30 cm (117/8 inches) 10 cm (4 inches) If you install the unit on an inclined surface, the unit may fall or drop and cause injury or damage.
Lightning For added protection for this TV during a lightning storm, or when it is left unattended and unused for long periods of time, unplug it from the wall outlet and disconnect the antenna. This will prevent damage to the receiver due to lightning and power-line surges. Damage requiring service If the surface of the TV cracks, do not touch it until you unplug the AC power cord. Otherwise electric shock may result.
Contents Getting Started Connecting the TV .........................................................................................................10 Cable System or VHF/UHF Antenna System............................................................10 Cable Box/Digital Cable Box .....................................................................................10 Cable System and VHF/UHF Antenna System .........................................................11 Satellite Receiver and Cable/Antenna........
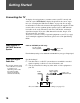
Getting Started Connecting the TV To display clear crisp pictures, you must connect your TV correctly and select the correct Wide Mode to display the picture in the correct aspect ratio (see “Changing the Wide Screen Mode” on page 20). It is strongly recommended to connect the antenna/cable input using the supplied 75-ohm coaxial cable to receive optimum picture quality signal. A 300-ohm twin lead cable can be easily affected by radio noise and the like, resulting in signal deterioration.
Getting Started A/B RF Switch Cable A B If you want to watch both antenna (over-the-air) and cable broadcast signals, you’ll need to use an optional A-B RF switch (not supplied), as shown below. Rear of TV VHF/UHF input Use the A-B selector to switch between the over-the-air signals and the cable signals. Then set the Cable setting in the Setup settings to On or Off, as described on page 31.
Getting Started Satellite Receiver and Cable/Antenna Satellite antenna cable Satellite Receiver CATV/Antenna cable (supplied) S VIDEO S VIDEO cable A/V cable VIDEO (yellow) AUDIO-L (white) AUDIO-R (red) VHF/UHF VIDEO IN 1 S VIDEO HD/DVD IN (1080i/720p/480p/480i) 3 5 4 Y OPTICAL OUT PB VIDEO PR L (MONO) L AUDIO AUDIO R R AUDIO OUT(VAR/FIX) Rear of TV If your satellite receiver is not equipped with S VIDEO, use a VIDEO cable (yellow) instead of the S VIDEO cable.
Getting Started Left side Getting Started When Connecting to Optional Equipment Rear 7 6 VIDEO 2 IN 4 1 RGB R-AUDIO-L S VIDEO AUDIO VIDEO IN PC IN 2 5 L (MONO) R AUDIO 0 3 1 S VIDEO qa HD/DVD IN VIDEO IN (1080i/720p/480p/480i) 3 5 4 Y 6 OPTICAL OUT PB 7 VIDEO PR L (MONO) L AUDIO R AUDIO 9 VHF/UHF AUDIO OUT (VAR/FIX) 8 qs R Item Description 1 VIDEO 2 IN S VIDEO Connects to the S VIDEO output jack on your camcorder or other video equipment that has S VIDEO.
Getting Started Item Description 5 HDMI IN 6 HDMI/ R-AUDIO-L HDMI (High-Definition Multimedia Interface) provides an uncompressed, all-digital audio/video interface between this TV and any HDMI-equipped audio/video equipment, such as a set-top box, DVD player, and A/V receiver. HDMI supports enhanced, or high-definition video, plus digital audio.
Getting Started Preventing the TV from Toppling Over Getting Started Installing the TV Attaching the Support Belt 1 Screw the support belt (supplied) to the TV stand with a wood screw (supplied). 2 Attach the support belt to the stand, and screw the belt with a securing screw (supplied) using a coin, etc. 3 Adjust the length by pulling the support belt towards you while holding the TV stand. Be sure to take measures to prevent the TV from toppling over and causing injury.
Getting Started Bundling the Connecting Cables You can bundle the connecting cables as illustrated below. 1 2 3 Do not bundle the AC power cord in the stand with other connecting cables. Adjusting the Viewing Angle of the TV This TV can be adjusted within the angles shown below. Adjust the angle left and right (swivel) Top view 15° 15° 15° 15° Front When adjusting the angle, hold the stand with one hand to avoid slipping or tipping the stand.
Getting Started After you finish connecting your TV, you need to run Initial Setup, which automatically sets up available channels. The Initial Setup screen appears when you turn on your TV for the first time. If you do not want to set up the channels at this time, you can do it later by selecting the Auto Program option in the Analog and Digital Setup settings (see pages 35 and 36). The default setting for channel selection is Cable On.
Basic Operations Remote Control Button 1 TV/VIDEO 1 2 3 4 5 2 SLEEP 3 FREEZE Description Press repeatedly to cycle through the video inputs. See page 30 on setting up the video input labels, including the skip function. Press repeatedly until the TV displays the time in minutes (15, 30, 45, 60, 90 or 120) that you want the TV to remain on before shutting off. To cancel Sleep Timer, press SLEEP repeatedly until Sleep Off appears. Press once to display a frozen image of the current program in a window.
Basic Operations Button Description Program information in the guide is provided by the broadcasters. As a result, it may sometimes include only the channel number, without a program title or description. qs 6 7 8 6 RETURN 9 7 MENU 0 8 DIGITAL/ ANALOG qa 9 0 VOL +/– qa MUTING qs POWER The Program Options setting allows you to customize the program settings on the currently tuned channel.
Basic Operations Button qd WIDE Description Press repeatedly to step through the Wide Mode settings: Wide Zoom, Normal, Full, Zoom. The Wide Mode settings can be also accessed in the Screen settings. See page 27.
Basic Operations TV Controls 1 2 4 5 VOLUME CHANNEL POWER Basic Operations 3 MENU TV/VIDEO 0 PIC OFF/TIMER 6 7 STANDBY 8 POWER 9 Item Description 1 MENU 2 TV/VIDEO Press to display MENU with TV functions and settings (see “Overview of MENU” on page 22). Press to cycle through the video inputs. If you set a certain input to Skip in Label Video Inputs, then the input will not appear. In the MENU screen, this button serves as confirming the selection or setting.
Introducing MENU Function Overview of MENU MENU provides one button access for controlling your TV. It enables you to perform a variety of tasks intuitively with a control panel on the screen rather than a variety of remote control button presses. When you press the MENU button, you can easily perform basic TV functions such as: switching between external inputs, viewing your favorite analog/digital stations, switching between analog and digital channels, and changing or customizing your TV settings.
Introducing MENU Function MENU Allows you to The Analog Favorites feature lets you select programs from a list of up to 16 favorite channels that you specify. 1 Highlight Analog Favorites on the MENU control panel Analog Favorites and press . 2 Press V/v to highlight the desired channel and press . To add the current channel to the list of Favorite Channels, highlight Add to Favorites and press .
Introducing MENU Function Navigating Through Settings The Settings provides access to the features: 1 Press MENU . 2 Select . 3 Highlight the item: Picture, Sound, Screen, Setup, PC Settings, Analog Setup, Digital Setup. 4 Press to select an option. To exit the settings, press MENU . The options you can adjust vary depending on the situation. Unavailable options are grayed out.
Introducing MENU Function Option Description Noise Reduction Select to reduce the noise level of connected equipment, and the VHF/UHF input. Select from Auto, High, Medium, Low and Off. Auto is only available when you are watching analog channels. It is not available when Target Input is set to All Inputs. Reset Resets all the advanced settings to the default settings.
Introducing MENU Function Using the Sound Settings Sound Target Inputs All Inputs Sound Mode Dynamic Reset Treble 0 Bass 0 Balance 0 Steady Sound Off Surround Off BBE High MTS A D Select: Set: Back: RETURN Exit: MENU Option Description Target Inputs Determines whether to apply Sound menu settings to all inputs, or only to the input you are currently watching. All Inputs Applies settings to all inputs.
Introducing MENU Function Using the Screen Settings Screen Target Inputs Current Input Wide Mode Normal Auto Wide On 4:3 Default Normal Display Area Normal Horizonal Center 0 Vertical Center Vertical Size A D Set: Back: RETURN Exit: MENU Description Target Inputs Determines whether to apply Screen menu settings to all inputs, or only to the input you are currently watching. Wide Mode All Inputs Current Input Applies settings to all inputs. Applies settings to the current input.
Introducing MENU Function Option Description Horizontal Center Allows you to move the position of the picture left and right. to choose a correction between Min, – 4 to + 4 and Max. Press B/b and press Vertical Center Vertical Size 28 Horizontal Center feature is useful if TV is connected to game equipment. Allows you to move the position of the picture up and down. Available only in Zoom mode. Press V/v and press to choose a correction between Min, – 4 to + 4 and Max.
Introducing MENU Function Using the Setup Settings Setup Language English Caption Vision Info Banner Parental Lock Label Video Inputs Auto YC Timer Settings Power Saving Off Light Sensor Off Quiet Power On On Speaker On Audio Out A Cable On Information D Set: Back: RETURN Exit: MENU Option Description Language Select to display all on-screen settings in your language of choice: English, Español, Français.
Introducing MENU Function Option Description Change Select to change your password. Password You need your password for any future access into the Parental Lock settings. If you lose your password, see “Lost password.” on page 40. Select Country U.S.A. Select to use U.S.A. ratings (see page 32). Canada Label Video Inputs Select to use Canadian ratings (see page 32). Allows you to identify A/V equipment you connected to the TV, such as a VCR, DVD, etc.
Introducing MENU Function Option Description 2 3 If you selected Set in step 1, press V/v/B/b to set the day(s), hour, minute, AM/PM, duration, channel number (VHF/UHF, CATV or Digital), and volume. When Digital is selected, the last digital channel you viewed will automatically show when the TV is turned on. Press MENU to exit Settings. To return to the Timer Settings after programming the Timer or Current Time, press B. 1 2 3 Power Saving Light Sensor Press to select Current Time.
Introducing MENU Function US Models: Selecting Custom Rating Options To select custom rating options for the U.S., select U.S.A. in the Select Country setting (see page 30). Option Description Movie Rating G PG All children and general audience. Parental guidance suggested. PG-13 R Parental guidance for children under 13. Restricted viewing, parental guidance is suggested for children under 17. No one 17 or under allowed.
Introducing MENU Function Option Description French Rating G 8 ans+ General programming. Not recommended for young children. 13 ans+ Not recommended for ages under 13. 16 ans+ 18 ans+ Not recommended for ages under 16. Programming restricted to adults. U.S.A. Rating See “US Models” on page 32 for details. You can view blocked programs by entering the password. Press ENT when tuned to a blocked program, then enter the password. This temporarily turns the parental control feature off.
Introducing MENU Function Using the PC Settings PC Settings PC Wide Mode Reset Auto Adjustment Phase 0 Pitch 0 Horizontal Center 0 Vertical Center 0 Power Management A Resolution 1024x 768/60Hz D Select: Set: Exit: MENU Option Description Wide Mode Normal Select to display in the original image size. Full1 Select to enlarge the picture to fill the display area, keeping its original horizontal-to-vertical ratio. Full2 Select to enlarge the picture to fill the display area.
Introducing MENU Function Using the Analog Setup Settings Analog Setup Favorite Channels Auto Program Show/Hide Channels Label Channels A D Set: Back: RETURN Exit: MENU Option Favorite Channels Description Lets you set up a list of up to 16 of your favorite channels. Press V/v to highlight a Favorite Channel number (1-16) which you want to make your Favorite Channel, then press to select it.
Introducing MENU Function Using the Digital Setup Settings Highlight Digital Setup and press Digital Setup . The Digital Setup option appears. Digital Setup A D Select: Set: Back: RETURN Exit: MENU Option Description Digital Channels Favorite Channels Lets you set up a list of up to 16 of your favorite channels. Press V/v to highlight a Favorite Channel number (1-16) which you want to make your Favorite Channel. 2 Enter the number you wish to assign to the channel.
Introducing MENU Function Option Description Digital Setup Caption Vision On Caption Vision is turned on. Off Caption Vision is turned off. Program Allows you to set basic and advanced Caption Vision options. See “Programming Caption Vision” below. A/V Sync Off/1/2/3 Use this option to make adjustments to audio and video synchronization when you have external equipment connected to OPTICAL OUT of the TV. Select Off (default setting) to make no adjustments.
Introducing MENU Function Option Description Advanced Settings Allows you to make additional settings for digital (EIA-708) closed caption options. Select from As Broadcast, Small Text, Large Text and Custom. Custom...
Other Information Troubleshooting Problem No picture. No picture. Cannot receive any channels. TV is locked to one channel. Possible Remedies ❑ ❑ ❑ ❑ ❑ Cannot receive or select channels. ❑ The TV turns off automatically. ❑ No picture from some video sources. ❑ ❑ ❑ ❑ ❑ Poor picture. Double images or ghosts. ❑ ❑ Only snow and noise appear on the ❑ screen. ❑ Dotted lines or stripes. ❑ No color/Dark picture/Color is not ❑ correct/The picture is too bright. ❑ ❑ Noisy picture.
Other Information Problem Audio noise. Possible Remedies ❑ Wide Mode changes automatically. ❑ ❑ ❑ “Black box” on screen. ❑ ❑ Black bands appear at the top and bottom of the screen. ❑ Certain programs on DVD or other ❑ digital sources display a loss of detail, especially during fast-motion or dark scenes. Remote control does not operate. Some digital cable channels are not being displayed. ❑ ❑ ❑ ❑ ❑ ❑ Lost password. ❑ How to reset the TV to factory settings.
Other Information PC Input Signal Reference Chart Resolution Signals VGA SVGA XGA WXGA Horizontal (Pixel) 640 640 720 800 800 1024 1024 1024 1280 1280 1360 × × × × × × × × × × × × Vertical (Line) 480 480 400 600 600 768 768 768 768 768 768 Horizontal frequency (kHz) Vertical frequency (Hz) 31.5 37.5 31.5 37.9 46.9 48.4 56.5 60.0 47.4 47.8 47.
Other Information Specifications Television system: NTSC American TV Standard ATSC (8VSB terrestrial) ATSC compliant 8VSB QAM on cable ANSI/SCTE 07 2000 (Does not include CableCARD functionality) Channel coverage: Terrestrial (analog) Cable TV (analog) Terrestrial (digital) Cable TV (digital) 75-ohm external terminal for VHF/UHF Screen size (measured diagonally): KDL-26S2000: 26 inches KDL-32S2000: 32 inches KDL-40S2000: 40 inches Panel System: LCD (Liquid Crystal Display) Panel Display resolution (ho
Index 4:3 Default 27 A A/V Sync 37 AC IN 14 Advanced Settings 25 Alternate Audio 19 Audio Out 31 AUDIO OUT jack, described 14 Auto Adjustment 34 Auto Program 17, 35, 36 Auto SAP, MTS setting 26 Auto Wide 27 Auto YC 30 B Backlight 24 Balance 26 Bass 26 BBE 26 Bilingual audio 26 Brightness 24 C Cable with VCR, connecting 12 Caption Vision 29, 37 CH+/– button 20, 21 Channels Creating labels 35, 36 Setting up 17 Closed caption modes 29 Color 24 Color Temperature 24 Current Time 31 D Diagnostics 37 Digital C
Printed on 100% recycled paper.