Operating Instructions LCD Digital Color TV Sony Customer Support U.S.A.: www.sony.com/tvsupport Canada: www.sony.ca/support KDL-52S5100 KDL-46S5100 KDL-40S5100 KDL-32S5100 © 2009 Sony Corporation United States 1.800.222.SONY Canada 1.877.899.
Owner’s Record The model and serial numbers are located at the rear of the TV. Record these numbers in the spaces provided below. Refer to them whenever you call upon your Sony dealer regarding this TV. Model Name Serial No. CAUTION To prevent electric shock and blade exposure, do not use this polarized AC plug with an extension cord, receptacle or other outlet unless the blades can be fully inserted. ❑ ❑ Operate the TV only on 120 V AC. Avoid operating the TV at temperatures below 41°F (5 °C).
Compatible Wall Mount Bracket Information Use the following Sony WALL-MOUNT BRACKET with your TV model. Sony TV Model No. KDL-32S5100/KDL-40S5100/ KDL-46S5100/KDL-52S5100 Sony Wall-Mount Bracket Model No. SU-WL500 Use with other WALL-MOUNT BRACKETS may cause instability and could result in property damages or injury. To Customers Sufficient expertise is required for TV installations.
Contents Introducing Your New BRAVIA® Using Features Welcome to the World of BRAVIA® . . . . . . . . .5 Experiencing Stunning HD with Your BRAVIA. . . . . . . . . . . . . . . . . . . . . . . . . . . . .5 The Four Steps to a Full HD Experience. . . . .6 TV Feature Highlights . . . . . . . . . . . . . . . . . . .6 Using BRAVIA® SyncTM with Control for HDMI. . . . . . . . . . . . . . . . . . . . . . . . . . . . . .16 Favorites . . . . . . . . . . . . . . . . . . . . . . . . . . . .17 Wide Mode . . . . . . .
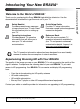
Introducing Your New BRAVIA® Thank you for purchasing this Sony BRAVIA high-definition television. Use the documentation listed below to get the most out of your TV. Safety Booklet Provides precautionary measures to keep you and your TV safe. Read this information prior to setting up your TV. Quick Setup Guide Provides TV setup information, illustrates sample optional equipment connection diagrams.
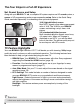
The Four Steps to a Full HD Experience Set, Sound, Source, and Setup Along with your BRAVIA TV set, a complete HD system requires an HD sound system, a source of HD programming and a proper connection setup. Refer to the Quick Setup Guide, enclosed separately, for connecting other optional equipment. 16:9 (high-definition) source Most HDTV signals use a wide screen aspect ratio of 16:9. The 16:9 fills your BRAVIA screen, maintaining a crisp, clear, vivid picture.
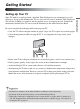
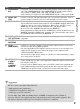
Getting Started Setting Up Your TV Be sure to consider the following while setting up your TV: • Carry the TV with an adequate number of people; larger size TVs require two or more people. • Correct hand placement while carrying the TV is very important for safety and to avoid damages. • Ensure your TV has adequate ventilation if it is installed against a wall or in an enclosed area. • For best picture quality, do not expose the screen to direct illumination or sunlight.
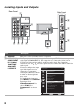
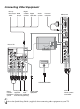
Locating Inputs and Outputs Rear Panel Side Panel 1 PC IN RGB VIDEO IN VIDEO 8 Y SERVICE (OPTICAL) PB PR IN AUDIO 6 1 5 DIGITAL AUDIO OUT 2 L L AUDIO AUDIO R 1 IN R AUDIO 2 3 COMPONENT IN AUDIO OUT (1080p/1080i/720p/480p/480i) (FIX) IN S VIDEO 9 CABLE/ANTENNA VIDEO 2 3 4 5 L (MONO) AUDIO 7 R 2 VIDEO IN Item Description 1 SERVICE This port is to be used when service is required.
Description Component video provides better picture quality than the S Video and composite video. The COMPONENT IN 2 and COMPONENT IN 1 both accommodate for video formats of 1080p, 1080i, 720p, 480p, and 480i as labeled. Audio connection is required for the COMPONENT IN ports, connect audio (L/R). 4 AUDIO OUT (FIX) Connects to the left and right audio input jacks of your audio equipment. You can use these outputs to listen to your TV’s audio through your stereo system.
Connecting Other Equipment Blu-ray Disc Player/ DVD “PS3” player Digital satellite Digital receiver cable box Audio system Personal computer Side panel PC IN RGB AUDIO 2 IN Rear of TV 3 IN S VIDEO VIDEO IN VIDEO Y VIDEO (OPTICAL) PB PR AUDIO 1 CABLE/ANTENNA L L AUDIO AUDIO R (MONO) IN DIGITAL AUDIO OUT 1 L SERVICE R 2 VIDEO IN R 2 AUDIO COMPONENT IN AUDIO OUT (1080p/1080i/720p/480p/480i) (FIX) CABLE/ANTENNA Digital recorder/ DVD/Game system Analog audio Analog Digital audi
Bundling the Connecting Cables You can bundle the connecting cables with the supplied cable band as illustrated below. Do not bundle the AC power cord with other connecting cables. Getting Started Securing the TV Sony strongly recommends taking measures to prevent the TV from toppling over. Unsecured TVs may topple and result in property damage, serious bodily injury or even death. Contact Sony Customer Support to purchase the optional Support Belt Kit by providing your TV model name.
Inserting Batteries into the Remote Control Insert two size AA batteries (supplied) by matching e and E on the batteries to the diagram inside the battery compartment of the remote control. Push to open Initial Setup The Initial Setup screen appears when you turn on the TV for the first time. During this initial setup, you can perform the following: 1 Select the language for the on-screen display text. 2 Select HOME or Retail mode.
Operating the TV Remote Control Button Description 1 2 DISPLAY CC POWER Button Description 1 DISPLAY Press to display information about channel/program or input you are watching. The information banner will disappear in a few seconds or press again to exit. You can enable or disable the Info Banner by pressing MENU and go to the Setup Menu to set Info Banner to On or Off.
DISPLAY CC POWER Button Description 8 0-9 ENT Press 0-9 to select a channel; the channel changes after a few seconds, or press ENT to change channels immediately. 9 Use with 0-9 and ENT to select digital channels. For example, to enter 2.1, press 2 , , 1 and ENT. 0 VOL +/– Press to adjust the volume. qa MUTING Press to mute the sound. Press again or press VOL + to restore the sound. qs POWER Press to turn on and off the TV.
TV Controls and Indicators POWER 5 CHANNEL 6 VOLUME Operating the TV 7 INPUT 1 PIC OFF / TIMER STANDBY POWER 2 3 4 Item Description 1 (IR) Infrared Receiver Light Sensor Receives IR signals from the remote control. 2 3 4 5 6 7 8 9 8 MENU 9 Senses room light level and adjusts the screen brightness accordingly. Do not put anything near the sensor or the nearby general area (as shown above), as its function may be affected.
Using Features Using BRAVIA® SyncTM with Control for HDMI The BRAVIA Sync function allows this TV to communicate with other Sony equipment supporting the Control for HDMI function. To connect Sony equipment with Control for HDMI Use an HDMI cable that bears the HDMI logo for connection. See the HDMI connection shown in the Quick Setup Guide provided with the TV documentation.
Favorites With Favorites, you can manage your preferred TV channels and External Inputs. Adding to Favorites 1 Press TOOLS to add the current channel or input while you are watching it. 2 Highlight Add to Favorites and press . Displaying Favorites Press FAVORITES on the remote control. Channel PC Recently viewed items Saved channel or external input Navigating Favorites 1 Press B/b to move between saved selections in a carousel-like fashion.
Wide Mode The Wide Mode feature allows you to select the screen display of your preference. Based on the original source, a black frame or black bars may surround the picture. You can manually change the Wide Mode setting while watching TV by pressing the WIDE button on your remote control. How to set to Auto Wide Press MENU then go to the Screen menu. Select Auto Wide and set to On. Changing the Wide Screen Mode Press WIDE repeatedly to cycle through the available modes.
Wide Mode with PC Changing the Wide Screen Mode for PC Timing Press WIDE repeatedly to cycle through the available modes while in the PC input mode. ~ • Full Pixel displays the picture in its native resolution.
Using the Menus The MENU button allows you to access the variety of TV settings for you to customize the settings. Navigating through TV Menus V/v button: WIDE INPUT Allows you to highlight options where applicable. button: Allows you to select the highlighted option and advance to the next screen. B button: TOOLS Allows you to move back to the previous screen. b button: MENU Picture Allows you to move to the next screen.
Other Information How to Care for Your BRAVIA Safety is very important, please read and follow the safety documentation (Safety Booklet) provided with the TV. • Unplug the TV and other connected equipment from the power source before you begin cleaning your TV. Gently dust the TV with a soft cloth. Do not use any chemicals or hard material to clean the TV as they may lead to discoloration and scratches. Stubborn stains can be wiped with a soft cloth moisten with warm water.
Specifications Model System KDL-32S5100 Television system NTSC: American TV standard ATSC (8VSB terrestrial): ATSC compliant 8VSB QAM on cable: ANSI/SCTE 07 2000 (Does not include CableCARD functionality) Analog terrestrial: 2 - 69 / Digital terrestrial: 2 - 69 Analog Cable: 1 - 135 / Digital Cable: 1 - 135 LCD (Liquid Crystal Display) Panel 10 W + 10 W Channel coverage Panel system Speaker output KDL-40S5100 KDL-46S5100 KDL-52S5100 Input/Output jacks CABLE/ANTENNA VIDEO IN 1/2 COMPONENT IN 1/2 HD
Index 0-9 buttons 14 J A JUMP button 14 AUDIO OUT (FIX) 9 AUDIO OUT jack, described 9 Auto Program 12 M B P BRAVIA Sync buttons 13 BRAVIA Sync with Control for HDMI 16 C CABLE/ANTENNA input, described 9 CC button 13 CH +/– button 14, 15 Channels Setting up 12 MENU button 13, 15 MUTING button 14 PC IN 9 PIC OFF/TIMER 15 POWER button 14, 15 POWER LED 15 R RETURN button 13 S D STANDBY LED 15 DIGITAL AUDIO OUT jack, described 9 DISPLAY button 13 T TOOLS button 14 Troubleshooting 21 ENT button 1
For Your Convenience Online Reference Book: Online Registration: To learn more about your TV, visit the online Reference Book at: http://www.sony.com/referencebook Be sure to register your TV. United States Canada http://productregistration.sony.com http://www.SonyStyle.ca/registration 4-129-401-11(7) Printed in U.S.A.