3-212-542-12(1) For Your Convenience Please contact Sony directly if you: • Have questions on the use of your television after reading your Operating Instruction manual and Quick Setup Guide • Experience difficulty operating your television Contact Sony Customer Support at: http://www.sony.
Owner’s Record The model and serial numbers are located at the rear of the TV. Record these numbers in the spaces provided below. Refer to them whenever you call upon your Sony dealer regarding this TV. Model Name Serial No. WARNING To reduce the risk of fire or electric shock, do not expose this TV to rain or moisture.
Contents Important Safety Instructions ............................4 Welcome to the World of BRAVIA™ The Four Steps to Full HD Experience: Set, Sound, Source, and Setup ....................6 Picture Quality and Aspect Ratio.......................6 TV Home Menu: XMB™ (XrossMediaBar)..........7 Getting Started 1. Installing the TV...............................................8 Carrying Your TV............................................8 Preventing the TV from Toppling Over ...........
Important Safety Instructions 1) 2) 3) 4) 5) Read these instructions. Keep these instructions. Heed all warnings. Follow all instructions. Do not use this apparatus near water. 6) Clean only with dry cloth. 7) Do not block any ventilation openings. Install in accordance with the manufacturer’s instructions. 12) Use only with the cart, stand, tripod, bracket, or table specified by the manufacturer, or sold with the apparatus.
s Before carrying the TV, disconnect any accessories or cables. Electric shock Do not touch the AC power cord or the TV with a wet hand. If you plug/unplug the AC power cord from the TV with a wet hand, it may cause electric shock. KDS-50A3000 KDS-55A3000/ KDS-60A3000 Cleaning s Clean the rear cover area of the TV regularly. Dust in the rear cover area may cause a problem with the cooling system of the TV set. s Clean the cabinet of the TV with a dry soft cloth.
Welcome to the World of BRAVIA™ Thank you for purchasing this Sony BRAVIA™ high-definition television. The quality of the image you see on your BRAVIA TV is only as good as the quality of the signal it receives. To experience the full detail of your new BRAVIA TV, you need access to HD programming.
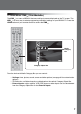
TV Home Menu: XMB™ (XrossMediaBar) The XMB™ is a menu of BRAVIA features and input sources displayed on the TV screen. The XMB™ is an easy way to select programming and adjust settings on your BRAVIA TV. Press the HOME button on your remote control to access the XMB™.
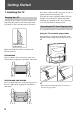
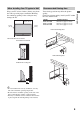
Getting Started 1. Installing the TV Carrying Your TV Carrying the TV requires at least two people. Do not hold by the pedestal or the front panel of the TV. Doing so may cause these parts to break off. If you have connected cables and cords, be sure to unplug them before moving the TV. To ensure the safety of children and the TV, keep children away from the TV during installation. Climbing on or pushing the TV or its stand may cause it to fall and may damage the TV.
Recommended Viewing Area Keep your TV at least 4 inches (10 cm) away from the wall to provide proper ventilation. Blocking the ventilation opening of the cooling fan may damage the TV. Your viewing position may affect the picture quality. For the best picture quality, install your TV within the areas shown below. Model 12 inches (approx. 30 cm) 4 inches (10 cm) 4 inches (10 cm) Viewing distance KDS-50A3000 KDS-55A3000 KDS-60A3000 min. 6.6 ft. (approx. 2.0 m) min. 6.8 ft. (approx. 2.1 m) min. 7.0 ft.
Screen Speaker Grille To minimize reflection, the screen surface has a special coating. Inappropriate cleaning methods could damage the screen surface. Special care is required. You can replace the speaker grille with another grille, sold separately. Only remove the speaker grille when replacing it. For details, see the instructions supplied with the speaker grille. Cleaning the Screen Surface Dust and dirt on the screen can affect the picture quality. To dust off the screen use a soft cloth.
2. Locating Inputs and Outputs Left Side Getting Started 0 1 COMPONENT IN DMex/ SERVICE (1080p/1080i/720p/480p/480i) VHF/UHF/CABLE 1 VIDEO IN S VIDEO 1 2 2 Y 3 2 PB VIDEO PR 3 (MONO) L L AUDIO AUDIO R R L R 4 DIGITAL OUT (OPTICAL) L AUDIO OUT AUDIO (VAR/FIX) R AUDIO 1 2 3 RGB PC IN 5 6 7 8 9 Item Description 1 VHF/UHF/CABLE RF input that connects to your Cable or VHF/UHF antenna.
Item Description 4 DIGITAL OUT (OPTICAL) Connects to the optical audio input of your digital audio equipment that is PCM/Dolby Digital compatible. Dolby Digital Audio signal from the HDMI input will be output as PCM. Dolby Digital Audio signal from digital channels will be output as it is. 5 AUDIO OUT (VAR/FIX) Connects to the left and right audio input jacks of your analog audio equipment. You can use these outputs to listen to your TV’s audio through your stereo system.
3. Connecting the TV HD Cable Box/HD Satellite Box You can enjoy high-definition and standarddefinition digital programming (if available in your area) along with standard-definition analog programming. ~ • This TV is capable of receiving unscrambled digital programming for both cable (QAM and 8VSB) and external VHF/UHF antenna (ATSC). • It is strongly recommended that you connect the antenna/cable input using a 75-ohm coaxial cable to receive optimum picture quality.
Shown with DVI Connection AUDIO-R (red) AUDIO-L (white) CATV/Satellite antenna cable Audio cable Side of TV HD cable box/ HD satellite box L AUDIO R AUDIO 1 2 3 RGB PC IN DVI-to-HDMI cable ~ • If the equipment has a DVI jack and not an HDMI jack, connect the DVI jack to the HDMI IN 1 (with DVI-to-HDMI cable or adapter) jack and connect the audio jack to the AUDIO IN (L/R) jacks of HDMI IN 1. For details, see page 12.
PC Side of TV L AUDIO R AUDIO 1 2 3 RGB PC IN HD15-HD15 cable (analog RGB) Connect to an HDMI compatible PC with an HDMI cable. Audio cable (stereo mini plugs) ~ • Connect the PC IN jack to the PC using an HD15HD15 cable with ferrite core (analog RGB, not supplied) and audio cable (page 12). PC Input Signal Reference Chart After connecting the PC to the TV, set the output signal from the PC according to the chart below.
Other Equipment Camcorder Game system VCR Digital recorder VHF/UHF/ CABLE COMPONENT IN DMex/ SERVICE (1080p/1080i/720p/480p/480i) VHF/UHF/CABLE 1 VIDEO IN S VIDEO 1 2 2 Y 3 PB VIDEO PR (MONO) L L AUDIO Side of TV AUDIO R R L DIGITAL OUT (OPTICAL) R AUDIO OUT (VAR/FIX) L AUDIO R AUDIO 1 2 3 RGB PC IN DVD player Digital audio Analog Personal audio equipment computer equipment (A/V Receiver/Home Theater) Audio Blu-ray Disc Player/ system PS3 ~ • Refer to the Quick Setup Guide
Using HDMI Control for BRAVIA Theatre Sync™ Getting Started This TV is equipped with BRAVIA Theatre Sync. The HDMI Control function enables BRAVIA Theatre Sync to allow communication between Sony TV’s and Sony equipment. Only Sony equipment with HDMI Control capability is supported. To Connect HDMI Control Equipment Use an HDMI cable that bears the HDMI logo for connection. See page 16 or see the HDMI connection shown in the Quick Setup Guide provided with the TV documentation.
4. Setting Up the Channel List – Initial Setup The Initial Setup screen appears when you turn on the TV for the first time. Initial Setup Step 1 of 5 ~ • If you accidentally turn off the TV during the Initial Setup process, the Initial Setup will restart from the beginning when the TV is turned back on. • The Auto Program may be canceled while the channels are being scanned. Press RETURN first then press either B/b on the remote control, highlight “Yes” to cancel or “No” to resume Auto Program.
Using the TV Features Remote Control and TV Controls/Indicators Inserting Batteries into the Remote Control Insert two size AA batteries (supplied) by matching e and E on the batteries to the diagram inside the battery compartment of the remote control. Push and slide to open. 1 2 3 Buttons located at the right side of the TV will operate the same as these buttons on the remote control. POWER CHANNEL VOLUME INPUT HOME ~ • The 5, PLAY and CH + buttons have a tactile dot.
Button Description 4 0-9 ENT Press 0-9 to select a channel; the channel changes after two seconds. Press ENT to change channels immediately. 5 Use with 0-9 and ENT to select digital channels. For example, to enter 2.1, press 2 , , 1 and ENT. Press once to display a frozen image with the current program in a window. Press again to return to the current program.
ql w; Description qs BD, DVD or STB Operating Buttons When FUNCTION is selected with BD (Blu-ray Disc), DVD or STB, these buttons operate the video equipment you have programmed into the remote control. For details, see “Using Other Equipment with Your Remote Control” on page 27. &m PREV: Press to replay the current program from the previous chapter mark (if any) or from the beginning of the live TV cache. REPLAY: Press to replay the current program for a set period of time.
Button Description ws WIDE Press repeatedly to step through the Wide Mode settings: Wide Zoom, Normal, Full, Zoom. The Wide Mode settings can be also accessed in the Screen settings (see page 35).
Button Description wd PICTURE Press repeatedly to cycle through the available picture modes: Vivid, Standard, Cinema, Photo, Custom. (Available options depend on the current mode.) The picture modes can also be accessed in the Picture settings. For details, see Picture settings on page 32. wf INPUT Press to display the list of External Inputs and TV mode. Press repeatedly to toggle through the inputs. ~ wd wg V/v/B/b wh OPTIONS wf wg wh wj Press V/v/B/b to move the on-screen cursor.
Indicators 1 Item 2 3 4 TIMER LAMP POWER 5 Description 1 Speaker Outputs the audio signal. 2 TIMER LED Lights up in orange when the timer is set. This LED will remain lit even if the TV is turned off. For details, see page 32. 3 LAMP LED The projection lamp has burned out. Replace it with a new one (see page 44). 4 POWER LED Lights up in green when the TV is turned on. Also lights up in red during the diagnostics. 5 (IR) Infrared Receiver Receives IR signals from the remote control.
Programming the Remote Control 2 4 Press while the FUNCTION button is lit. The selected FUNCTION button will blink twice if your equipment is programmed correctly and five times if it is not. To Confirm the Programming If you can turn on and off the equipment by pressing the green button, then the programming is complete. If not, try the next code listed. POWER ~ 2 4 Operating Sony Brand Video Equipment • In some cases, you may not be able to program your remote control.
Manufacturer’s Codes VCRs DVD Players Manufacturer Sony Manufacturer Sony General Electric/ RCA Hitachi JVC Magnavox Mitsubishi Oritron Panasonic Philips Pioneer RCA/PROSCAN Samsung Toshiba Zenith Code 751, 763 755 758 756 757 761 759 753 757 752, 778 755 758 754 760, 762 DVD/VCR Combo Units Manufacturer Sony Broksonic JVC Panasonic Samsung Toshiba Zenith Code 767 776 775 777 774 773 768 HDD/DVD Combo Units Manufacturer Sony Code 770, 771, 772 DVD Changers Manufacturer Sony Panasonic Code 765 766
Using Other Equipment with Your Remote Control Make sure that the equipment is programmed on the remote control (page 25). Press INPUT repeatedly until you see the video input on the screen for your connected equipment. Remote control tips are provided below. ~ Cable Box To Do This ... Press ... Activate the remote control to operate STB (FUNCTION) the cable box Press ... x Fast forward M Rewind the tape m Pause X (press again to resume normal playback) DVD Player or DVD Changer To Do This ...
To Do This ... Press ... To Do This ... Press ... Specify the previous chapter/track Specify the next chapter/track . > INPUT SELECT INPUT MENU ON/OFF HOME Return to the previous display RETURN HDD/DVD Combo Unit 5.1ch DVD AV System (Sony DAV) To Do This ... To Do This ... Press ... Activate the remote control to operate DVD (FUNCTION) the DVD Press ...
Press ... . > Stop x Pause X Record z Open the Favorites List FAVORITES Open the Guide OPTIONS Open Main Menu HOME Move highlight (cursor) VvBb Using the TV Features To Do This ...
Using the Menus The HOME button allows you to access the TV Home Menu on the XMB™ (XrossMediaBar) as well as a variety of TV features. Product Support Clock/Timers The XMB™ displays the Media Category icons (horizontally) and available features (vertically) within the highlighted icon. Settings Sound Screen The XMB™ is shown here with Settings highlighted. Video Options TV Media Category Icons Adjusting TV Settings Settings Customize the TV settings with various options.
Navigating through TV Home Menu on XMB™ 1 Press HOME to display the XMB™. 2 Press B/b to select a Media Category icon. Settings 3 Available channels are listed under the TV icon. Select inputs from Video1, 2, 3 Component 1, 2 HDMI 1, 2, 3 PC under the External Inputs icon. Using the Menus Available TV settings and features are listed under the Settings icon. Press V/v to move within the Category Object Bar. (The Category Object Bar shown below is for the Settings.
TV Setting Description Product Support Contact Sony Sony contact information is available from this screen for your convenience. Your TV’s specific information such as Model Name, Serial Number, Software Version and downloadable ratings version, if available from the TV, is displayed here. Signal Diagnostics Press to display the diagnostics information for the current signal. Clock/Timers Settings Current Time Sets the current time (day, hour, minutes, and AM/PM).
~ • Picture Mode for all inputs can also be accessed by pressing PICTURE on the remote control to directly toggle the modes. • The options for Picture Mode may differ depending on the Video/Photo Optimizer setting (see page 38). Reset Resets the current Picture Mode setting to the default values. Advanced Iris By selecting the iris option, you can obtain the best brightness and contrast suited for your TV viewing. Automatically detects the brightness of the screen.
DRC Palette Allows you to customize the level of detail (Reality) and smoothness (Clarity). Press the arrow buttons to highlight DRC Palette then press . The DRC Palette appears. 1 DRC Palette Video 1 Reality 25 Clarity 1 RETURN Back 2 Press the arrow buttons to adjust the position of the marker (z). As you move the z higher along the Reality axis, the picture becomes more detailed. As you move the z to the right along the Clarity axis, the picture becomes smoother.
Voice Zoom Adjusts the clarity of human voices. For example, if the voice of a news announcer is indistinct, you can turn up this setting to make the voice clearer. Conversely, if you are watching a sports program, you can turn down this setting to soften the voice of the commentator. Sound Booster Sound Booster provides a fuller sound with a greater sense of depth and width, by emphasizing the high and low frequency sounds.
4:3 Default Select the default screen mode to use for 4:3 sources Wide Zoom Enlarges the 4:3 picture to fill the 16:9 screen, displaying as much of the original image as possible. Normal Displays the 4:3 picture in its original aspect ratio. Full Enlarges the 4:3 picture horizontally only, to fill the screen. Zoom Enlarges the picture horizontally and vertically to fill the screen while maintaining the aspect ratio.
Wide Mode Normal Displays the picture in its original resolution and aspect ratio. Full 1 Select to expand the picture size while maintaining the original aspect ratio. Full 2 Select to expand picture size without original aspect ratio. Zoom Select to enlarge the picture horizontally and vertically to an equal aspect ratio that fills the wide screen. ~ • Wide Mode can also be accessed by pressing WIDE on the remote control. • See WIDE button description on page 22 for accessing Wide Mode.
Game/Text Mode When the signal is 480p, 720p, or 1080p, it provides the optimum screen for viewing images with fine lines and characters that are input from video game equipment and PCs. Set to On for the sharp display of fine lines or characters. Video/Photo Optimizer Provides suitable image quality by selecting the option depending on the input source (video or photograph data).
Speakers Audio Out Easy control of volume adjustment TV Speakers Select to use the TV speakers for audio. Audio System Select this option if you wish to use an external audio system for the TV sound. By selecting this option you are disabling the TV speakers. Fixed Select to fix the audio output and allow you to adjust the volume with your audio system’s remote control. (The TV’s remote control’s VOL and MUTING buttons have no effect on Audio Out.
Edit Channel Labels Assigns labels (such as station call letters) to channel numbers. Press V/v to scroll through the channel numbers. Then press to select the channel number to assign a label. 2 Press V/v to scroll through the label characters (A-Z, 0-9, etc.). Press b to move to the next character. Repeat to add up to 7 characters to the label. Press to set it. To assign labels to more channels, repeat steps 1-2.
Rating Off Turns off Parental Lock. No programs are blocked from viewing based on their ratings. Child Maximum ratings permitted are: U.S.: TV-Y, TV-G, G Canada: C, G, TV-Y Youth Maximum ratings permitted are: U.S.: TV-PG, PG Canada: C8+, PG, 8 ans+, TV-PG Young Adult Maximum ratings permitted are: U.S.: TV-14, PG-13 Canada: 14+, 13 ans+, TV-14 Custom Sets ratings manually. U.S.: See page 41 for details. Canada: See page 42 for details. ~ Digital Rating (Available only in U.S.A.
TV Rating Block programs by their rating, content or both Age-Based Ratings TV-Y All children TV-Y7 Directed to children age 7 and older TV-G General audience TV-PG Parental guidance suggested TV-14 Parents strongly cautioned TV-MA Mature audience only Content-Based Ratings FV Fantasy violence D Suggestive dialogue L Strong language S Sexual situations V Violence ~ • To ensure maximum blocking capability, set the Age-Based Ratings.
HDMI Settings HDMI inputs of this TV will recognize and communicate with other Sony equipment equipped with HDMI Control. HDMI Control On/Off feature allows your TV to communicate with other equipment that supports HDMI Control. Device Auto Power Off Select On to have your connected HDMI Control equipment power off automatically when the TV is turned off. Select Off to disable this function. TV Auto Power On Select On to control your TV’s power on from your connected HDMI Control equipment.
Other Information Replacing the Lamp The projection lamp, like all lamps, will eventually lose brightness and functionality, which affects the overall performance of your TV. How long the lamp maintains its brightness will vary depending upon your usage and environmental conditions.
6 Pull the lamp out of the TV. 8 Reattach the lamp door. Hold the indented grooves as shown in the illustration, and pull the lamp straight out. If the lamp is hard to remove, pull the right side of the lamp for additional traction. Replace the door by inserting the two tabs in the slot from the left side. Slide the lever to the right and then turn the screw clockwise to secure the door.
The used lamp For customers in the United States: Lamp in this product contains mercury. Disposal of these materials may be regulated due to environmental considerations. For disposal or recycling information, please contact your local authorities or the Electronic Industries Alliance (http://www.eiae.org). s Do not leave the used lamp near flammable materials or within the reach of children. s Do not pour water onto the used lamp or put any object inside the lamp. Doing so may cause the lamp to burst.
Troubleshooting If you have questions, service needs, or require technical assistance related to the use of your Sony TV, please visit our website or call one of the following numbers: Condition http://www.sony.com/tvsupport 1-800-222-SONY(7669) for US Support 1-877-899-SONY(7669) for Canadian Support Explanation/Solution No picture • Make sure the power cord is connected securely. • Turn on the power of the TV. • Check antenna/cable connections.
Condition Explanation/Solution No sound/Noisy sound Good picture, no sound • Check the volume control. • Press MUTING or VOL + so that “Muting” disappears from the screen (see page 21). • Disconnect your headphones. • Set Speakers to TV Speakers in the Audio Options settings (see page 39). If it is set to Audio System, sound is not output from the TV’s speakers regardless of the TV’s volume control.
Condition Explanation/Solution • If you are using the TV to change channels, first press TV (FUNCTION) once, and the TV indicator lights up. • If you are using another device to change channels, be sure you have not inadvertently switched your TV from the channel 3 or 4 setting. • If you are using another device to change channels, be sure to press FUNCTION for that device.
Specifications Model KDS-50A3000 KDS-55A3000 KDS-60A3000 System Projection system 3 SXRD panel, 1 lens projection system SXRD panel High Frame Rate Compatible 0.61 Inch Panel Full HD SXRD Device Projection lens High performance, large diameter hybrid lens F2.
Index 0-9 buttons 20 4:3 Default 36 G A H Add Digital Channels 39 Advanced Iris 33 Advanced Settings 34 Analog CC 40 Audio Out 39 AUDIO OUT jack 12 Auto Adjust 36 Auto Program 18, 39 Auto Wide 35 B Balance 34 Bass 34 BD, DVD or STB operating buttons 21 BD/DVD MENU button 21 BD/DVD TOP MENU button 21 Brightness 33 C Cable 39 CC button 20 CC Display 40 CH +/– button 23 Channel Block 41 CineMotion 37 Color 33 Color Matrix 38 Color Temperature 33 COMPONENT IN jack (1080p/1080i/ 720p/480p/480i) 12 Connec