Note: this is a 2 color print job. PMS black and PMS 7463 / blue 4-088-026-11 Operating Instructions © 2002 Sony Corporation http://www.world.sony.com/ Sony Corporation Printed in U.S.A.
WARNING Note on Caption Vision To reduce the risk of fire or shock hazard, do not expose the projection TV to rain or moisture. This television receiver provides display of television closed captioning in accordance with §15.119 of the FCC rules. Note on Convergence Adjustment CAUTION RISK OF ELECTRIC SHOCK DO NOT OPEN ATTENTION RISQUE DE CHOC ELECTRIQUE, NE PAS OUVRIR PRECAUCION RIESGO DE CHOQUE ELECTRICO NO ABRIR CAUTION: TO REDUCE THE RISK OF ELECTRIC SHOCK, DO NOT REMOVE COVER (OR BACK).
Installing ❑ To prevent internal heat buildup, do not block the ventilation ❑ ❑ ❑ ❑ openings. Do not install the projection TV in a hot or humid place, or in a place subject to excessive dust or mechanical vibration. Avoid operating the projection TV at temperatures below 5°C (41°F). If the projection TV is transported directly from a cold to a warm location, or if the room temperature changes suddenly, the picture may be blurred or show poor color due to moisture condensation.
IMPORTANT SAFEGUARDS For your protection, please read these instructions completely, and keep this manual for future reference. Carefully observe and comply with all warnings, cautions and instructions placed on the set or described in the operating instructions or service manual. WARNING To guard against injury, the following basic safety precautions should be observed in the installation, use and servicing of the set.
Ventilation Lightning The slots and openings in the cabinet and in the back or bottom are provided for necessary ventilation. To ensure reliable operation of the set, and to protect it from overheating, these slots and openings must never be blocked or covered. For added protection for this television receiver during a lightning storm, or when it is left unattended and unused for long periods of time, unplug it from the wall outlet and disconnect the antenna.
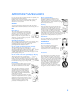
For Safety Be careful when moving the projection TV When you place the projection TV in position, be careful not to drop it on your foot or fingers. Watch your footing while installing the projection TV. Carry the projection TV in the specified manner If you carry the projection TV in a manner other than the specified manner and without the specified number of persons, it may drop and a serious injury may be caused. Be sure to follow the instructions mentioned below.
Contents Introducing the Projection TV Welcome ........................................................................................................ 9 Package Contents.............................................................................. 9 Features ............................................................................................ 9 Setting Up the TV Overview .....................................................................................................
Using the Features SETUP SETUP Welcome Overview .....................................................................................................55 Watching TV ................................................................................................56 Using the Scrolling Index ...........................................................................57 Using Wide Mode .......................................................................................58 Using Twin View ...................
Introducing the Projection TV Welcome Thank you for purchasing the Sony Projection TV. This manual is to be used with the following models: Package Contents ❑ KP-57WV600 ❑ KP-65WV600 ❑ KP-57WV700 ❑ KP-65WV700 Along with your new projection TV, the package contains a remote control and two AA batteries. No additional cables are included. These items are all you need to set up and operate the projection TV in its basic configuration. Most components (VCRs, DVD players, etc.
Twin View™: Using the Multi-Image Driver (MIDX), Twin View allows you to watch two programs side by side, with the ability to zoom in one picture. You can watch pictures from two different sources (1080i, 720p, 480p, and 480i) simultaneously. (Only the left Twin View window can display 1080i, 720p, and 480p sources.) ❑ ClearEdge VM™ Velocity Modulation: Sharpens picture definition by enhancing vertical lines.
Setting Up the TV Overview This chapter includes illustrated instructions for setting up your TV.
Carrying Your Projection TV Setup SETUP Carrying the TV requires four or more people. The TV is equipped with casters for easy movement on a hard surface. Be sure to move your projection TV using the casters. The TV includes handles that you can use to carry the unit. Do not carry the TV by placing hands under the front screen Installing the TV min . 2.4 m( ap 65" prox. 8 min ft.) . 2.1 m( app 57" rox. 7 ft.) SETUP SETUP SETUP Handle (one on each side) ACCESS MEMORY STICK mi n. mi 2.4 n. m 2.
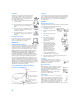
TV Controls and Connectors SETUP To access the front video panel, push up and then release. The panel drops down automatically (KP-57/65WV700 shown). Setup ACCESS MEMORY STICK POWER BY STAND TIMER CHANNEL VOLUME TV/VIDEO FLASH FOCUS 1 SETUP Front Video Controls SETUP Push up and release 2 Connects to the S VIDEO OUT jack on your camcorder or other video equipment that has S VIDEO. Provides better picture quality than composite video (2).
Item Description 1 MEMORY STICK ACCESS LED When lit, indicates that the Memory Stick is being read. (Do not remove the Memory Stick when the indicator is lit.) 2 MEMORY STICK Memory Stick insertion slot. For details, see “Inserting and Removing a Memory Stick” on page 66. 3 POWER Press to turn on and off the TV. 4 Infrared Receiver (IR) Receives IR signals from the TV’s remote control. 5 STAND BY LED Blinks when the TV is turned on, then shuts off when the picture is displayed.
ACCESS 1 MEMORY STICK POWER Description When lit, indicates that the Memory Stick is being read. (Do not remove the Memory Stick when the indicator is lit.) 2 MEMORY STICK Memory Stick insertion slot. For details, see “Inserting and Removing a Memory Stick” on page 66. 3 POWER Press to turn on and off the TV. 4 Infrared Receiver (IR) Receives IR signals from the TV’s remote control. 5 STAND BY LED Blinks when the TV is turned on, then shuts off when the picture is displayed.
SETUP SETUP SETUP SETUP Setup SETUP Rear Panel 1 6 2 7 8 3 9 q; 4 16 5
1 DVI-HDTV VIDEO AUDIO R/L (VIDEO 7 IN) Can accommodate a copy-protected digital connection (HDCP*) to other devices (such as digital set-top boxes) that have compatible interfaces. The DVI-HDTV input terminal is compliant with the EIA-861 standard and is not intended for use with personal computers. See the instruction manual that came with your equipment for details about connecting and using it with the TV.
Basic Connections: Connecting a Cable or Antenna SETUP The way in which you will connect your TV varies, depending on how your home receives a signal (cable, cable box, antenna) and whether or not you plan to connect a VCR.
For best results, use one of the following connections if you are connecting a cable or an antenna and you: ❑ Do not need a cable box to unscramble channels. (If you have a cable box, see pages 22-24.) ❑ Do not intend to connect a VCR. (If you have a VCR, see pages 26 and 28.) SETUP Cable or Antenna Only The connection you choose depends on the cable type you have in your home, as described below.
SETUP Cable and Antenna Only For best results, use this connection if you: ❑ Have a cable and an antenna. (This is convenient if you are using a separate rooftop antenna to receive additional channels that are not provided by your cable company.) ❑ Do not have a cable box or VCR. (If you have a cable box, see pages 22 to 24. If you have a VCR, see pages 26 and 28.
Notes on Using This Connection Do This ... Switch the TV’s input between the cable and antenna Press ANT to switch back and forth between the TV’s VHF/UHF and AUX inputs. Receive channels using an antenna, instead of the cable 1 2 3 Press ANT to switch to the AUX input. Set the Cable option to Off. For details, see “Selecting Channel Options” on page 78. Run the Auto Setup program, as described in “Using Auto Setup” on page 43. SETUP To Do This ...
SETUP Cable Box and Cable Only For best results, use this connection if: ❑ Your cable company scrambles some channels, such as premium channels (which requires you to use a cable box), but does not scramble all channels. ❑ You do not have a VCR. (If you have a VCR, see pages 26 and 28.) With this connection you can: ❑ Use the TV remote control to change channels coming through Setup the cable box to the TV’s AUX input jack.
To connect the cable box and cable 1 Connect the cable from your cable company to the TV’s 2 Use a coaxial cable to connect the TV’s TO CONVERTER jack to the cable box’s input jack. (The TV’s internal converter lets you switch between unscrambled signals coming straight into the TV and scrambled signals coming in through the cable box, eliminating the need for an external splitter.) SETUP VHF/UHF jack. 3 Use a coaxial cable to connect the cable box’s output jack to the TV’s AUX jack.
SETUP Cable Box Only For best results, use this connection if: ❑ Your cable company scrambles all channels, which requires you to use a cable box. ❑ You do not have a VCR. (If you have a VCR, see pages 26 and 28.) With this connection you can: ❑ Use the TV remote control to change channels coming through Setup the cable box to the TV’s VHF/UHF jack. (You must first program the remote control for your specific cable box.) About Using This Connection with Dual Picture (Twin View, etc.
Connecting Optional Equipment If You Are Connecting See Page VCR and Cable 26 VCR and Cable Box 28 Two VCRs for Tape Editing 30 Satellite Receiver 32 34 DVD Player with Component Video Connectors 36 DVD Player with S VIDEO and Audio Connectors 38 Camcorder 40 Audio Receiver 41 Setup Satellite Receiver and VCR If the optional equipment you are connecting has an S VIDEO jack (shown at left), you can use an S VIDEO cable for improved picture quality (compared to an A/V cable).
SETUP VCR and Cable For best results, use this connection if: ❑ Your cable company does not require you to use a cable box. About Using This Connection with Dual Picture (Twin View, etc.) Features With this connection, you can use all the dual picture features. To connect the VCR and cable Setup Using S VIDEO jacks? See page 25. 1 Connect the CATV cable to the VCR’s VHF/UHF input jack. 2 Use a coaxial cable to connect the VCR’s VHF/UHF output jack to the TV’s VHF/UHF jack.
Notes on Using This Connection Do This ... Watch the VCR Press TV/VIDEO repeatedly to select the VCR input (VIDEO 1 in the illustration). Watch cable channels Press TV/VIDEO repeatedly to select the cable input (VHF/UHF in the illustration). Set up the TV remote control to operate the VCR If you have a non-Sony VCR, you must program the remote control. See “Programming the Remote Control” on pages 51-52. Activate the TV remote control to operate the VCR Open the outside cover, as shown on page 50.
SETUP VCR and Cable Box For best results, use this connection if: ❑ Your cable company scrambles some channels, such as premium channels (which requires you to use a cable box), but does not scramble all channels. About Using This Connection with Dual Picture (Twin View, etc.) Features With this connection, you can use all the dual picture features. Setup With this connection you can: ❑ Use the TV remote control to change channels coming through SETUP the cable box.
TV SETUP Splitter (not supplied) Coaxial cable CATV cable Setup Cable box Coaxial cable VCR SETUP Cables are often color-coded to connectors. Connect red to red, white to white, etc. A/V cable Notes on Using This Connection Watch cable (unscrambled) channels Press TV/VIDEO repeatedly to select the cable input (UHF/VHF in the illustration). Watch cable box (scrambled) channels Turn on the VCR and tune it to the channel the cable box is set to (usually channel 3 or 4).
SETUP Two VCRs for Tape Editing Using S VIDEO jacks? See page 25. Connecting two VCRs lets you record from one VCR to the other. By connecting them as shown below, you can view (monitor) what is being recorded. To connect two VCRs for tape editing 1 Use an A/V cable to connect the playback VCR’s A/V output jacks to the TV’s A/V input jacks. 2 Use an A/V cable to connect the recording VCR’s A/V input Setup jacks to the TV’s MONITOR OUT jacks.
Notes on Using This Connection Do This ... View (monitor) what is being recorded Press TV/VIDEO repeatedly to select the VCR input (VIDEO 1 in the illustration above). Set up the TV remote control to operate the VCR(s) If you have a non-Sony VCR, you must program the remote control. See “Programming the Remote Control” on pages 51-52. Activate the TV remote control to operate the VCR(s) Open the outside cover, as shown on page 50.
Satellite Receiver To connect a satellite receiver SETUP 1 Connect the satellite antenna cable to the satellite receiver’s Using S VIDEO jacks? See page 25. satellite input jack. 2 Use an A/V cable to connect the satellite receiver’s A/V output jacks to the TV’s A/V input jacks. 3 Connect a CATV cable from your cable or antenna to the TV’s VHF/UHF jack. Channel List” on page 43.
Notes on Using This Connection Do This ... Watch the satellite receiver Press TV/VIDEO repeatedly to select the satellite receiver input (VIDEO 1 in the illustration). Set up the TV remote control to operate the satellite receiver If you have a non-Sony satellite receiver, you must program the remote control. See “Programming the Remote Control” on pages 51-52. Activate the TV remote control to operate the satellite receiver Press SAT/CABLE FUNCTION.
SETUP Satellite Receiver and VCR To connect a satellite receiver and VCR 1 Connect the satellite antenna cable to the satellite receiver’s satellite input jack. Using S VIDEO jacks? See page 25. 2 Connect the CATV cable to the VCR’s VHF/UHF input jack. 3 Use a coaxial cable to connect the VCR’s VHF/UHF output jack to the TV’s VHF/UHF jack. 4 Use an A/V cable to connect the satellite receiver’s A/V output jacks to the VCR’s A/V input jacks.
Notes on Using This Connection Do This ... Watch the satellite receiver Press TV/VIDEO repeatedly to select the VCR input (VIDEO 1 in the illustration). SETUP To Do This ... The VCR may need to be turned on and set to the satellite receiver input. Watch the VCR Press TV/VIDEO repeatedly to select the input to which the VCR is connected (VIDEO 1 in the illustration).
SETUP DVD Player with Component Video Connectors For best results, use this connection if your DVD player has component video (Y, PB, PR) jacks. To connect a DVD player with component video connectors 1 Use a component video cable, or three composite video cables, to connect the DVD player’s Y, P B and PR jacks to the Y, PB and PR jacks (VIDEO 5) on the TV. ✍ The Y, PB and PR jacks on your DVD player are sometimes labeled Y, Setup CB and CR, or Y, B-Y and R-Y. If so, connect the cables to like colors.
Notes on Using This Connection Watch the DVD player Press TV/VIDEO repeatedly to select the DVD input (VIDEO 5 in the illustration). Set up the TV remote control to operate the DVD player If you have a non-Sony DVD player, you must program the remote control. See “Programming the Remote Control” on pages 51-52. Activate the TV remote control to operate the DVD player Open the outside cover, as shown on page 50. Then set the A/V slide switch to the position you programmed for the DVD player.
SETUP DVD Player with S VIDEO and Audio Connectors Use this connection if your DVD player does not have component video (Y, PB, PR) jacks. To connect a DVD player with A/V connectors 1 Use an audio cable to connect the DVD player’s audio output jacks to the TV’s audio input jacks. 2 Use an S VIDEO cable to connect the DVD player’s S VIDEO jack Setup to the TV’s S VIDEO jack. TV Cables are often color-coded to connectors. Connect red to red, white to white, etc.
Digital TV Set-Top Box with Component Video Connectors To connect a digital TV set-top box with component video connectors player’s Y, PB and P R jacks to the Y, PB and PR jacks (VIDEO 5) on the TV. SETUP 1 Use three separate component video cables to connect the DVD ✍ The Y, PB and PR jacks on your DVD player are sometimes labeled Y, CB and CR, or Y, B-Y and R-Y. If so, connect the cables to like colors.
SETUP Camcorder Using S VIDEO jacks? See page 25. For easy connection of a camcorder, the TV has front A/V input jacks. If you prefer, however, you can connect the camcorder to the TV’s rear A/V input jacks. To connect a camcorder 1 Open the front video panel, as shown on page 13. 2 Use A/V cables to connect the camcorder’s A/V output jacks to the TV’s A/V input jacks. Setup TV Front Video Panel SETUP Cables are often color-coded to connectors. Connect red to red, white to white, etc.
Audio Receiver To connect an audio system 1 Use an audio cable to connect the TV’s audio output jacks to the SETUP For improved sound quality, you may want to play the TV’s audio through your stereo system. audio receiver’s line input jacks. TV Setup SETUP Audio cable Receiver To line input Cables are often color-coded to connectors. Connect red to red, white to white. SETUP 2 Using the TV’s Audio Menu, set the Speaker option to Off.
Using the CONTROL S Feature SETUP CONTROL S allows you to control your system and other Sony equipment with one remote control. In addition to allowing you to control multiple devices with one remote control, the CONTROL S feature allows you to always point your remote control at your TV, instead of having to point it at the other equipment, which might be hidden or out of direct line of sight. Use CONTROL S IN to send signals to the TV. Setup Use CONTROL S OUT to send signals to connected equipment.
Setting Up the Channel List SETUP After you finish connecting your TV, you need to run Auto Setup to set up your channels. The Auto Setup screen appears when you turn on your TV for the first time after hooking it up. If you do not want to set up the channels at this time, you can do it later by selecting the Auto Program option in the Channel Menu (see page 78). ✍ The Auto Setup feature does not apply for installations that use a cable box for all channel selection. 1 Press POWER to turn on the TV.
Adjusting the Convergence Automatically (Flash Focus) SETUP The projection tube image appears on the screen in three colors (red, green and blue). If they do not converge, the color is poor and the picture blurs. Before you use your TV, be sure to adjust the convergence. The Flash Focus feature allows you to adjust the convergence automatically. Setup ✍ It is recommended that you perform Flash Focus about 30 minutes after the z You can also access Flash Focus in the Setup menu. For details, see page 85.
Adjusting the Convergence Manually ✍ Before using the manual Convergence, you must first perform Flash Focus SETUP The Convergence feature gives you more control over the picture’s convergence than the Flash Focus feature, allowing you to fine-tune the convergence. (as described on page 44). . 3 Move the joystick to highlight Convergence and press . Setup z For details on using the Setup Menu, see page 83. 1 Press MENU to display the Menu.
SETUP SETUP SETUP SETUP SETUP Setup Notes on Adjusting the Convergence Manually 46 ❑ For best results, stand about 3 to 5 feet back from the picture when adjusting the convergence. Begin with the crosses in the center area of the screen and, once those are adjusted, move to the crosses on the edges of the screen. ❑ You can make separate adjustments to each wide mode: Full/Normal, Zoom, Wide Zoom, and Memory Stick/1080i highdefinition input. (These features share a common convergence mode.
Using the Remote Control Overview This chapter describes how to set up, program, and use the TV’s remote control. Topic Page Inserting Batteries 47 Button Descriptions Outside Panel Inside Panel 48 50 Programming the Remote Control 51 Inserting Batteries 1 Remove the battery cover from the remote control. 2 Insert two size AA (R6) batteries (supplied) by matching the e and E terminals on the batteries to the diagram inside the battery compartment. 3 Replace the battery cover.
SETUP Button Descriptions Outside Panel MUTING SETUP 1 2 3 4 5 SLEEP SAT/CABLE POWER SAT/CABLE FUNCTION TV/VIDEO ANT Button Description 1 MUTING Press to mute the sound. Press again or press VOL+ to restore the sound. 2 SLEEP Press repeatedly until the TV displays the time in minutes (15, 30, 45, 60, or 90) that you want the TV to remain on before shutting off automatically. To cancel press until Sleep Off appears. While the Sleep feature is set, press once to display the remaining time.
Description qg CODE SET Press to program the remote control to operate nonSony video equipment. For details, see “Programming the Remote Control” on page 51. qh POWER Buttons SAT/CABLE*: Press to turn on and off the satellite receiver or cable box. SETUP Button TV: Press to turn on and off the TV. qk 0 - 9 ENTER Press 0 - 9 to select a channel; the channel changes after 3 seconds. Press ENTER to change channels immediately. ql TWIN VIEW Press to turn on and off Twin View.
Inside Panel To access the inside panel, open the outside cover as shown. SETUP ✍ Opening the outside cover automatically switches the remote control to operate your VCR or DVD player, depending on the position of the A/V slide switch. For details, see page 51. VCR and DVD buttons require that you first program the remote (page 51), if the VCR and DVD player are not Sony brand.
Programming the Remote Control The remote control is preset to operate Sony brand video equipment. SLEEP SAT/CABLE POWER Programmable Code Number Beta, Ed Beta VCRs AV1 303 8 mm VCR AV2 302 VHS VCR AV3 301 DVD player DVD 751 If you have video equipment other than Sony brand that you want to control with the TV’s remote control, use the following procedure to program the remote control.
SETUP SETUP SETUP Remote Control SETUP SETUP Manufacturer’s Codes DVD Players VCRs Manufacturer Code Manufacturer Sony Admiral (M.
Using Other Equipment with Your TV Remote Control SETUP All Equipment Do This ... Switch the TV’s input to the VCR, DVD player, or other connected equipment Press TV/VIDEO repeatedly to cycle through the video equipment connected to the TV’s video inputs. Set up the TV remote control to operate non-Sony equipment You must program the remote control the first time you use it. See “Programming the Remote Control” on pages 51 to 52.
Operating a DVD Player SETUP SETUP Remote Control SETUP Operating a Cable Box SETUP SETUP Operating an MDP (Laserdisc Player) 54 To Do This ... Press Activate the remote control to operate the cable box SAT/CABLE FUNCTION Turn on/off SAT/CABLE POWER Select a channel 0-9, ENTER Change channels CH +/- Back to previous channel JUMP To Do This ... Press Activate the remote control to operate the DVD Open the outside cover, as shown on page 50.
Using the Features Overview This chapter describes how to use the features of your TV.
z For a complete list of all the functions of the remote control, see pages 47-52. SETUP SETUP Watching TV To Do This ... Do This ...
Using the Scrolling Index 1 Press INDEX. SETUP The Scrolling Index lets you select programs from a scrolling index of video pictures. The Scrolling Index appears, with the currently selected program in the main (left) window, and four scrolling video pictures in the right. SETUP Live preview window SETUP As each picture on the right scrolls to the live preview window, it changes briefly from a frozen video picture to a live video. The right side continues to scroll through the entire channel list.
Using Wide Mode SETUP Wide Screen mode lets you watch 4:3 normal broadcasts in several Wide Screen modes (16:9 aspect ratio). ✍ When viewing high-definition programs broadcast in 720p/1080i, it is not SETUP possible to change between Wide Screen modes. z You can also access the Wide Mode settings in the Screen menu. For details, see page 76. ❑ Press WIDE MODE repeatedly to toggle through the following Wide Mode settings.
Using Twin View 1 Tune the TV to a working channel. 2 Press . SETUP Displaying Twin Pictures SETUP Twin View lets you see two pictures from two sources — from an antenna, VCR, DVD, etc. — on the screen at the same time. You hear the sound from only one of the sources at a time, but you can choose which source’s sound is selected. You can also change the relative size of each of the pictures. A second picture appears. The active picture is highlighted in blue.
SETUP Activating the Picture To activate the picture in the left window ❑ Move the joystick B. To activate the picture in the right window ❑ Move the joystick b. , SETUP , SETUP SETUP Features SETUP Functions Available in the Active (Highlighted) Window 60 To Do This ... Do This ...
The zoom feature lets you vary the relative size of the left and right pictures. 1 Move the joystick B or b to activate the picture that you want to resize. SETUP Changing the Picture Size 2 Move the joystick V to enlarge the picture. 3 Move the joystick v to make the SETUP picture smaller. SETUP Features SETUP When you adjust the picture sizes, the TV memorizes the change. The next time you use the Twin View function, the memorized sizes appear.
Using Favorite Channels SETUP The Favorite Channels feature lets you select programs from a list of up to eight favorite channels that you specify. Creating a List of Favorite Channels 1 Press MENU to display the Menu. 2 Move the joystick B or b to highlight the Channel icon and press SETUP . z For details on using the Channel Menu, see page 78. 3 Press to select Favorite Channels. 4 Move the joystick V or v to highlight a Favorite Channel number (1-8) and press .
Using the Freeze Function ✍ The Freeze feature is not available while you are using the Twin View or SETUP The FREEZE button allows you to temporarily capture a program’s picture. You can use this feature to write down information such as phone numbers, recipes, etc. Scrolling Index features. 1 When the program information you want to capture is displayed, press FREEZE. picture on the right, while the current program continues on the left.
About Memory Stick SETUP SETUP Using the Memory Stick Picture Viewer ✍ You cannot write to Memory Stick media using the TV. Memory Stick technology allows you to view on your TV screen digital (jpeg) images that are stored on Memory Stick media. You can choose from an index of the images stored on the Memory Stick, or you can run a slideshow of those images.
About DCF File Names Image Directory Name SETUP Most Sony brand digital still and video cameras automatically record still images using DCF compliant directory and file names, as shown in the following example: Image File Names SETUP ✍ Do not rename directories. If the names are changed, the still images cannot be displayed on your TV.
SETUP To insert a Memory Stick 1 Locate the Memory Stick slot (see pages 14-15) and insert the Memory Stick into the Memory Stick slot as illustrated below. When inserted properly, it should slide in with little resistance and click into place. SETUP Inserting and Removing a Memory Stick SETUP ✍ Be sure to insert the Memory Stick in the correct direction. If the Memory Stick is forced in the wrong way, it may become damaged. Insert only Memory Stick media into the Memory Stick slot.
1 Insert a Memory Stick that contains the images you want to view. For details, see page 66. 2 Press the MEMORY STICK button on the remote control. The Memory Stick Menu appears. SETUP Displaying the Memory Stick Menu Memory Stick Index Slideshow Setup SETUP Move: V v Select: + 3 To select an option, move the joystick V or v to highlight the option and press . Index Displays an index of thumbnail images that are on the Memory Stick. For details, see “Using the Memory Stick Index” on page 68.
SETUP Using the Memory Stick Index The Memory Stick Index lets you view images that are on the Memory Stick in an index of thumbnail images. ✍ There is no audio signal available while viewing images on Memory Stick. 1 Insert a Memory Stick that contains the images you want to view. For details, see page 66. 2 Press the MEMORY STICK button on the remote control. The Memory Stick Menu appears. SETUP 3 Move the joystick to highlight Index and press . The Memory Stick Index appears.
The Memory Stick Slideshow lets you watch a slideshow of the images that are on the Memory Stick. 1 Insert a Memory Stick that contains the images you want to view. For details, see page 66. SETUP Using the Memory Stick Slideshow 2 Press the MEMORY STICK button on the remote control. The Memory Stick Menu appears. 3 Move the joystick to highlight Slideshow and press . The slideshow starts. . The Memory Stick Menu is SETUP 4 To end the slideshow, press displayed.
SETUP Using the Rotate Picture Screen The Rotate Picture Screen lets you rotate an image from an index of thumbnails. ✍ You cannot rotate images if the LOCK switch on the Memory Stick is on. To rotate the images, first set the LOCK switch to off. 1 In the Memory Stick Setup Menu, move the joystick to highlight z The Page and folder ( ) buttons are available only if the Memory Stick contains more images or folders than can be displayed on one screen. . The Rotate Picture screen appears.
Using the Menus Overview The Menu gives you access to the following features: Menu Icon Description Page 72 Allows you to make adjustments to your picture settings. It also allows you to customize the Picture Mode based on the type of program you are viewing, select Advanced Video options, and more. z Press MENU to enter and exit Menus. Offers enhanced audio options such as listening to second audio programming (SAP) or customizing the Effect of the sound on your TV.
Using the Video Menu SETUP To select the Video Menu 1 Press MENU. 2 Move the joystick B or b to highlight the Video icon and press . 3 Move the joystick to highlight SETUP an option. Press option. to select an 4 Move the joystick V v B b to change settings. Press Mode: Vivid Picture Brightness Color Hue Sharpness Color Temp.: Cool ClearEdge VM: High Advanced Video Move: V vBb Select: + End: MENU to select the changed setting. 5 Press MENU to exit the Menu.
Option Description z To change quickly from one DRC Mode to another, use the DRC MODE button on the remote control. Advanced Video Select Program to choose among the DRC Mode and DRC Palette options while viewing NTSC sources. DRC Mode Creates a high-resolution picture with 4x density, for high quality sources (i.e., DVD player, satellite receiver). Interlaced SETUP Custom 1 Reality [26] Clarity 2 Move the joystick to adjust the position of the marker ( ).
Using the Audio Menu SETUP To select the Audio Menu 1 Press MENU. 2 Move the joystick B or b to highlight the Audio icon and press . 3 Move the joystick to highlight SETUP an option. Press an option. to select 4 Move the joystick V v B b to change settings. Press Treble Bass Balance Steady Sound: Off Effect: Simulated MTS: Stereo Speaker: On Audio Out: Fixed Move: V vBb Select: + End: MENU to select the changed setting. 5 Press MENU to exit the Menu.
Description Speaker On Select to turn on the TV speakers. Off Select to turn off the TV speakers and listen to the TV's sound only through your external audio system speakers. Audio Out Easy control of volume adjustments SETUP Option This option can be set only when the Speaker option is set to Off. The TV’s speakers are turned off, but the audio output from your audio system can still be controlled by the TV’s remote control.
Using the Screen Menu SETUP To select the Screen Menu 1 Press MENU. 2 Move the joystick B or b to Wide Mode: Wide Zoom 4:3 Default: Wide Zoom Vertical Center move to the Screen icon and press . 3 Move the joystick V or v to SETUP move to an option. Press select an option. SETUP Move: V vBb Select: + End: MENU 4 Move the joystick B b V v to change settings. Press to select the changed setting. 5 Press MENU to exit the Menu.
Option Description Wide Zoom 4:3 Default Select the default Screen Mode to use for 4:3 sources Normal Select to return the 4:3 picture to normal mode. Full Select to enlarge the 4:3 picture horizontally only, to fill the wide screen. Zoom Select to enlarge the 4:3 picture horizontally and vertically to an equal aspect ratio that fills the wide screen. Off Select to continue using the current Wide Mode setting when the channel or input is changed.
Using the Channel Menu SETUP To select the Channel Menu 1 Press MENU. 2 Move the joystick B or b to highlight the Channel icon and press . Favorite Channels Cable: On Channel Fix: Off Auto Program Channel Skip/Add Channel Label 3 Move the joystick to highlight SETUP an option. Press an option. to select Move: V vBb Select: + 4 Move the joystick V v B b to change settings. Press End: MENU to select the changed setting. 5 Press MENU to exit the Menu.
Allows you to customize the channel list that appears when you use the CH+/- buttons. 1 Move the joystick V or v to scroll through the channels until you find the channel you want to skip or add. Then press to select it. 2 Move the joystick V or v to toggle between Add or Skip. Then press to select. 3 To add or skip more channels, repeat steps 1 and 2. 4 Move the joystick B to return to the Channel Menu, or press MENU to exit the Menus.
Using the Parent Menu SETUP The Parent Menu allows you to set up the TV to block programs according to their content and rating levels. To select the Parent Menu 1 Press MENU. 2 Move the joystick B or b to Password: ____ Press + to enter password Move: V vBb Select: + End: MENU SETUP highlight the Parent icon and press . 3 Use the 0-9 buttons on the remote control to enter a four-digit password. 4 If this is the first time you are creating this password, confirm the password by entering it again.
Option Description Movie Rating G All children and General Audience. PG Parental Guidance suggested. PG-13 Parental Guidance for children under 13. R Restricted viewing, parental guidance is suggested for children under 17. NC-17 and X No one 17 or under allowed. TV Rating Block programs by their rating, content or both Age-Based Ratings TV-Y All children. TV-Y7 Directed to children age 7 and older. Parental Guidance suggested. TV-14 Parents Strongly cautioned.
SETUP SETUP Canadian Models: Selecting Custom Rating Options For Canadian models, the Custom Rating Menu includes the following options. (For US models, see page 81.) Option Description English Rating C All children. C8+ Children 8 years and older. G General programming. PG Parental Guidance. 14+ Viewers 14 and older. 18+ Adult programming. G General programming. 8 ans+ Not recommended for young children. 13 ans+ Not recommended for ages under 13.
Using the Setup Menu 1 Press MENU. 2 Move the joystick B or b to highlight the Setup icon and press . SETUP To select the Setup Menu Caption Vision: Off Video Label Language: English Clock/Timers Flash Focus Convergence Demo 3 Move the joystick to highlight to select Move: V vBb Select: + 4 Move the joystick V v B b to change settings. Press End: MENU to select the changed setting. 5 Press MENU to exit the Menu.
Description Video Label Allows you to identify A/V equipment you connected to the TV, such as a VCR, DVD, etc. For example, if you have a DVD player connected to the VIDEO 5 jack, you can select the label DVD for the VIDEO 5 input. Then when you press the TV/VIDEO button to change inputs, the Video Label you assigned to that input appears on screen. 1 Move the joystick V or v to highlight the video input (VIDEO 1-7) to which you want to assign a label. Then press to select the input.
Description Clock/Timers (continued) Current Time 1 Press to select Current Time. 2 Move the joystick V and v to set the current time 3 (day, hour, and minute). Press (or move the joystick b) to confirm each setting and move to the next setting. Move the joystick B to go back to the previous setting. Press MENU to exit the Menu. Allows you to adjust the convergence automatically. For details, see page 44. Convergence Allows you to fine-tune the convergence manually. For details, see page 45.
Other Information Overview This chapter includes the following topics: Topic Page Glossary 88 Notes on Using Memory Stick Media 89 Contacting Sony 90 Troubleshooting 90 Specifications 95 Optional Accessories 96 Index 97 87
Glossary Welcome analog signal aspect ratio A signaling method that uses continuous changes in the amplitude or frequency of an electronic transmission to convey information. Refers to the ratio between the width and height of the screen. This TV has a 16:9 (widescreen) aspect ratio, as opposed to a 4:3 aspect ratio. SETUP SETUP 4:3 aspect ratio component video 16:9 aspect ratio Component video is sent through three cables: two color shade (chrominance) signals and one brightness (luminance) signal.
Notes on Using Memory Stick Media When using Memory Stick media, follow these precautions: To avoid permanent damage to still image data, do not turn off the TV or remove Memory Stick media from the insertion slot while data is being read (as indicated by the Memory Stick indicator light being on). ❑ Avoid touching the terminal of Memory Stick media or bringing it into contact with a metal object. ❑ Do not drop, bend, or submit Memory Stick media to external shock.
Contacting Sony Welcome If, after reading these operating instructions, you have additional questions related to the use of your Sony television, please call our Customer Information Services Center at 1-800-222-SONY (7669) (US residents only) or (416) 499-SONY (7669) (Canadian residents only). Troubleshooting SETUP If you are having problems with your TV, you can reset all the TV’s settings to their original factory default settings, as follows.
Remote Control Possible Remedies ❏ ❏ ❏ ❏ ❏ ❏ ❏ ❏ SETUP Memory Stick Problem Possible Remedies Image does not display ❏ ❏ ❏ Cannot rotate image, no thumbnail appears ❏ ❏ Dashes appear instead of the file name if the image was recorded using equipment that is not DCF-compliant. Dashes also appear if a DCFcompliant file was renamed.
Welcome Possible Remedies ❏ Dark, poor or no picture (screen lit), good sound No color Only snow and noise appear on the screen SETUP Problem No picture (screen not lit), no sound SETUP Video Dotted lines or stripes ❏ ❏ ❏ ❏ ❏ ❏ ❏ ❏ ❏ ❏ ❏ ❏ ❏ Double images or ghosts ❏ “Black box” on screen ❏ Certain programs on DVD or ❏ other digital sources display a loss of detail, especially during fast-motion or dark scenes Other Info SETUP SETUP Black bands appear at the ❏ top and bottom of the screen
Audio Possible Remedies ❏ ❏ ❏ ❏ ❏ Problem Possible Remedies Cannot receive upper channels (UHF) when using an antenna TV is fixed to one channel ❏ ❏ ❏ ❏ ❏ ❏ SETUP Cannot receive any channels when using cable TV Cannot receive or select channels ❏ Change the Cable option to Off (see page 78). Use Auto Program in the Channel Menu to add receivable channels that are not presently in the TV’s memory (see page 78).
Problem Possible Remedies How to reset TV to factory settings ❏ How to restore Video settings ❏ to factory settings How to restore Audio ❏ settings to factory settings ❏ Cannot cycle through the other video equipment connected to the TV Cannot operate Menu ❏ Lost password ❏ LED on front panel is lit ❏ SETUP SETUP Welcome General Other Info SETUP SETUP ❏ 94 Turn on the TV. While holding down the RESET button on the remote control, press the POWER button on the TV.
Specifications Projection Lenses Antenna Television System Channel Coverage KP-57WV600/700 Audio (IN) Component Video Input CONTROL S (IN/OUT) Variable/Fixed Audio (OUT) Supplied Accessories Screen Size (measured diagonally) KP-65WV600/700 Power Consumption KP-57WV600/700 KP-65WV600 KP-65WV700 In Use In Standby SETUP Mass 1361 x 1394 x 689 mm (53 5/8 x 54 15/16 x 27 1/8 in) 1542 x 1516 x 735 mm (60 3/4 x 59 3/4 x 28 15/16 in) 98Kg (216 lbs) 136Kg (300 lbs) 134Kg (295 lbs) 295 W Under 1 W SETUP
Other Info SETUP SETUP SETUP SETUP Welcome Optional Accessories 96 ❑ A/V Cable (VMC-810/820/830 HG) ❑ Audio Cable (RKC-515HG) ❑ Component Video Cable (VMC-10/30 HG) ❑ Control S Cable (RK-G69HG) ❑ Memory Stick media: 8 MB (MSA-8A); 16 MB (MSA-16A); 32 MB (MSA-32A); 64 MB (MSA-64A); 128 MB (MSA-128A)
Index 0-9 buttons 49, 56 16:9 aspect ratio 58 4:3 aspect ratio 58 4:3 Default settings 77 A Advanced Video 73 ANT button 48, 56 antenna, connecting 19 Audio Menu 71, 74 Audio Out 75 audio receiver, connecting 41 Auto Program (channel setup) 43, 78 Auto SAP, MTS setting 74 AUX jack, described 17 AV1-3/DVD slide switch 50 B balance, adjusting 74 bass, adjusting 74 batteries, inserting in remote 47 bilingual audio 74 blocking programs. See ratings.
SETUP features 9 Fixed audio setting 75 Flash Focus 44 FREEZE button 50, 63 Freeze, using 63 Full mode, setting 76 G SETUP GUIDE button 49 HD Detailer 10 HD/DVD IN (1080i/720p/480p/480i) jacks, described 17 hue, adjusting 72 SETUP I INDEX button 48, 57 interlaced 9, 48, 73, 88 J joystick 48 JUMP button 48, 56 L SETUP label channels 79 Language, setting 84 LOCK switch, Memory Stick 70 M Menus MDP, using with TV remote control 54 Memory Stick Other Info Mono, MTS setting 74 Movie mode 72 MTS 7
U S VIDEO jack, described 13, 17 SAT/CABLE FUNCTION button 48 SAT/CABLE POWER button 49 satellite receiver, using with TV remote control Uniform Brightness Screen 10 53 Variable audio setting 75 VCR using with TV remote control 53 with cable box, connecting 28 with cable, connecting 26 with satellite receiver, connecting 34 VCR/DVD button 50 Vertical Center, adjusting 77 VHF/UHF jack, described 17 VIDEO (L/R)/AUDIO jacks, described 17 Video Menu 71, 72 Video modes, selecting 72 Vivid mode 72 VOL button