4-083-403-12 (1) Projection TV KP-XA43 Projection TV Operating Instructions EN Mode d’emploi F xxxxxxxxxx C xxxxxxxxxx C PR A KP-XA43 © 2001 Sony Corporation M61, M91, M31
L(MONO) R ENTER MENU AUTO PROGRAM PR : 0 1 T V SY S : B / G VHF L O W 1 3
WARNING Table of contents To prevent fire or shock hazard, do not expose the projection TV to rain or moisture. Dangerously high voltages are present inside the projection TV. Do not open the cabinet. Refer servicing to qualified personnel only. For general safety: • Do not expose the projection TV to rain or moisture. • Do not open the rear cover. For safe installation: • Do not block the ventilation openings. • Do not install the projection TV in hot, humid or excessively dusty places.
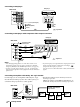
Getting Started Connections Connecting a VHF antenna or a combination VHF/UHF antenna — 75-ohm coaxial cable (round) Attach an optional IEC antenna connector to the 75-ohm coaxial cable. (antenna) socket at the rear of the TV. Plug the connector into the Rear of TV On a wall Rear of TV or Connecting optional equipment You can connect optional audio/video equipment to your TV such as a VCR, multi disc player, camcorder, video game or stereo system.
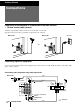
Front of TV Camcorder to (S video input) to S video output 3 L(MONO) R to … 3 (video input) (yellow) to video and audio outputs -L (MONO)(white) -R (red) : Signal flow When connecting a monaural VCR Connect the yellow plug to (video input) and the black plug to -L (MONO) (audio input). When connecting video game equipment Connect video game equipment to the … 3 (video input) jacks at the front or the rear of your TV.
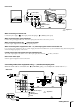
Connecting a DVD player DVD player Rear of TV 1 2 LINE OUT 3 R-AUDIO-L R L (MONO) VIDEO to … 1, 2, or 3 (video input) (yellow) to audio/ video outputs -L (MONO)(white) -R (red) : Signal flow Connecting a DVD player with component video output connectors DVD player Rear of TV to (component video input) Y/CB/B-Y/CR/R-Y COMPOMENT VIDEO OUT CB/B-Y CR/R-Y Y Y S VIDEO OUT LINE OUT R-AUDIO-L VIDEO CB/ B-Y C R/ R-Y to component video output L R to audio output : Signal flow -L (white) -R (re
Installing the projection TV For the best picture quality, install the projection TV within the areas shown below. Optimum viewing area (Horizontal) Optimum viewing area (Vertical) min 1.5m (5 ft.) min 1.5m (5 ft.
Getting to know the remote commander Names/symbols of buttons on the remote commander are indicated in different colors to represent the available functions. Label color Button function Grey For general TV operations. Green For Teletext operations.
Introducing the menu system You can preset TV channels, adjust the picture and sound qualities, and select some settings using the on-screen menus. You can use the buttons on both the remote commander and the TV to operate the menus.
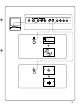
Changing the menu language 3 Press V or v to move the cursor (z) to the PRESET menu ( ), and press ENTER. ENTER If you prefer Chinese (for M61/M31 model)/Arabic (for M91 model) to English, you can change the menu language. You can use buttons on both the remote commander and the TV. MENU ENTER 4 Make sure the cursor (z) appears beside ( ), and press ENTER. LANGUAGE/ 5 Press V/b/v/B to select ( ), and press ENTER. All of the menus change to Chinese (Arabic).
Presetting channels You can preset TV channels easily by storing all the receivable channels automatically. You can also preset channels manually or disable program positions (see page 15 ). Presetting channels automatically You can preset up to 100 TV channels in numerical sequence from the program position 1. You can preset channels automatically using the button on the TV or the menu. To preset channels automatically using the menu 1 Press MENU.
4 Press V or v to move the cursor (z) to MANUAL PROGRAM, and press ENTER. ENTER ENTER MANUA L PROGRAM PR : 0 1 T V SYS : B / G AT T : OFF VOLUME: 0 VHF L O W 5 Select the program position to which you want to preset a channel. (1) Make sure the cursor (z) appears beside PR, and press ENTER. (2) Press V/b/v/B until the program position you want appears on the menu, and press ENTER. 6 Select the desired channel. (1) Press V or v to move the cursor (z) to VHF LOW (VHF Hi or UHF), and press ENTER.
Disabling program positions Presetting the volume level for individual programs By disabling unused or unwanted program positions, you can skip those positions when you press PROGR +/–. If the volume of the selected program is louder than that of other programs, set the volume level. 1 1 Press MENU. MENU 2 ENTER MENU A / V CONTROL DYNAM I C STANDARD SOF T PERSONAL V I DEO AD J UST AUD I O AD J UST Press V or v to move the cursor (z) to the ), and press ENTER. PRESET menu ( ENTER Press MENU.
3 Adjusting the convergence (CONVERGENCE) Press V or v to move the cursor (z) to CONVERGENCE and press ENTER. The CONVERGENCE adjustment screen appears. R G B R=Red G=Green B=Blue Before you use the projection TV, adjust convergence. The projection tube image appears on the screen in three layers (red, green and blue). If they do not converge, the color is poor and the picture blurs. To correct this, adjust convergence. After 20-30 minutes of turning on the power, adjust convergence.
Operations To scan through program positions Press PROGR +/– on the remote commander or the TV until the program position you want appears. Watching the TV PROGR 3 Press Á +/– on the remote commander or the TV to adjust the volume. PROGR 1 Press U to turn on the TV. Turning off the TV To turn off the TV temporarily Press u on the remote commander. The u/Â indicator lights up. When the TV is turned on in the standby mode, the u/Â indicator on the TV lights up.
Watching the video input Displaying the on-screen information Press … the TV. Press on the remote commander or … on . 8 VIDEO 1 VIDEO 2 VIDEO 3 DVD DYNAMIC POWER BASSO: ON 1 Note To watch TV Press ; on the remote commander or … on the TV. • The on-screen display shows the program position or the video mode, the picture and sound information. The on-screen display for the picture and sound information disappears after being displayed for approximately three seconds.
Adjusting the picture and sound Adjusting the picture settings (VIDEO ADJUST) You can adjust the picture settings to suit your taste with the VIDEO ADJUST option. The adjusted settings are stored in the PERSONAL option. 1 Press MENU. A / V CONTROL DYNAM I C STANDARD SOF T PERSONAL V I DEO AD J UST AUD I O AD J UST MENU Selecting the picture and sound modes MENU ENTER 1 3 Make sure the cursor (”) appears in the A/V CONTROL menu ( ), and press ENTER.
5 If the picture is slightly snowy You may try to improve the picture by changing the VM setting as described below: 1 2 3 For details on each item, see “Description of adjustable items” below. Display the VIDEO ADJUST menu. Press V or v to move the cursor (”) to VM, and press ENTER. Press V/b/v/B to select LOW, and press ENTER.
Setting the speaker If you connect a Dolby Pro Logic-compatible amplifier to the center speaker terminals, you can use the projection TV speakers as center speakers. 1 Press MENU. A / V CONT ROL DY NAM I C S T A NDARD SOF T P ERSONAL V I DEO AD J UST A UD I O AD J UST MENU 2 Make sure the cursor (z) appears in the A/V CONTROL menu ( ), and press ENTER. 3 Press V or v to move the cursor (z) to AUDIO ADJUST, and press ENTER.
Listening to the surround sound (HYPER SURROUND) The HYPER SURROUND feature enables you to enjoy a surround sound effect that is like being in a concert hall or movie theater when receiving stereo signals. Description of adjustable items Select To MOVIE Listen to a sound that emphasizes the bass audio effect of movie theater. MUSIC Listen to a dynamic and clear sound that emphasizes the low and high audio sounds. NEWS〈BBE〉 Listen to a sound that emphasizes voice.
Selecting a stereo or bilingual program Receiving area for NICAM and A2 (German) programs System Receiving area NICAM Hong Kong, Singapore, New Zealand, Malaysia, Thailand, etc. A2 (German) Australia, Malaysia, Thailand, etc. Notes You can enjoy stereo sound or bilingual programs of NICAM and A2 (German) stereo systems. Press A/B repeatedly until you receive the sound you want. The on-screen display changes corresponding to the selected sound and the u/Â indicator also lights up.
Viewing Teletext Checking the contents of a Teletext service (INDEX) Press to display an overview of the Teletext contents and page numbers. Using FASTEXT TV stations broadcast an information service called Teletext via a TV channel. Teletext service allows you to receive various information such as weather forecasts or news at any time. ; 1 2 3 4 5 6 7 8 9 Green 0 Red Number This feature allows you to quickly access a Teletext page that uses FASTEXT.
Revealing concealed information (REVEAL) The REVEAL option lets you disclose concealed information, such as an answer to a quiz that you find on some of the Teletext pages. Press Operating optional components . To conceal the information again. Press You can use the supplied remote commander to operate Sony video equipment such as Beta, 8mm, VHS, MDP, CD, or DVD. Enlarging the Teletext display (ENLARGE) Press .
To control Hold down VIDEO u and press Operating an MDP using the remote commander DVD 00 To Press VTR1 (Beta) 01 turn on/off VIDEO u VTR2 (8 mm) 02 play ( VTR3 (VHS) 03 stop p 04 pause P Press again to resume normal playback. step through different tracks of a disc + to step forward or step backward. MDP CD 06 MD 07 + Code numbers for Sony video equipment to Notes Operating a VCR using the remote commander To Press turn on/off VIDEO u record ( while pressing r.
Viewing a video game screen (GAME MODE) To restore the normal picture and sound modes Press ;, … , or PROGR +/–. Notes • If you press the GAME button when the TV is in the standby mode, the TV turns on automatically and the picture and sound change to the mode that is suitable for video games. • To display a video game screen, connect the video game equipment to the … 3 (video input) jacks at the front or the rear of the TV.
Customizing the TV Using the AV OUT (advanced rec-out) terminal You can select the output signal from the Ú (monitor/ TV output) jacks at the rear of the TV. However, the signals from the (component video input) jacks, and the Teletext broadcast cannot be output even though MONITOR is selected. 1 Press MENU. MENU 2 A / V CONT ROL DY NAM I C S T A NDARD SOF T P ERSONAL V I DEO AD J UST A UD I O AD J UST Press V or v to move the cursor (z) to the FEATURES menu ( ), and press ENTER.
Additional Additional Information Information Troubleshooting Good picture Noisy sound / Check the TV system (TV SYS) setting. If you have any problems, read this manual again and check the countermeasure for each of the symptoms listed below. If the problem persists, contact your nearest Sony dealer or authorized service center. Snowy picture Noisy sound / Check the antenna. / Check the antenna connection on the TV and on the wall. / Check the TV system (TV SYS) setting.
Cleaning the screen • To clean the screen with a cloth, please use a soft cloth lightly moistened with a mild detergent solution or water. Do not use any type of abrasive pad, alkaline cleaner, scouring powder or solvent, such as alcohol or benzine, or anti static spray. As a safety precaution, unplug the TV before cleaning it. • Do not rub, touch, or tap the surface of the screen with sharp or abrasive items, like a ball point pen or a screw driver.
AVERTISSEMENT Table des matières Afin d’éviter tout risque d’incendie ou d’électrocution, n’exposez pas le téléviseur de projection à la pluie ou à l’humidité. Ce téléviseur de projection fonctionne avec de très hautes tensions dangereuses. N’ouvrez jamais le châssis de l’appareil. Confiez-en exclusivement l’entretien à un personnel qualifié. Sécurité: • N’exposez pas le téléviseur de projection à la pluie ou à l’humidité. • N’ouvrez pas le panneau arrière.
Préparation Raccordements Raccordement à une antenne VHF ou VHF/UHF — câble coaxial de 75 ohms (rond) Reliez le connecteur de l’antenne IEC (non fourni) au câble coaxial de 75 ohms. (antenne) située à l’arrière du téléviseur.
Avant du téléviseur Caméscope vers (entrée S vidéo) vers la sortie S vidéo 3 L(MONO) R vers … 3 (entrée vidéo) (jaune) vers les sorties vidéo et audio -L (MONO)(blanc) -R (rouge) : Sens du signal Raccordement d’un magnétoscope mono Introduisez la fiche jaune dans l’entrée (entrée vidéo) et la fiche noire dans la prise -L (MONO) (entrée audio). Raccordement d’un équipement pour jeu vidéo Raccordez l’équipement pour jeu vidéo aux prises … 3 (entrée vidéo) à l’avant ou à l’arrière du téléviseur.
Raccordement d’un lecteur DVD Arrière du téléviseur Lecteur DVD 1 2 LINE OUT 3 R-AUDIO-L R L (MONO) vers … 1, 2 ou 3 (entrée vidéo) (jaune) VIDEO vers les sorties audio/vidéo -L (MONO)(blanc) -R (rouge) : Sens du signal Raccordement d’un lecteur DVD doté de connecteurs de sortie vidéo composant Lecteur DVD Arrière du téléviseur (entrée vidéo vers composant) Y/CB/B-Y/CR/R-Y COMPOMENT VIDEO OUT CB/B-Y CR/R-Y Y Y S VIDEO OUT LINE OUT R-AUDIO-L VIDEO CB/ B-Y CR / R-Y vers la sortie vidéo comp
Installation du téléviseur de projection Pour obtenir une image de qualité optimale, installez le téléviseur de projection en respectant le schéma illustré ci-dessous. Zone de visualisation optimale (horizontale) Zone de visualisation optimale (verticale) min 1,5m (5 pied) min.
Manipulation de la télécommande Les noms/symboles des touches de la télécommande sont indiqués dans différentes couleurs afin de représenter les fonctions disponibles. Couleur Fonction de la touche Gris Pour l’utilisation générale du téléviseur Vert Pour l’utilisation générale du télétexte 1 8 Symbol 1 GAME 9 !º 2 3 A/B 3 A/B !¡ 4 5 2¤ 1 2 3 4 5 6 7 8 9 -/-- 0 4 5÷ !™ !£ 6 POWER BASSO 7 .
Présentation du système de menus Vous pouvez présélectionner des chaînes télévisées, régler la qualité de l’image et du son et sélectionner quelques réglages à l’aide des menus sur écran. Vous pouvez utiliser les touches de la télécommande et du téléviseur pour exploiter les menus.
Modification de la langue du menu 3 Appuyez sur V ou v pour déplacer le curseur (z) sur le menu PRESET ( ) et appuyez sur ENTER. ENTER Si vous préférez l’arabe à l’anglais, il vous est loisible de modifier la langue du menu. Pour ce faire, utilisez les touches de la télécommande et du téléviseur. MENU ENTER ENTER 4 Assurez-vous que le curseur (z) apparaît en regard de LANGUAGE/ et appuyez sur ENTER. 5 Appuyez sur V/b/v/B pour sélectionner et appuyez sur ENTER. Tous les menus apparaîtront en arabe.
Présélection des canaux Vous pouvez présélectionner les canaux aisément en mémorisant tous ceux qui peuvent être captés automatiquement. Vous avez également la possibilité de présélectionner manuellement les canaux ou de désactiver des positions de programme (reportez-vous à la page 15). Présélection automatique des canaux Pour présélectionner les canaux automatiquement par le biais du menu 1 Appuyez sur MENU.
4 Appuyez sur V ou v pour déplacer le curseur (z) sur MANUAL PROGRAM et appuyez sur ENTER. ENTER ENTER MANUA L PROGRAM PR : 0 1 T V SYS : B / G AT T : OFF VOLUME: 0 VHF LO W 5 Sélectionnez la position de programme que vous désirez attribuer à la chaîne présélectionnée. (1) Assurez-vous que le curseur (z) apparaît en regard de PR et appuyez sur ENTER. (2) Appuyez sur V/b/v/B jusqu’à ce que la position de programme désirée apparaisse sur le menu et appuyez sur ENTER.
Désactivation des positions de programme Présélection du niveau du volume pour les différentes chaînes (Atténuateur de volume) La désactivation des positions de programme inutilisées ou indésirées vous permet de sauter ces positions en appuyant sur PROGR +/–. Si le volume de la chaîne sélectionnée est trop élevé par rapport à d’autres chaînes, réglez le niveau du volume. 1 1 Appuyez sur MENU.
Ajustement de la convergence (CONVERGENCE) 3 Appuyez sur V ou v pour amener le curseur (z) sur CONVERGENCE et appuyez sur ENTER. L’écran d’ajustement CONVERGENCE apparaît. R G B R=Rouge G=Vert B=Bleu Avant d’utiliser le téléviseur de projection, ajustez la convergence. L’image du tube de projection se présente à l’écran en trois couches (rouge, verte et bleue). Si elles ne convergent pas, la couleur n’est pas nette et l’image est imprécise.
Opérations Pour sélectionner une position de programme à deux chiffres, appuyez sur “÷” avant d’appuyer sur les touches numériques. Par exemple: pour sélectionner la position de programme 25, appuyez sur “÷” et puis sur “2” et “5”. Regarde le téléviseur -/-- 2 5 Pour effectuer une recherche sur les positions de programme Appuyez sur PROGR +/– de la télécommande ou du téléviseur jusqu’à ce que la position de programme désirée apparaisse.
Visualisation de l’entrée vidéo Affichage des informations sur écran Appuyez sur … du téléviseur. Appuyez sur de la télécommande ou … . 8 VIDEO 1 VIDEO 2 VIDEO 3 DVD Pour regarder la télévision Appuyez sur ; de la télécommande ou … du téléviseur. 1 DYNAMIC POWER BASSO: ON Remarque • L’affichage sur écran indique la position de programme ou le mode vidéo, les informations relatives à l’image et au son.
Réglage de l’image et du son Ajustement des réglages de l’image (VIDEO ADJUST) Vous pouvez ajuster les réglages de l’image à votre gré à l’aide de l’option VIDEO ADJUST. Les réglages effectués sont conservés dans l’option PERSONAL. 1 Appuyez sur MENU. A / V CONT ROL DY NAM I C S T A NDARD SOF T P ERSONAL V I DEO AD J UST A UD I O AD J UST MENU Sélection des modes d’image et de son 2 Assurez-vous que le curseur (”) apparaît dans le menu A/V CONTROL ( ) et appuyez sur ENTER.
Si l’image est légèrement neigeuse Vous pouvez essayer d’améliorer l’image en changeant la valeur VM comme décrit ci-dessous: 1 2 3 Affichez le menu VIDEO ADJUST. Appuyez sur V ou v pour déplacer le curseur (”) sur VM et appuyez sur ENTER. Appuyez sur V/b/v/B pour sélectionner LOW et appuyez sur ENTER.
Ecoute du son dynamique (POWER BASSO) Réglage du haut-parleur Si vous raccordez un amplificateur Dolby Pro Logic compatible aux bornes du haut-parleur central, vous pouvez utiliser les haut-parleurs du téléviseur de projection comme haut-parleurs centraux. 1 Appuyez sur MENU. A / V CONTROL DYNAM I C STANDARD SOF T PERSONAL V I DEO AD J UST AUD I O AD J UST MENU 2 3 Assurez-vous que le curseur (z) apparaît dans le menu A/V CONTROL ( ) et appuyez ensuite sur ENTER.
Description des options réglables Ecoute du son spatial (HYPER SURROUND) L’option HYPER SURROUND vous permet de profiter d’un effet sonore spatial ressemblant à une salle de concert ou de cinéma lors de la réception de signaux stéréo. 2 Appuyez sur MENU. 3 4 A / V CONTROL DYNAM I C STANDARD SOF T PERSONAL V I DEO AD J UST AUD I O AD J UST Appuyez sur V ou v pour déplacer le curseur (z) sur le menu FEATURES ( ) et appuyez sur ENTER.
Sélection d’un programme stéréo ou bilingue Zone de réception des programmes NICAM et A2 (allemand) Système Zone de réception NICAM Hong-Kong, Singapour, NouvelleZélande, Malaisie, Thaïlande, etc. A2 (allemand) Australie, Malaisie, Thaïlande, etc. Remarques Vous pouvez profiter du son stéréo ou des émissions bilingues des systèmes stéréo NICAM et A2 (allemand). Appuyez plusieurs fois sur A/B jusqu’à ce que vous obteniez le son désiré.
Utilisation du télétexte Visualisation du contenu du service télétexte (INDEX) Appuyez sur pour afficher un aperçu du contenu du télétexte et des numéros de page. Utilisation de FASTEXT Certaines chaînes émettent un service d’informations appelé le télétexte. Le service télétexte vous permet de recevoir à tout moment différentes informations telles que les prévisions météo ou les nouvelles.
Numéros de code des appareils vidéo Sony Pour piloter Maintenez la touche VIDEO u enfoncée et appuyez sur DVD 00 VTR1 (Bêta) Pilotage d’un lecteur de mini-discs portable avec la télécommande Pour Appuyez sur VIDEO u 01 mettre l’appareil sous/hors tension VTR2 (8 mm) 02 effectuer une lecture ( VTR3 (VHS) 03 arrêter la lecture p MDP 04 activer une pause de lecture P Appuyez de nouveau sur cette touche pour reprendre la lecture normale.
Numéros de code des appareils vidéo Sony Pour piloter Maintenez la touche VIDEO u enfoncée et appuyez sur DVD 00 VTR1 (Bêta) Pilotage d’un lecteur de mini-discs portable avec la télécommande Pour Appuyez sur VIDEO u 01 mettre l’appareil sous/hors tension VTR2 (8 mm) 02 effectuer une lecture ( VTR3 (VHS) 03 arrêter la lecture p MDP 04 activer une pause de lecture P Appuyez de nouveau sur cette touche pour reprendre la lecture normale.
Visualisation d’un jeu vidéo (GAME MODE) Pour revenir aux modes d’image et de son normaux ou PROGR +/–. Appuyez sur ;, … Remarques • Si vous appuyez sur la touche GAME lorsque le téléviseur est en mode de veille, le téléviseur s’allume automatiquement et l’image et le son passent au mode qui convient au jeu vidéo. • Pour afficher un jeu vidéo, raccordez la console de jeu vidéo aux prises … 3 (entrée vidéo) à l’avant et à l’arrière du téléviseur.
Personnalisation du téléviseur Utilisation de la borne AV OUT Vous pouvez sélectionner le signal de sortie provenant des prises Ú (sortie moniteur/téléviseur) situées à l’arrière du téléviseur. Cependant, les signaux transmis via les prises (entrée vidéo composant) et la diffusion du télétexte ne peuvent pas sortir même si MONITOR est sélectionné. 1 Appuyez sur MENU.
Informations complémentaires Guide de dépannage Image normale Son parasité / Vérifiez le réglage du système TV (TV SYS). Absence d’image Absence de son En cas d’anomalie, relisez ce manuel et vérifiez les points présentés ci-après. Si le problème persiste, contactez votre centre de service agréé ou votre représentant Sony le plus proche. Neige sur l’image Son parasité / Vérifiez l’antenne. / Assurez-vous que l’antenne est correctement raccordée au téléviseur et à la prise murale.
Nettoyage de l’écran • Pour nettoyer l’écran avec un chiffon, utilisez un chiffon doux légèrement imprégné d’une solution détergente neutre ou d’eau. N’utilisez aucun type de tampon abrasif, de nettoyant alcalin, de poudre à récurer ou de solvant tel que de l’alcool ou de la benzine, ni de spray antistatique. En guise de mesure de précaution, débranchez le téléviseur avant de le nettoyer.
Sony Corporation Printed in Malaysia