FD Trinitron f/EGA Operating Instructions KV-13FS100 KV-13FS110 KV-20FS 100 KV-24FS 100 © 2002 by Sony Corporation
WARNING To reduce the risk of fire or electric shock, do not expose the TV to rain or moisture. This symbol is intended to alert the user to the presence of uninsulated "dangerous voltage" within the product's enclosure that may be of sufficient magnitude to constitute a risk of electric shock to persons. This symbol is intended to alert the user to the presence of important operating and maintenance (servicing) instructions in the literature accompanying the appliance.
You are cautioned that any changes or modifications could void your authority to operate this equipment. not expressly approved in this manual NOTIFICATION This equipment has been tested and found to comply with the limits for a Class B digital device pursuant to Part 15 of the FCC Rules. These limits are designed to provide reasonable protection against harmful interference in a residential installation.
IMPORTANT SAFEGUARDS For your protection, please read these instructions completely, and keep this manual reference. Carefully observe and comply with all warnings, cautions and instructions on the set, or described in the operating instructions or service manual. for future placed WARNING To guard against injur36 the following basic safety installation, use, and servicing of the set.
Overloading Do not overload wall outlets, extension cords or convenience receptacles beyond their capacity, since this can result in fire or electric shock. Always tum the set off when it is not to be used. When the set is left unattended and unused for long periods of time, unplug it from the wall outlet as a precaution against the possibility of an internal malfunction that could create a fire hazard. Do not disconnect the antenna or the power cord during a heavy storm.
Accessories Do not place the set on an unstable cart, stand, tripod, bracket, table, or shelf. The set may fall, causing serious injury to a child or an adult, and serious damage to the set. Use only a cart or stand recommended by the manufacturer for the specific model of TV. Any mounting of the product should follow the manufacturer's instructions, and should use a mounting accessory recommended by the manufacturer. An appliance and cart combination should be moved with care.
Grounding or Polarization This set may be equipped with a polarized alternating current line plug (a plug having one blade wider than other). This plug will fit into the power outlet only one way. This is a safety feature. If you are unable to insert the plug fully into the outlet, try reversing the plug. If the plug still fails to fit, contact your electrician to replace your obsolete outlet. Do not defeat the safety purpose of the polarized plug.
Service • Damage Requiring Service Unplug the set from the wall outlet and refer servicing to qualified service personnel under the following conditions: • When the power cord or plug is damaged or frayed. When the set exhibits a distinct in performance -- this indicates for service. change a need Servicing Do not attempt to service the set yourself since opening the cabinet may expose you to dangerous voltage or other hazards. Refer all servicing to qualified service personnel.
Contents Introduction Introducing the FD Tnmtron WEGA Features ................................................. Batteries for the Remote Control .......................................................................... 1 2 About 2 Front this Manual Panel .................................................................................................. Menu Controls ................................................................................... Connecting Your IV TV Rear Panel ...............
Introduction Congratulations on your purchase of the Sony FD Trinitron WEGA ®. Before you begin using this manual, please check the model number located on the rear of your TV or on the front cover of this manual.
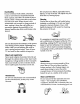
Operating Instructions Batteries for the Remote Control Insert two AA (R6) batteries as a guide. (supplied) Under normal conditions, into the remote control using batteries will last up to six months. the following illustration If the remote control does not operate properly, the batteries might be worn out. If you will not be using the remote control for an extended period of time, remove the batteries to avoid possible damage from battery leakage.
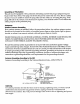
Connecting Your TV Read this section before connections in addition setting up your TV for the first time. This section covers to any optional equipment you may be connecting. basic W Rear Panel VIDEO IN 3 [] RI Jack Description [] S VIDEO Connects to the S VIDEO OUT jack on your VCR or other video equipment that has S VIDEO. S VIDEO provides better picture quality than the VHF/UHF jacks or the video input jack. S VIDEO does not provide sound; the audio cables must still be connected.
Operating Instructions Basic Connections TV with indoor or outdoor antenna, Depending on the cable available A VHF only or VHF/UHF or CAW cable in your home, 75-ohm coaxial choose one of the connections below: (Rear of TV) VHF/UHF cable _ or Cable B VHF only or UHF only 300-ohm twin lead cable _ (Rear of TV) VHF/UHF _-m_ or C VHFIUHF Antenna connector "_ Converter (EAC-25) "_ (not supplied) VHF and 75-ohm coaxial cable U" (Rear of W) 66 U/V mixer (not supplied) 300-ohm twin lead
Connecting Your TV II Connecting Additional Equipment TV and VCR Rear of TV 2 1_ VCR _ cable/ antenna From _ ideo (yellow) Audio L (white) Audio R (red) Optional connection To watch video programs from your VCR, tune your TV to channel 3 or 4 (as set on the rear of your VCR). 1 Connect VCR. 2 Connect a coaxial jack on the TV.
Operating Instructions TV and Cable Box Cable Box From cable IN OUT 2 Coaxial Cable Rear of TV VIDEO IN L. R m 1 Connect 2 Connect a coaxial cable (not supplied) VHF/UHF jack on the TV. the coaxial cable from your cable service I@@., to the IN jack on your cable box. from the OUT jack on your cable box to the To view channels from your cable box, tune your rv tO channel 3 or 4 (as set on the rear panel of your cable box) and use the cable box's remote control to change channels.
Connecting Your TV TV, VCR, and Cable Box Rear of TV , vi°E°' ,,=F,_F I@i s''_° 3 'aoeo7 --@ y VCR " OUT S VTDEO AUDIO R NJDIO L _DEO Video (yellow) Audio L (white) Audio R (red) t mm_ °UT IN Optional connection From cable 1 Connect the coaxial 2 Connect on your a coaxial VCR. cable (not supplied) from the OUT jack on your 3 Connect a coaxial jack on the TV.
Operating Instructions TV and Satellite Receiver From cable/ antenna Rear of TV 2 VHF_JHF Satellite Receiver AUDIO R AUDIO L VIDEO Satellite J LINEOUT antenna cable / I @ ' @ T T @ I T --- Audio Audio (yellow) L (white) R (red) 3 1 Connect the cable from your satellite antenna 2 Connect the coaxial cable service your 3 cable from your to SATELLITE IN on your or antenna to the VHF/UHF receiver. jack on TV.
Connecting TV, Satellite Rear of TV From 4 cable/ 2 antenna _,_ Vt'_Ut_ 1 Connect the cable from your 2 Connect the coaxial 3 Using a coaxial jack on your Using satellite 5 Using cable from your cable (not supplied), IN T antenna to SATELLITE cable service connect or antenna IN on the satellite receiver. to the IN jack on your VCR. the OUT jack on your VCR to the VHF/UHF TV.
Operating Instructions Connecting a DVD Player Using Audio/Video cables (not supplied), connect player to AUDIO and VIDEO IN on your TV. AUDIO and VIDEO OUT on your DVD Rear of TV Rear of DVD Player 1 VIDEO v_-_ IN _SVOEO 0 Audio L (white) Audio R (red) Video (yellow) For better picture quality, use S VIDEO instead of the yellow Audio/Video does not provide sound; the audio cables must still be connected. cable.
Connecting Your TV Connecting a Camcorder Using Audio/Video cables (not supplied), connect camcorder to AUDIO and VIDEO IN on your TV. AUDIO Front and VIDEO A/V OUT on your Panel _ udio R (red) Audio L (white) A/V output Video (yellow) Connecting Headphones Connect the headphones to the _ jack on the front of your TV. Headphone jack is STEREO. Front A/V Panel t p O* 0 ''_u ooo+ _o=,.
Using the Remote Control and Basic Functions This section shows on-screen menus.
Using the Remote Control and Basic Functions II Using the Remote Control Button Description [] MUTING Instantly turns the sound. [] SLEEP Turns Press again the TV off automatically 90 minutes. [] MTS/SAP off the sound. Cancel Cycles through Stereo, Mono, in approximately by pressing until the Multi-channel and Auto or press _ to restore 15, 30, 45, 60, or SLEEP OFF appears. TV Sound SAP (Second Audio (MTS) options: Program).
Operating Instructions Setting Up the TV Automatically After you have finished channels. connecting 1 Press _R _ 2 Press (_) on the remote press _z_ to exit. your TV, you can perform to turn on the TV. The Initial Setup screen Auto Program to set up your appears. CH control or on the TV front panel to perform Auto Program, or The Initial Setup screen appears each time you turn on the TV until you perform Auto Program.
Using the Remote Control and Basic Functions Quick Start to the Menus The following Menu settings are available in your on-screen menus: Allows Make you to adjustments Change to your picture your audio settings. Customize your channel settings. Set rating limits on your TV based program's rating settings. on a or content. The menus shown in this manual are for KV-24FS100. Your menus may not look like those illustrated.
Operating Instructions Menu Allows you to Set the clock on your TV and program scheduled Timer 2. ........................................................................................................................ viewing Timer 1 and .......................................................... Select dosed inputs, captioning adjust languages, 16 using options, tilt correction, or run a demo label video select menu of the menus.
Using the Menus This section shows the options available for setting up and adjusting your TV. To Access a Menu MENU 1 Press :2 Use the <= or _ buttons to highlight the desired menu, 3 Use the (_ or _ buttons to highlight the desired option, 4 Press CD to complete the adjustment screen to activate the desired option. 5 Press C) to display the on-screen menu. or follow then press CD. then press the instructions CD.
Operating Instructions Using the Video To access the Video Menu menu, refer to the following To Display steps: To Select MENU Picture Controls Press <> to open Picture Picture: Press <: to decrease Controls the contrast. menu: Press <>to increase contrast. Brightness: Press <_ to darken the picture. Color: Press <>to brighten the picture. Press <=to decrease Hue: color saturation. Press <_ to increase Sharpness: the red tones. Press q> to increase Press _ to soften the picture.
Using Using the Audio To access the Audio To Display menu, To Highlight the Menus Menu refer to the following ---_-_'. steps: To Select MENU MTS Multi-Channel TV Sound Press _ Press ff or _ to select one of the following Stereo: Select when viewing Mono: Select to reduce noise Auto SAP: Select to have the Program (SAP) when a signal options: a broadcast in stereo. in areas of poor reception. TV automatically switch to a Second is received.
Operating Instructions Using the Channel Setup To access the Channel To Display Setup menu, To Highlight [_ Menu refer to the following steps: To Select MENU Favorite Channels Quick access to favorite channels Press <> to open the Favorite Channels menu: 1 Use the _ or _, buttons to select the position (1-5) where you want to set a favorite channel, then press CD. 2 Using the ff or _ button, select the desired channel. 3 Press c2D to change to the channel selected.
Using Channel Skip/Add the Menus Use this feature after you run Auto Program to skip unwanted channels or add new ones. Press _ to open the Channel Skip/Add menu: 1 Use the 0 or _ buttons to select the position then press C_. 2 Use the O or _ buttons to select 3 Press <_ to return to the Channel Skip or Add, Setup menu of the desired channel, then press CD. MENU or press C) to exit. Pressing CH+ or CH- will skip over channels that have been skipped.
Operating Instructions Parental Control The Parental Control feature is designed to help parents monitor what their children watch on television. This section shows you the different rating systems available and how to set your TV's rating limit. Overview of the Ratings Once you have become TV's rating limit. familiar with these rating systems, you should be ready to set your Movie Rating (U.S. models only) This system channels.
Using the Menus TV Rating (U.S. models only) The TV rating is divided into two groups: age-based and content-based.
Operating Instructions English Rating (Canadian models only) These ratings are for Canadian Rating Defined C Children C8+ Children G General programming PG Parental Guidance 14+ Viewers 14 and older 18+ Adult programs that are broadcast in English. that are broadcast in French.
Using Using the Parental Control To access the Parental To Display Control menu, the Menus Menu refer to the following steps: To Select To Highlight MENU In the Parental Control _ menu, access into Parental Control. 1 Press _, you will be asked then use the (_)-(_) buttons to enter to set a 4-digit a 4-digit password for any further password. Keep this manual in a safe place. If you forget your password, see page 32. 2 Confirm your password by entering it again.
Operating Instructions Setting the Rating You can change 1 with the Rating by selecting Lock highlighted, If you are not familiar preselected categories :2 press one of the Lock options. cD. with the Parental Guidelines rating system, use one of the following to simplify the rating selections: Child, Youth, Young Adult. Use the ff or _ buttons to select the desired Rating W Child TV-Y, TV-G, G (U.S. models Youth TV-PG, Young Adult will allow a maximum PG (U.S.
Using the Menus Using the Custom Menu Before setting Custom ratings, the available rating systems. see pages 22-24, "Overview of the Ratings," for a description of Follow the instructions on the screen to make your custom settings. Select the country desired for your TV's rating limit. See page 23 for U.S. models and page 24 for Canadian models for more information. Once you have blocked a rating or content, automatically all higher ratings or content will be blocked.
Operating Instructions Using the Timer To access the Timer To Display Menu menu, refer to the following To Select To Highlight MENU Current steps: °% Time Set your TV to the current Press _ to open Current 1 Use the ff or _" button 2 Press _ day and time. Time menu: to enter the day and time, then press c_. to exit the menu. You must set the Current Time before you can use Timer 1 and Timer 2. 1"liner 1-an-d-...............
Using Using the Setup To access the Setup menu, To Display To Highlight refer to the following sl_ steps: To Select Vision Caption Vision Allows you to select from three closed broadcast with closed caption). ClosedCaptioning Press _ or _" to select CC1, 2, 3, 4: Displays caption modes one of the following options: printed dialogue and sound Text1, 2, 3, 4: Displays network/station XDS (Extended Data Services): Displays and its remaining time, if available.
Other Information Troubleshooting If you are having a problem with your TV, try the suggestions contact your nearest Sony Dealer. No picture, no sound below. Make _ If a red light is flashing on the front of your TV for more than a few minutes, disconnect and reconnect the power cord to restore the TV. If the problem continues, call your local service center. sure the power cord is plugged Try another _ channel; Adjust Picture (page 18).
Operating Instructions Cannot receive higher number _ Make sure Cable is set to Off in the Channel (page 20). channels (UHF) when using an antenna _ Perform Auto Program the memory (page 14). Cable stations don't seem to work _ Make sure Cable is set to On in the Channel (page 20). to add channels that are not presently Perform Auto Program to add channels the memory (page 14).
Other Information Specifications [or__.. a_!!mode!._s(except___a s note_____d)__ Television Channel Antenna Picture Power system coverage tube American TV standard/NTSC VHF: 2-13/UHF: 75-ohm external FD Trinitron requirements 14-69/CATV: 1-125 antenna terminal for VHF/UHF ® tube 120V, 60 Hz Supplied Accessories Size AA (R6) batteries (2) Remote Control RM-Y173 (1) Optional Accessories Connecting cables VMC-810S/820S, YC-YC-15V/30V, RK74.
Operating Instructions KV-24FS100 Screen size Visible Actual Inputs/outputs screen screen size: 24 inches size: 25 inches (610 mm) measured (635 mm) measured diagonally diagonally 2 video, 2 audio 1 S VIDEO 1 Y, PB, PR, 1 audio ............. 1 headphone SP_sr__p_u_tpu t ......... Power Consumption ................................ Dimensions (W/H/D) Mass Design 34 Jack ............................................................................. 7:5 W x3 ...................................
Index A Audio _ Auto Auto Menu Program SAP 19 Video [] 18 Mono 19 MTS Auto SAP 19 Mono 19 Stereo 19 19 14, 20 B Battery Installation Brightness 18 2 P Parental Control Parental Control Picture 18 Picture Controls C 20 Cable Caption Channel Channel Vision 29 Fix 20 Label 21 22 _ menu 18 Brightness 18 Color 18 Hue 18 Picture 18 Channel Setup [_ Menu 20 Channel Skip/Add 21 Color 18 Connections Cable and Antenna 4 Sharpness 18 R Connecting a Camcorder 11 Connecting a DVD Player 10 Connect
SONY. .o,,__2_ FD Trinitron WEGA Manual de Instrucciones KV-21 FS100 KV-25FS100 Lea este manual © 2002 por Corporacibn Sony antes de operar el producto.
ADVERTENCIA Para disminuir el riesgo de incendio o descarga eldctrica, no exponga el televisor alluvia o humedad. Este simbolo tiene por objeto advertir al usuario de la presencia de "voltaje peligroso" desprovisto de aislamiento en el interior del producto que puede set de suficiente magnitud como para presentar un fiesgo de descarga eldctrica para las personas.
Se advierte que cualquier cambio o modificacibn que no se apruebe de modo explicito en este manual podda anular su autorizacibn para utilizar este equipo. NOTIFICACION Este equipo se ha probado y cumple con las restricciones de los aparatos digitales de clase B de acuerdo con la secci6n 15 del reglamento de FCC. Estas restricciones se han disefiado para pro .porcionar protecci6n contra interferencias nocivas en instalaciones dom_sticas.
Normas importantes sobre seguridad Para su protecci6n lea completamente las instrucciones y conserve este manual para consultarlo en el futuro. Tenga en cuenta y siga todas las advertencias, precauciones e instrucciones que aparecen en pantalla o que se describen en el manual de instrucciones asistencia t6cnica. o de ADVERTENCIA Para prevenir dafios personales, seguridad durante la instalaci6n, se aconseja seguir las siguientes precauciones el uso y la reparaci6n del aparato.
Sobrecarga No sobrecargue las tomas de pared, los cables de extensi6n ni los recept_culos mKs alhl de su capacidad, puesto que podrla producirse un incendio o una descarga el_ctrica. Apague siempre el televisor cuando no lo utilice. Si no va a utilizar el aparato durante un tiempo prolongado, descon_ctelo de la toma de pared como precauci6n ante la posibilidad de que se produzca un mal funcionamiento intemo que pueda provocar un incendio.
. ::,', Colocaci6n No sit6e el aparato sobre un carro, una mesa pequefia, un tripie, un soporte, una mesa o una estanterla inestables. E1 aparato podrfa caer y dafiarse o bien provocar lesiones graves a nifios o adultos. Utilice thnicamente carros o mesas recomendados pot el fabricante para el modelo especifico de televisor. Para el montaje del producto deber_in seguirse las instrucciones del fabricante y utilizar los accesorios de montaje recomendados por el mismo.
Conexi6n a tierra o polarizaci6n Este aparato puede estar equipado con un enchufe de llnea de corriente altema polarizado (con una terminal mils ancha que la oh:a). E1 enchufe s61o se puede introducir en la toma de corriente en una direcci6n. Se txata de una caracterlstica de seguridad. Si no puede insertar completamente el enchufe en la toma, intente girarlo. Si sigue teniendo problemas para introducir el enchufe, p6ngase en contacto con su electricista para que sustituya la toma obsoleta.
Reparaci6n Da_os que requieren reparacibn Desconecte el aparato de la toma de pared y haga que sea revisado por personal calificado cuando se produzcan las siguientes condiciones: • Si el cable de alimentaci6n o el enchufe est_tn dafiados o deshilachados. • Si el aparato muestra un cambio rendimiento significativo, debe repararse. de Asistencia t6cnica No intente reparar usted mismo el aparato, puesto que si abre la unidad puede exponerse voltajes peligrosos u otros peligros.
Contenido Introducci6n Caracterlsticas del televisor FD Trinitron WEGA ®............................................... 1 Baterias para el control remoto ................................................................................ Acerca de este manual ...............................................................................................
Introducci6n Gracias por la compra del televisor FD Trinitron WEGA ® a color de Sony. Antes de utilizar este manual, verifique el nfimero de modelo situado en la parte posterior del televisor o en la portada de este manual. Caracteristicas del televisor FD Trinitron WEGA® Algunas de las caracterlsficas de las cuales FD Trinitron CRT PLANO -- Nueva de imagen 6prima.
Manual de instrucciones Baterias para el control remoto Inserte dos baterias de tipo AA (R6) (inclufdas) siguiente ilustraci6n. en el control remoto utilizando como ejemplo la En condiciones de uso normales, las baterias tienen una duraci6n mSxima de seis meses. Si el control remoto no funciona correctamente, es posible que las baterias est_n gastadas. _:_ Si no va a utilizar el control remoto durante un largo tiempo, extraiga las baterias para evitar posibles da6os por fugas de las mismas.
Conexi6n del televisor Lea este capitulo antes las conexiones b_sicas, de instalar el televisor por primera vez. Este capitulo hace referencia asf como a cualquier otro equipo opcional que conecte. Panel posterior del televisor VIDEO IN 3 [] VHF/UHF Toma Descripci6n [] Establece S VIDEO una conexi6n con la toma S VIDEO OUT (salida de S video) de la videograbadora o de otto equipo de video con S VIDEO.
Manual de instrucciones Conexiones b sicas Televisor con antena interior Dependiendo o exterior del cable de que disponga, elija una de las siguientes A S61oVHF75ohm o o cable CATV Cablecoaxial conexiones: (Parteposteriordel televisor) VHF/UHF VHF/UHF O Cable B S61oVHF 300ohm o Cableduplex (Parteposteriordel televisor) VHF/UHF oS61° .
Conexi6n del televisor Conexi6n de equipo adicional Televisor y videograbadora Parte posterior del televisor VIDEO IN 3 VIHF_JHF Videograbadora OUT SVtDEO AUDIOR AUOIOL VIDEO Desde cable/ antena _ ideo (amarillo) Audio izquierdo (blanco) Audio derecho (rojo) f Conexi6n opcional ._ 1 Para ver programas de video desde la videograbadora, sintonice el televisor en los canales 3 6 4 (como se indica en la parte posterior de la videograbadora).
Manual de instrucciones Televisor y caja de cable Caja de cable Desde Cable 1 OUT IN tCable coaxial 2 Parte posterior televisor del , vi°E°'_" j )7 Y -_ I ®=,o 1 Conecte el cable coaxial 2 Conecte un cable coaxial VHF/UHF del servicio (no inclufdo) de cable a la toma de la toma IN de la caja de cable. OUT de la caja de cable a la toma del televisor.
Conexi6n Televisor. videograbadora del televisor y caja de cable Parte posterior del televisor 3 1 VIDEO IN -S VIDEO 3 "dHFIUHF VIDEO- _ Videograbadora L-- Au9_o R-- _UDIO --R ____Video(amarillo) Audioizquierdo(blanco) -- Audioderecho(rojo) Caja de c:ble_ f Conexi6n opcional IN 1 Conecte 2 Conecte un cable coaxial de la videograbadora. (no incluido) desde la toma OUT de la caja de cable a la toma 3 Conecte un cable coaxial VHF/UHF del televisor.
Manual de instrucciones Televisor y receptor de sat_lite Desde cable/ antena Parte posterior VIDEO 2 1 del televisor IN 3 -S VIDEO VHF/UHF Receptor 1_ de sat_lite VHF_HF mmm_JLklT_ _SATE IN Cable de antena l por sat_lite AUDIO R AUDIO L VIDEO [ I UNE OUTI -- AUDIO --R OUT _@_ T 1 T 1 Conecte sat_lite.
Conexi6n del televisor Televisor, receptor de sat_lite y videograbadora Cable de antena pot satdlite Parte posterior televisor Desde cable/ antena 4 VIDEO del IN Videograbadora VHF_HF _O1 AUDtO Receptor de satdlite _ ._ AUDIO I Audioderecho(rojo) 1 2 3 Conecte sat_lite. el cable de la antena Conecte el cable coaxial Conecte la toma un cable coaxial 4 5 -_ por sat61ite a la entrada del servicio de cable o antena OUT de la videograbadora (no incluldo).
Manual de instrucciones Conexi6n de un reproductor de DVD Conecte VIDEO las salidas AUDIO y VIDEO OUT del reproductor IN del televisor mediante los cables de Audio/Video Parte posterior Parte posterior del reproductor de DVD 1 VIDEO DVD alas entradas (no incluldos). AUDIO y del televisor IN @ L_ AUDIO Video (amarillo) Audio izquierdo (blanco) Audio derecho (rojo) Para obtener una mejor calidad de imagen, utilice S VIDEO en lugar del cable amarillo de audio/video.
Conexi6n del televisor Conexi6n de una c_mara de video Conecte VIDEO las salidas AUDIO INPUT del televisor y VIDEO mediante OUT de la c4mara de video los cables de Audio/Video Panel de Audio/Video alas entradas (no incluldos). AUDIO y frontal u ('_ VIDEO 2 INPUT ['-- Audio derecho (rojo) Salida de Auc ':_^^ Audio izquierdo (blanco) Video (amarillo) \ Conexibn de audifonos Conecte los audifonos a la toma _ situada en la parte frontal Panel de Audio/Video frontal VIDEO 2 INPUT 0_.
Uso del control remoto y funciones b_sicas Este capftulo pantalla. muestra c6mo utilizar todos los botones SLEEP del control remoto y los menfs [] [] [] [] [] [] [] [] [_. [_.
Manual de instrucciones Uso del control remoto Bot6n Descripci6n [] MUTING Desactiva el sonido de forma instant_nea. Oprlmalo de nuevo _3L u oprima [] SLEEP Apaga _ para restaurar autom_iticamente 45, 60 6 90 minutos. SLEEP OFF. [] MTS/SAP el sonido. el televisor Para cancelar, Muestra las distintas opciones (MTS): Est_reo, Mono, y Auto Audio).
Uso del control Programaci6n autom tica Cuando haya terminado Autoprogramaci6n. de conectar remoto y funciones b_sicas del televisor el televisor, puede ajustar los canales mediante FOWER 1 Oprima Para _ para encender KV-21FS100 el televisor. y KV-25FS100 Aparecer_ con destino la pantalla a Argentina: de Ajustes Oprima _,_ Iniciales. antes de oprimir I_NER para encender el televisor.
Manual de instrucciones Acceso r_pido a los men_s Los ajustes Mend siguientes est_n disponibles en los men_s de pantalla. Permite Modificar Cambiar los ajustes el ajuste Personalizar Bloquear de la imagen. de audio. el ajuste los canales de los canales. no deseados.
Uso del control Mend remoto y funciones b_sicas Permite Ajustar el reloj del televisor y programar encendido y apagado autom_tico televisor en un canal establecido Timer 1 y Timer Seleccionar etiquetar 2 (Reloj los modos las entradas el del mediante I y Reloj 2). de subfftulos, de video, corregir inclinaci6n de la imagen, seleccionar idioma de los men6s o ejecutar una demostraci6n de los menfis.
Uso de los men s Este capftulo muestra las opciones disponibles para configurar y ajustar el televisor. Para accesar a un men_ 1 Oprima 2 Utilice los botones Utilice los botones MENU para que aparezca el men_ de pantalla. _ o c_ para seleccionar el men6 _' o _ para seleccionar la opci6n 4 Siga las indicaciones que aparecen C!D para terminar el ajuste. 5 Oprima _u en pantalla deseado deseada para activar y despues y despues las opciones oprima oprima deseadas. CE3. CD.
Manual de instrucciones Uso del ment de Video Para accesar al mend Video, siga los siguientes pasos: Para seleccionar Paramostrar MENU Control Imagen de de Oprima _> para Contraste: abrir Oprima <_ para contraste. Brillo: disminuir el contraste. Oprima oscurecer la imagen. _ para el metal Control de Imagen: Oprima Oprima _> para aumentar q>para aumentar el el brillo de la imagen. Color: Oprima _ para disminuir la intensidad aumentar la intensidad de color.
Uso de los ment_s Uso del men Para accesar Audio al men_ Audio, Para mostrar Para seleccionar _ MENU pasos : Para seleccionar .% MTS Sonido multicanal del televisor Oprima Realce graves siga los siguientes de Oprima _ o @ para seleccionar una de las siguientes opciones: Est4reo: Seleccione esta opci6n cuando visualice una emisi6n en est_reo. Mono: Seleccione esta opci6n para reducir el ruido en zonas de diflcil recepci6n.
Manual de instrucciones Uso del men Para accesar Para mostrar Ajuste de Canal al menfi Ajuste de Canal, siga los siguientes Para seleccionar [_ pasos: Para seleccionar MENU Canales Favoritos Oprima Acceso r_pido a los canales ajustar un canal favorito. A continuaci6n oprima c_. 2 Utilice el bot6n ff o _ para seleccionar el canal deseado. 30prima c2D para cambiar al canal seleccionado.
Uso de los mentis Omitir/A_adir Canal Utilice esta funci6n canales no deseados men_ Omitir/A_adir despu_s de ejecutar o para a_adir Canal: 1 Utilice los botones ff o _" para a continuaci6n oprima cz). 20prima oprima 30prima Autoprogramaci6n nuevos canales. seleccionar Oprima la posici6n Nombre Canal omitir los _> para del canal abrir el deseado el bot6n _ o _ para omitir o afladir canales y a continuaci6n CZ). .
Manual de instrucciones Uso del men Para accesar Para mostrar Bloqueo de Canal al mentl Bloqueo de Canal, siga los siguientes Para seleccionar _ MENU pasos: Para seleccionar °% Cuando entre al ment_ BIoqueo de Canal, el canal seleccionado visualizando. Con el menfi Bloquear o Desbloquear Bloqueo de Canal abierto: 1 Utilice los botones continuaci6n _ o _" para oprima C_ para elegir es el canal que est_ el canal deseado seleccionarlo.
Uso de los menGs Uso del men Para accesar Para mostrar al mend Timer (Reloj) Q Timer (Reloj), Para seleccionar _ siga los siguientes pasos: Para seleccionar MENU Hora Actual Muestra Actual. el dla y la hora actual. (9prima <> para 1 Utilice los botones _ o _ para introducir continuaci6n oprima C!3. 20prima _ para salir del men6. abrir el dlay el men_ la hora de Hora correcta y a Debe ajustar la hora actual antes de poder utilizar Timer 1 y Timer 2 (Reloj 1 y Reloj 2).
Manual de instrucciones Uso del men,', Ajustes Para accesar Para mostrar al metal Ajustes, siga los siguientes Para seleccionar i1_ pasos: Para seleccionar .% MENU Caption Vision Permite seleccionar con subtltulos). tres modos Subtitulos Oprima ff o _ para seleccionar una de las siguientes opciones: CC1, 2, 3, 4: Muestra el di_logo impreso y los efectos de sonido programa. Text1, 2, 3, 4: Muestra de subtitulos informaci6n sobre XDS: Muestra el nombre del programa disponible.
Informaci6n adicional Soluci6n de problemas Si tiene problemas con el televisor, intente seguir las indicaciones continuaci6n. Si el problema persiste, consulte con su proveedor No hay imagen ni sonido que se sugieren a Sony m_s cercano. _ Aseg6rese _ Si hay una luz roja que parpadea en la parte frontal del televisor durante algunos minutos, desconecte y vuelva a conectar el cable de alimentaci6n para restaurar el televisor. Si el problema persiste, llame al servicio t_cnico local.
Manual de instrucciones No se reciben canales con un ndmero alto (UHF) cuando se utiliza una antena Las emisoras del cable parece que no funcionan El control remoto no funciona El televisor sucio est_ Ha perdido el control remoto Si despuds Asegtirese de que Cable esta en la posici6n de Canal (p_gina 22). Ejecute Autoprogramaci6n no est6n en la memoria _1 A_g6rese de Canal de que Cable (p_gina 22).
Informaci6n adicional Especificaciones Para todos los modelos (excepto los indicados) Sistema de televisi6n Cobertura de canales Est_indar de televisi6n arnericana/NTSC (KV-21FS100, KV-25FS100) PAL-M/PAL-N/NTSC (KV-21FS100, KV-25FS100, con destino a Argentina) VHF: 2-13/UHF: 14-69/CATV: 1-125 A__!en a ....................................... Tubo de imagen _Te_ inal d.e antena.
indice alfab6tico A Autoprogramaci6n Auto SAP 21 15, Instalaci6n de baterias 2 Interruptor MAIN POWER (Alimentaci6n principal)2 22 M B Bloquear o desbloquear Brillo 20 Mends 24 Ajuste de Canal Ajustes _ 26 Audio _ 21 C Cable 22 Canales Favoritos 22 Caption Vision 26 Caracteristicas del televisor 1 Color 20 Conexiones Cable y antena 4 Conexi6n de audffonos 11 Conexi6n de una c6mara de video 11 Conexi6n de un reproductor de DVD 10 Televisor y caja de cable 6 Televisor y receptor de sat_lite 8 Televis
Sony Corporation Printed in U,S.