Connecting Additional Equipment 4-086-340-22 Operating Instructions KV-13FS100 KV-13FS110 KV-20FS100 KV-24FS100 © 2002 by Sony Corporation
User Guide
Connecting Additional Equipment WARNING To reduce the risk of fire or electric shock, do not expose the TV to rain or moisture. CAUTION RISK OF ELECTRIC SHOCK DO NOT OPEN ATTENTION RISQUE DE CHOC ELECTRIQUE, NE PAS OUVRIR PRECAUCION RIESGO DE CHOQUE ELECTRICO NO ABRIR CAUTION: TO REDUCE THE RISK OF ELECTRIC SHOCK, DO NOT REMOVE COVER (OR BACK). NO USER-SERVICEABLE PARTS INSIDE. REFER SERVICING TO QUALIFIED SERVICE PERSONNEL.
User Guide You are cautioned that any changes or modifications not expressly approved in this manual could void your authority to operate this equipment. NOTIFICATION This equipment has been tested and found to comply with the limits for a Class B digital device pursuant to Part 15 of the FCC Rules. These limits are designed to provide reasonable protection against harmful interference in a residential installation.
Connecting Additional Equipment IMPORTANT SAFEGUARDS For your protection, please read these instructions completely, and keep this manual for future reference. Carefully observe and comply with all warnings, cautions and instructions placed on the set, or described in the operating instructions or service manual. WARNING To guard against injury, the following basic safety precautions should be observed in the installation, use, and servicing of the set.
User Guide Overloading Do not overload wall outlets, extension cords or convenience receptacles beyond their capacity, since this can result in fire or electric shock. Always turn the set off when it is not to be used. When the set is left unattended and unused for long periods of time, unplug it from the wall outlet as a precaution against the possibility of an internal malfunction that could create a fire hazard. Do not disconnect the antenna or the power cord during a heavy storm.
Connecting Additional Equipment Accessories Do not place the set on an unstable cart, stand, tripod, bracket, table, or shelf. The set may fall, causing serious injury to a child or an adult, and serious damage to the set. Use only a cart or stand recommended by the manufacturer for the specific model of TV. Any mounting of the product should follow the manufacturer’s instructions, and should use a mounting accessory recommended by the manufacturer.
User Guide Grounding or Polarization This set may be equipped with a polarized alternating current line plug (a plug having one blade wider than other). This plug will fit into the power outlet only one way. This is a safety feature. If you are unable to insert the plug fully into the outlet, try reversing the plug. If the plug still fails to fit, contact your electrician to replace your obsolete outlet. Do not defeat the safety purpose of the polarized plug.
Connecting Additional Equipment Service Damage Requiring Service Unplug the set from the wall outlet and refer servicing to qualified service personnel under the following conditions: • When the power cord or plug is damaged or frayed. • When the set exhibits a distinct change in performance — this indicates a need for service. Servicing Do not attempt to service the set yourself since opening the cabinet may expose you to dangerous voltage or other hazards.
User Guide
Contents Introduction ® Introducing the FD Trinitron WEGA Features.................................................1 Batteries for the Remote Control ..........................................................................2 About this Manual ..................................................................................................2 Front Panel Menu Controls ...................................................................................2 Connecting Your TV TV Rear Panel ......................
User Guide
Introduction ® Congratulations on your purchase of the Sony FD Trinitron WEGA . Before you begin using this manual, please check the model number located on the rear of your TV or on the front cover of this manual. ® Introducing the FD Trinitron WEGA Features Some of the features you will enjoy include: FD Trinitron FLAT CRT — Technologically advanced tube delivers a picture with uncompromising accuracy and outstanding image detail.
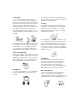
Operating Instructions Batteries for the Remote Control Insert two AA (R6) batteries (supplied) into the remote control using the following illustration as a guide. Under normal conditions, batteries will last up to six months. If the remote control does not operate properly, the batteries might be worn out. If you will not be using the remote control for an extended period of time, remove the batteries to avoid possible damage from battery leakage.
Connecting Your TV Read this section before setting up your TV for the first time. This section covers basic connections in addition to any optional equipment you may be connecting. TV Rear Panel 1 2 4 3 Jack Description 1 S VIDEO Connects to the S VIDEO OUT jack on your VCR or other video equipment that has S VIDEO. S VIDEO provides better picture quality than the VHF/UHF jacks or the video input jack. S VIDEO does not provide sound; the audio cables must still be connected.
Operating Instructions Basic Connections TV with indoor or outdoor antenna, or CATV cable Depending on the cable available in your home, choose one of the connections below: If you are connecting to an indoor or outdoor antenna, you may need to adjust the orientation of the antenna for best reception.
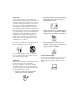
Connecting Your TV Connecting Additional Equipment TV and VCR Rear of TV 2 1 VCR Video (yellow) Audio L (white) Audio R (red) From cable/ antenna Optional connection To watch video programs from your VCR, tune your TV to channel 3 or 4 (as set on the rear of your VCR). 1 Connect the coaxial cable from your TV antenna or cable service to the IN jack on your VCR. 2 Connect a coaxial cable (not supplied) from the OUT jack on your VCR to the VHF/UHF jack on the TV.
Operating Instructions TV and Cable Box Cable Box 1 From cable 2 Coaxial Cable Rear of TV 1 2 Connect the coaxial cable from your cable service to the IN jack on your cable box. Connect a coaxial cable (not supplied) from the OUT jack on your cable box to the VHF/UHF jack on the TV. To view channels from your cable box, tune your TV to channel 3 or 4 (as set on the rear panel of your cable box) and use the cable box’s remote control to change channels.
Connecting Your TV TV, VCR, and Cable Box Rear of TV 3 VCR Video (yellow) Audio L (white) Audio R (red) 2 Cable Box 1 Optional connection From cable 1 2 Connect the coaxial cable from your cable service to the IN jack on your cable box. 3 Connect a coaxial cable (not supplied) from the OUT jack on your VCR to the VHF/UHF jack on the TV. Connect a coaxial cable (not supplied) from the OUT jack on your cable box to the IN jack on your VCR.
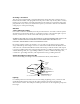
Operating Instructions TV and Satellite Receiver From cable/ antenna Rear of TV 2 1 Satellite Receiver Satellite antenna cable Video (yellow) Audio L (white) Audio R (red) 3 1 2 Connect the cable from your satellite antenna to SATELLITE IN on your satellite receiver. 3 Using Audio/Video cables (not supplied), connect AUDIO and VIDEO OUT on your satellite receiver to AUDIO and VIDEO IN on your TV. Connect the coaxial cable from your cable service or antenna to the VHF/UHF jack on your TV.
Connecting Your TV TV, Satellite Receiver, and VCR Satellite antenna cable From cable/ antenna 4 1 Rear of TV 2 VCR Satellite Receiver 3 Video (yellow) Audio L (white) Audio R (red) 5 1 2 3 Connect the cable from your satellite antenna to SATELLITE IN on the satellite receiver. 4 Using Audio/Video cables (not supplied), connect AUDIO and VIDEO OUT on your satellite receiver to AUDIO and VIDEO IN on your VCR.
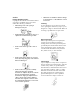
Operating Instructions Connecting a DVD Player Using Audio/Video cables (not supplied), connect AUDIO and VIDEO OUT on your DVD player to AUDIO and VIDEO IN on your TV. Rear of TV Rear of DVD Player Video (yellow) Audio L (white) Audio R (red) For better picture quality, use S VIDEO instead of the yellow Audio/ Video cable. S VIDEO does not provide sound; the audio cables must still be connected.
Connecting Your TV Connecting a Camcorder Using Audio/Video cables (not supplied), connect AUDIO and VIDEO OUT on your camcorder to AUDIO and VIDEO IN on your TV. Front A/V Panel F F Audio R (red) Audio L (white) Video (yellow) A/V output Connecting Headphones Connect the headphones to the jack on the front of your TV. Headphone jack is STEREO.
Using the Remote Control and Basic Functions This section shows you how to use the buttons on the remote control and how to navigate the on-screen menus.
Using the Remote Control and Basic Functions Using the Remote Control Button Description 1 MUTING Instantly turns off the sound. Press again or press the sound. 2 SLEEP Turns the TV off automatically in approximately 15, 30, 45, 60, or 90 minutes. Cancel by pressing until SLEEP OFF appears. 3 MTS/SAP Cycles through the Multi-channel TV Sound (MTS) options: Stereo, Mono, and Auto SAP (Second Audio Program). 4 JUMP Press to jump back and forth between two channels.
Operating Instructions Setting Up the TV Automatically After you have finished connecting your TV, you can perform Auto Program to set up your channels. 1 Press to turn on the TV. The Initial Setup screen appears. Initial Setup First please connect cable / antenna [CH+] [CH–] Auto Program Exit 2 Press press on the remote control or on the TV front panel to perform Auto Program, or to exit. The Initial Setup screen appears each time you turn on the TV until you perform Auto Program.
Using the Remote Control and Basic Functions Quick Start to the Menus The following settings are available in your on-screen menus: Menu Allows you to Make adjustments to your picture settings. Video Picture Controls Color Temp. : Neutral VM : Low Move Select End Change your audio settings. Audio MTS : Stereo Move Select End Customize your channel settings.
Operating Instructions Menu Allows you to Set the clock on your TV and program scheduled viewing using Timer 1 and Timer 2. Timer Timer 1 : Set Timer 2 : Set Current Time Move Select End Select closed captioning options, label video inputs, adjust tilt correction, select menu languages, or run a demo of the menus.
Using the Menus This section shows the options available for setting up and adjusting your TV. To Access a Menu 1 2 3 4 Press 5 Press to display the on-screen menu. Use the G or g buttons to highlight the desired menu, then press Use the F or f buttons to highlight the desired option, then press . . Press to complete the adjustment or follow the instructions that will appear on your screen to activate the desired option. to exit the menu.
Operating Instructions Using the Video Menu To access the Video menu, refer to the following steps: To Display To Select Video MENU Picture Controls Color Temp. : Neutral VM : Low Move Select End Picture Controls Press g to open Picture Controls menu: Picture: Press G to decrease the contrast. Press g to increase contrast. Brightness: Press G to darken the picture. Press g to brighten the picture. Color: Press G to decrease color saturation. Press g to increase color saturation.
Using the Menus Using the Audio Menu To access the Audio menu, refer to the following steps: To Display To Highlight To Select Audio MENU MTS : Stereo Move MTS Multi-Channel TV Sound Press Select End Press F or f to select one of the following options: Stereo: Select when viewing a broadcast in stereo. Mono: Select to reduce noise in areas of poor reception. Auto SAP: Select to have the TV automatically switch to a Second Audio Program (SAP) when a signal is received.
Operating Instructions Using the Channel Setup Menu To access the Channel Setup menu, refer to the following steps: To Display To Highlight To Select Channel Setup Favorite Channels Cable : On Channel Fix : Off Auto Program Channel Skip/Add Channel Label Move Select MENU Favorite Channels Quick access to favorite channels Press g to open the Favorite Channels menu: 1 Use the F or f buttons to select the position (1-5) where you want to set a favorite channel, then press .
Using the Menus Channel Skip/Add Use this feature after you run Auto Program to skip unwanted channels or add new ones. Press g to open the Channel Skip/Add menu: 1 Use the F or f buttons to select the position of the desired channel, then press . . 2 Use the F or f buttons to select Skip or Add, then press to exit. 3 Press G to return to the Channel Setup menu or press Pressing CH+ or CH- will skip over channels that have been skipped.
Operating Instructions Parental Control The Parental Control feature is designed to help parents monitor what their children watch on television. This section shows you the different rating systems available and how to set your TV’s rating limit. Overview of the Ratings Once you have become familiar with these rating systems, you should be ready to set your TV’s rating limit. Movie Rating (U.S. models only) This system defines the rating levels of movies shown in theaters and on prime cable channels.
Using the Menus TV Rating (U.S. models only) The TV rating is divided into two groups: age-based and content-based.
Operating Instructions English Rating (Canadian models only) These ratings are for Canadian programs that are broadcast in English. Rating Defined as C Children C8+ Children 8 years and older G General programming PG Parental Guidance 14+ Viewers 14 and older 18+ Adult programming English Rating C: C8+ : G: PG : 14+ : 18+ : Press Move Return to block Select Select MENU End French Rating (Canadian models only) These ratings are for Canadian programs that are broadcast in French.
Using the Menus Using the Parental Control Menu To access the Parental Control menu, refer to the following steps: To Display To Select To Highlight Parental Control MENU Password : Use [0-9] buttons to enter new password Move Select End In the Parental Control menu, you will be asked to set a 4-digit password for any further access into Parental Control. 1 Press , then use the 0 9 buttons to enter a 4-digit password. Keep this manual in a safe place.
Operating Instructions Setting the Rating You can change the Rating by selecting one of the Lock options. Parental Control Lock : Off Change Password Country : U.S.A. Turn Parental Lock Off Move Select 1 With Lock highlighted, press End . If you are not familiar with the Parental Guidelines rating system, use one of the following preselected categories to simplify the rating selections: Child, Youth, Young Adult. 2 Use the F or f buttons to select the desired rating, then press .
Using the Menus Using the Custom Menu Before setting Custom ratings, see pages 22-24, “Overview of the Ratings,” for a description of the available rating systems. Follow the instructions on the screen to make your custom settings. Select the country desired for your TV’s rating limit. See page 23 for U.S. models and page 24 for Canadian models for more information. Once you have blocked a rating or content, all higher ratings or content will be automatically blocked.
Operating Instructions Using the Timer Menu To access the Timer menu, refer to the following steps: To Display MENU To Highlight To Select Timer Timer 1 : Set Timer 2 : Set Current Time Move Current Time Select Set your TV to the current day and time. Press g to open Current Time menu: 1 Use the F or f button to enter the day and time, then press 2 Press to exit the menu. End . You must set the Current Time before you can use Timer 1 and Timer 2.
Using the Menus Using the Setup Menu To access the Setup menu, refer to the following steps: To Display To Highlight To Select MENU Setup Caption Vision : Off Video Label Tilt Correction Language : English Demo Move End Select Caption Vision ClosedCaptioning Allows you to select from three closed caption modes (for programs that are broadcast with closed caption). Press F or f to select one of the following options: CC1, 2, 3, 4: Displays printed dialogue and sound effects of a program.
Other Information Troubleshooting If you are having a problem with your TV, try the suggestions below. If the problem persists, contact your nearest Sony Dealer. No picture, no sound Poor or no picture, good sound Good picture, no sound No color Only snow appears on the screen Dotted lines or stripes Double images or ghosts Make sure the power cord is plugged in.
Operating Instructions Cannot receive higher number channels (UHF) when using an antenna Cable stations don’t seem to work Remote control does not operate The TV needs to be cleaned Lost password for Parental Control You lost your remote control Make sure Cable is set to Off in the Channel Setup menu (page 20). Perform Auto Program to add channels that are not presently in the memory (page 14). Make sure Cable is set to On in the Channel Setup menu (page 20).
Other Information Specifications For all models (except as noted) Television system Channel coverage Antenna Picture tube Power requirements Supplied Accessories Optional Accessories KV-13FS100, KV-13FS110 Screen size Inputs/outputs Speaker output Power Consumption American TV standard/NTSC VHF: 2-13/UHF: 14-69/CATV: 1-125 75-ohm external antenna terminal for VHF/UHF FD Trinitron® tube 120V, 60 Hz Size AA (R6) batteries (2) Remote Control RM-Y173 (1) Connecting cables VMC-810S/820S, VMC-720M, YC-YC-15V/
Operating Instructions KV-24FS100 Screen size Inputs/outputs Speaker output Power Consumption Visible screen size: 24 inches (610 mm) measured diagonally Actual screen size: 25 inches (635 mm) measured diagonally 2 video, 2 audio 1 S VIDEO 1 Y, PB, PR, 1 audio 1 headphone jack 7.5 W x 2 145 W in use 1 W in standby Dimensions (W/H/D) 704 x 524 x 472 mm (27 3/4 x 20 5/8 x 18 1/2 in.) Mass 35 kg (77 lbs. 1oz.) Design and specifications are subject to change without notice.
Index Video 18 Mono 19 MTS Auto SAP 19 Mono 19 Stereo 19 A Audio Menu 19 Auto Program 14, 20 Auto SAP 19 B Battery Installation 2 Brightness 18 P Parental Control 22 Parental Control menu 25 Picture 18 Picture Controls 18 Brightness 18 Color 18 Hue 18 Picture 18 Sharpness 18 C Cable 20 Caption Vision 29 Channel Fix 20 Channel Label 21 Channel Setup Menu 20 Channel Skip/Add 21 Color 18 Connections Cable and Antenna 4 Connecting a Camcorder 11 Connecting a DVD Player 10 Connecting Headphones 11 TV and Cab
User Guide Sony Corporation Printed in U.S.A.