
Operating Instructions


15
EN
Recording on MDs
•
•
•
•
•
•
•
•
•
•
•
p
·∏
•
•
•
•
•
•
•
r
)
0
§
=
+
TIMER
p
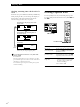
Recording on an MD Using a
Timer
By connecting a timer (not supplied) to the deck, you
can start and stop recording operations at specified
times. For further information on connecting the timer
and setting the starting and ending times, refer to the
instructions that came with the timer.
1 Do Steps 1 to 7 in “Recording on an MD” on pages
6 and 7.
2 • If you want to specify the time for the start of
recording, press p.
• If you want to specify the time for the end of
recording, do Steps 8 and 9 of “Recording on an
MD” on page 7.
• If you want to specify the time for both start and
end of recording, press p.
3 Set TIMER on the deck to REC.
4 Set the timer as required.
• When you have set the time for the start of
recording, the deck turns off. When the
specified time arrives, the deck turns on and
starts recording.
• When you have set the time for the end of
recording, recording continues. When the
specified time arrives, the deck stops recording
and turns off.
• When you have set the time for both the start
and end of recording, the deck turns off. When
the starting time arrives, the deck turns on and
starts recording. When the ending time arrives,
the deck stops recording and turns off.
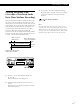
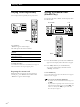
Synchro-Recording a Tape and
Radio Program Z
By using the MUSIC SYNC button on the remote, you
can automatically start recording in sync with the
signal input from the program source through the
LINE (ANALOG) IN jacks (Music Synchro-Recording).
The method of marking track numbers differs,
depending on the program source being recorded and
how the deck is connected to the program source. (See
“Notes on Recording” on page 9.)
1 Do Steps 1 to 5 in “Recording on an MD” on page
6.
2 Press MUSIC SYNC.
The deck changes to recording pause.
3 Start playing the program source you want to
record.
The deck starts recording automatically.
To stop Music Synchro-Recording
Press p.
Notes
• You can also use this procedure for synchro-recording
digital audio from other equipment connected to the
DIGITAL IN connector.
• When Music Synchro-Recording, the Smart Space
Function and the Auto Cut Function turn on automatically
regardless of their setting (on or off) and type of input
(digital or analog).
(Continued)
)0P
+
=
p
·
·ª
·ª
◊
·
)0P
+
=
p
√
MUSIC SYNC