4-489-692-13(2) Bluetooth® Audio System Owner’s Record The model and serial numbers are located on the bottom of the unit. Record these numbers in the spaces provided below. Refer to these numbers whenever you call upon your Sony dealer regarding this product. Model No. Serial No. To cancel the demonstration (DEMO) display, see page 18. Para cancelar la pantalla de demostración (DEMO), consulte la página 19.
Be sure to install this unit in the dashboard of the car for safety. For installation and connections, see the supplied installation/connections manual. The nameplate indicating operating voltage, etc., is located on the bottom of the chassis. Warning This equipment has been tested and found to comply with the limits for a Class B digital device, pursuant to Part 15 of the FCC Rules. These limits are designed to provide reasonable protection against harmful interference in a residential installation.
Notes on BLUETOOTH function Caution IN NO EVENT SHALL SONY BE LIABLE FOR ANY INCIDENTAL, INDIRECT OR CONSEQUENTIAL DAMAGES OR OTHER DAMAGES INCLUDING, WITHOUT LIMITATION, LOSS OF PROFITS, LOSS OF REVENUE, LOSS OF DATA, LOSS OF USE OF THE PRODUCT OR ANY ASSOCIATED EQUIPMENT, DOWNTIME, AND PURCHASER’S TIME RELATED TO OR ARISING OUT OF THE USE OF THIS PRODUCT, ITS HARDWARE AND/OR ITS SOFTWARE.
Table of Contents Warning . . . . . . . . . . . . . . . . . . . . . . . . . . . . . . . . . . . 2 Guide to Parts and Controls . . . . . . . . . . . . . . . . . . . 5 Getting Started Detaching the Front Panel . . . . . . . . . . . . . . . . . . . . Setting the Clock . . . . . . . . . . . . . . . . . . . . . . . . . . . . Preparing a BLUETOOTH Device. . . . . . . . . . . . . . . . Connecting an iPod/USB Device . . . . . . . . . . . . . . . Connecting Other Portable Audio Device . . . . . . . .
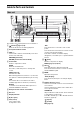
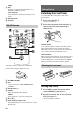
Guide to Parts and Controls Main unit The number 3/ (repeat) button has a tactile dot. -OFF Press and hold for 1 second to turn off the power. Press and hold for more than 2 seconds to turn off the power and the display. If the unit is turned off and the display disappears, it is unable you to operate with the remote. (browse) (page 13, 14) Enter the browse mode during playback. Front panel release button SEEK +/– Tune in radio stations automatically. Press and hold to tune manually.
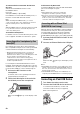
PAUSE TAG Retrieve song information broadcast on a SiriusXM or HD Radio station. -CAT (category) Press and hold to enter the category browse mode. AUX input jack USB port RM-X231 Remote Getting Started Detaching the Front Panel You can detach the front panel of this unit to prevent theft. 1 Press and hold OFF . The unit is turned off. 2 Press the front panel release button , then remove the panel by pulling it towards you.
3 Rotate the control dial to set the hour and minute. 5 To move the digital indication, press SEEK +/–. 4 If passkey* input is required on the BLUETOOTH device, input [0000]. * Passkey may be called “Passcode,” “PIN code,” “PIN number” or “Password,” etc., depending on the device. After setting the minute, press MENU. The setup is complete and the clock starts. To display the clock, press DSPL.
To connect the last-connected device from this unit Activate the BLUETOOTH function on the BLUETOOTH device. Press SRC. Select [BT PHONE] or [BT AUDIO]. Press ENTER to connect with the cellular phone, or PAUSE to connect with the audio device. Note While streaming BLUETOOTH audio, you cannot connect from this unit to the cellular phone. Connect from the cellular phone to this unit instead.
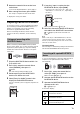
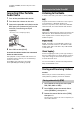
For MEX-GS810BH, the rear USB port is also available. Listening to the Radio/SiriusXM Connecting Other Portable Audio Device 1 2 3 To listen to the radio, press SRC to select [TUNER]. Turn off the portable audio device. Turn down the volume on the unit. Connect the portable audio device to the AUX input jack (stereo mini jack) on the unit with a connecting cord (not supplied)*. * Be sure to use a straight type plug.
Tuning 1 Press MODE to change the band (FM1, FM2, FM3, AM1 or AM2). 2 Perform tuning. To tune manually Press and hold SEEK +/– to locate the approximate frequency, then press SEEK +/– repeatedly to fine adjust to the desired frequency. To tune automatically Press SEEK +/–. Scanning stops when the unit receives a station. Repeat this procedure until the desired station is received.
To receive the stored channel, press MODE to select [SX1], [SX2] or [SX3], then press a number button (1 to 6). 1 The TAG indicator lights up when song information is broadcast on a SiriusXM or HD Radio station. The TAG indicator blinks while retrieving and saving the song information. The song information is saved to the unit. To set a parental control The parental control feature allows you to limit access to SiriusXM channels with mature content.
To stop playback Press and hold OFF for 1 second. Playback Playing a Disc 1 Insert the disc (label side up). To remove the device Stop playback, then remove the device. Caution for iPhone When you connect an iPhone via USB, phone call volume is controlled by the iPhone, not the unit. Do not inadvertently increase the volume on the unit during a call, as sudden loud sound may result when the call ends. Operating an iPod directly (Passenger control) Playback starts automatically.
Press MENU and rotate the control dial. Select [SOUND] [BTA VOL] (page 20). 4 Press ENTER to return to the QuickBrowZer mode. The selected item appears. Searching and Playing Tracks 5 Rotate the control dial to select the desired item, then press it. Playback starts. Repeat play and shuffle play 1 During playback, press (repeat) for Repeat play, or (shuffle) for Shuffle play. 2 Press (repeat) or (shuffle) repeatedly to select the desired play mode.
Listening to Pandora® Pandora® is available to stream music through your iPhone, Android™ and BlackBerry® phones. You can control Pandora® on a USB-connected iPhone or BLUETOOTH connected Android/BlackBerry phone from this unit. The Pandora® service is not available in some countries/regions. Available Operations in the Pandora® “Thumbs” feedback “Thumbs Up” or “Thumbs Down” feedback allows you to personalize stations. Thumbs Up During playback, press .
2 Handsfree Calling Rotate the control dial to select a name or phone number from the call history, then press it. The phone call starts. To use a cellular phone, connect it with this unit. For details, see “Preparing a BLUETOOTH Device” (page 7). Calling by phone number input 1 Press CALL, rotate the control dial to select [DIAL NUMBER], then press it. 2 Rotate the control dial to enter the phone number, and lastly select [ ] (space), then press ENTER*. The phone call starts.
Calling by voice tags You can make a call by saying the voice tag stored in a connected cellular phone that has a voice dialing function. 1 Press CALL, rotate the control dial to select [VOICE DIAL], then press it. Alternatively, press ENTER while the App Remote function is off. 2 Say the voice tag stored on the cellular phone. Your voice is recognized, and the call is made. To cancel voice dialing Press ENTER.
Establishing the App Remote connection 1 Connect iPhone to the USB port or Android phone with the BLUETOOTH function. 2 3 Launch the “App Remote” application. Press and hold APP on the unit for more than 2 seconds. Activating voice recognition (Android phone only) By registering applications, you can control an application by voice command. For details, refer to the help of the application. To activate voice recognition 1 2 Press ENTER to activate voice recognition.
Settings Canceling the DEMO Mode You can cancel the demonstration display which appears while this unit is turned off. 1 Press MENU, rotate the control dial to select [DISPLAY], then press it. 2 Rotate the control dial to select [DEMO], then press it. 3 Rotate the control dial to select [DEMOOFF], then press it. The setting is complete. 4 Press (back) twice. The display returns to normal reception/play mode. Basic Setting Operation You can set items in the menu to the following procedure.
POSITION (listening position) SET F/R POS (set front/rear position) Simulates a natural sound field by delaying the sound output from front/rear speaker to suit your position. FRONT L (): Front left FRONT R (): Front right FRONT (): Center front ALL (): In the center of your car CUSTOM: Position set by App Remote OFF: No position set ADJ POSITION* (adjust position) Fine-tunes the listening position setting. Adjustable range: [+3] – [CENTER] – [-3].
AUX VOL (AUX volume level) Adjusts the volume level for each connected auxiliary device: [+18 dB] – [0 dB] – [-8 dB]. This setting negates the need to adjust the volume level between sources. BTA VOL (BLUETOOTH audio volume level) Adjusts the volume level for each connected BLUETOOTH device: [+6 dB] – [0 dB] – [-6 dB]. This setting negates the need to adjust the volume level between sources. * Does not appear when [SET F/R POS] is set to [OFF].
Additional Information Precautions Cool off the unit beforehand if your car has been parked in direct sunlight. Do not leave the front panel or audio devices brought in inside the car, or it may cause malfunction due to high temperature in direct sunlight. Power antenna (aerial) extends automatically. Moisture condensation Should moisture condensation occur inside the unit, remove the disc and wait for about an hour for it to dry out; otherwise the unit will not operate properly.
“Made for iPod” and “Made for iPhone” mean that an electronic accessory has been designed to connect specifically to iPod or iPhone, respectively, and has been certified by the developer to meet Apple performance standards. Apple is not responsible for the operation of this device or its compliance with safety and regulatory standards. Please note that the use of this accessory with iPod or iPhone may affect wireless performance.
Maintenance Specifications Replacing the lithium battery of the remote commander AUDIO POWER SPECIFICATIONS When the battery becomes weak, the range of the remote commander becomes shorter. Replace the battery with a new CR2025 lithium battery. Use of any other battery may present a risk of fire or explosion. + side up Notes on the lithium battery Keep the lithium battery out of the reach of children. Should the battery be swallowed, immediately consult a doctor.
Frequency band: 2.4 GHz band (2.4000 – 2.4835 GHz) Modulation method: FHSS Compatible BLUETOOTH Profiles*2: A2DP (Advanced Audio Distribution Profile) 1.3 AVRCP (Audio Video Remote Control Profile) 1.5 HFP (Handsfree Profile) 1.
Troubleshooting The following checklist will help you remedy problems you may encounter with your unit. Before going through the checklist below, check the connection and operating procedures. For details on using the fuse and removing the unit from the dashboard, refer to the installation/ connections manual supplied with this unit. If the problem is not solved, visit the support site on the back cover. General No power is being supplied to the unit.
Application name is mismatched with the actual application in App Remote. Launch the application again from the “App Remote” application. NFC function One touch connection (NFC) is not possible. If the smartphone does not respond to the touching. Check that the NFC function of the smartphone is turned on. Move the N-Mark part of the smartphone closer to the N-Mark part on this unit. If the smartphone is in a case, remove it. NFC receiving sensitivity depends on the device.
Pairing failed due to time out. Depending on the connecting device, the time limit for pairing may be short. Try completing the pairing within the time. BLUETOOTH function cannot operate. Turn off the unit by pressing OFF for more than 2 seconds, then turn the unit on again. No sound is output from the car speakers during handsfree call. If the sound is output from the cellular phone, set the cellular phone to output the sound from the car speakers. Pandora® connection is not possible.
MEMORY BUSY This unit is storing data. Wait until storing has finished. NO DEV (no device) BLUETOOTH audio source is selected without a BLUETOOTH audio device connected. A BLUETOOTH audio device has been disconnected during a call. Be sure to connect a BLUETOOTH audio device. BLUETOOTH phone source is selected without a cellular phone connected. A cellular phone has been disconnected during a call. Be sure to connect a cellular phone. P EMPTY (preset number empty) The preset dial is empty.
NOT ALLOWED “Thumbs” feedback is not allowed. Wait until the commercial ends. Some functions, such as Shared Station, do not permit feedback. Wait until the next track begins, or select another station on the list. Bookmark is not allowed. Wait until the commercial ends. Select another track or station, then try it again. OPEN APP (open application) When connecting via the USB port. Pandora® does not launch. Launch the Pandora® application on the iPhone.
Verify that the SiriusXM magnetic mount antenna is mounted on a metal surface on the outside of the vehicle. Move the SiriusXM antenna away from any obstructions. Inspect the antenna cable for damage and kinks. Consult the SiriusXM Connect Vehicle Tuner installation manual for more information on antenna installation. Replace the antenna if the cable is damaged. SiriusXM products are available at your local car audio retailer or online at www.shop.siriusxm.
Asegúrese de instalar esta unidad en el tablero del automóvil por razones de seguridad. Para realizar la instalación y las conexiones, consulte el manual de instalación y conexiones suministrado. La placa de características que indica el voltaje de funcionamiento, etc., está situada en la parte inferior del chasis. PRECAUCIÓN El uso de instrumentos ópticos con este producto aumenta el riesgo de sufrir daños oculares. ADVERTENCIA: no ingiera las baterías, riesgo de quemaduras químicas.
Notas sobre la función BLUETOOTH Precaución SONY NO SERÁ RESPONSABLE DE NINGÚN DAÑO INCIDENTAL, INDIRECTO O DERIVADO NI DE OTROS DAÑOS QUE INCLUYEN, ENTRE OTROS, PÉRDIDA DE GANANCIAS, PÉRDIDA DE INGRESOS, PÉRDIDA DE DATOS, PÉRDIDA DE LA UTILIDAD DEL PRODUCTO O DE CUALQUIER EQUIPO RELACIONADO, TIEMPO DE INACTIVIDAD Y TIEMPO DEL COMPRADOR RELACIONADO CON LA UTILIZACIÓN DE ESTE PRODUCTO, SU HARDWARE Y SU SOFTWARE, O QUE RESULTE DE DICHA UTILIZACIÓN.
Tabla de contenidos Guía para las partes y los controles. . . . . . . . . . . . . 5 Procedimientos iniciales Extracción del panel frontal . . . . . . . . . . . . . . . . . . . 7 Ajuste del reloj. . . . . . . . . . . . . . . . . . . . . . . . . . . . . . 7 Preparación del dispositivo BLUETOOTH . . . . . . . . 7 Conexión de un dispositivo iPod/USB. . . . . . . . . . . 9 Conexión de otro dispositivo de audio portátil . . . . . . . . . . . . . . . . . . . . . . . . . . . . . . . .
Guía para las partes y los controles Unidad principal El botón con el número 3/ (repetir) tiene un punto sensible al tacto. (navegar) (página 14, 15) Para entrar al modo de navegación durante la reproducción. Botón de liberación del panel frontal SEEK +/– Para sintonizar emisoras de radio en forma automática. Manténgalo presionado para sintonizarlas en forma manual. / (anterior/siguiente) / (rebobinar/avanzar) Selector de control Gírelo para ajustar el volumen.
ALBUM / Para saltearse un álbum en el dispositivo de audio. Manténgalo apretado para saltear álbumes en forma continua. Presione para aprobar o para rechazar en Pandora® (página 15). (repetir) (reproducción aleatoria) MIC (página 17) PAUSE TAG Recupere la emisión de información de la canción en una estación SiriusXM o HD Radio. -CAT (categoría) Mantenga presionado para ingresar al modo de navegación de categoría.
Procedimientos iniciales Ajuste del reloj 1 Presione MENU, gire el selector de control para seleccionar [GENERAL] y, a continuación, presiónelo. 2 Gire el selector de control para seleccionar [CLOCK-ADJ] y, a continuación, presiónelo. Extracción del panel frontal Es posible extraer el panel frontal de la unidad para evitar que la roben. 1 Mantenga presionado OFF . La unidad se apagará.
2 Presione CALL, gire el selector de control para seleccionar [PAIRING] y, a continuación, presiónelo. parpadea. La unidad entrará en modo de espera de emparejamiento. 3 Realice el emparejamiento en el dispositivo BLUETOOTH para detectar esta unidad. 4 Seleccione [Sony Car Audio] que se muestra en la pantalla del dispositivo de BLUETOOTH. Conexión con un dispositivo BLUETOOTH emparejado Para utilizar un dispositivo emparejado, es necesaria la conexión con esta unidad.
Conectar con un smartphone a través de One touch (NFC) Al tocar el selector del control de la unidad con un smartphone compatible con NFC*, la unidad está emparejada y automáticamente conectada con el smartphone. * NFC (Transmisión de datos en proximidad) es una tecnología que permite la comunicación inalámbrica de corto rango entre varios dispositivos, como teléfonos móviles y etiquetas de IC.
Conexión de otro dispositivo de audio portátil 1 2 3 Apague el dispositivo de audio portátil. Escuchar la radio Baje el volumen de la unidad. Para escuchar una estación de radio, presione SRC para seleccionar [TUNER]. Conecte el dispositivo de audio portátil a la toma de entrada AUX (minitoma estéreo) en la unidad con un cable de conexión* (no suministrado). * Asegúrese de utilizar una clavija recta. 4 Escuchar la radio/SiriusXM Presione SRC para seleccionar [AUX].
Almacenamiento automático (BTM) 1 Presione MODE para cambiar la banda de radio (FM1, FM2, FM3, AM1 o AM2). 2 Presione MENU, gire el selector de control para seleccionar [GENERAL] y, a continuación, presiónelo. 3 Gire el selector de control para seleccionar [BTM] y, a continuación, presiónelo. La unidad almacena las emisoras en el orden de frecuencia en los botones numéricos. Sintonización 1 Presione MODE para cambiar la banda de radio (FM1, FM2, FM3, AM1 o AM2). 2 Realice la sintonización.
2 Gire el selector de control para seleccionar la categoría deseada y, a continuación, presiónelo. Para almacenar canales 1 Mientras recibe el canal que desea almacenar, mantenga presionado un botón numérico (de 1 a 6) hasta que aparezca [MEM]. Para recibir el canal guardado, presione MODE para seleccionar [SX1], [SX2] o [SX3], luego presione un botón numérico (de 1 a 6).
Para MEX-GS810BH, presione SRC para seleccionar [USB1] para el puerto USB frontal, [USB2] para el puerto USB en la parte posterior. Reproducción 2 Ajuste el volumen de esta unidad. Reproducción de un disco Para detener la reproducción 1 Mantenga presionado OFF por un segundo. Inserte el disco (con la etiqueta orientada hacia arriba). Para extraer el dispositivo Detenga la reproducción y extraiga el dispositivo.
Notas En función del dispositivo de audio, es posible que no se muestre en esta unidad cierta información como, por ejemplo, el título, el número de pista y la duración y el estado de la reproducción. Incluso si se cambia la fuente en la unidad, la reproducción de la señal del dispositivo de audio no se interrumpe. [BT AUDIO] no aparece en la pantalla mientras se ejecuta la aplicación “App Remote” mediante la función BLUETOOTH.
Al activar la función BLUETOOTH Escuchar Pandora® Pandora® se encuentra disponible para transmitir música a través de su teléfono iPhone, Android™ y BlackBerry®. Puede controlar Pandora® en un iPhone conectado por USB o un teléfono Android/ BlackBerry conectado por BLUETOOTH desde esta unidad. El servicio Pandora® no se encuentra disponible en algunos países/algunas regiones. Puede ajustar el nivel de volumen. Presione MENU y gire el selector de control. Seleccione [SOUND] [BTA VOL] (página 21).
4 Realización de llamadas con manos libres Para usar un teléfono celular, conéctelo a esta unidad. Para obtener más información, consulte “Preparación del dispositivo BLUETOOTH” (página 7). Gire el selector de control para seleccionar un número de la lista de números y, a continuación, presiónelo. Comienza la llamada telefónica. Realización de llamadas desde el historial de llamadas 1 Presione CALL, gire el selector de control para seleccionar [RECENT CALL] y, a continuación, presiónelo.
Marcación predefinida de números telefónicos Es posible almacenar hasta 6 contactos en la marcación predefinida. 1 Seleccione un número de teléfono que desee almacenar en la marcación predefinida, de la agenda telefónica, el historial de llamadas o bien ingresando directamente el número. El número de teléfono aparecerá en la pantalla de esta unidad. 2 Mantenga presionado un botón numérico (de 1 a 6) hasta que aparezca [MEM]. El contacto se almacena en el número predefinido que seleccione.
Establecer la conexión App Remote Funciones útiles App Remote con iPhone/ Android Phone Se requiere la descarga de la aplicación “App Remote” desde la App Store para el iPhone o desde Google Play para teléfonos Android. Mediante la aplicación “App Remote”, las siguientes características están disponibles: Operar la unidad para iniciar y controlar aplicaciones compatibles en iPhone/teléfono con Android.
Activar el reconocimiento de voz (solamente para teléfonos Android) Al registrar aplicaciones, usted puede controlar una aplicación por comando de voz. Para más detalles, consulte la ayuda de la aplicación. Para activar el reconocimiento de voz 1 2 Presione ENTER para activar el reconocimiento de voz. Diga por el micrófono el comando de voz deseado cuando [Say Source or App] aparece en el teléfono Android. Notas En algunos casos, el reconocimiento de voz puede no estar disponible.
Configuración GENERAL CLOCK-ADJ (ajuste del reloj) (página 7) CAUT ALM (alarma de precaución) Activa la alarma de precaución: [ON], [OFF] (página 7). (Solamente está disponible cuando la unidad está apagada). BEEP Activa el sonido de los pitidos: [ON], [OFF]. AUTO OFF Permite apagar la alimentación automáticamente una vez transcurrido un período deseado cuando la unidad está apagada: [NO], [30S] (30 segundos), [30M] (30 minutos), [60M] (60 minutos).
DSEE (motor potenciador de sonido digital) Mejora el sonido comprimido digitalmente, ya que restaura las altas frecuencias que se pierden en el proceso de compresión. Este ajuste se puede memorizar para cada fuente diferente al sintonizador. Selecciona el modo DSEE: [ON], [OFF]. LOUDNESS Refuerza los graves y agudos para obtener un sonido claro a niveles de volumen bajos: [ON], [OFF].
Configuración DISPLAY Configuración BT (BLUETOOTH) DEMO (demostración) Activa la demostración: [ON], [OFF]. PAIRING (página 7) PHONEBOOK (página 16) DIMMER Cambia el brillo de la pantalla. AT (automático) Se atenúa la pantalla automáticamente al encender la luz. (Disponible solamente si el cable de control de iluminación está conectado). ON Se atenúa la pantalla. OFF Desactiva el atenuador.
Notas sobre los discos CD-R/CD-RW Información complementaria Precauciones Deje que la unidad se enfríe antes de usarla si el automóvil ha estado estacionado bajo la luz directa del sol. No deje el panel frontal o los dispositivos de audio dentro del vehículo o podría causar fallas en el funcionamiento debido a las altas temperaturas bajo la luz directa del sol. La antena de alimentación se extiende automáticamente.
Acerca de iPod Puede conectarse a los siguientes modelos de iPod. Actualice sus dispositivos iPod a la última versión de software antes de utilizarlos.
No se aceptan responsabilidades por la pérdida de información que pudiera producirse durante una comunicación BLUETOOTH. No se garantiza la comunicación con todos los dispositivos BLUETOOTH. Un dispositivo que disponga de la función BLUETOOTH debe cumplir el estándar BLUETOOTH especificado por BLUETOOTH SIG y estar autenticado.
Especificaciones Sección del sintonizador FM Rango de sintonización: 87,5 – 107,9 MHz Terminal de antena: Conector de antena externa Frecuencia intermedia: 25 kHz Sensibilidad útil: 8 dBf Selectividad: de 75 dB a 400 kHz Relación señal-ruido (estéreo): 79 dB (Emisión convencional) 80 dB (Emisión HD Radio) Separación a 1 kHz: 50 dB (Emisión convencional) 80 dB (Emisión HD Radio) Respuesta de frecuencia: 20 - 15 000 Hz (Emisión convencional) 20 - 20 000 Hz (Emisión HD Radio) AM Rango de sintonización: 530 – 1
Derechos de autor Sintonizador para vehículo SiriusXM Connect y las suscripciones se venden por separado. www.siriusxm.com Sirius, XM y todas las marcas y logotipos relacionados son marcas comerciales de Sirius XM Radio Inc. Todos los derechos reservados. Tecnología HD Radio fabricada bajo la licencia de iBiquity Digital Corporation. Patentes de E.E.U.U y Extranjeras. HD Radio™ y los logos HD, HD Radio y con el “Arco” son marcas propias de iBiquity Digital Corp.
La pantalla se apaga si mantiene presionado OFF. Presione OFF en la unidad hasta que se ilumine la pantalla. Los conectores están sucios (página 25). Los botones de operación no funcionan. El disco no se expulsa. Presione TAG/CAT y (volver)/MODE durante más de 2 segundos para la restauración de la unidad. Los contenidos almacenados en la memoria son eliminados. Por su seguridad, no realice la restauración de la unidad mientras maneja. Recepción de radio No es posible recibir emisoras.
No es posible realizar la conexión. La conexión se controla de un solo lado (esta unidad o dispositivo BLUETOOTH) pero no de ambos lados. Conecte esta unidad a un dispositivo BLUETOOTH o viceversa. El volumen del dispositivo de audio conectado es bajo (alto). El nivel de volumen cambiará dependiendo del dispositivo de audio. Ajuste el volumen del dispositivo de audio conectado o de esta unidad. No aparece el nombre del dispositivo detectado.
El nombre de la aplicación no coincide con la aplicación real en App Remote. Inicie la aplicación nuevamente desde la aplicación “App Remote”. Cuando ejecute la aplicación “App Remote” mediante BLUETOOTH, la pantalla cambia automáticamente a [BT AUDIO]. La aplicación “App Remote” o la función BLUETOOTH han fallado. Ejecute la aplicación nuevamente. Mensajes/indicaciones de error ERROR El disco está sucio o se insertó al revés. Límpielo o insértelo de forma correcta. Se insertó un disco vacío.
La fuente del teléfono BLUETOOTH se selecciona sin un teléfono celular conectado. El teléfono celular se ha desconectado durante una llamada. Asegúrese de conectar un teléfono celular. P EMPTY (número predefinido) La marcación predefinida está vacía. UNKNOWN El nombre o el número de teléfono no se pueden visualizar al explorar una agenda telefónica o un historial de llamadas. WITHHELD La persona que llama oculta el número de teléfono.
NOT ALLOWED No se permite la devolución “pulgares”. Espere hasta que el comercial finalice. Algunas funciones, como la Estación compartida, no permiten devoluciones. Espere hasta que comience la siguiente pista, o seleccione otra estación en la lista. No se permite marcar como favorito. Espere hasta que el comercial finalice. Seleccione otra pista o estación y, a continuación, inténtelo nuevamente. OPEN APP (abrir aplicación) Al conectar por medio del puerto USB. Pandora® no se ejecuta.
MEM FAILURE (error de memoria) La unidad no pudo almacenar el canal en la marcación predefinida. Asegúrese de que el canal que intenta almacenar es correcto. NO SIGNAL El Sintonizador para vehículo SiriusXM Connect tiene problemas para recibir la señal del satélite SiriusXM. Verifique que su vehículo se encuentra al aire libre con una vista clara al cielo. Verifique que la antena de montaje magnético SiriusXM esté montada sobre una superficie de metal en la parte exterior del vehículo.
http://esupport.sony.com If you have any questions/problems regarding this product, try the following: 1 Read Troubleshooting in these Operating Instructions. 2 Please contact (U.S.A. only); Call URL 1-800-222-7669 http://www.SONY.com http://www.sony.