4-107-851-12 (1) Instruction Manual Personal Navigation System Instruction Manual NV-U94T NV-U84 NV-U74T ©2008 Sony Corporation US
Using the manuals The manuals for this unit consist of the following 3 guides. Before installing or operating the unit, read these manuals thoroughly and retain them for future reference. • Quick Start Guide Contains instructions on basic operations, such as installation, navigation operations, etc. After you have read this manual, you should be ready to start using the unit.
Table of Contents Basic Operations 7 Menu operations . . . . . . . . . . . . . . . . . . . . . . . . . . . . . . . . . . . . . . . . . . . . . . . . . . . . . . . . . . . . . . 7 Gesture Command operations . . . . . . . . . . . . . . . . . . . . . . . . . . . . . . . . . . . . . . . . . . . . . . . . . . . . 9 Keyboard operations . . . . . . . . . . . . . . . . . . . . . . . . . . . . . . . . . . . . . . . . . . . . . . . . . . . . . . . . . . 11 Navigation 13 Checking the GPS status . . . . . . . . .
Destination management . . . . . . . . . . . . . . . . . . . . . . . . . . . . . . . . . . . . . . . . . . . . . . . . . . . . . . . 40 Recent destinations . . . . . . . . . . . . . . . . . . . . . . . . . . . . . . . . . . . . . . . . . . . . . . . . . . . . . . . . . 40 Address book . . . . . . . . . . . . . . . . . . . . . . . . . . . . . . . . . . . . . . . . . . . . . . . . . . . . . . . . . . . . . 40 Favorites . . . . . . . . . . . . . . . . . . . . . . . . . . . . . . . . . . . . . . . . . . . . . .
Video Playback (NV-U94T only) 60 Transferring video files . . . . . . . . . . . . . . . . . . . . . . . . . . . . . . . . . . . . . . . . . . . . . . . . . . . . . . . . 60 Watching videos . . . . . . . . . . . . . . . . . . . . . . . . . . . . . . . . . . . . . . . . . . . . . . . . . . . . . . . . . . . . . 61 Video playback controls . . . . . . . . . . . . . . . . . . . . . . . . . . . . . . . . . . . . . . . . . . . . . . . . . . . . . 61 Selecting a video file from the list . . . . . . . . . . . . .
Using the PC Application Software 78 System requirements . . . . . . . . . . . . . . . . . . . . . . . . . . . . . . . . . . . . . . . . . . . . . . . . . . . . . . . . . . 78 Installing the software . . . . . . . . . . . . . . . . . . . . . . . . . . . . . . . . . . . . . . . . . . . . . . . . . . . . . . . . . 79 Connecting the unit to your computer . . . . . . . . . . . . . . . . . . . . . . . . . . . . . . . . . . . . . . . . . . . . . 79 Starting the software . . . . . . . . . . . . . . . . . . . . .
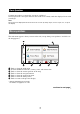
Basic Operations Common procedures to operate the system are explained. General operations can be performed on the touch screen. Gently touch the displayed icons with your finger. Note Do not press the display with excessive force. Do not use any sharp object, such as a pen, etc., to tap on the display. Menu operations The main menu appears when you turn on the unit (except during route guidance, in which case the map appears). 1 2 MENU VOICE/ POS. 3 4 5 6 7 1 Touch to show the main menu.
Other basic menu operations To Touch cancel the setting “Cancel” confirm the selection/proceed to the next step “Done” or “OK” About the battery status indication The battery status can be checked by the indicator in the main menu. Indicator Status Adapter connected. Fully charged. Not fully charged. Low battery. Battery is empty. Charge battery immediately.
Gesture Command operations Frequently-used operations can be performed by assigning finger strokes such as a line, etc. For navigation In the map display (except in map scrolling mode), draw the command stroke as below.
For audio/video playback (NV-U94T only) In the audio/video playback display, draw the command stroke as below. For details on audio/video playback, see page 54 and 60.
Keyboard operations The keyboard display appears when you need to enter text. When entering addresses, you need only enter characters in upper case, as the system automatically converts them to appropriate characters. You can change the case or enter special characters/symbols when necessary. The following types of keyboards are selectable: • “QWERTY + 123”: QWERTY layout with number keys.* • “QWERTY”: Large QWERTY layout without number keys.* • “ABC”: Alphabetical layout without number keys.
To Touch enter an alphabetical character the desired character key enter a number the desired number key*1 enter a special character “ÀŐŇ” to switch to the special character keyboard, then the desired character; and “ABC” to switch back enter a symbol “@!?” to switch to the symbol keyboard, then the desired symbol key; and “ABC” to switch back enter a space “Space” delete a character “Backspace” change the case “Caps” proceed to the next step “Next” show the candidate list*2 “Search” con
Navigation Checking the GPS status About the GPS status indication The GPS status can be checked by the color of the current position icon. If the current position is not displayed, touch VOICE/POS. to show the icon. Current position icon Indication Status Signals are insufficient for navigation. Reception temporarily interrupted (e.g., in a tunnel). In the case of NV-U94T, the built-in sensor (POSITION plus) calculates the current position instead. Signals are sufficient for navigation.
Viewing detailed GPS status information Detailed GPS status information, such as the latitude, longitude, etc., can be viewed to check if the current position is properly calculated. 1 In the menu display, touch , “General,” then “GPS Status.
Route searching You can search for a route in various ways. The following route search methods are available.
6 Select the desired city in the list. If more than one address candidate exists, the list of candidates appears. In this case, select the desired address. The address confirmation display appears. 7 Select “Go.” Route guidance starts. Street search If the house number is not known, a search can be made to an approximate point on the street. 1 In the menu display, touch , then “Enter Address.” If the state selection display appears, select the new (current) state or “Change to Different State.
Home search If you register your home, you can search for a route there. For details on registering your home, see page 71. 1 In the menu display, touch Route guidance starts. , then “Take Me Home.” Tip If you select “Take Me Home” without having registered a home address, the registration display automatically appears. With Gesture Command In the map display, draw . POI search POI (Points Of Interest) search allows you to set facilities such as restaurants, hotels, gas stations, etc.
By POI name You can search for a route to a POI by directly entering its name. 1 In the menu display, touch , then “Find a Place.” The search method selection display appears. 2 3 Select “Points of Interest.” 4 Enter the POI name. The list of POI candidates appears in order of distance from the current position. 5 Select the desired POI. The POI confirmation display appears. 6 Select “Go.” Route guidance starts. Select “By Name.” The POI name input display appears.
By POI category You can search for a route to a POI by selecting its category(ies). 1 In the menu display, touch , then “Find a Place.” The search method selection display appears. 2 3 Select “Points of Interest.” 4 Select the desired category. Select sub category when necessary until the POI candidates are narrowed down. The list of candidates appears in order of distance from the current position. 5 Select the desired POI. The POI confirmation display appears. 6 Select “Go.
City center search The city center can be set as a destination. 1 In the menu display, touch , then “Find a Place.” The search method selection display appears. 2 Select “Find City.” The city name input display appears. 3 Enter the city name. The list of city candidates appears. 4 Select the desired city in the list. The address confirmation display appears. 5 Select “Go.” Route guidance starts.
Changing a POI name/category in Quick Links 1 2 3 In the menu display, touch , then “Find a Place.” Select “Quick Link Settings,” then the desired Quick Link. Select the desired setting method. Select To set By Name the POI name. Enter the name. Category the POI category. Select category(ies). Category and By Name the POI category and name. Select category c “By Name,” then enter the name.
Address book search You can select the destination saved in the address book. For details on how to manage the address book, see page 40. 1 In the menu display, touch , then “My Places.” The search method selection display appears. 2 Select “Address Book.” The list of groups appears. 3 Select the desired group. The list of data in the selected group appears. 4 Select the desired entry in the list. The address/POI confirmation display appears. 5 Select “Go.” Route guidance starts.
Option menu in the address/POI confirmation display The option menu in the address/POI confirmation display provides various useful operations. When the confirmation display appears after setting a destination, select “Options,” then one of the following items. Item Purpose Save This Location*1 (page 40) Saves the selected point to the address book. Edit Item*1 (page 70) Edits the selected address book entry.
Map operations Indications on the map When no route guidance is in progress: B A C D E A Current direction (page 73) B Current speed (page 73) C Current position/GPS status indication (page 13) D North indicator/current time E Current street name continue to next page r 24
During route guidance: Straight-ahead driving F G H F Distance/ETA (Estimated Time of Arrival) to destination G Distance to next turn H Next instruction Approaching an intersection I I Next turn instruction continue to next page r 25
Approaching an intersection (closer)* J K J Magnified view of an intersection (page 75) K Bar indication of the distance to next turn Approaching an intersection (even closer)* L L Current position * You can set to hide the magnified view of an intersection (page 75).
Map scrolling mode You can switch to map scrolling mode by touching the map, whether during route guidance or not. By placing the desired point into the crosshair, you can view the information on the point or open the map options.
Using the map tools The map tool bar appears when you touch “Options” on the map display. 2 1 3 4 MENU VOICE/ POS. 5 6 7 8 9 q; 1 To show the main menu. 2 To toggle the map orientation (heading up/north up). 3 To check the TMC status/show the traffic messages on the current route (page 37).*1 4 To show the call in progress display (page 50).*1*2 5 During route guidance: To repeat the last voice guidance. In other cases: To return to the current position display. 6 To show more map options.
More map options More options are available by selecting “More…” in the map tool bar. Item Purpose Navigate to Here*1 Starts route guidance to the point. Save This Location (page 40) Saves the point to the address book. Edit Item* (page 70) Edits the address book entry. 2 Quit Navigation*3 Exits the current route guidance. Skip to Next Destination* * * (page 34) Reroutes to skip to the next destination.
Route planning Creating a new itinerary The procedure to create a new itinerary is explained below. 1 2 3 In the menu display, touch , then “Route Planning.” Select “Route Planning,” then “Options.” Select “New Route.” The route planning display appears in which the current position is set as the start point. For details on how to change the start point, see “Editing route points” on page 32. 4 Select “Add” to add a route point in your itinerary. The search method selection display appears.
6 After setting the route point, select “Done.” The route planning display reappears with the selected point added in the list. The last setting is listed as the final destination. Repeat step 4 to 6 to continue adding route points. Up to 10 route points can be set. 7 Select “Calculate Route.” The route calculation starts. After the calculation is complete, the route confirmation display appears. 8 Select one of the following items. Item Purpose Go Starts the route guidance.
Editing route points You can edit the selected route points while creating an itinerary. Select the desired route point in the route planning display, then one of the following items. Item Purpose Change Location Shows the search method selection display to set the route point again. Delete Deletes the selected point from the itinerary. Change Order Changes the order of route points. Select the point to move c / c “Done.
Option menu for route planning The option menu in the route planning/route confirmation display provides various useful operations. When the route planning/route confirmation display appears, select “Options,” then one of the following items. Item Purpose Save Route Saves the current route. Select an unregistered line in the list, then enter the name. To overwrite a registered route, select a registered line in the list c “OK.” Saved Routes*1 Edits the route/starts the route guidance.
Adding an interim destination to the current route During route guidance, you can add an interim destination. 1 In the menu display, touch , then select the desired search method to set the interim destination. For details on search methods, see “Route searching” on page 15. You can select the desired search method, except for home search and Favorites search. 2 After setting the interim destination, select “Options” in the address/POI confirmation display. 3 Select “Interim Destination.
Route confirmation Viewing the turn-by-turn list During route guidance, you can view the turn-by-turn list. 1 In the map display, select “Options,” then “Turns.” The turn-by-turn list appears. 2 Select the desired item to show the detailed information.
Viewing the entire route During route guidance, you can view the entire route to the destination. 1 2 In the map display, select “Options,” then “Turns.” Select “Route Confirmation.” The entire route appears. To change the route calculation conditions 1 Select “Change Condition,” then the desired option. Route guidance starts. Viewing a map of the vicinity of the destination During route guidance, you can view a map of the vicinity of the current destination.
TMC information (NV-U94T/U74T only) The built-in TMC (Traffic Message Channel) receiver* allows you to receive traffic information. You can check the traffic messages. * For NV-U94T, the receiver is located in the cradle. For NV-U74T, the receiver is located in the unit. Checking traffic information About the TMC status indication The TMC status can be checked by the traffic icon in the map display. Traffic icon Indication Status No icon Out of service.
Viewing traffic messages 1 In the menu display, touch , then “Traffic Information.” The list of traffic messages appears. If the traffic information type set to display is previously selected, the relevant messages appear (page 39). A B C D E A Traffic event type B Distance from the current position C State D Road name E Traffic message 2 Select the desired message to view detailed information. To view the previous/next message, touch / .
Selecting the traffic information type You can select the traffic information type to display. 1 Open the list of traffic messages. For details, see “Viewing traffic messages” on page 38. 2 Select “Change Message.” The type selection display appears. 3 Select the desired type. 4 Select To show On Route all traffic messages on the current route Not on Route all traffic messages not on the current route Touch . The message list of selected information type appears.
Destination management Destinations on “Recent Destinations,” “Address Book,” and “Favorites” can be managed. Recent destinations You can delete the history of “Recent Destinations.” 1 2 3 In the menu display, touch 4 Select “Done,” then “OK.” The selected item(s) is deleted. , “My Places,” then “Recent Destinations.” Select “Delete.” Select the item to delete. To select all items, select “All.” To unselect all items, select “Clear.
4 5 Set the following items. Item Purpose Name Enters the name. Group Selects the group to categorize. To create a new group, select “New Group,” then enter the group name. Phone Enters the phone number. Icon Selects the icon to show on the map. To select from the facility icon list, select “Facilities Icons” c category(ies) c icon. Sound Configures the sound setting. – “Sound Function”: Sets to “ON” to have notification sound upon approach. – “Sound Source”: Selects the sound source.
Bluetooth Hands-free Calling (NV-U94T/U74T only) The following is the basic procedure required for using the Bluetooth function. 1 Bluetooth signal activation Activating the Bluetooth signal is required to connect this unit to a Bluetooth compatible cellphone. 2 Pairing When connecting a cellphone for the first time, mutual registration is required. This is called “pairing.
Activating the Bluetooth signal 1 2 In the menu display, touch , then “Bluetooth.” Select “Bluetooth Signal,” then “ON.” The signal is activated. The Bluetooth indicator lights up in blue. Pairing with a cellphone Pairing is required only the first time you connect to a cellphone. To pair this unit to a cellphone, you need to enter the same passkey* on this unit and on the cellphone. The passkey can be either your own selected number or the number determined by the cellphone.
Searching from a cellphone The procedure to search for this unit from a cellphone is explained below. In this case, the name of the unit is registered as “nav-u,” which can be changed in the Bluetooth setting (page 76). 1 Start searching for this unit from the cellphone. For details, see the manual of the cellphone. After you perform the required operation on the cellphone, the passkey input display appears on this unit. 2 Enter the passkey. A message appears stating that the pairing is complete.
Connecting to a cellphone Once the Bluetooth signal is activated, the unit searches for the last connected cellphone, and connection is made automatically if possible. In this chapter, instructions on how to connect manually to registered cellphones are introduced. Before starting, be sure to activate the Bluetooth signal both on this unit and the cellphone. 1 In the menu display, touch , “Phone,” then “Select Phone.” The list of registered cellphones appears. 2 Select the cellphone to connect.
Making calls You can make hands-free calls in various ways. The following calling methods are available. • “Dialing a phone number” (page 46) • “Using the list of recent calls” (page 47) • “Using the phone book” (page 47) • “Using preset numbers” (page 48) • “Other ways to make calls” (page 48) Dialing a phone number 1 In the menu display, touch , then “Phone.” The calling method selection display appears. 2 3 Select “Make a Call,” then “Numeric Input.” Enter the phone number, then select .
Using the list of recent calls The system stores the last 40 calls, allowing you to select one quickly from the list. For details on how to delete the history, see page 52. 1 In the menu display, touch , then “Phone.” The calling method selection display appears. 2 Select “Make a Call,” then “Recent Calls.” The list of recent calls appears. 3 Select the desired item in the list. The call is made. The calling display appears until the other party answers.
Using preset numbers You can make a call quickly using preset phone numbers. For details on how to preset phone numbers, see page 77. 1 In the menu display, touch , then “Phone.” The calling method selection display appears. 2 Select “D1,” “D2,” “D3,” or “Home.” The call is made. The calling display appears until the other party answers. For details on operations during a call, see page 50. To cancel calling, touch . To adjust the volume of the hands-free function, touch –/+.
Receiving calls With the unit connected to the cellphone, you can receive a call in any status. The following display indicates an incoming call, along with the ring tone. Name* and phone number of other party Volume indicator * Appears only when stored in the phone book. 1 Touch . Hands-free talking starts. For details on operations during a call, see page 50. To reject the call, touch . To adjust the volume of the hands-free function, touch –/+.
Operations during a call Various operations are available from the following call in progress display, which appears during a call. Name* and phone number of other party Call duration Volume indicator * Appears only when stored in the phone book. To adjust the volume of the hands-free function Touch –/+. Showing the map 1 Touch VOICE/POS. The map and the route guidance (if in progress) appear with To return to the call in progress display, touch To show the menu display, touch MENU.
Entering numbers You may need to enter numbers during a call (e.g., to forward the call). 1 Select “Numeric Input” in the call in progress display. The number input display appears. 2 Enter the required number. Ending a call 1 Touch in the call in progress display.
Call data management Call data on “Recent Calls” and “Phone Book” can be managed. Recent calls You can delete the history of “Recent Calls.” 1 2 3 4 In the menu display, touch 5 Select “Done,” then “OK.” The selected item(s) is deleted. , then “Phone.” Select “Make a Call,” then “Recent Calls.” Select “Delete.” Select the item to delete. To select all items, select “All.” To unselect all items, select “Clear.
Deleting data You can delete unnecessary data in the phone book of this unit. 1 2 3 In the menu display, touch 4 Select “Done,” then “OK.” The selected contact(s) is deleted. , then “Phone.” Select “Phone Book,” then “Delete.” Select the contact to delete. To select all contacts, select “All.” To unselect all contacts, select “Clear.” Tip Deleting phone book data on this unit does not delete data on the cellphone, even if you connect the unit to the cellphone (the data will not be synchronized).
Audio Playback (NV-U94T only) You can listen to audio files stored on a “Memory Stick Duo” inserted in the unit. Supported audio file type • File format MP3 (MPEG-1 Audio Layer-3), AAC (Advanced Audio Coding) • File extension MP3: .mp3 AAC: .aac, .m4a, .3gp • Sampling frequency MP3: 32, 44.1, 48 kHz AAC: 8, 11.025, 12, 16, 22.05, 24, 32, 44.
Listening to audio 1 In the menu display, touch , then “Audio.” The audio playback display appears, and playback of audio files in the “Memory Stick Duo” starts. Audio playback controls Elapsed time/total time Progress bar 1 2 3 4 5 6 1 To exit the audio player. 2 To select a file from the list (page 56). 3 To skip to the beginning of the previous/current file. 4 To start/pause playback. 5 To skip to the beginning of the next file. 6 To adjust the audio playback volume.
Selecting an audio file from the list You can select an audio file to play from the list. 1 In the audio playback display, select “List.” The list of folders/files appears. To move to the upper level, touch . 2 Select the desired folder/file. If you select a folder, then select the desired file. Playback of the selected file starts. To switch to the audio playback display from the audio file list, select “Now Playing.
Audio streaming via Bluetooth You can listen to audio files through your car audio system if it supports A2DP (Advanced Audio Distribution Profile) Bluetooth technology. About the Bluetooth status indication The Bluetooth status can be checked by the indicator in the main menu. Bluetooth indicator Indicator Status None Bluetooth signal is off. You need to activate the signal for connection. Signal is on, with no car audio unit connected. The unit is discoverable and ready for a connection.
Preparation To perform audio streaming, you first need to pair the unit and car audio unit. Before starting, be sure to activate the Bluetooth signal both on this unit (page 43) and the car audio unit. 1 2 In the menu display, touch 3 Select “OK.” After search is complete, the list of detected devices appears. To list devices by address, select “Address.” To list by name, select “Name.”* , then “Bluetooth.” Select “Add Devices.” A message asking you to set the car audio unit to discoverable appears.
Audio settings The following audio settings are configurable. In the audio folder/file list, select “Settings” c the desired item c the desired option. Item Purpose Play Mode Repeats the current file, all files in the current folder, or all files in a “Memory Stick Duo”: “Repeat Single Content,” “Repeat Folder,” “Repeat All.” Audio Transfer Rate (A2DP) Selects audio transfer rate for streaming via Bluetooth to prioritize sound quality or stability.
Video Playback (NV-U94T only) You can watch video files stored on a “Memory Stick Duo” inserted in the unit. Supported video file type • File format MP4 (MPEG-4 Simple Profile) • File extension .mp4 • Frame rate 15 fps • Bit rate 384 kbps • Resolution QVGA (320 × 240) Transferring video files You can transfer video files to a “Memory Stick Duo” inserted in the unit using Windows Explorer. 1 2 3 4 5 6 Insert a “Memory Stick Duo” in the unit. Turn on your computer and start Windows.
Watching videos 1 In the menu display, touch , then “Video.” The video playback display appears, and playback of video files in the “Memory Stick Duo” starts. Video playback controls Touch the display if the video playback controls are not shown. Elapsed time/total time Progress bar 1 2 3 4 5 6 7 1 To exit the video player. 2 To select a file from the list (page 62). 3 To go back slightly. 4 To start/pause playback. 5 To go forward slightly. 6 To adjust the video playback volume.
Selecting a video file from the list You can select a video file to play from the list. 1 In the video playback display, select “List.” The list of folders/files appears. To move to the upper level, touch . 2 Select the desired folder/file. If you select a folder, then select the desired file. Playback of the selected file starts. To switch to the video playback display from the video file list, select “Now Playing.
Video sound streaming via Bluetooth When you play video files, playback sound can be output from your car audio system if it supports A2DP (Advanced Audio Distribution Profile) Bluetooth technology. About the Bluetooth status indication The Bluetooth status can be checked by the indicator in the main menu. Bluetooth indicator Indicator Status None Bluetooth signal is off. You need to activate the signal for connection. Signal is on, with no car audio unit connected.
Preparation To perform video sound streaming, you first need to pair the unit and car audio unit. Before starting, be sure to activate the Bluetooth signal both on this unit (page 43) and the car audio unit. 1 2 In the menu display, touch 3 Select “OK.” After search is complete, the list of detected devices appears. To list devices by address, select “Address.” To list by name, select “Name.”* , then “Bluetooth.” Select “Add Devices.
Video settings The following video settings are configurable. In the video folder/file list, select “Settings” c the desired item c the desired option. Item Purpose Screen Size Selects the screen size. Play Mode Repeats the current file, all files in the current folder, or all files in a “Memory Stick Duo”: “Repeat Single Content,” “Repeat Folder,” “Repeat All.” Lip Sync (A2DP) Reduces the delay between video and sound during video sound streaming via Bluetooth.
Photo Playback You can view photo files stored on a “Memory Stick Duo” inserted in the unit. Insert a “Memory Stick Duo” containing photo files shot by a Sony digital still camera in the unit. The photos in the DCIM folder of the “Memory Stick Duo” are displayed. Supported photo file type • File format JPEG • File extension .JPG • Number of pixels Max. 12 mega pixels Viewing photos 1 In the menu display, touch , then “Photo.” The list of folders/files appears. To move to the upper level, touch .
Photo playback controls Touch the display if the photo playback controls are not shown. File name/shooting date and time 1 2 3 4 5 6 7 1 To exit the photo browser. 2 To select a file from the list. 3 To skip to the previous file. 4 To start the slideshow. 5 To skip to the next file. 6 To open the option menu for photo playback. 7 To hide the playback controls.
Photo settings The following photo settings are configurable. In the photo file list, select “Settings” c the desired item c the desired option. Item Purpose Playing Interval Sets the slideshow interval. Repeat Repeats the slideshow. Slideshow Range Plays slideshow of all photo files in a “Memory Stick Duo” or the currently selected folder. File Order Sorts photo files by shooting date or name.
Settings The setting menu includes the following categories. • “Route Planning” (page 69) • “Address Book” (page 70) • “General” (page 71) • “Map” (page 73) • “Route Profile” (page 74) • “Guide” (page 75) • “Bluetooth” (NV-U94T/U74T only) (page 76) • “Phone” (NV-U94T/U74T only) (page 77) Route planning settings The following route planning settings are configurable. In the menu display, touch c “Route Planning” c the desired item c the desired option.
Address book settings The following address book settings are configurable. In the menu display, touch c “Address Book” c the desired item c the desired option. Item Purpose Edit Item Edits the address book entry. Select the group, then one of the following items. – Entry in the list: Opens the display where you can delete an entry, or change the name/ group/phone/icon/sound setting. – “Move”: Categorizes entry(ies) to another group. Select the entry(ies) to move c “Move To” c the new group c “OK.
General settings The following settings related to the system are configurable. In the menu display, touch c “General” c the desired item c the desired option. Item Purpose Volume (Operation Sound) Presets the volume level for touch screen operation sound: “Level 3,” “Level 2,” “Level 1,” “OFF.” Units Selects the distance unit: “Kilometers,” “Miles.” Time Format Selects the clock indication: “12hr (AM / PM),” “24hr.” Time Zone Sets the time zone automatically or manually.
Item Purpose GUI Day / Night Mode Selects the color theme of menu displays. Power Saving (Display OFF) Turns off the display automatically after several minutes of inactivity: “ON,” “OFF.” Keyboard Style (page 11) Selects the keyboard type: “QWERTY + 123,” “QWERTY,” “ABC.” Password Lock Locks the unit by setting a 4-digit numerical password to prevent unauthorized access: “ON,” “OFF.” Once activated, you will need to enter the password when you turn on the unit.
Map settings The following map display settings are configurable. In the menu display, touch c “Map” c the desired item c the desired option. Item Purpose 2D / 3D Map View Selects the default map view. – “2D”: Overhead view. – “3D” (level 1): Aerial view (high angle). – “3D” (level 2): Aerial view (medium angle). – “3D” (level 3): Aerial view (low angle). Map Orientation Selects the default orientation of 2D map. – “In Direction of Travel”: Heading up. – “Always North”: North up.
Route profile settings The following route profile settings are configurable. In the menu display, touch c “Route Profile” c the desired item c the desired option. Item Purpose Ferries Allows the use of ferries/avoids them unless no alternative is available: “Allow,” “Avoid.” Carpool Lanes Allows the use of carpool lanes/avoids them unless no alternative is available: “Allow,” “Avoid.
Guidance settings The following route guidance settings are configurable. In the menu display, touch c “Guide” c the desired item c the desired option. Item Purpose Volume (Guide) Presets the volume level for voice guidance: “Level 3,” “Level 2,” “Level 1,” “OFF.” Voice Attention (Merge) Activates the audio warning on merge: “ON,” “OFF.” Automatic Zoom Zooms out the map automatically when driving on the highway: “ON,” “OFF.
Bluetooth settings (NV-U94T/U74T only) The following Bluetooth settings are configurable. In the menu display, touch c “Bluetooth” c the desired item c the desired option. Item Purpose My Devices Views the list of registered Bluetooth device(s); deletes registration. To delete the registration, select “Delete” c the device(s) to delete c “Done” c “OK.” Add Devices (page 43) Pairs the unit and the Bluetooth device. Bluetooth Signal (page 43) Activates the Bluetooth signal: “ON,” “OFF.
Phone settings (NV-U94T/U74T only) The following phone settings are configurable. In the menu display, touch c “Phone” c the desired item c the desired option. Item Purpose Select Phone (page 45) Selects the cellphone to connect for a handsfree call or phone book transfer. Receive Phone Book (page 52) Receives the phone book data of the cellphone. Volume (Ring Tone) Presets the ring tone volume. Speed Dial Presets/edits phone numbers on “D1”/“D2”/ “D3”/“Home.
Using the PC Application Software You can install the PC application software to your computer. Using the software, you can manage various data to use on the unit.
Installing the software 1 2 3 4 Go to http://esupport.sony.com/ Enter your model number (e.g., NV-U94T), then click “Continue.” Select “Drivers,” then “nav-u tool” to download the software. Follow the instructions at the website and complete the installation. Connecting the unit to your computer 1 2 Turn on the unit and your computer. Connect the unit to your computer with the USB cable. Note While using the software or transferring data, do not: – disconnect the USB cable. – turn off or reset the unit.
Starting the software 1 Start the software. Click “start,” then select “(All) Programs” c “nav-u tool” c “nav-u tool.” The main menu appears. 1 2 3 4 5 6 1 To manage guidance voice data (page 81). 2 To manage the map data (page 82). 3 To manage the address book data (page 83). 4 To upgrade the firmware (page 85). 5 To select the language for software on-screen displays. 6 To access to the Sony navigation support site.
Guidance voice data management You can transfer guidance voice data from your computer to the unit, using the software. Before starting, connect the unit to your computer and start the software. You can also transfer data to the “Memory Stick Duo” inserted in the unit. 1 Select “Guidance Voice Manager.” If the guidance voice data on your computer does not appear, select “Browse,” then specify the data location on your computer. 2 3 Select the drive corresponding to the unit/“Memory Stick Duo.
Map data management You can transfer and replace the map data on the unit, using the software (e.g., to restore map data if necessary). Before starting, connect the unit to your computer and start the software. 1 Select “Map Manager.” If the map data does not appear, select “Browse,” then specify the data location. 2 3 In the list, select the map to transfer, then 4 Select “OK.” The map on the unit is replaced. Select “OK.” Transfer starts. 82 .
Address book data management Address book data on the unit or your computer can be managed, using the software. You can transfer or import the address book data on the unit or your computer. Editing the address book data on your computer You can edit the address book data on your computer, using the software. 1 Select “Address Book Manager.” If the data does not appear in the list, select “Browse,” then specify the data location. 2 3 Select 4 5 .
Transferring address book data from your computer to the unit You can transfer address book data from your computer to the unit, using the software. Before starting, connect the unit to your computer and start the software. 1 2 Select “Address Book Manager.” 3 4 5 Check the box(es) of the group(s)/entry(ies) on your computer. 6 Select “Apply to the Unit,” then “OK.” The address book data is transferred to the unit. Select .
Firmware upgrade You can upgrade the firmware on the unit, using the software. For details, visit the website below: http://www.sony.