
Operating Instructions (PUM)


23
Notes
• The following notebook
computers do not
support digital audio
CD playback.
PCG-505GX, 505G
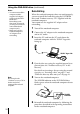
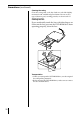
To playback audio CDs
use the audio cable RK-
G136, sold separately,
to connect the DVD-
ROM drive’s LINE
OUT connector and
your notebook
computer’s LINE IN
connector.
• Depending on the
notebook computer
operating mode (while
accessing the hard disk,
etc.) noise may occur
during digital audio
CD playback.
• To adjust the volume,
click the “volume” icon
in the taskbar, or use
the Fn + F4 key.
Playing an audio CD
If you are using a digital audio CD playback-
compatible notebook computer, connecting the DVD-
ROM drive to the notebook computer allows you to
enjoy audio sound via the built-in notebook computer
speaker or headphones. In this case, the audio signal is
not output from the LINE OUT connector on the
DVD-ROM drive.
For notebook computers with Windows
R
98
1 Connect the DVD-ROM drive to the notebook
computer and click the [Start] button, point to
[Settings], and then click [Control Panel].
The “Control Panel” appears.
2 Double-click [Multimedia].
The “Multimedia Properties” appears.
3 Click the [CD Music] tab.
4 Confirm that the “Enable digital CD audio for this
CD-ROM device” checkbox is checked and click
[OK].
If not, check the “Enable digital CD audio for this
CD-ROM device” checkbox and click [OK].
For notebook computers with Windows
R
2000 Professional
1 Connect the DVD-ROM drive to the notebook
computer and click the [Start] button, point to
[Settings], and then click [Control Panel].
The “Control Panel” appears.
2 Double-click [Sounds and Multimedia].
The “Sound and Multimedia Properties” appears.
3 Click the [Hardware] tab.
4 Select “TOSHIBA DVD-ROM SD-C2402...“ from
the list and click [Properties].
5 Confirm that the “Enable digital CD audio for this
CD-ROM device” checkbox in the [Properties] tab
is checked and click [OK].
If not, check the “Enable digital CD audio for this
CD-ROM device” checkbox and click [OK].