3-089-698-11 (1) Read This First 1 Setting up your CLIÉ™ handheld 2 Basic operations of your CLIÉ™ handheld 3 Supplied applications 4 Using CLIÉ Manuals with your computer Troubleshooting Operating Instructions CLIÉ™ handheld components Personal Entertainment Organizer PEG-TH55 © 2004 Sony Corporation Sony Personal Entertainment Organizer PEG-TH55 3-089-698-11 (1)
The following manuals are included with your CLIÉ handheld. Printed manual Read This First (Operating Instructions), this manual* Explains how to set up your CLIÉ handheld and computer, and basic operations. For safe use, make sure you read the supplied “Safety & Regulations Guide”. * If your CLIÉ handheld was purchased in Europe, the manual is not in printed format, but is included as a PDF file on the Installation CD-ROM.
Before use Caution IN NO EVENT SHALL SONY BE LIABLE FOR ANY INCIDENTAL, INDIRECT OR CONSEQUENTIAL DAMAGES OR OTHER DAMAGES INCLUDING WITHOUT LIMITATION LOSS OF PROFITS, LOSS OF REVENUE, LOSS OF DATA, LOSS OF USE OF THE PRODUCT OR ANY ASSOCIATED EQUIPMENT, DOWNTIME, AND PURCHASER’S TIME RELATED TO OR ARISING OUT OF THE USE OF THIS PRODUCT, ITS HARDWARE AND/OR ITS SOFTWARE.
Table of Contents Setting up your CLIÉ™ handheld Entering text. . . . . . . . . . . . . . .33 Using Graffiti® 2 writing to enter text . . . . . 33 Confirming the package contents . . . . . . . . . . . . . . . . 6 Other ways to enter text. . . . . . . . . . . . . . . . 35 Setting up your CLIÉ™ handheld . . . . . . . 8 Synchronizing data between your CLIÉ handheld and computer by entering a schedule event (the HotSync® operation). . . . .39 Step 1: Charging your CLIÉ handheld . . . . . .
CLIÉ™ handheld components Front panel . . . . . . . . . . . . . . . . . . . . . . . . . . 85 Locating the components of the Home screen (CLIE Organizer). . . . . . . . . . . . . . . . . . . . 91 INDEX. . . . . . . . . . . . . . . . . . . 98 Back panel . . . . . . . . . . . . . . . . . . . . . . . . . . 87 Notes on this manual • Screen shots in this manual may be different from the actual displays in the supplied software.
Setting up your CLIÉ™ handheld This chapter explains how to charge your CLIÉ handheld, perform the initial setup, and use it with your computer. Confirming the package contents Please confirm that all the following accessories are included in the package before setting up your CLIÉ handheld. CLIÉ handheld (1) AC power adapter (1) (including AC cord) Some illustrations omit the protective cover in this manual. USB cable (1) Stylus (1) The stylus is inserted into your CLIÉ handheld at the factory.
Strap (1) Refer to the illustration below to attach the strap. Read This First - Operating Instructions* (1, this manual) Safety & Regulations Guide (1) Setting up your CLIÉ™ handheld Internet Connection Guide (1) Software license agreement (1) Graffiti 2 Card (1) Other printed materials * If your CLIÉ handheld was purchased in Europe, the manual is not in printed format, but is included as a PDF file on the Installation CD-ROM. Make sure that the package contains all of the above contents.
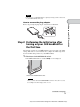
Setting up your CLIÉ™ handheld Perform the following before setting up your CLIÉ handheld. Step 1: Charging your CLIÉ handheld Before using your CLIÉ handheld for the first time, make sure you fully charge the battery. To a wall outlet 1 2 3 Connect the AC power adapter to the DC IN connector of the plug adapter. Connect the plug adapter to the interface connector of your CLIÉ handheld . Connect the AC cord to the AC power adapter (1). Then, plug the AC cord into a wall outlet (2).
Note If the battery of your CLIÉ handheld is completely discharged, all user data stored on your CLIÉ handheld will be lost. How to remove the plug adapter Setting up your CLIÉ™ handheld Remove by pressing the plug adapter on both sides as illustrated. Step 2: Performing the initial setup after turning on your CLIÉ handheld for the first time The first time you turn on your CLIÉ handheld, you need to make some initial settings.
Tips If you cannot turn on your CLIÉ handheld • Did you charge your CLIÉ handheld as described on page 8? b For details, refer to “Frequently Asked Questions: I cannot turn on my CLIÉ handheld” on page 67. • Perform a soft reset if you cannot turn on your CLIÉ handheld even after charging it (page 47). 2 Take out the stylus. You can use the stylus to enter text or to select applications. Take out the stylus Tip You can extend or shorten the stylus, as shown in the illustration.
3 Following the on-screen instructions, tap exactly in the center of the displayed mark. Tap the next targets, which are displayed at the bottom right and then in the center of the screen. The display in the screen depends on where you purchased your CLIÉ handheld. Note Setting up your CLIÉ™ handheld Open the protective cover, and press lightly on the screen.
5 6 Click [Yes] to confirm. (Only available for certain models or areas.) Tap the box next to [Set Time:]. The Set Time dialog box is displayed. Tip You can reconfigure the date and time settings in the Preferences screen. b For details, refer to “Customizing your CLIÉ™ handheld (Preferences): Setting up the Date & Time preferences” in the “Handbook” (PDF format). 7 Tap v or V to set the current time. Tap each box to set the hour and minute. 8 Tap [OK].
9 Tap the box next to [Set Date:]. The Set Date screen is displayed. Setting up your CLIÉ™ handheld 10 Tap b or B to select the current year. 11 Tap the current month, then tap the current date. The Set Date screen closes. 12 Tap the box next to [Time Zone:]. The Set Time Zone screen is displayed.
13 Tap the region to set the time zone, then tap [OK]. 14 Tap V next to [Daylight Saving:] and select [On] or [Off]. 15 Tap [Next].
16 Tap [Next] and [Done]. The Holiday screen is displayed. 17 Tap your country or region in the Holiday screen to set holidays, and tap [OK]. If your country or region is not displayed in the Holiday screen, tap or to scroll the list in the screen. The Confirmation dialog box is displayed. Setting up your CLIÉ™ handheld b Tip If you do not want to set holidays, tap [Cancel].
18 Tap [Yes]. The Home screen (CLIE Organizer) is displayed. Tip The screen displayed when you turn on your CLIÉ handheld and tap (Home) is called the Home screen. b For details on the Home screen, refer to “Using an application: Displaying the Home screen” on page 27. The initial setup is complete.
Using your CLIÉ™ handheld with your computer b For details on the system requirements of your computer, refer to “System requirements” on page 84. b For details on CLIÉ Manuals, refer to “Using CLIÉ Manuals with your computer” on page 57. Before installing the software on your computer Do not connect your CLIÉ handheld to your computer before installing the software. Otherwise, the software may not be installed properly.
Step 1: Installing Palm™ Desktop for CLIÉ on your computer Palm™ Desktop for CLIÉ is the software supplied with the Palm OS® device. You can synchronize data between your CLIÉ handheld and computer using Palm™ Desktop for CLIÉ. Make sure you install this before installing CLIE Organizer for PC (page 23). 1 2 Quit all applications running on Windows®. Insert the supplied Installation CD-ROM into the CD-ROM drive of your computer. The Installation CD-ROM window is displayed.
7 Click [Next]. The InstallShield Wizard window for [Select User] is displayed. 8 Enter a user name and click [Next]. Note If you have more than one CLIÉ handheld Enter a user name that is different from the one you use for another CLIÉ handheld. If you set an identical user name for multiple CLIÉ handhelds, errors may occur. Tip If you want to transfer data between CLIÉ handhelds Refer to “Transferring data from another CLIÉ™ handheld” in the “Handbook” (PDF format). 9 Click [Install].
Step 2: Registering your CLIÉ handheld You can register your CLIÉ handheld by following the on-screen instructions. With your permission, Sony will keep you informed of special opportunities. Also, your registration information helps Sony assist you if you call for customer support. All of the information you provide is confidential. Notes • To register your CLIÉ handheld online, you need to have an access to the Internet. • You need to register again if you purchase a new CLIÉ handheld.
1 Connect the “A” plug of the USB cable to the USB port of your computer. To the USB port of your computer Note Make sure you connect the USB cable directly to a USB port of your computer. If the USB cable is connected to a computer via another device, such as a USB hub, the HotSync® operation may not work properly.
Step 4: Entering a user name for your CLIÉ handheld 1 Tap [Applica…] from the Home screen of your CLIÉ handheld. The Applications screen is displayed. b 2 Tap (HotSync) in the Applications screen. The HotSync screen is displayed. 3 Tap (HotSync) in the HotSync screen. The HotSync® operation starts and the installation for the required software starts automatically.
4 Click [OK] when your user name is displayed in the Users window of your computer. Note If you have more than one CLIÉ handheld, the user name for your old CLIÉ handheld may be displayed. In this case, select the user name you entered in step 8 in “Step 1: Installing Palm™ Desktop for CLIÉ on your computer” on page 18. Follow the steps below to install CLIE Organizer for PC on your computer.
4 Click [Install]. Installation of CLIE Organizer for PC starts. “InstallShield Wizard Complete” message is displayed in the InstallShield Wizard window when the installation is complete. 5 Click [Finish]. The Image Converter window is displayed. Image Converter is required to be installed to use CLIE Organizer for PC. Follow the onscreen instructions. The Installation CD-ROM window is displayed again after installing Image Converter. 6 Click [Finish] in the Installation CD-ROM window of your computer.
Installing the supplied applications on your CLIÉ™ handheld b For details on supplied applications, refer to “Supplied applications” on page 50. Note The supplied applications are designed to operate on your CLIÉ handheld only. Compatibility with other CLIÉ handhelds or Palm OS® PDAs is not guaranteed. Installing the applications from the supplied Installation CD-ROM 1 2 Quit all applications running on Windows®. Insert the supplied Installation CD-ROM into the CD-ROM drive of your computer.
Basic operations of your CLIÉ™ handheld This chapter explains how to turn on/off your CLIÉ handheld, start an application, enter text, synchronize with your computer, take a picture, and perform a reset. Turning on/off your CLIÉ™ handheld Turning on your CLIÉ handheld Slide down the POWER/HOLD switch. Your CLIÉ handheld turns on, and the last screen you viewed is displayed.
Using an application To use your CLIÉ handheld, you need to start an application. The following explains how to start an application from the Home screen (CLIE Organizer). Displaying the Home screen The screen displayed when you turn on your CLIÉ handheld and tap (Home) is called the Home screen. When you purchase your CLIÉ handheld, CLIE Organizer is assigned to the Home screen by default. When you turn on your CLIÉ handheld for the first time, the Date Book screen of CLIE Organizer is displayed.
Starting an application from CLIE Organizer What is CLIE Organizer? CLIE Organizer is an essential application that manages all applications installed on your CLIÉ handheld. You can start an application from the application tabs which include Date Book, Address Book, To Do List, Free Notes, Memo Pad, Viewer, Reference, and Applications. You can also synchronize the data you entered in CLIE Organizer with CLIE Organizer for PC installed on your computer.
• Memo Pad You can take text format memos. Text files created on your computer can also be read. • Viewer You can display the list of pictures, movie files, voice memos, and Free Notes memos. You can also tap the files to view or play. You can use some reference items, such as [Conversion Table], [Sizes], and [Temperatures and Precipitations], for useful information. New items can be added later. Starting other applications 1 Tap [Applica...] in CLIE Organizer. The Applications screen is displayed.
Quitting the application You do not need to save data manually on your CLIÉ handheld as you do on a computer, although some applications require data be saved. b For details, refer to the “CLIÉ Application Manual” (HTML format). To switch from one application to another, perform either of the following methods. z Tap a tab to start another application. If you are using an application other than the applications of CLIE Organizer, return to the Home screen once and tap a tab.
1 Press the BACK button when the Home screen is displayed. The current application is selected. 2 Rotate the Jog Dial™ navigator to select an application to start. An application is selected. Rotate up or down b 3 Press the Jog Dial™ navigator. The selected application starts.
Tip To select an application by category Tap at the top right of the Applications screen to select the category you want. The category list Pressing the application buttons You can also start the applications by pressing the application buttons. The default setting of the application buttons are: Date Book, Free Notes, and CLIE Organizer. Application buttons Tips • Even when your CLIÉ handheld is off, you can start an application by pressing one of the application buttons.
Entering text Using Graffiti® 2 writing to enter text Using the Graffiti® 2 writing area of your CLIÉ handheld You need to write the Graffiti® 2 strokes in the Graffiti® 2 writing area in the lower screen of your CLIÉ handheld to enter text. The Graffiti® 2 writing area is divided into two parts.
Entering text You need to start an application and display the screen in which you want to enter text. Follow the steps below to enter text. 1 2 3 Start an application, such as Date Book, in which you want to enter text. Tap a line for the insertion point where text is to be entered. Write the Graffiti® 2 strokes in the Graffiti® 2 writing area.
Other ways to enter text There are some other ways to enter text into your CLIÉ handheld. You can use whichever is the most comfortable for you. z Handwriting system There is another way of using the handwriting system besides Graffiti® 2. b For details, refer to “Entering text on your CLIÉ™ handheld” in the “Handbook” Decuma Input You can enter text using Decuma Input, which converts your handwriting into typed text as you write.
Using data You can use data from another application to easily create new data in an application. You can use data efficiently by following procedures. Creating new data from the text data of other applications For example, follow the steps below to use data from another application in Address Book. 1 2 In an application other than Address Book, drag the text you want to use with the stylus. Press (Data Assistant). The menu is displayed in the right of the screen. 3 Tap [New Address data].
5 Tap [OK]. Address Book starts and the data you created is displayed. Tips Creating new data by searching the text data of other applications For example, follow the steps below to create new data by searching the data in Address Book. 1 2 In an application other than Address Book, drag the text you want to search with the stylus.
4 Select the operation you want for the search results. You can select the following operations. A [V]: Tap to display the search results in other applications. B [Detail]: Select the data from the search results, and tap this to display detailed information on the data. When you select the data of Date Book, Address Book, or Free Notes, you can also select the item in the To Do Detail, Address Detail, or Free Notes Detail screen.
Synchronizing data between your CLIÉ handheld and computer by entering a schedule event (the HotSync® operation) What is the HotSync® operation? b For details, refer to “Exchanging and updating files/data using the HotSync® operation (Other HotSync® operations)” in the “Handbook” (PDF format). For example, follow the procedures below using Date Book and synchronize the data with your computer. Entering a schedule event in Date Book 1 Tap [Date B...] in CLIE Organizer. The Date Book screen is displayed.
5 Drag an image file in the contents field with the stylus to where you want to put it. The image file is put. b Contents field Tip A movie file, voice memo, and Free Notes memo can also be put on the screen. b For details on how to use Date Book, refer to “CLIE Organizer-Date Book” in the “CLIÉ Application Manual” (HTML format). Performing the HotSync® operation 1 2 3 Turn on your computer. Connect your CLIÉ handheld and computer via the supplied USB cable (page 20). Tap [Applica...
5 Tap (HotSync) in the HotSync screen. The HotSync® operation starts. When the HotSync® operation is complete, the following screen is displayed. 1 Double-click desktop. (CLIE Organizer for PC) on the Windows CLIE Organizer for PC starts and the Date Book window is displayed. Tip You can also click [Start], select [Programs] ([All Programs] for Windows XP)[Sony Handheld], and click [CLIE Organizer for PC] to start the software. 2 Click the day you entered the schedule event in the calendar.
To display other application windows (Address Book, To Do List, Memo Pad, Free Notes, and Reference) Click any icon on the left side of the window. Performing the HotSync® operation using the wireless LAN function You can also synchronize data between your CLIÉ handheld and computer using the wireless LAN function.
Taking pictures using the built-in camera You can take pictures and view image files using your CLIÉ handheld as a digital still camera. b For details on CLIE Camera, refer to “Still images” in the “CLIÉ Application Manual” (HTML format). 1 Slide the Lens Cover Lever down, as shown in the illustration. The lens cover is opened and CLIE Camera starts. The first time you start CLIE Camera, a message about adjustment for the Flicker control setting is displayed.
3 Slide the Lens Cover Lever up. The lens cover is closed. Notes • By taking pictures, hold your CLIÉ handheld firmly with both hands and press the CAPTURE button slowly. • After the CAPTURE button is pressed when the viewfinder blacks out, your CLIÉ handheld captures an image. At this moment, do not move your CLIÉ handheld, otherwise the picture will be blurred. • Your CLIÉ handheld is equipped with a flicker control feature. However, flicker may occur under certain conditions.
Recording/Playing back a voice memo (Voice Recorder) You can record sounds using the built-in microphone of your CLIÉ handheld. You can also use the voice memo as an alarm sound or attach it to an e-mail. b For details, refer to “Voice Recorder” in the “CLIÉ Application Manual” (HTML Basic operations of your CLIÉ™ handheld format). Recording a voice memo 1 Slide down the VOICE REC switch. Voice Recorder starts, and voice memo recording starts. Speak directly into the built-in microphone.
Playing back a voice memo You can play back a voice memo using Voice Recorder, [Viewer] of CLIE Organizer, or CLIE Viewer. b For details on each application, refer to each application in the “CLIÉ Application Manual” (HTML format).
Restarting your CLIÉ™ handheld Normally, you do not need to reset your CLIÉ handheld. However, if your CLIÉ handheld does not turn on or respond, performing a soft reset may solve the problem. To reset your CLIÉ handheld, follow the procedure below. All records and add-on applications stored on your CLIÉ handheld are retained even after performing a soft reset. Gently press the RESET button with the stylus. The system shuts down and your CLIÉ handheld restarts.
Performing a hard reset If a soft reset does not solve the problem, you may need to perform a hard reset to restart your CLIÉ handheld. Notes • All records and add-on applications stored on your CLIÉ handheld will be erased by performing a hard reset. • Perform a hard reset only if a soft reset does not solve the problem. However, you can restore the data if you have made a backup on your computer via the HotSync® operation*. * Note that some data cannot be backed up.
4 Press (the Left button) on your CLIÉ handheld. The Left button is on the left side when the display of your CLIÉ handheld is face up. Press (the Left button) (the Left The hard reset is performed. After restarting, your CLIÉ handheld displays “palm POWERED”, “SONY” and “CLIÉ”, followed by the SETUP screen. Refer to “Step 2: Performing the initial setup after turning on your CLIÉ handheld for the first time” on page 9 for the initial setup.
Supplied applications The following applications are supplied with your CLIÉ handheld. b For details, refer to the “CLIÉ Application Manual” (HTML format). Types of applications There are two types of applications: • Applications already installed on your CLIÉ handheld • Applications you need to install on your computer b For details on how to install applications, refer to “Installing the supplied applications on your CLIÉ™ handheld” on page 25.
Other applications Applications that are run on your CLIÉ handheld. To start the following applications, tap the application icon in the Applications screen, which can be displayed by tapping [Applica…] in CLIE Organizer. Address Book You can manage addresses and telephone numbers. Supplied applications Applications You can display the CLIE Launcher. b For details on the CLIE Launcher, refer to “CLIÉ™ handheld basic operations: Using the CLIE Launcher” in the “Handbook” (PDF format).
CLIE Mail You can browse, send, and receive e-mail messages with your CLIÉ handheld. Notes • You must be connected to the Internet beforehand to send and receive e-mail messages. • When you want to send an e-mail message from your computer to your CLIÉ handheld, you need to install CLIE Mail Conduit on your computer from “CLIÉ Utilities” of the Installation CD-ROM Menu. CLIE FAQ You can refer to CLIE FAQ for questions about operations on your CLIÉ handheld.
HotSync You can synchronize data between your CLIÉ handheld and computer. You can also save backup data on your computer. Macromedia Flash Player 5 You can play the Macromedia Flash files. Prepare a “Memory Stick” media. Memo Pad Supplied applications You can take text format memos. Memory Stick Backup You can make a backup of an application or data on your CLIÉ handheld to a “Memory Stick” media. Prepare a “Memory Stick” media.
NetFront v3.1 for CLIE You can browse website. Note You must be connected to the Internet beforehand. Picsel Viewer for CLIE You can view documents created in Microsoft Word/Excel/PowerPoint® or PDF files on your CLIÉ handheld. Prepare a “Memory Stick” media. Preferences You can customize various settings for your CLIÉ handheld. Security You can lock your CLIÉ handheld with a password. You can also set to hide or mask private data.
Applications that are run on your computer. To use the following software, install it on your computer from the supplied Installation CD-ROM beforehand. CLIE Update Wizard You can update the contents of your CLIÉ handheld from Sony CLIÉ handheld support page via the Internet. Install CLIE Update Wizard on your computer from “CLIÉ Utilities” of the Installation CD-ROM Menu, and make sure you connect your CLIÉ handheld to your computer with the USB cable and plug adapter.
Intellisync Lite You can synchronize data of Date Book, Address Book, To Do List, etc., on your CLIÉ handheld with Microsoft Outlook or Lotus Organizer on your computer. Install Intellisync Lite on your computer from “CLIÉ Utilities” of the Installation CD-ROM Menu, and make sure you connect your CLIÉ handheld to your computer with the USB cable and plug adapter.
Using CLIÉ Manuals with your computer You can also use the other manuals of your CLIÉ handheld that are stored on the supplied Installation CD-ROM. The manuals are to be read on your computer. Note Tip You can open CLIÉ Manuals from the supplied Installation CD-ROM. b For details, refer to “Opening CLIÉ Manuals from the supplied Installation CD-ROM” on page 60. Manuals Overview You can read each manual installed on your computer to use your CLIÉ handheld more effectively.
How to perform basic operations and to use advanced features of your CLIÉ handheld Handbook “Handbook” is a PDF format manual. It explains the basic operations and advanced features of your CLIÉ handheld in detail. How to solve problems you may have If you have any problems while using your CLIÉ handheld, refer to “Frequently Asked Questions” on page 65 first. If the problem persists, read “Troubleshooting Q&A” to solve the problem. Troubleshooting Q&A “Troubleshooting Q&A” is a PDF format manual.
Opening CLIÉ Manuals Follow the steps below to open CLIÉ Manuals. 1 Double-click (CLIÉ Manuals PEG-TH55) on the Windows desktop. The CLIÉ Application Guide PEG-TH55 window is displayed. You can also click [Start], select [Programs] ([All Programs] for Windows XP)[Sony Handheld]-[About PEG-TH55], and click [CLIÉ Manuals] to start CLIÉ Manuals. 2 Click the manual you want to read. The selected manual is displayed. Note To read the PDF manuals, Adobe Reader must be installed on your computer.
Opening CLIÉ Manuals from the supplied Installation CD-ROM 1 Insert the supplied Installation CD-ROM into the CD-ROM drive of your computer. The Installation CD-ROM window is displayed. 2 Click [Finish] at the bottom left of the Installation CD-ROM window. 3 Double-click (My computer) on the Windows desktop. For Windows XP, click [Start] at the bottom left of the Windows desktop, then click [My Computer] on the displayed screen. 4 Right-click [CLIE], and select [Open].
Reading the PDF manuals on your computer The following explains how to read the PDF format manuals on your computer. B Bookmarks are displayed. Click each title to display the page. Click to display the directories of the chapters. C Buttons for zooming in/out the page. D Click here and drag to scroll the page. E You can display the linked page by clicking a point where is displayed. F Buttons for displaying the previous or next page.
4 Click [Install] to install Adobe Reader. Follow the on-screen instructions. 5 Click [Finish]. The Installation CD-ROM window closes. Reading the HTML manual on your computer (CLIÉ Application Manual) The following explains how to read the HTML format manual on your computer. Note You need Microsoft Internet Explorer version 5.0 or later to display “CLIÉ Application Manual” properly. A Click any application to display the explanation in detail.
Troubleshooting If you have problems, please follow the procedure below. Make note of any messages or alerts that are displayed. Step 1: Refer to CLIE FAQ, this manual, “Troubleshooting Q&A”, or the manual of each application • Refer to CLIE FAQ on your CLIÉ handheld Troubleshooting • Read “Frequently Asked Questions” on page 65. • Refer to the “Troubleshooting Q&A” (PDF format). • Click (CLIÉ Manuals PEG-TH55) on the Windows desktop for more information on applications.
Making a backup of the data or applications on your CLIÉ handheld Sony recommends that you make a backup of your data in case of unexpected problems. Backing up your data will ensure that it can be restored again on your CLIÉ handheld, even if you have to perform a hard reset. Making a backup using Memory Stick Backup Use “Memory Stick” media and Memory Stick Backup on your CLIÉ handheld to back up data and applications on your CLIÉ handheld. b “Memory Stick” media (sold separately) is required.
Frequently Asked Questions If the solutions mentioned in this section do not solve your problem, refer to the “Troubleshooting Q&A” (PDF format).
• Palm™ Desktop for CLIÉ does not start or cannot be selected from the menu • CLIE Organizer for PC does not start or cannot be selected from the menu • HotSync Manager does not start.
My CLIÉ handheld does not work properly I cannot turn on my CLIÉ handheld B Is the POWER/HOLD switch of your CLIÉ handheld in HOLD mode (page 88) ? Your CLIÉ handheld does not work when the POWER/HOLD switch is in HOLD mode. Make sure you release HOLD mode. Note If you press the application buttons, Data Assistant button, or CAPTURE button, slide down the VOICE REC switch, or open the camera lens cover during HOLD mode, the POWER LED blinks 3 times. However, your CLIÉ handheld does not operate.
My CLIÉ handheld keeps turning itself off B Your CLIÉ handheld is designed to turn itself off after a period of inactivity (Automatic power-off). You can set the automatic power-off time by selecting time for [Auto-off After:] in [General] of the Preferences screen. Note The maximum idle time is 3 minutes. b For details, refer to “Customizing your CLIÉ™ handheld (Preferences): Setting the automatic power-off time” in the “Handbook” (PDF format).
Applications do not operate properly after a soft reset is performed B If you encounter application problems (such as improper operations, unusual display, or freezing during a soft reset) after you performed a reset, the reset may not be completed properly. In such a case, perform a soft reset once again (page 47). If you still cannot solve your problem, try a hard reset (page 48).
I cannot enter text properly My CLIÉ handheld does not recognize handwritten characters (when using Graffiti® 2 ) B To have your CLIÉ handheld recognize handwritten characters entered with the stylus, you must use Graffiti® 2. b For details, refer to “Entering text on your CLIÉ™ handheld: Using Graffiti® 2 writing to enter text” in the “Handbook” (PDF format). B Make sure you enter the Graffiti® 2 strokes in the Graffiti® 2 writing area.
The HotSync® problems I cannot perform the local HotSync® operation Verifying your CLIÉ handheld B Is the connector between your CLIÉ handheld and the plug adapter dirty? Connect and disconnect your CLIÉ handheld and the plug adapter several times to clean the connector. B Are your CLIÉ handheld with the plug adapter and the USB cable properly connected (page 20)? B Is there sufficient memory space in your CLIÉ handheld? Delete any unnecessary data/files and then perform the HotSync® operation again.
B Is the USB port active? Check whether the USB port works normally by connecting another USB device, such as a USB mouse. B If you use an extended terminal devices for laptop computers, such as a port replicator, you may not be able to use either the port replicator or the USB port of your computer. B Quit all applications other than CLIE Organizer for PC (or Palm™ Desktop for CLIÉ).
B Is the application set not to synchronize files? Click (HotSync) in the task tray (Notification area) at the bottom right of your computer window and select [Custom...] from the menu. Check that the application is set to synchronize files. B Is third party backup or synchronization software installed on your computer or CLIÉ handheld? In such a case, you may not synchronize some data/files using CLIE Organizer for PC (or Palm™ Desktop for CLIÉ).
CLIE Organizer for PC does not start or cannot be selected from the menu B Is CLIE Organizer for PC properly installed on your computer? The hardware or software of your computer may not be compatible with CLIE Organizer for PC. Uninstall CLIE Organizer for PC and reinstall it. B Is Palm™ Desktop for CLIÉ installed on your computer? CLIE Organizer for PC cannot be installed before installing Palm™ Desktop for CLIÉ on your computer. HotSync Manager does not start.
Do not use a USB hub If you connect your CLIÉ handheld to your computer via a USB hub, you may not be able to perform the HotSync® operation properly. Make sure you connect the USB cable directly to a USB port of your computer. Some computers have the hub function built into their internal circuitry. Contact your computer manufacturer to check whether the USB port of your computer is connected to an internal USB hub.
Customer Support and Customer Registration ■ For customer support information Double-click (CLIÉ Info) on the Windows desktop, and select [CLIÉ™ Handheld Support]. ■ For online customer registration (For customers in the U.S.A. , Canada, and Europe only) Double-click (CLIÉ Info) on the Windows desktop, and select [Sony CLIÉ™ Registration].
Notes on use Handling your CLIÉ handheld Cleaning your CLIÉ handheld • Clean your CLIÉ handheld with a soft, dry cloth. • Wipe any dirt and dust from the camera lens by using a soft damp cotton swab. If condensation occurs Turn off your CLIÉ handheld for approximately one hour to clear condensation before use. If you leave condensation within the camera lens, you may not be able to take clear pictures. Cleaning the stylus Tapping or dragging the screen with a dirty stylus may damage the screen surface.
Battery considerations Battery safety To avoid battery leakage, heat generation, firing, or bust, observe the following: • Do not use any other type of battery in your CLIÉ handheld. • Do not charge the battery in any other way than as specified in this manual. • Do not throw the battery into fire. • Do not attempt to short-circuit the battery. • Do not take the battery apart. • Do not modify the battery. • Do not heat the battery in an oven or micro wave.
Using peripheral devices If a low battery warning is displayed while using peripheral devices, charge your CLIÉ handheld immediately. If you continuously use it, it automatically turns off and cannot operate until you charge it. When the battery power gets low Do not let the remaining battery power indicator reach 0 If you leave your CLIÉ handheld in an uncharged state (the remaining battery power indicator reaches 0 ), all user data stored on your CLIÉ handheld will be erased.
Specifications OS Weight Palm OS® 5 (Ver.5.2) Approx. 5.8 oz (165 g) (including the supplied stylus) Approx. 6.5 oz (185 g) (when attaching the protective cover) CPU Sony Handheld Engine Memory Operating temperature Total: 32 MB (RAM) User memory available: Approx. 32 MB 41 ºF to 95 ºF (5 ºC to 35 ºC) Audio frequency response External input/output Interface connector IrDA (1.2) Bluetooth® (for models containing the Bluetooth® wireless technology only) Wireless LAN (IEEE 802.
Voice encoding/decoding format IMA ADPCM (1ch, 4bit) SP mode (22 kHz) LP mode (8 kHz) Maximum audio recording time (when using a 128MB “Memory Stick” media, sold separately): SP mode: Approx. 190 minutes LP mode: Approx.
Approx. 4 hours (when viewing movie files with the backlight on*) Recording voice memos (in continuous mode): Approx. 19.5 hours (when recording voice memos in HOLD mode) Approx. 6 hours (when recording voice memos not in HOLD mode and the backlight on*) Performing data communication (for models containing the Bluetooth® wireless technology only): Approx.
Your CLIÉ handheld supports “Memory Stick” media, “MagicGate Memory Stick” media, “Memory Stick Duo” media, “Memory Stick PRO” media, and “Memory Stick PRO Duo” media. Note that data requiring the MagicGate function cannot be viewed or recorded with “Memory Stick PRO” media and “Memory Stick PRO Duo” media. Communication method Bluetooth® standard Ver.1.1 2.4 GHz band (2.4000 GHz - 2.
System requirements The following are the system specifications required to run Palm™ Desktop for CLIÉ and software supplied on the Installation CD-ROM: • OS: Windows Millennium Edition, Windows 2000 Professional, Windows XP Home Edition, Windows XP Professional • CPU: Pentium II 400MHz or faster (Pentium III 500MHz or faster is recommended) • RAM: 96MB or more (128MB or more is recommended, 256MB or more is recommended for Windows XP) • Hard disk drive space: 200MB or more (350MB or more is recommended) •
CLIÉ™ handheld components This chapter explains each part of your CLIÉ handheld, the supplied accessories, and additional information.
A Headphone Jack For headphones/earphones with a φ3.5 stereo mini jack (commercially available). B CAPTURE Button (Page 43) Press the CAPTURE button to take pictures. C Lens Cover Lever (Page 43) Slide to open/close the lens-cover and start CLIE Camera. D “Memory Stick” LED (Page 89) Blinks orange while your CLIÉ handheld is writing data to, or reading data from a “Memory Stick” media. E “Memory Stick” Slot (Page 90) Insert a “Memory Stick” media into this slot.
Back panel E IR Port (Page 90) You can beam data between your CLIÉ handheld and another CLIÉ handheld or Palm OS® PDA. B Left/Right Buttons Moves the selection area of an item or an operation. Depending on the application, unique features such as displaying the previous or next screen are assigned. F BACK Button Cancels the selection of an item or an operation. Depending on the application, unique features such as restoring to the previous screen are assigned.
POWER/HOLD switch z Turning on/off your CLIÉ handheld Slide down the POWER/HOLD switch The POWER/HOLD switch will return to the center position after being released. Your CLIÉ handheld powers on, the last screen viewed is displayed, and the POWER LED lights green. To turn off your CLIÉ handheld, slide down the POWER/HOLD switch again and then release. POWER/HOLD Switch z Turning on/off the LCD backlight Slide down the POWER/HOLD switch and hold it for more than two seconds.
Using “Memory Stick” media z Inserting “Memory Stick” media 1 3 Pull out the “Memory Stick” slot cover. 2 Open the “Memory Stick” slot cover. Insert a “Memory Stick” media. The “Memory Stick” LED blinks orange while your CLIÉ handheld is writing data to, or reading data from a “Memory Stick” media. CLIÉ™ handheld components Note Insert a “Memory Stick” media in the right direction. If you forcibly insert a “Memory Stick” media in the wrong direction, the “Memory Stick” slot may be damaged.
z Removing “Memory Stick” media b Push “Memory Stick” media in Pull “Memory Stick” media out Note Make sure that your CLIÉ handheld is not writing data/files to, or reading data/files from a “Memory Stick” media before removing it. (The “Memory Stick” LED blinks when it is reading or writing data/files.) If you remove a “Memory Stick” media while the “Memory Stick” LED is blinking, recorded data/files may be deleted or damaged.
Locating the components of the Home screen (CLIE Organizer) Tip If a different screen is displayed, tap B Status bar (Page 92) C Home icon Tap to display the Home screen. D Menu icon Tap to display menu of the current application. E Find icon Tap to display the dialog box finding data or applications. F Silk Plug-In icon (Page 92) G Application Tabs Tap to switch the application. H Resize icon Tap to switch the screen view.
Status bar The status bar displays the following icons. Additional icons will be displayed according to the applications in use. A Tap to display the Home screen. B Tap to display the menus of the current application. C Tap to display the Find dialog box. D Tap to display the Silk Plug-In screen. You can edit the display and functions of the Silk Screen area by switching the Silk Plug-In.
Each icon indicates the information on the “Memory Stick” media inserted into your CLIÉ handheld. “Memory Stick” media is inserted. “Memory Stick” media is not inserted. “Memory Stick” media is write-protected. “Memory Stick” media is not read correctly. A “Memory Stick” compatible device is inserted. Tap the icon to display the Media Info dialog box when “Memory Stick” media is inserted. 1 Media type You can choose another device by tapping V next to [Device:]. 2 Tap to display CLIE Files.
is displayed when the Bluetooth® function is used. (for models containing the Bluetooth® wireless technology only) 1 Status for the Bluetooth® : off : Waiting or in use 2 Power On/Power Off Tap to switch [Power On (Waiting for signal)] and [Power Off (No transmission)]. Tap to display the Adjust Volume dialog box. 1 Turns off the sound of your CLIÉ handheld. When Muting mode is selected, is displayed in the status bar. 2 Adjusts the volume level for playing back audio files.
Icons for switching Graffiti® 2/Software keyboard (When standard plug-in is selected) You can switch between the Graffiti® 2 writing area and the software keyboard by tapping this icon. Operating the software keyboard is the same as the on-screen keyboard, however applicaions can be used without minimizing the current screen.
Protective Cover You can remove the protective cover as follows. Removing the protective cover 1 2 3 Push in the direction 1 with your left hand. Remove the right side of the protective cover from the hinge of your CLIÉ handheld by pulling it in the direction 2. Remove the protective cover completely from your CLIÉ by pushing in the direction 3. Attaching the protective cover 1 2 Align the clasps of the protective cover with the hinges of your CLIÉ handheld.
3 After attaching the protective cover, open and close it to check. Notes • Do not open the protective cover too far or damage will occur. • Do not carry your CLIÉ handheld by the protective cover only or damage will occur.
z INDEX A E AC power adapter . . . . . . . . . . . . . 6, 8 Address Book . . . . . . . . . . . . . . . . . . 51 Applications . . . . . . . . . . . . . . . . . . . 51 Installing . . . . . . . . . . . . . . . . . . . . 25 Quitting . . . . . . . . . . . . . . . . . . . . 30 Using . . . . . . . . . . . . . . . . . . . . . . 27 Audio Player . . . . . . . . . . . . . . . . . . . 51 Entering text . . . . . . . . . . . . . . . . . . . 33 B Home screen . . . . . . . . . . . . . . . . . . . 91 HotSync. . . . .
P T Palm™ Desktop for CLIÉ . . . . . . . . . 17 Picsel Viewer for CLIE . . . . . . . . . . . . 54 Preferences . . . . . . . . . . . . . . . . . . . . 54 Protective Cover . . . . . . . . . . . . . . . . 96 Time zone . . . . . . . . . . . . . . . . . . . . . 13 To Do List . . . . . . . . . . . . . . . . . . . . . 54 R USB cable . . . . . . . . . . . . . . . . . . . . . 20 USB port . . . . . . . . . . . . . . . . . . . . . . 21 U Restarting Hard reset . . . . . . . . . . . . . . . . . . .
Sony Personal Entertainment Organizer PEG-TH55 3-089-698-11 (1)
Sony Personal Entertainment Organizer PEG-TH55 3-089-698-11 (1)
Sony Personal Entertainment Organizer PEG-TH55 3-089-698-11 (1)
On the trademarks Before using your CLIÉ handheld, make sure you read the accompanying End-User’s License Agreement. • Sony, CLIÉ, “Memory Stick”, “Memory Stick Duo”, “Memory Stick PRO”, “Memory Stick PRO Duo”, “MagicGate Memory Stick”, Jog Dial, and their logos are trademarks of Sony Corporation. • Palm, Palm Powered, the Palm logo, the Palm Powered logo, Palm OS, Graffiti, HotSync and the HotSync logo are trademarks of PalmSource, Inc. • Graffiti 2 powered by Jot®.
For the latest information on support, CLIÉ products and accessories, check our official Sony CLIÉ website For customers in the U.S.A. and Canada http://www.sony.com/clie/ For customers in Australia, Hong Kong, Malaysia, Mexico, New Zealand, Singapore, Taiwan, Thailand, and U.A.E. http://www.sony.net/clie-online/ For customers in Europe http://www.sony-europe.