
User Manual


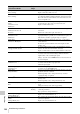
Table Of Contents
- Table of Contents
- Overview
- Preparations
- Recording
- Basic Operation Procedure
- Selecting the Video Format
- Switching the ND Filters
- Using the 5600K CC Filter
- Adjusting the White Balance
- Adjusting the Black Balance
- Displaying the Markers and Zebra Patterns
- Setting the Gain
- Setting the Electronic Shutter
- Adjusting the Iris
- Adjusting the Zoom
- Adjusting the Focus
- Reducing Flickers
- Setting the Time Data
- Recording Audio Signals
- Outputting the Color Bars and Reference Tone
- Recording Shot Marks
- Adding the OK Mark
- Rec Review
- Changing Functions of the Assignable Buttons
- Interval Recording
- Frame Recording
- Picture Cache Recording
- Slow & Quick Motion Recording
- Freeze Mix: Image Alignment
- Picture Profiles
- Deleting Clips
- Operating Planning Metadata
- Playback
- Thumbnail Screens
- Playing Back Clips
- Clip Operations
- Clip Operation Menus
- Basic Operations of the Clip Operation Menus
- Displaying the Detailed Information of a Clip
- Adding/Deleting the OK Mark to/from a Clip (HD Mode Only)
- Copying Clips
- Deleting Clips
- Displaying the EXPAND CLIP Screen
- Displaying the SHOT MARK Screen (HD Mode Only)
- Adding/Deleting Shot Marks (HD Mode Only)
- Changing the Index Frame (HD Mode Only)
- Dividing a Clip (HD Mode Only)
- Status Displays
- Menu Configuration and Detailed Settings
- Storing/Retrieving the Setting Data
- Connecting External Devices
- Appendixes

Error/Warning Indications
149
Appendixes
The camcorder informs you of situations where
warning, caution, or an operation check is
required, through messages on the LCD monitor/
viewfinder screen, the tally lamps, and a buzzer.
The buzzer is output to the built-in speaker or to
the headphones connected via the headphone
connector. The buzzer volume can be adjusted
with “Alarm Level” in “Audio Output” (page
114) of the AUDIO SET menu.
The camcorder stops all operations, including recording, if an error indication occurs (see below).
When one of the following indications is generated, follow the message to clear the problem.
Error/Warning Indications
Error Indications
Error indication on
LCD/viewfinder
Buzzer Tally
lamps
Cause and measures
E + Error code Continuous Rapidly
flashing
The camcorder may be defective.
Turn off the power and check that the connected devices,
cables, and media are in proper condition. If the error persists
when you reapply power, consult Sony service personnel.
(If power cannot be turned off by setting the power switch to
OFF, remove both the battery pack and the DC IN source.)
Warning Indications
Warning indication
on LCD/viewfinder
Buzzer Ta ll y
lamps
Cause and measures
Media Near Full Intermittent Flashing Free space on the SxS memory card has become insufficient.
Replace it with another at the earliest opportunity.
Media Full Continuous Rapidly
flashing
No space is left on the SxS memory card. Recording, clip
copying and clip division cannot be performed.
Replace it with another.
Battery Near End Intermittent Flashing The battery power will be exhausted soon.
Charge the battery pack at the earliest opportunity.
Battery End Continuous Rapidly
flashing
The battery pack is exhausted. Recording cannot be
performed.
Connect a power source via the DC IN connector or stop
operation to charge the battery pack.
Temperature High Intermittent Flashing The internal temperature has risen above a safe operation
limit.
Suspend operation, turn off the power, and wait until the
temperature falls.
Voltage Low Intermittent Flashing The DC IN voltage has become low (stage 1).
Check the power supply.
Insufficient Voltage Continuous Rapidly
flashing
The DC IN voltage is too low (stage 2). Recording cannot be
performed.
Connect other power source.
Battery Error
Please Change Battery.
An error was detected with the battery pack.
Replace the battery pack with a normal one.