
User Manual

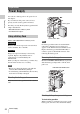
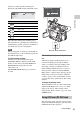
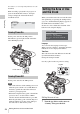
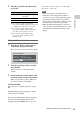
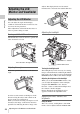

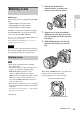

Table Of Contents
- Table of Contents
- Overview
- Preparations
- Recording
- Basic Operation Procedure
- Selecting the Video Format
- Switching the ND Filters
- Using the 5600K CC Filter
- Adjusting the White Balance
- Adjusting the Black Balance
- Displaying the Markers and Zebra Patterns
- Setting the Gain
- Setting the Electronic Shutter
- Adjusting the Iris
- Adjusting the Zoom
- Adjusting the Focus
- Reducing Flickers
- Setting the Time Data
- Recording Audio Signals
- Outputting the Color Bars and Reference Tone
- Recording Shot Marks
- Adding the OK Mark
- Rec Review
- Changing Functions of the Assignable Buttons
- Interval Recording
- Frame Recording
- Picture Cache Recording
- Slow & Quick Motion Recording
- Freeze Mix: Image Alignment
- Picture Profiles
- Deleting Clips
- Operating Planning Metadata
- Playback
- Thumbnail Screens
- Playing Back Clips
- Clip Operations
- Clip Operation Menus
- Basic Operations of the Clip Operation Menus
- Displaying the Detailed Information of a Clip
- Adding/Deleting the OK Mark to/from a Clip (HD Mode Only)
- Copying Clips
- Deleting Clips
- Displaying the EXPAND CLIP Screen
- Displaying the SHOT MARK Screen (HD Mode Only)
- Adding/Deleting Shot Marks (HD Mode Only)
- Changing the Index Frame (HD Mode Only)
- Dividing a Clip (HD Mode Only)
- Status Displays
- Menu Configuration and Detailed Settings
- Storing/Retrieving the Setting Data
- Connecting External Devices
- Appendixes

Attaching a Lens
29
Preparations
Usable lenses
The following lenses are supplied with the PMW-
F3K.
• SCL-P35T20 (focal length: 35mm)
• SCL-P50T20 (focal length: 50mm)
• SCL-P85T20 (focal length: 85mm)
In addition to equivalents of the lenses supplied
with the PMW-F3K, various PL-mount lenses
can be used with the PMW-F3K/F3L.
For other lenses usable with the PMW-F3K/F3L, ask
a Sony service representative.
For information on handling lenses, refer to the
operation guide of the lenses.
Do not leave the camcorder with the lens facing
the sun. Direct sunlight can enter through the lens,
be focused in the camcorder, and cause fire.
Notes
• Turn off the camcorder before attaching/
removing the lens.
• The camera interface of the camcorder is set to
“Type C” for the lenses supplied with the
PMW-F3K and those having a Cooke
connector. When attaching a lens with an
ARRI
1)
connector (usable in the future), set the
interface to “Type A” with “Lens IF” (page
113) of the CAMERA SET menu. Or set it to
“Off” for other lenses.
If the interface setting is not correct, a warning
message will be displayed when you turn on the
camcorder.
For details on menu operations, see “Basic Menu
Operations” on page 107.
1)ARRI Group
1 Turn the lens mount frame
counterclockwise and remove the
mount cap from the lens mount.
2 Align the recess of the lens with the
alignment pin at the upper part of the
lens mount of the camcorder and set the
lens in place.
3 While holding the lens, turn the lens
mount frame clockwise to secure the
lens.
When using an ARRI LDS lens or a Cooke /i lens,
align the contacts of the lens with the
corresponding hot shoe of the camcorder.
Attaching a Lens
Caution
Attaching a Lens
2
3
Hot shoe for ARRI LDS lenses
Hot shoe for Cooke /i lenses