3-864-750-12(1) Stereo Turntable System Operating Instructions PS-LX350H © 1998 by Sony Corporation 1
WARNING To prevent fire or shock hazard, do not expose the unit to rain or moisture. For the customers in the U.S.A. This symbol is intended to alert the user to the presence of uninsulated “dangerous voltage” within the product’s enclosure that may be of sufficient magnitude to constitute a risk of electric shock to persons. This symbol is intended to alert the user to the presence of important operating and maintenance (servicing) instructions in the literature accompanying the appliance.
Welcome! Thank you for purchasing the Sony Stereo Turntable System. Before operating the unit, please read this manual thoroughly and retain it for future reference. TABLE OF CONTENTS Getting Started Unpacking 3 Assembling the Turntable 4 Hooking up the Turntable 5 Adjusting the Turntable 6 Convention The following icon is used in this manual: Indicates hints and tips for making the task easier.
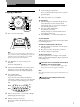
Getting Started Assembling the Turntable 1 4 7 3 2 5 1 6 If your turntable is equipped with a voltage selector, be sure to set the selector to your line voltage. 110V·120V 220V·240V 4 2 Carefully, place the platter on the spindle. 3 Using the ribbon, loop the drive belt around the motor pully. After looping the belt, do not forget to remove the ribbon. 4 Place the rubber mat on the platter.
Getting Started Hooking up the Turntable 1 Connect the supplied audio connecting cord and earth lead to the output terminals and GND terminal at the rear. Be sure to connect the red plug to the R output jack and the white plug to the L output jack. R 2 L GND Connect the cord with the red plug to the lower PHONO IN R input jack on the amplifier and connect the cable with the white plug to the upper PHONO IN L input jack.
Getting Started Adjusting the turntable 6 Return the tone arm to the arm stand. 7 Since the tracking force is zero when the tone arm is properly balanced, set the tracking force scale ring so that “0” lines up with the index line. Before attempting to play any records, be sure to complete the following steps to insure proper tone arm balance, tracking force and anti-skating adjustment.
Operations Playing a Record 1 2 4 1 6,7 5 3 6 3 5 7 Set the cueing lever backward. The tone arm descends slowly to the record and playback begins. 8 Adjust the volume on your amplifier. To stop playing 1 2 Place a record on the platter. 3 Shift the cueing lever forward to lift up the tone arm, return the tone arm to the arm stand. Attach the protective cover onto the cartridge to prevent damage to the stylus. Press the START/STOP button. The platter stops rotating.
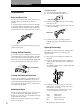
Additional Information To replace the stylus Maintenance 1 2 Turn off the turntable and amplifier. Protect the stylus with the stylus cover. Stylus and Record Care In order to prevent premature stylus and record wear, the stylus and record should be cleaned before playback. To clean the stylus, brush it from back to front using a good quality stylus cleaning brush. Do not clean the stylus with your finger tip. When using a fluid stylus cleaner, make sure not to moisten the stylus too much.
Additional Information Platter does not rotate. Troubleshooting Before going through the check list below, first make sure that: • The power cord is securely connected. • The speaker cords are securely connected. Should any problem persist after you have made these checks, consult your nearest Sony dealer. b Make sure the power cord is inserted all the way into an AC wall outlet. b The drive belt is not completely hooked onto the motor pulley.
Additional Information Parts and Controls 1 2 3 4 5 6 7 8 9 45 r/min adaptor Spindle Strobo lamp and POWER button START/STOP button Rubber mat Platter Cartridge and headshell SPEED button Insulator 0 !¡ !™ !£ !¢ !∞ !§ !¶ !• !ª @º Dust cover Counter weight Hinge ANTI-SKATING dial Headshell holder Arm stand Cueing lever Tone arm PITCH CONTROL Locking collar Finger lift 1 0 2 !¡ 3 !™ 4 !£ !¢ 5 !∞ 6 !§ 7 !¶ 8 !• 9 !ª @º 10
Sony Corporation 12 Printed in Taiwan, R.O.C.