3-867-248-22 (1) DIRECTV Digital Satellite Receiver Operating Instructions Before you begin using your Digital Satellite Receiver for the first time, follow the instructions in “Connecting Your Digital Satellite Receiver” on pages 6-13 and “Setting Up Your Digital Satellite Receiver” on pages 22-33.
WARNING Owner’s Record To reduce the risk of fire or shock hazard, do not expose the unit to rain or moisture. The model and serial numbers are located on the bottom of the Digital Satellite Receiver. The number for the Access Card is on the back of the card and on the carton label. Record these numbers in the space provided below. Refer to these numbers whenever you need to call your sales or service representative regarding this product.
Getting Started! Connecting Your Digital Satellite Receiver (Page 6) Using Your Remote Control (Page 14) + 1 2 4 7 3 5 6 8 9 0 S SATELLITE RECEIVER Setting Up Your Digital Satellite Receiver (Page 22) Using the Program Guide (Page 36) Using the Favorite Stations Guide (Page 39) Setting Locks & Limits (Page 53) 3
Features Congratulations on your purchase of the Sony Digital Satellite Receiver. This manual can help you to become familiar with the many great features of the Digital Satellite Receiver. Check below to find out about some of the most exciting features. Convenience and Ease-of-Use • Access all the system features and functions with the easy-to-use on-screen menu icons. See page 21. • The Program Guide shows the picture and sound in the Media Window™ while you check station and program information.
Contents Carton Contents .................................................... 6 Connection Overview ........................................... 7 Step 1: Inserting the Batteries.............................. 7 Step 2: Connecting the Satellite Dish Antenna and Telephone Line............................................ 8 Step 3: Connecting Your TV.................................. 9 Step 4: Adding a VCR and Audio System .......... 10 Step 5: Connecting the VCR Controller..............
Connecting Your Digital Satellite Receiver Carton Contents Check to make sure the following items are in the Digital Satellite Receiver’s carton. If you are missing any items, contact your Sony dealer. RF Antenna** 9 6 Access Card 8 S R AT E E C L E LIT IV E E R Remote Control* S 0 7 4 1 5 2 + 3 Digital Satellite Receiver AC Power Cord Size AA Batteries RF Coaxial Cable VCR Controller Telephone Cord Audio/Video Cable S-Video Cable** * The RM-Y802 Remote Control shown.
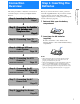
Connection Overview Step 1: Inserting the Batteries Page 7 v Connecting Your Digital Satellite Receiver Follow the procedures or make the connections in each of the steps to connect your Digital Satellite Receiver. Step 1: Inserting the Batteries Before you can use the remote control, you must insert the supplied batteries. If you want to use this remote control to operate other audio/video equipment, such as a TV or VCR, you must set up the remote control (see page 65).
Step 2: Connecting the Satellite Dish Antenna and Telephone Line The SATELLITE IN jack sends power to, and receives satellite signals from, the Satellite Dish Antenna. The telephone line connection periodically sends information about your receiver and Access Card to your service provider.
Step 3: Connecting Your TV Connecting Your Digital Satellite Receiver Connect your TV to the Digital Satellite Receiver as shown below. Refer to your TV’s instruction manual for more information. 1 If you have a local TV antenna or cable company service Connect it to the VHF/UHF IN jack on your Digital Satellite Receiver using a coaxial cable or RF adapter (not supplied). You can view local stations using your TV controls.
Step 4: Adding a VCR and Audio System You can record programs by adding a VCR. You can also connect your Digital Satellite Receiver to an audio system for enhanced sound enjoyment. Audio Receiver 1a If you have a digital or Dolby® Digital audio system (SAT-A50 only) Connect the DIGITAL OUT (OPTICAL) of the Digital Satellite Receiver to the optical digital input of your audio system.
Step 5: Connecting the VCR Controller Connecting Your Digital Satellite Receiver Connect the VCR Controller to allow the Timer & Rec feature to automatically operate your VCR. See “Setting Up the VCR Control Feature” on page 25 for information about setting up the Digital Satellite Receiver to work with your VCR.
Step 6: Connecting the RF Antenna (SAT-A50 only) With the SAT-A50 model you can connect the RF Antenna and operate the Digital Satellite Receiver when installed in a cabinet or from another room in your house using the remote control. See page 31 for information about how to set up the Digital Satellite Receiver to use the RF feature. 1 If you want to use the RF feature RF Antenna Connect the RF Antenna to the RF REMOTE jack of the Digital Satellite Receiver.
Step 7: Connecting the AC Power Cord Connecting Your Digital Satellite Receiver After all other connections are complete, connect the AC Power Cord to the Digital Satellite Receiver.
Viewing Pictures From Your Digital Satellite Receiver Using Your Remote Control RM-Y802 Remote Control (SAT-A50 model) POWER MUTING CABLE 1 TV SAT AUDIO VOLUME + 2 3 CABLE FUNCTION TV SLEEP SAT TV/SAT TV/VIDEO 1 2 3 4 5 6 7 8 9 DISPLAY qa qs qd qf 2 AUDIO VOLUME buttons Adjust the volume of your audio receiver. To operate your audio receiver, you must first set up the remote control (see page 65).
qa POWER buttons Turn on and off the Digital Satellite Receiver, TV and VTR (VCR). To operate your TV or VTR (VCR), you must first set up the remote control (see page 65). qs FUNCTION buttons Select the equipment (CABLE, TV or SAT) that you want to operate. The indicators light up to show which device the remote control is operating. To operate your TV or cable box, you must first set up the remote control (see page 65).
Using Your Remote Control (continued) RM-Y139 Remote Control (SAT-B50 model) POWER MUTING VTR 1 TV SAT qa 1 MUTING button Mutes the volume. Press again to restore the volume. To operate your TV, you must first set up the remote control (see page 65). FUNCTION TV/VIDEO VTR TV SAT 2 qs TV/VTR 3 qd TV/SAT 4 1 2 3 4 5 6 7 8 DISPLAY qf 9 ENTER 0 5 INDEX CATEGORY qh qj JUMP EXIT VOL MENU FAVORITE qk ql CH 9 0 3 TV/VTR button Switches between the inputs of your VCR.
9 VOL buttons Adjust the volume. To operate your TV, you must first set up the remote control (see page 65). q; CODE SET button Lets you program the remote control to operate your TV and other audio/video equipment (see page 65). qs FUNCTION buttons Select the equipment (SAT, TV, VTR) that you want to operate. The indicators light up to show which device the remote control is operating. To operate your TV or VTR (VCR), you must first set up the remote control (see page 65).
Selecting Items In on-screen displays such as the Main Menu and program guides, you must first move the highlight to the item you want, then select the item. RM-Y802 Remote Control (SAT-A50 model) + + 1 2 4 7 1 3 2 4 5 6 8 9 0 7 3 5 6 8 9 0 S S SATELLITE RECEIVER SATELLITE RECEIVER 1 Move the joystick in any direction to move the highlight to the item you want. 2 Press down on the joystick to select the item.
Turning On the Power MUTING POWER CABLE 1 TV SAT AUDIO VOLUME + FUNCTION CABLE TV Press the POWER SAT button to turn on the Digital Satellite Receiver. The POWER indicator lights up. SAT POWER SLEEP TV/SAT TV/VIDEO SAT 1 2 3 4 5 6 7 8 9 Viewing Pictures From Your Digital Satellite Receiver DISPLAY ENTER 0 ALT AUDIO JUMP 2 Press the TV button to turn on the TV.
Changing Channels MUTING POWER CABLE TV 1 Press the SAT FUNCTION button. SAT FUNCTION AUDIO VOLUME + CABLE FUNCTION TV SLEEP SAT SAT TV/SAT TV/VIDEO 1 2 3 4 5 6 7 8 9 DISPLAY 1 2 ENTER 0 Press the CH +/– buttons. The Digital Satellite Receiver tunes to the next channel, and the Station ID and channel number appear in the upper right corner of your TV screen.
Using the On-Screen Displays Using the Main Menu The Main Menu acts as a gateway to all of the features your Digital Satellite Receiver has to offer. ALT AUDIO JUMP FAVORITE INDEX CATEGORY GUIDE VOL MENU 1 VTR3 2 DVD AMP The Main Menu appears. CH EXIT CODE SET Press the MENU button. MENU RM-Y802 SATELLITE RECEIVER Highlight and select the feature you want to access. GUIDES (Page 34) Access the many guides that help you find the program you want.
Setting Up Your Digital Satellite Receiver (SYSTEM) Using the System Menu ALT AUDIO JUMP FAVORITE INDEX CATEGORY GUIDE VOL MENU CH The System Menu provides many ways to adjust your Digital Satellite Receiver so it matches your preferences and optimizes the conditions of your home entertainment system. 1 The SYSTEM pop-up appears. EXIT CODE SET VTR3 2 DVD AMP Press the MENU button, then highlight and select SYSTEM.
ALT AUDIO JUMP FAVORITE INDEX CATEGORY GUIDE VOL MENU CH EXIT CODE SET VTR3 2 DVD AMP RM-Y802 Setting Up the Satellite Dish Antenna This display helps you aim your Satellite Dish Antenna to get the strongest signal. For complete information on installation of your Satellite Dish Antenna, see the Satellite Dish Antenna Installation/Operating Instructions. 1 Press the MENU button, then highlight and select SYSTEM. The SYSTEM pop-up appears.
Setting Up Your Digital Satellite Receiver (SYSTEM) (continued) 4 Select “Zip Code”. 5 Enter your Zip Code, then select “OK”. The Zip Code pop-up appears. z Tip If it is more convenient for you to enter latitude and longitude, select “Latitude & Longitude” instead of “Zip Code”. The azimuth and elevation appear. Use these coordinates to aim your Satellite Dish Antenna towards the satellite. Refer to your Satellite Dish Antenna’s Operating/Installation Instructions for more details.
Setting Up the VCR Control Feature ALT AUDIO JUMP FAVORITE INDEX CATEGORY GUIDE VOL MENU CH The VCR Control feature lets the Digital Satellite Receiver control your VCR using the Timer & Rec feature (see page 60). To use the VCR Control feature you must connect the VCR Controller or a Sony SmartFile VCR (see page 11). 1 EXIT CODE SET VTR3 2 DVD AMP Press the MENU button, then highlight and select SYSTEM. The SYSTEM pop-up appears.
Setting Up Your Digital Satellite Receiver (SYSTEM) (continued) Setting the VCR Manufacturer Code MUTING POWER CABLE TV SAT AUDIO VOLUME + CABLE The VCR Manufacturer Code allows the Digital Satellite Receiver to control your VCR using the VCR Controller or a Sony SmartFile VCR. FUNCTION TV SLEEP 1 SAT The Manufacturer pop-up appears. TV/SAT TV/VIDEO 1 2 3 4 5 6 7 8 DISPLAY Highlight and select “Manufacturer” from the VCR Control display (see page 25).
Setting Up Auto Title Insert MUTING POWER CABLE TV SAT AUDIO VOLUME + CABLE FUNCTION TV SLEEP SAT TV/SAT TV/VIDEO 1 2 3 4 5 6 7 8 DISPLAY The Auto Title Insert feature lets you display information about the program at the beginning of a Timer & Rec event. The Auto Title Insert feature displays the program title, program description, total program time, station logo, station name, channel number, and the program’s content rating.
Setting Up Your Digital Satellite Receiver (SYSTEM) (continued) Performing a System Test MUTING POWER CABLE TV SAT AUDIO VOLUME + CABLE FUNCTION TV SLEEP SAT TV/SAT TV/VIDEO 1 2 3 4 5 6 7 8 DISPLAY The system test checks your Access Card, telephone line, and Satellite Dish Antenna connections for proper operation. 1 Press the MENU button, then highlight and select SYSTEM. The SYSTEM pop-up appears.
Setting the Aspect Ratio MUTING POWER CABLE TV SAT AUDIO VOLUME + CABLE FUNCTION TV SLEEP SAT TV/SAT TV/VIDEO 1 2 3 4 5 6 7 8 DISPLAY The aspect ratio refers to the proportion of your TV screen. Some newer TVs may offer the 16:9 ratio which is similar to the proportions of a movie screen. Most TVs use the standard 4:3 ratio. 1 Press the MENU button, then highlight and select SYSTEM. The SYSTEM pop-up appears.
Setting Up Your Digital Satellite Receiver (SYSTEM) (continued) Replacing Your Access Card MUTING POWER CABLE TV SAT AUDIO VOLUME + CABLE FUNCTION TV SLEEP SAT Occasionally your service provider may send you a new Access Card. Use this display to set up your new card. See “Inserting the Access Card” on page 13 for information about inserting the Access Card into the Digital Satellite Receiver.
ALT AUDIO JUMP FAVORITE INDEX CATEGORY GUIDE VOL MENU CH Selecting RF or IR Remote Control Reception (SAT-A50 only) The RF feature allows you to operate the Digital Satellite Receiver from behind a cabinet or from another room within your home. The RF Antenna must be connected to use the RF feature (see page 12). EXIT CODE SET VTR3 2 DVD AMP RM-Y802 1 Press the MENU button, then highlight and select SYSTEM. The SYSTEM pop-up appears.
Setting Up Your Digital Satellite Receiver (SYSTEM) (continued) 4 Highlight and select “RF”. 5 Highlight and select “Return”. The Remote Signal pop-up closes to show the Remote Control display. The display closes to show the Main Menu, and the Digital Satellite Receiver is set to receive RF signals from the remote control.
3 Select “Yes”. The RF Security Code pop-up appears. 4 Select a different security code. The conformation pop-up appears. 5 Press the CODE SET button on the remote control. The CABLE and TV FUNCTION indicators flash. CODE SET CABLE FUNCTION TV SAT Enter the three digit security code you selected for the receiver in step 4 above. 7 Press the enter button. Using the On-Screen Displays 6 The remote control and Digital Satellite Receiver are now set to a new security code.
Viewing Station and Program Information (GUIDES) Using the Guides Menu ALT AUDIO JUMP FAVORITE INDEX CATEGORY GUIDE VOL MENU CH The Guides Menu helps you find the program you want to watch. You can choose to see all stations or just a few. You can also create your own favorite station guides for fast access to your favorite stations. 1 The GUIDES Menu appears. EXIT CODE SET VTR3 2 DVD AMP Press the MENU button, then highlight and select GUIDES.
MUTING POWER CABLE TV SAT AUDIO VOLUME + CABLE FUNCTION TV SLEEP SAT Using the Alpha List The Alpha List shows program information in the category you select (such as movies, sports, etc.) in alphabetical order. Program information is available for up to four hours in advance. TV/SAT TV/VIDEO 1 2 3 4 5 6 7 8 DISPLAY 1 Press the MENU button, then highlight and select GUIDES. The GUIDES Menu appears.
Viewing Station and Program Information (GUIDES) (continued) Using the Program Guide ALT AUDIO JUMP FAVORITE INDEX CATEGORY GUIDE VOL MENU CH The Program Guide shows program information for up to three days in advance. You can open the Program Guide using the Main Menu or by pressing the GUIDE button. 1 Press the GUIDE button. The Program Guide opens and the current program appears in the Media Window.
Using the Category Guide MUTING POWER CABLE TV SAT AUDIO VOLUME + CABLE FUNCTION TV SLEEP SAT The Category Guide shows programs in the category you select (such as movies, sports, etc.). Program information is available for up to three days in advance. You can open the Category Guide using the Main Menu or by pressing the CATEGORY button. TV/SAT TV/VIDEO 1 2 3 4 5 6 7 8 DISPLAY 1 Press the CATEGORY button. The Category Guide opens and the current program appears in the Media Window.
Viewing Station and Program Information (GUIDES) (continued) Using the Station Index MUTING POWER CABLE TV SAT AUDIO VOLUME + CABLE FUNCTION TV SLEEP The Station Index displays each station’s logo and channel number in a grid format. Program information is available for the current time only. You can open the Station Index using the Main Menu or by pressing the INDEX button. TV/SAT TV/VIDEO 1 2 3 4 5 6 7 8 DISPLAY 1 Press the INDEX button.
Using the Favorite Stations Guide MUTING POWER CABLE TV SAT AUDIO VOLUME + CABLE FUNCTION TV SLEEP SAT TV/SAT TV/VIDEO 1 2 3 4 5 6 7 8 DISPLAY 9 ENTER 0 The Favorite Stations guide shows four Favorite Titles that you can customize with eight stations each. Program information is available for the current time only. You can open the Favorite Stations guide using the Main Menu or by pressing the FAVORITE button.
Viewing Station and Program Information (GUIDES) (continued) Customizing the Favorite Stations Guide MUTING POWER CABLE TV 1 SAT AUDIO VOLUME + CABLE FUNCTION TV SLEEP Highlight and select the Favorite Title you want to customize. The station list appears in the right half of the display. SAT TV/SAT TV/VIDEO 1 2 3 4 5 6 7 8 DISPLAY 9 ENTER 0 ALT AUDIO JUMP 2 Highlight and select “Edit”. The Edit pop-up appears.
Editing the Title of a Favorite Title MUTING POWER CABLE TV 1 AUDIO VOLUME + CABLE FUNCTION TV SLEEP Highlight and select the Favorite Title you want to edit. The station list appears in the right half of the display. SAT SAT TV/SAT TV/VIDEO 1 2 3 4 5 6 7 8 DISPLAY 9 ENTER 0 2 Highlight and select “Edit”. The Edit pop-up appears. ALT AUDIO JUMP FAVORITE INDEX CATEGORY GUIDE VOL MENU CH EXIT CODE SET VTR3 2 DVD AMP RM-Y802 3 Select “Edit Title” from the pop-up menu.
Viewing Station and Program Information (GUIDES) (continued) Using Other Guides MUTING POWER CABLE TV SAT AUDIO VOLUME + CABLE FUNCTION TV SLEEP SAT The Other Guides display provides special categories supplied by DIRECTV. Each category is divided into subcategories to help you find the exact program you want to watch. Program information is available for up to three days in advance. TV/SAT TV/VIDEO 1 2 3 4 5 6 7 8 9 DISPLAY 1 Press the MENU button, then highlight and select GUIDES.
5 Select the category you want. 6 Select the subcategory you want. 7 Highlight and select the program you want. If the category you select has subcategories, the available subcategories appear. The programs that match your selections appear in the lower half of the display. Using the On-Screen Displays If you select a current program, the Other Guides display closes. For information about selecting a future program, see “One Button Timer & Rec” on page 60.
Viewing Station and Program Information (GUIDES) (continued) Viewing Pay Per View Programs Many programs are available as pay per view. By selecting a pay per view program you agree to be charged for that program. Select a pay per view program using any of the methods described in the “Viewing Station and Program Information (GUIDES)” section on pages 34 through 42. The Purchase Program display appears. This display shows detailed information about the program including the cost.
Adjusting the Displays (PREFERENCES) Using the Preferences Menu ALT AUDIO JUMP FAVORITE INDEX CATEGORY GUIDE VOL MENU CH The Preferences Menu lets you change the appearance of the on-screen displays, the stations you want to appear in the program list area, and the order in which the stations are listed. 1 The PREFERENCES Menu appears. EXIT CODE SET VTR3 2 DVD AMP Press the MENU button, then highlight and select PREFERENCES.
Adjusting the Displays (PREFERENCES) (continued) Setting Display Options ALT AUDIO JUMP Display Options lets you choose the color scheme of the on-screen displays and the order in which stations are listed in the program list area. You can also turn the surf option on or off. FAVORITE INDEX CATEGORY GUIDE VOL MENU CH 1 Press the MENU button, then highlight and select PREFERENCES. The PREFERENCES Menu appears.
Changing the Color Scheme MUTING POWER CABLE TV SAT AUDIO VOLUME + CABLE FUNCTION TV SLEEP 1 Highlight and select “Colors” from the Display Options display (see page 46). The Colors pop-up appears. SAT TV/SAT TV/VIDEO 1 2 3 4 5 6 7 8 DISPLAY 9 ENTER 0 ALT AUDIO JUMP FAVORITE INDEX CATEGORY GUIDE VOL MENU 2 Highlight and select the color scheme you like. The display changes colors as you highlight each color scheme.
Adjusting the Displays (PREFERENCES) (continued) Changing the Station Order MUTING POWER CABLE TV SAT AUDIO VOLUME + CABLE FUNCTION TV SLEEP SAT TV/SAT TV/VIDEO 1 2 3 4 5 6 7 8 DISPLAY You can select numerical or alphabetical for the order in which stations appear in the List Area of the Program Guide, Category Guide and Other Guides display. 1 Highlight and select “Station Order” from the Display Options display (see page 46). The Station Order pop-up appears.
Setting Up Custom Stations ALT AUDIO JUMP FAVORITE INDEX CATEGORY GUIDE VOL MENU CH 1 EXIT CODE SET VTR3 2 DVD AMP The Custom Stations display lets you choose which stations will be skipped in the Program Guide, Category Guide and Station Index, and when you change channels using the CH +/– buttons. You can reduce the number of stations that appear by skipping unwanted stations. RM-Y802 Press the MENU button, then highlight and select PREFERENCES. The PREFERENCES Menu appears.
Adjusting the Displays (PREFERENCES) (continued) 3 Highlight and select a station icon to add or remove the “X” mark. The “x” mark indicates that the station will be skipped when you open the Program Guide, Category Guide or Station Index, or change channels using the CH +/– buttons. 4 50 Highlight and select “Return”. The Custom Stations display closes to show the Main Menu.
Selecting Data Services The Data Services feature is reserved for future applications.
Viewing Messages (MESSAGES) ALT AUDIO JUMP Your service provider may occasionally send messages to your Digital Satellite Receiver to inform you of changes to your service and other special announcements. FAVORITE INDEX CATEGORY GUIDE VOL MENU CH 1 Press the MENU button, then highlight and select MESSAGES. The Messages display appears. EXIT CODE SET VTR3 2 DVD AMP RM-Y802 MENU SATELLITE RECEIVER 2 Highlight and select the message you want to read. The message pop-up appears.
Setting Locks and Limits (LOCKS & LIMITS) Using the Locks & Limits Display ALT AUDIO JUMP FAVORITE INDEX CATEGORY GUIDE VOL MENU CH The Locks & Limits feature gives you control over access to your Digital Satellite Receiver. You can restrict program viewing by cost, ratings, and station. You can also set a lock to prevent the ordering of pay per view programs. 1 EXIT Press the MENU button, then highlight and select LOCKS & LIMITS. The Locks & Limits display appears.
Setting Locks and Limits (LOCKS & LIMITS) (continued) Changing the Spending Limit MUTING POWER CABLE TV The spending limit pop-up lets you limit the amount you can spend per event on pay per view purchases. SAT AUDIO VOLUME + CABLE FUNCTION TV SLEEP SAT 1 TV/SAT TV/VIDEO 1 2 3 4 5 6 7 8 DISPLAY Highlight and select “Spending Limit” from the Locks & Limits edit display (see page 53). The Spending Limit pop-up appears.
Changing the Rating Limit MUTING POWER CABLE TV SAT AUDIO VOLUME + CABLE FUNCTION TV SLEEP The Rating Limit pop-up lets you limit programs according to the content rating. 1 SAT The Rating Limit pop-up appears. TV/SAT TV/VIDEO 1 2 3 4 5 6 7 8 DISPLAY Highlight and select “Rating Limit” from the Locks & Limits edit display (see page 53).
Setting Locks and Limits (LOCKS & LIMITS) (continued) Changing the Station Locks Settings The Stations Locks feature lets you prevent access to specific stations. MUTING POWER CABLE TV SAT AUDIO VOLUME + FUNCTION CABLE TV SLEEP 1 SAT Highlight and select “Station Locks” from the Locks & Limits edit display (see page 53). The Station Locks display appears.
Locking Your Receiver MUTING POWER CABLE TV SAT AUDIO VOLUME + CABLE FUNCTION TV SLEEP SAT TV/SAT TV/VIDEO 1 2 3 4 5 6 7 8 DISPLAY After you have made the changes you want to the Locks & Limits settings, you must enter a passcode to lock the receiver. 1 Press the MENU button, then highlight and select LOCKS & LIMITS. The Locks & Limits display appears. 9 ENTER 0 MENU ALT AUDIO JUMP FAVORITE INDEX CATEGORY GUIDE VOL MENU CH 2 Highlight and select “Edit”, then select “Lock”.
Setting Locks and Limits (LOCKS & LIMITS) (continued) Unlocking Your Receiver MUTING POWER CABLE TV SAT AUDIO VOLUME + CABLE FUNCTION TV SLEEP SAT TV/SAT TV/VIDEO 1 2 3 4 5 6 7 8 DISPLAY If you want to make changes to the Locks & Limits settings, you must enter your passcode to unlock the receiver. 1 Press the MENU button, then highlight and select LOCKS & LIMITS. The Locks & Limits display appears.
Checking Pay Per View Purchases (PURCHASES) Checking Your Purchases ALT AUDIO JUMP FAVORITE INDEX CATEGORY GUIDE VOL MENU CH You can view a history of the pay per view purchases you have made. This display also shows the future purchases you have ordered and those that you have canceled. 1 The Purchases display appears. EXIT CODE SET VTR3 2 DVD AMP Press the MENU button, then highlight and select PURCHASES.
Scheduling Programs (TIMER & REC) Using One Button Timer & Rec You can easily set the timer to view or record programs by selecting future programs directly from program guides. To record a future program use the VCR Control feature to turn on your VCR and start recording automatically. For information on how to set up the VCR Control feature, see page 25. Highlight and select a future program using any of the methods described in “Viewing Station and Program Information (GUIDES)” on pages 34 through 42.
Using the Timer & Rec Feature The Timer & Rec feature lets you set up the Digital Satellite Receiver to automatically tune to a program scheduled at a future time. You can also use the One Button Timer & Rec feature to set up the timer by selecting a future program. To record a future program, use the VCR Control feature to turn on your VCR and start recording automatically. For information on how to set up the VCR Control feature see page 25.
Scheduling Programs (TIMER & REC) (continued) 3 1 Press V/v to select from the following. • Any date up to 30 days from the current date • EVERY SUN • EVERY MON • EVERY TUE • EVERY WED • EVERY THU • EVERY FRI • EVERY SAT • MON–FRI • DAILY Follow the steps below to set the timer. Move the joystick in the direction indicated in these steps. 2 Press or b 3 Press V/v to 4 Press V/v to to move to change the change the the next starting hour. starting minute. item.
Editing Timer Events ALT AUDIO JUMP You can easily edit or delete timer events. FAVORITE INDEX CATEGORY GUIDE VOL MENU CH 1 Press the MENU button, then highlight and select TIMER & REC. The Timer & Rec display appears. EXIT CODE SET VTR3 2 DVD AMP RM-Y802 MENU SATELLITE RECEIVER 2 Highlight and select the number of the event you want to edit. The edit pop-up appears. Return Closes the edit pop-up to show the Timer & Rec display.
Setting Audio Options (AUDIO) Using the Audio Display ALT AUDIO JUMP FAVORITE INDEX CATEGORY GUIDE VOL MENU CH 1 EXIT CODE SET VTR3 2 DVD AMP You can set your Digital Satellite Receiver to play the audio track in the language you prefer if that language is available. You can set the language for the current program and as the default language for all programs when that language is available. You can also set your Digital Satellite Receiver to receive Dolby Digital audio signals (SAT-A50 only).
Other Information Setting Up the Remote Control MUTING POWER CABLE TV The RM-Y139 and RM-Y802 remote controls can be programmed to operate your other audio/video equipment. SAT AUDIO VOLUME + CABLE FUNCTION TV SLEEP SAT 1 TV/SAT TV/VIDEO 1 2 3 4 5 6 7 8 DISPLAY Find the code(s) for the manufacturer of the device you want to operate with this remote control. You can find these codes on pages 66 and 67. 9 ENTER 0 2 Press the CODE SET button. All function indicators begin flashing.
Manufacturer Codes TV Codes Manufacturer 66 VCR Codes Sony Code 101 Manufacturer Sony Code 300, 301,302, 303 Admiral (M. Wards) 102, 114, 109 ABC Bell & Howell (M. Wards) Broksonic 112 114, 109, 138 Aiwa Audio Dynamic 338 314, 347 Bell & Howell (M.
VCR Codes (continued) Manufacturer Code Realistic Sansui 309, 330, 328, 335, 324, 338 314 Singer Samsung 315 322, 313, 321 Sanyo Scott 330, 335 312, 313, 321, 335, 323, 324, 325, 326 Sharp Shintom 327, 325, 328 315 Signature 2000 (M.
Location and Function of Controls Front Panel 2 1 POWER POWER 7 6 MESSAGE 5 GUIDE MENU 4 3 1 POWER Button Turns your Digital Satellite Receiver on and off. 5 MESSAGE Indicator Indicates that you have a new message. Buttons 2 Arrow and The arrow buttons move the highlight in the button selects the on-screen displays. The highlighted item. 6 TIMER Indicator Indicates that the Timer is set. 3 MENU Button Opens the Main Menu. 4 GUIDE Button Opens the Program Guide.
SAT-A50 Back Panel 2 1 3 ACCESS CARD 4 CH3 CH4 RF REMOTE AUDIO SATELLITE IN VIDEO VHF/UHF IN 1 DIGITAL OUT (OPTICAL) 5 S VIDEO LOW SPEED DATA 2 R VCR CONTROL qs qa L(MONO) VIDEO OUT q; 9 VHF(SAT)/UHF OUT TEL LINE 8 7 AC IN~ 6 1 ACCESS CARD slot Do not remove the Access Card unless instructed to do so by your service provider. 7 TEL LINE jack Connects the Digital Satellite Receiver to a telephone outlet using a telephone line cable.
Location and Function of Controls (continued) SAT-B50 Back Panel 1 2 3 4 CH3 CH4 ACCESS CARD AUDIO SATELLITE IN VIDEO VHF/UHF IN 1 S VIDEO LOW SPEED DATA 2 R VCR CONTROL q; L(MONO) VIDEO OUT 9 8 VHF(SAT)/UHF OUT TEL LINE 7 6 AC IN~ 5 1 ACCESS CARD slot Do not remove the Access Card unless instructed to do so by your service provider. 5 AC IN jack Inputs AC power from a power outlet using the AC Power Cord.
Specifications Input Jacks Supplied Accessories UHF/VHF IN 75 ohm f-type SATELLITE IN 75 ohm f-type Remote Control RF REMOTE (SAT-A50) Size AA Batteries (2) AC IN (120 V, 60 Hz) Access Card (1) RM-Y802 (SAT-A50) RM-Y139 (SAT-B50) Audio/Video Cable (1) Output Jacks Cable Type S-VIDEO OUT 4-pin mini DIN VIDEO (2) RCA type OPTICAL OUT (1) (SAT-A50 only) Optical Rectangular AUDIO R/L (2) RCA type VHF (SAT)/UHF 75 ohm f-type Low-Speed Data 9-pin D-Sub Female TEL LINE RJ-11 VCR CONTROL
Troubleshooting Problem What you can do Poor picture quality or no picture • If you are receiving only a few stations, (only 2 or 3 channels for example), call your service provider to have your programming activated. • Some pay per view programs may be protected by Macrovision copy protection at the discretion of the copyright owner. You may want to connect the Digital Satellite Receiver directly to your TV. • Check the connections to your TV and other equipment (see pages 7–13).
What you can do You cannot see any Favorite Stations • Set up your personal Favorite Titles before you try to use the Favorite Stations guide (see page 40). Locks & Limits feature not working properly • Make sure that the Spending, Rating, Pay Per View, and Station Locks are set as you want them (see page 53). Then, make sure that the system is locked (see page 57).
FCC Regulations and Information Your Digital Satellite Receiver has been registered by the Federal Communication Commission (FCC) as not being harmful to the telephone network when connected directly to the telephone lines.
Limited Warranty Digital Satellite Receivers SONY ELECTRONICS INC. (“SONY”) warrants this Product (including any accessories) against defects in material or workmanship as follows: 1 LABOR. For a period of 90 days from the original date of purchase, if the Product is determined to be defective, SONY will repair or replace the Product at no charge. After this 90 day period, you must pay for all labor charges. 2 PARTS.
Index A D Access Card, inserting, 13 replacing, 30 slot, 13, 69, 70 AC Power Cord, connecting, 13 Adjusting the on-screen displays, 46 Alert. See Timer & Rec ALT AUDIO button, 14 Alpha List, 35 Antenna. See RF antenna, satellite dish antenna, and local TV off-air antenna.
L Languages, 64 Latitude and longitude, for setting antenna, 24 Limited Warranty, 75 List Area, 36 Local TV off-air antenna, 9 Locking your receiver, 57 Locks and limits, 53 display, 53 locking, 57 setting, 54 unlocking, 58 LOW SPEED DATA port, 69, 70 M Macrovision copy-protection, 2 Manufacturer codes, 66, 67 Mail. See messages.
Printed in U.S.A.