4-233-315-14(1) Super Audio CD Player Operating Instructions SCD-CE775 2001 Sony Corporation
WARNING To prevent fire or shock hazard, do not expose the unit to rain or moisture. For the customers in the United States Owner’s Record The model and serial numbers are located at the rear of the unit. Record the serial number in the space provided below. Refer to them whenever you call upon your Sony dealer regarding this product. Welcome! Thank you for purchasing the Sony Super Audio CD Player. Before operating the unit, please read this manual thoroughly and retain it for future reference.
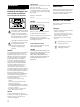
Features About the Super Audio CD • Super Audio CD is a new high-quality audio disc standard where music is recorded in the DSD (Direct Stream Digital) format (conventional CDs are recorded in the PCM format). The DSD format, using a sampling frequency 64 times higher than that of a conventional CD, and with 1-bit quantization, achieves both a wide frequency range and a wide dynamic range across the audible frequency range, and so provides music reproduction extremely faithful to the original sound.
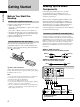
Getting Started Getting Started Before You Start the Hookup Checking the supplied accessories This player comes with the following items: • Audio connecting cord phono jack × 2 (Red and White) y phono jack × 2 (Red and White) (2) phono jack × 1 (Black) y phono jack × 1 (Black) (2) • Monaural (2P) mini-plug cord (1) (Connecting cord for CONTROL A1 ) (supplied for Canadian models only) • Remote commander (remote) RM-SC500 (1) • R6 (size-AA) batteries (2) Inserting batteries into the remote Insert two R6 (si
Notes Connecting via ANALOG 2CH OUT jacks Use an audio connecting cords for this connection. Connect the ANALOG 2CH OUT L/R jacks to the CD (SACD) input jacks of your amplifier. Be sure to match the color-coded pin to the appropriate jacks: white (left) to white and red (right) to red. Audio connecting cords (Red and White) (not supplied*) White (L) White (L) Red (R) Red (R) * If you do not make the ANALOG 5.
Hooking Up the Audio Components Getting Started Connecting via DIGITAL (CD) OUT OPTICAL connector When using another Sony CD player in conjunction with this player Use an optical digital cable for this connection. When connecting the optical digital cable to the DIGITAL (CD) OUT OPTICAL connector, take the cap off the connectors and push the cable plugs in until they click into place. Be careful not to bend or twist the optical cable.
Location and Functions of Parts Further details are provided on the pages indicated in parentheses. It also tells you about the information that appears in the display window. Front Panel Parts Descriptions Location and Functions of Parts 1 POWER switch (11) Press to turn on/off the player. 2 DISC 1–5 button (12) Press to select the disc. (4) 3 Remote sensor 4 Display window (12) Shows various information. 5 N button (12) Press to start play. 6 X button (12) Press to pause play.
Rear Panel Parts Descriptions Location and Functions of Parts L CENTER L R FRONT 2CH OUT SUB R SURR WOOFER 5.1CH OUT ANALOG OPTICAL OUT DIGITAL (CD) CONTROL A1ΙΙ 1 ANALOG 2CH OUT L/R jacks (5) Connect to an audio component (stereo/2 channel) using the audio connecting cord. 2 ANALOG 5.1CH OUT jacks (4) Connect to an amplifier equipped with the 5.1CH input jacks (Multi-channel amplifier, AV amplifier, etc.) using the audio connecting cords.
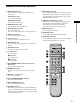
Remote Parts Descriptions 1 CONTINUE button (11) Press to resume normal play from Shuffle Play or Program Play. SHUFFLE button (19) Press to select Shuffle Play. 2 NAME INPUT button (25) Press to enter the name input mode. 3 DISC/CAPS button (16, 25) Press to select the disc. Press to select the capital letter in name input mode. 4 Number buttons (16) Press to enter the track numbers. 5 i10 button (16) Press to locate a track numbered over 10.
Playing Discs Compatible Disc Types You can play the following discs with this player. Depending on the type of disc to be played, select the appropriate indicator by pressing SACD/CD or MULTI/ 2CH (pages 12). Super Audio CD + CD (Hybrid disc) This disc consists of an HD layer and a CD layer. Press SACD/CD to select the layer you want to listen to. Also, as the dual layers are on one side, it is not necessary to turn the disc over. You can play the CD layer using a conventional CD player.
Playing a Disc 2 channel + Multi-channel Super Audio CD This disc consists of the 2 channel playback area and the multi-channel playback area. Press MULTI/2CH to select the playback area you want to listen to. The operations for normal play and the basic operations during play are explained below. POWER N X x DISC SKIP 2 channel playback area Multi-channel playback area CONTINUE You can select the default playback area (2 channel playback or multi-channel playback area). During stop mode, press MENU.
Playing a Disc Using the Display 7 Press N. Playback starts from the first track. If you want to start playing from a specific track, turn lAMSL to select the track number before pressing N. The display window shows various information about the disc or track being played. This section describes the current disc information and information that appears for each play status. 8 Adjust the volume on the amplifier.
Disc information when a disc is loaded Displaying information while the player is playing Z Depending on the disc that is currently loaded, the display shows as follows: Press TIME/TEXT. Each time you press the button, the current track number and its elapsed time or remaining time appears, or the total remaining time for the disc appears in the display. When the player detects a Multi-channel Super Audio CD, the channel information appears before the default display appears.
Using the Display Displaying the information of a TEXT disc Z TEXT discs contain information, such as the disc name or artist name, as well as the audio signals. This player can display the disc name, artist name, and current track name as TEXT information. When the player detects a TEXT disc, “TEXT” appears in the display. Display information of a TEXT disc while playing a disc Z The current track name appears.
Replacing Discs While Playing a Disc Displaying the information of a TEXT disc in other languages You can open the disc tray while playing a disc so that you can check what discs are to be played next and replace discs without interrupting play of the current disc. You can change the displayed language if the TEXT disc has multi language capacity. When the player detects such a TEXT disc, “TEXT” and “MULTI” appear in the display. Change the language according to the procedures below.
Locating a Specific Disc Locating a Specific Track You can locate any disc before or while playing a disc. During stop or play mode, you can locate any track to be played. DISC SKIP DISC 1–5 lAMSL Number buttons >10 Playing Discs DISC Number buttons ./> >10 ENTER To locate You need to The next or succeeding tracks Turn l AMS L clockwise until you find the track. When using the remote, press > repeatedly until you find the track.
Locating a Particular Point in a Track You can locate a particular point in a track during play or play pause. H lAMSL H Locating a point by setting the start time (Time Search) 1 Turn l AMS L or press ./> to select the desired track in stop mode. 2 Press and hold m/M to set the time to start play while looking at the display.
Playing Tracks Repeatedly You can play an entire disc or portions thereof repeatedly. This function can be used with Shuffle Play to repeat all the tracks in random order (page 19), or with Program Play to repeat all the tracks in a program (page 20). H x REPEAT Repeating all the tracks on the disc (Repeat All Play) Press REPEAT once, then press H. “REPEAT” appears in the display and Repeat All Play starts. The repeat play changes depending on the play mode you select.
Playing Tracks in Random Order (Shuffle Play) You can have the player “shuffle” tracks and play in a random order. The player shuffles all the tracks on all discs or one disc you’ve specified. DISC 1–5 CONTINUE N lAMSL Shuffle Play on one disc You can play all tracks on the specific disc in a random order. 1 Press SHUFFLE repeatedly until “1 DISC” appears in the display. 2 Press DISC 1–5 to start 1 DISC Shuffle Play on the selected disc. “;” appears while the player is “shuffling” the tracks.
Creating Your Own Program (Program Play) You can pick out the tracks that you like and specify the playback order in a program containing up to 32 tracks. To resume normal play Press CONTINUE. z You can create your program while checking the disc labels CONTINUE PROGRAM DISC Number buttons >10 CHECK While the disc tray is open, follow Steps 1 to 8 with pressing the DISC SKIP button to check the disc labels.
Listening to a Multichannel Super Audio CD (Multi-channel management function) Selecting 2 channel playback mode This player is equipped with a Multi-channel management function that sets the playback mode of the Super Audio CD by the DSD-DSP (built into the player) according to the layout or size of your speaker. 1 2 Press MENU. Example of the speaker layout 3 Press l AMS L. The playback mode appears in the display. Turn l AMS L until “2CH SPK MODE” appears in the display.
Listening to a Multi-channel Super Audio CD About “Large” or “Small” speaker A “Large” speaker is a speaker that can reproduce bass frequencies plentifully. If you select “Small” for the surround speakers, the bass frequencies will come from the front speakers and/or sub woofer. For normal use, select “MCH Direct” or set all the speakers to “Large” (ex. “5 – Large + SW,” “5 – Large,” etc.).
7 Press l AMS L. The balance adjustment display appears. In stop mode, the test tone is output from the selected speaker. Example: When you select “SURR BALANCE” during stop mode, the test tone is output from the front speakers and surround speakers. ALL DISCS 1 2 3 4 5 CD1 1 2 3 4 5 6 7 8 9 10 2 3 4 5 FRT:_____:SURR CD1 MULTI 1 2 3 4 5 6 MULTI 5.1CH SACD 1 2 3 4 5 6 7 8 9 10 FRT:_____:SURR Press ./> repeatedly to adjust the output level. 5.
Storing Information About CDs What You Can Do With the Disc Name The player can store the information called “Disc Name,” up to 255 discs (for the Hybrid disc, each layer is correspond to the Disc Name). Once you have stored the Disc Name for a disc, the player automatically recalls what you have stored whenever you select that disc. Labeling Discs (Disc Name) You can label discs using up to 14 characters and have the player display the Disc Name each time you select the disc.
Labeling Discs Using the Remote Z NAME INPUT DISC/CAPS 6 Press M to select the character. The selected character lights up, and the flashing cursor appears to indicate the next space to be input. You can also go to the next space by pressing other number buttons. 7 8 Repeat Steps 4 through 6 to input more characters. SPACE Number buttons ENTER CLEAR Press NAME INPUT to store the Disc Name. Repeat Steps 1 through 8 to assign Disc Names to other discs.
Additional Information Connecting the CONTROL A1II control system Using the CONTROL A1II control system This player is compatible with the CONTROL A1II Control System. The CONTROL A1II control system was designed to simplify the operation of audio systems composed of separate Sony components. CONTROL A1II connections provide a path for the transmission of control signals that enable automatic operation and control features usually associated with integrated systems.
Precautions Notes On safety • This function works only when the components are connected to the amplifier (or receiver) inputs according to the names on the function buttons. Certain receivers allow you to switch the names of the function buttons. In this case, refer to the operating instructions supplied with the receiver. • When recording, do not play any components other than the recording source. It will cause the automatic function selection to operate.
Precautions Notes on Discs On inserting a disc On handling discs • You may hear a transmission or a mechanical sound from the player. This indicates that the player is automatically adjusting its internal mechanisms according to the inserted disc. You may also hear the mechanical sound from the player when you insert a warped disc. • To keep the disc clean, handle the disc by its edge. Do not touch the surface. • Do not stick paper or tape on the disc.
Troubleshooting Specifications If you experience any of the following difficulties while using the player, use this troubleshooting guide to help you remedy the problem. Should any problem persist, consult your nearest Sony dealer. When a super audio CD is played There is no sound. , Check that the player is connected securely. , Make sure you operate the amplifier correctly. , When you use the headphones, adjust the volume with PHONE LEVEL. Total harmonic distortion rate 0.
Index A O Accessories 4 Output level balance 22 Amplifier (not supplied) 4 AMS (Automatic Music Sensor) 12 ANALOG OUT 5.
Additional Information 31
Sony Corporation Printed in Malaysia