4-427-804-13(1) Bluetooth® Audio System Owner’s Record The model and serial numbers are located on the bottom of the unit. Record the serial number in the space provided below. Refer to these numbers whenever you call upon your Sony dealer regarding this product. Model No. MEX-GS600BT Serial No. To cancel the demonstration (DEMO) display, see page 7. Pour annuler l’affichage de démonstration (DEMO), reportezvous à la page 7.
4-427-706-11(1) FM/AM Compact Disc Player Owner’s Record The model and serial numbers are located on the bottom of the unit. Record the serial number in the space provided below. Refer to these numbers whenever you call upon your Sony dealer regarding this product. Model No. CDX-GS500R Serial No. To cancel the demonstration (DEMO) display, see page 6. Pour annuler l’affichage de démonstration (DEMO), reportezvous à la page 5.
Be sure to install this unit in the dashboard of the car for safety. For installation and connections, see the supplied installation/connections manual. Warning FOR UNITED STATES CUSTOMERS. NOT APPLICABLE IN CANADA, INCLUDING IN THE PROVINCE OF QUEBEC. POUR LES CONSOMMATEURS AUX ÉTATS-UNIS. NON APPLICABLE AU CANADA, Y COMPRIS LA PROVINCE DE QUÉBEC. This equipment has been tested and found to comply with the limits for a Class B digital device, pursuant to Part 15 of the FCC Rules.
For the State of California, USA only Perchlorate Material – special handling may apply, See www.dtsc.ca.gov/hazardouswaste/perchlorate Perchlorate Material: Lithium battery contains perchlorate SiriusXM Connect Vehicle Tuner and Subscription sold separately. www.siriusxm.com Sirius, XM and all related marks and logos are trademarks of Sirius XM Radio Inc. All rights reserved. The Bluetooth word mark and logos are owned by the Bluetooth SIG, Inc.
Table of contents Getting Started . . . . . . . . . . . . . . . . . . . . . . . . . . . . . . . . . . . . . . . . . . . . . . . . . . . . . 6 Notes on Bluetooth function . . . . . . . . . . . . . . . . . . . . . . . . . . . . . . . . . . . . . . . . . . . . . . . 6 Canceling the DEMO mode . . . . . . . . . . . . . . . . . . . . . . . . . . . . . . . . . . . . . . . . . . . . . . . . 7 Setting the clock . . . . . . . . . . . . . . . . . . . . . . . . . . . . . . . . . . . . . . . . . . . . . . . . . . . . .
Pandora® via Bluetooth wireless technology (Android™ & BlackBerry® phones) . . . . . . . . . . . . . . . . . . . . . . . . . . . . . . . . . . . 30 Streaming Pandora® . . . . . . . . . . . . . . . . . . . . . . . . . . . . . . . . . . . . . . . . . . . . . . . . . . . . . . 30 App Remote via Bluetooth wireless technology (Android phone) . . . . . . . . . 32 Two-way Music Control with Android phone . . . . . . . . . . . . . . . . . . . . . . . . . . . . . . . 32 Sound Settings and Setup Menu. . . . . . . .
Radio frequency exposure Getting Started Notes on Bluetooth function Caution IN NO EVENT SHALL SONY BE LIABLE FOR ANY INCIDENTAL, INDIRECT OR CONSEQUENTIAL DAMAGES OR OTHER DAMAGES INCLUDING, WITHOUT LIMITATION, LOSS OF PROFITS, LOSS OF REVENUE, LOSS OF DATA, LOSS OF USE OF THE PRODUCT OR ANY ASSOCIATED EQUIPMENT, DOWNTIME, AND PURCHASER’S TIME RELATED TO OR ARISING OUT OF THE USE OF THIS PRODUCT, ITS HARDWARE AND/OR ITS SOFTWARE.
Canceling the DEMO mode You can cancel the demonstration display which appears while this unit is turned off. 1 Press , rotate the control dial until “DISPLAY” appears, then press it. 2 Rotate the control dial until “DEMO” appears, then press it. 3 Rotate the control dial to select “DEMO-OFF,” then press it. The setting is complete. 4 Press (BACK) to return to the previous display. The display returns to normal reception/ play mode.
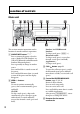
Location of controls Main unit This section contains instructions on the location of controls and basic operations. SOURCE/OFF button*1*2*3*4 Press to turn on the power; select the source (Radio/CD/USB/Pandora® via USB/AUX/Bluetooth audio/Bluetooth Pandora®/Bluetooth phone). Press repeatedly to change to another source. Press and hold for 1 second to turn off the power. Press and hold for more than 2 seconds to turn off the power and the display disappears.
Disc slot Insert the disc (label side up), playback starts. Display window (Eject) button To eject the disc. (BACK)/MODE button*1 page 11, 15, 17, 27, 31 Press to return to the previous display; select the radio band (FM/AM). Press and hold to enter/cancel the passenger control (iPod); enter the bookmark mode (Pandora® via USB/ Bluetooth Pandora®). Press to activate/deactivate the appropriate device (this unit/cellular phone) (Bluetooth phone).
*5 When a Bluetooth audio device (supports AVRCP of Bluetooth technology) is connected. Depending on the device, certain operations may not be available. *6 When App Remote is established with iPhone/Android phone. Depending on the application, certain operations may not be available. *7 When the SiriusXM Vehicle Tuner is connected. *8 This button has a tactile dot.
(+)/ (–) buttons To control CD/USB/Pandora® via USB/ Bluetooth audio device/Bluetooth Pandora®, the same as / (ALBUM /) on the unit. Setup items can be operated by . DSPL (Display)/SCRL (Scroll) button Number buttons To receive stored stations (press); store stations (press and hold). To call a stored phone number (press); to store a phone number as a preset (press and hold) (in the call menu) (Bluetooth phone). To pause playback (press ).
Receiving the stored stations 1 2 Select the band, then press a number button ( to ). Rotate the control dial until the desired program type appears, then press it. The unit starts to search for a station broadcasting the selected program type. Type of programs Tuning automatically 1 Select the band, then press +/– to search for the station. Scanning stops when the unit receives a station. Repeat this procedure until the desired station is received.
CD Playing a disc This unit can play CD-DA (also containing CD TEXT) and CD-R/CD-RW (MP3/ WMA/AAC files (page 40)). 1 Insert the disc (label side up). Playback starts automatically. To eject the disc, press . Notes • When ejecting/inserting a disc, keep any USB devices disconnected to avoid damage to the disc. • Corresponding codec is MP3 (.mp3), WMA (.wma) and AAC (.m4a). Changing display items Press . Displayed items may differ depending on the disc type, recording format and settings.
Notes • Do not use USB devices so large or heavy that they may fall down due to vibration, or cause a loose connection. • Do not detach the front panel during playback of the USB device, otherwise USB data may be damaged. Changing display items Press . Displayed items may differ depending on the USB device, recording format and settings.
Caution for iPhone When you connect iPhone via USB, phone call volume is controlled by iPhone, not the unit. Do not inadvertently increase the volume on the unit during a call, as sudden loud sound may result when the call ends. Operating an iPod directly — Passenger control You can operate an iPod directly even when it is connected to the unit. 1 Note Do not detach the front panel during playback of the iPod, otherwise data may be damaged. Tip The iPod is recharged while the unit is turned on.
4 Pandora® via USB (iPhone) Pandora® is available to stream music through your iPhone. You can control Pandora® on a USB-connected iPhone from this unit. Download the latest version of the Pandora® application and obtain more information from www.pandora.com Adjust the volume on this unit. To pause playback, press (PAUSE). To resume playback, press again. To skip a track, press +. Notes • You cannot skip back to the previous track. • Pandora® limits the number of skips allowed.
Shuffle Shuffle allows you to listen to tracks played on one or more Pandora® stations in your station list randomly. Edit your Shuffle station selections on the device before connection. Bookmarking The track or artist currently being played can be bookmarked and stored in your Pandora® account. 1 During playback, press and hold until “BOOKMARK” appears. 2 Rotate the control dial to select “TRK” (Track) or “ART” (Artist), then press it.
3 Press and hold (APP) on the unit for more than 2 seconds. Connection to iPhone starts. When connection is established, the name of the application on iPhone appears when selecting a source, and some playback operations for the application become available. (Available operations differ depending on the application.) Likewise, some playback operations of the unit can be controlled by iPhone. For details on the operations on iPhone, see the help of the application.
SHUF GENRE*1 genre in random order. SHUF DEVICE*3 device in random order. SHUF OFF track in normal order (Normal play). Searching by skip items — Jump mode When many items are in a category, you can search for a desired item quickly. 1 Press + in Quick-BrowZer mode. The item name will appear. 2 Rotate the control dial to select the item near the one desired. The list is skipped in steps of 10% of the total number of items in the list. 3 Press (ENTER).
To cancel Alphabet search, press (BACK) or –. Notes • In Alphabet search, a symbol or article (a/an/ the) before the selected letter of the item is excluded. • Depending on the search item you select, only Jump mode may be available. • Alphabet search may take some time, depending on the number of tracks. Searching a track by listening to track passages — ZAPPIN™ By playing back short track passages in a CD or USB device in sequence, you can search for a track you want to listen to.
Customizing the display and button color — Custom Color 2 3 You can register a customized color for the display and buttons. 1 Press , rotate the control dial until “DISPLAY” appears, then press it. 2 Rotate the control dial until “CUSTOM-C” appears, then press it. 3 Rotate the control dial until “BASE” appears, then press it. You can select a preset color as a basis for further customizing. When you select “BASE,” the customized color is overwritten.
To cancel White Menu, select “OFF” in step 3. Start up effect — Start White In the Start White setting, when you press , the display and buttons on the main unit turn white once, then change to the customized color. 1 Press , rotate the control dial until “DISPLAY” appears, then press it. 2 Rotate the control dial until “STARTWHT” appears, then press it. 3 Rotate the control dial to select “WHITE-ON,” then press it. 4 Press (BACK) to return to the previous display.
Operating the Bluetooth functions 1 Press . The call menu appears. 2 Rotate the control dial until the desired item appears, then press it. 3 Press (BACK)*. The source returns to the Bluetooth phone. * For PAIRING, REDIAL, VOICE DIAL and BT SIGNL settings, step 3 is not necessary. The following items can be set: PAIRING*1 (page 23) PHONEBOOK (page 26) Pairing The Bluetooth device (cellular phone, audio device, etc.
4 If passkey* input is required in the display of the device to be connected, input “0000.” If the device supports Bluetooth version 2.1, passkey input is not required. * Passkey may be called “passcode,” “PIN code,” “PIN number” or “Password,” etc., depending on the device. Tip Connection between this unit and the Bluetooth device may be automatic, depending on the device. Canceling pairing Perform step 2 to cancel the pairing mode after this unit and the Bluetooth device are paired.
2 3 Turn on the cellular phone and activate the Bluetooth signal. Connect to this unit using the cellular phone. “ ” appears when the connection is made. If you select the Bluetooth phone source after the connection is made, the network name and the connected cellular phone name appear in the display. Tip With Bluetooth signal on: when the ignition is turned to on, this unit reconnects automatically to the last-connected cellular phone.
Handsfree calling Once the unit is connected to the cellular phone, you can make/receive handsfree calls by operating this unit. Before handsfree calling, check the following: Make sure that “ ” and “ ” appear in the display. If “ ” and “ ” do not appear, perform the connection procedure (page 24). If you cannot connect this unit and the cellular phone via the Bluetooth function, perform the pairing procedure (page 23).
Calling by phone number input Operations during a call 1 Press and rotate the control dial until “DIAL NUMBER” appears, then press it. Presetting the volume of the ringtone and talker’s voice You can preset the volume level of the ringtone and talker’s voice. 2 Rotate the control dial to enter the phone number, and lastly select “ ” (space), then press (ENTER)*. The phone call starts. To adjust the ringtone volume: Rotate the control dial while receiving a call.
Preset dial You can store up to 6 contacts in the preset dial. Notes • If your cellular phone supports PBAP (Phone Book Access Profile), you can select a phone number from the phonebook or call history. • Disconnecting the power supply lead will erase all the contacts in the preset dial. 1 Select a phone number that you want to store in the preset dial, from the phonebook, call history* or by inputting the phone number directly. The phone number appears in the display of this unit.
Music streaming Listening to music from an audio device You can listen to music from an audio device on this unit if the audio device supports A2DP (Advanced Audio Distribution Profile) of Bluetooth technology. 4 Rotate the control dial until “BTA VOL” appears, then press it. 5 Rotate the control dial to adjust the input level (“+18dB” – “0dB” – “– 8dB”), then press it. 6 Press (BACK) to return to the previous display.
The information is displayed during Bluetooth audio playback only. • Even if the source is changed on this unit, playback of the audio device does not stop. Initializing Bluetooth Settings You can initialize all the Bluetooth related settings (pairing information, preset number, device information, etc.) from this unit. 1 Press and hold for 1 second to turn off the power. 2 Press , rotate the control dial until "BT" appears, then press it. The menu list appears.
4 Press *2 (PAUSE) to start playback. *1 Does not appear, depending on the device connected to the USB port. *2 When the mobile device is connected, the device number may appear. Make sure that the same numbers are displayed (e.g., 123456) in this unit and the mobile device, then press on this unit and select “Yes” on the mobile device. Station list The station list allows you to easily select a desired station. 1 2 3 To pause playback, press (PAUSE). To resume playback, press again.
App Remote via Bluetooth wireless technology (Android phone) Downloading the “App Remote” application from Google Play is required for Android phone. If the application is downloaded to an Android phone and connected to the unit, the following features are available: – Operate the unit to launch and control compatible applications on Android phone. – Operate Android phone with simple finger gestures to control the source of the unit.
Sound Settings and Setup Menu Enjoying sophisticated sound functions — Advanced Sound Engine Advanced Sound Engine creates an ideal incar sound field with digital signal processing. 1 After selecting a source, press , rotate the control dial until “SOUND” appears, then press it. 2 Rotate the control dial until “EQ7 SETTING” appears, then press it. 3 Rotate the control dial until “BASE” appears, then press it. You can select an equalizer curve as a basis for further customizing.
The options for “POSITION” are indicated below. FRONT L (): Front left FRONT R (): Front right FRONT (): Center front ALL (): In the center of your car OFF: No position set You can also set the approximate subwoofer position from your listening position if the listening position is set to other than “OFF.” The options for “SET SW POS” are indicated below.
Using rear speakers as subwoofer — Rear Bass Enhancer Rear Bass Enhancer enhances the bass sound by applying a low pass filter setting (page 37) to the rear speakers. This function allows the rear speakers to work as a subwoofer if one is not connected. 1 During reception/playback, press , rotate the control dial until “SOUND” appears, then press it. 2 Rotate the control dial until “RB ENH” appears, then press it. 3 4 Rotate the control dial to select “1,” “2” or “3,” then press it.
AUX-A*1*2 (AUX Audio) Activates the AUX source display: “ON,” “OFF” (page 38). FADER Adjusts the relative level: “FRONT-15” – “CENTER” – “REAR-15.” CT (Clock Time) Activates the CT function: “ON,” “OFF” (page 12). DM+*2 (page 34) BTM*3 (page 11) ZAPPIN*4 ZAP TIME (Zappin Time) Selects the playback time for the ZAPPIN function. – “Z.TIME-1 (about 6 seconds),” “Z.TIME-2 (about 15 seconds),” “Z.TIME-3 (about 30 seconds).” ZAP BEEP (Zappin Beep) Applies a beep sound between track passages: “ON,” “OFF.
S.WOOFER (Subwoofer) SW LEVEL (Subwoofer Level) Adjusts the subwoofer volume level: “+10 dB” – “0 dB” – “–10 dB.” (“ATT” is displayed at the lowest setting.) SW PHASE (Subwoofer Phase) Selects the subwoofer phase: “NORM,” “REV.” SW POS*1 (Subwoofer Position) Selects the subwoofer position: “NEAR,” “NORMAL,” “FAR.” LPF FREQ (Low Pass Filter Frequency) Selects the subwoofer cut-off frequency: “50Hz,” “60Hz,” “80Hz,” “100Hz,” “120Hz.” LPF SLOP (Low Pass Filter Slope) Selects the LPF slope: “1,” “2,” “3.
APP REM: Start establishing App Remote. Using optional equipment Auxiliary audio equipment By connecting an optional portable audio device to the AUX input jack (stereo mini jack) on the unit and then simply selecting the source, you can listen on your car speakers. Connecting the portable audio device 1 2 3 Turn off the portable audio device. Turn down the volume on the unit. Connect the portable audio device to the unit with a connecting cord (not supplied)*. * Be sure to use a straight type plug.
SiriusXM Vehicle Tuner Everything worth listening to is on SiriusXM, getting over 130 channels, including the most commercial-free music, plus the best sports, news, talk and entertainment. A SiriusXM Vehicle Tuner (sold separately) and Subscription are required. For more information, visit www.siriusxm.com. To listen to SiriusXM Satellite Radio, a subscription is required. Activate the SiriusXM Vehicle Tuner using one of the two methods below: • Online: Go to www.siriusxm.
• Discs that this unit CANNOT play Additional Information Precautions • Cool off the unit beforehand if your car has been parked in direct sunlight. • Do not leave the front panel or audio devices brought in inside the car, or it may cause malfunction due to high temperature in direct sunlight. • Power antenna (aerial) extends automatically.
About iPod • You can connect to the following iPod models. Update your iPod devices to the latest software before use.
• This unit supports security capabilities that comply with the Bluetooth standard to provide a secure connection when the Bluetooth wireless technology is used, but security may not be enough depending on the setting. Be careful when communicating using Bluetooth wireless technology. • We do not take any responsibility for the leakage of information during Bluetooth communication. • Connection with all Bluetooth devices cannot be guaranteed.
USB Player section Notes • For safety, turn off the ignition before cleaning the connectors, and remove the key from the ignition switch. • Never touch the connectors directly with your fingers or with any metal device. Specifications FOR UNITED STATES CUSTOMERS. NOT APPLICABLE IN CANADA, INCLUDING IN THE PROVINCE OF QUEBEC. POUR LES CONSOMMATEURS AUX ÉTATS-UNIS. NON APPLICABLE AU CANADA, Y COMPRIS LA PROVINCE DE QUÉBEC.
Mass: Approx. 1.2 kg (2 lb 11 oz) Supplied accessories: Remote commander: RM-X231 Microphone Parts for installation and connections (1 set) Optional accessories/equipment: USB connection cable for iPod: RC-100IP SiriusXM Vehicle Tuner: SXV100 Your dealer may not handle some of the above listed accessories. Please ask the dealer for detailed information. Design and specifications are subject to change without notice.
During playback or reception, demonstration mode starts. If no operation is performed for 5 minutes with “DEMO-ON” set, demonstration mode starts. – Set “DEMO-OFF” (page 37). The display disappears from/does not appear in the display window. The dimmer is set to “DIM-ON” (page 37). The display disappears if you press and hold . – Press on the unit until the display appears. The connectors are dirty (page 42). The Auto Off function does not operate. The unit is turned on.
USB playback You cannot play back items via a USB hub. This unit cannot recognize USB devices via a USB hub. Cannot play back items. A USB device does not work. – Connect it again. A USB device takes longer to play back. The USB device contains files with a complicated tree structure. The sound is intermittent. The sound may be intermittent at a high-bitrate of more than 320 kbps. Pandora® connection is not possible. Shut down Pandora® application on the mobile device, and then launch again.
The phone sound quality is poor. Phone sound quality depends on reception conditions of cellular phone. – Move your car to a place where you can enhance the cellular phone’s signal if the reception is poor. The volume of the connected audio device is low (high). Volume level will differ depending on the audio device. – Adjust the volume of the connected audio device or this unit. No sound is heard from the Bluetooth audio device. The audio device is paused. – Cancel pause of the audio device.
The disc cannot play due to a problem. – Insert another disc. USB device was not automatically recognized. – Connect it again. Press to remove the disc. FAILURE The connection of speakers/amplifiers is incorrect. – See the installation/connections manual of this model to check the connection. HUB NO SUPRT (Hubs Not Supported) USB hub is not supported on this unit. NO DEV (No Device) “USB” is selected as source without a USB device connected.
NO DEV (No Device) Bluetooth audio source is selected without a Bluetooth audio device connected. A Bluetooth audio device has been disconnected during a call. – Be sure to connect a Bluetooth audio device. Bluetooth phone source is selected without a cellular phone connected. A cellular phone has been disconnected during a call. – Be sure to connect a cellular phone. NO INFO (No Information) Network name and cellular phone name are not received with cellular phone connected.
For SiriusXM operation: CH LOCKD (Channel Locked) The selected channel is locked by the parental control function. CH UNAVL (Channel Unavailable) The selected channel is not available. The active channel has become unavailable. CH UNSUB (Channel Unsubscribed) There is no subscription to the selected channel. The subscription to the active channel has been terminated. CHEK ANT (Check Antenna) The antenna (aerial) is not being used properly.
http://esupport.sony.com http://www.sony.com/caraudio http://www.SONY.com http://www.sony.
4-427-805-11(1) Equipment used in illustrations (not supplied) Appareils utilisés dans les illustrations (non fournis) *1 Front speaker Haut-parleur avant Subwoofer Caisson de graves Power amplifier Amplificateur de puissance Rear speaker Haut-parleur arrière iPod/iPhone ×2 Bluetooth® Audio System Satellite radio tuner (SiriusXM)*3 Syntoniseur radio satellite (SiriusXM)*3 ×4 *1 Installation/Connections Installation/Connexions Ferrite sleeve Gaine en ferrite Fuse (10 A) Fusible
1 Unit: mm (in) Unité: mm (po) 1 A TOYOTA A size 5 × max. 8 mm (7/32 × max. 5/16 in) dimension 5 × max. 8 mm (7/32 × 5/16 po max.) 53 (2 1/8) to dashboard/center console vers le tableau de bord/la console centrale Catch Loquet Front panel release button Touche de déverrouillage de la façade 2 Bracket Support 2 2 A1 182 (7 1/4) size 5 × max. 8 mm (7/32 × max. 5/16 in) dimension 5 × max. 8 mm (7/32 × 5/16 po max.
SONY. 4-425-636-01 For Dealers For display purposes it is necessary to secure the front panel to the unit as shown below. Secure the screw on the left side of the unit.
SONY. Garantie d'un an protegeant les consommateurs Preuve d'achat : La presente garantie limitee s'applique au produit acompter de Ia date d'achat originelle au detail. Par consequent, le proprietaire doit presenter une preuve d'achat originelle au detail.
SONY. Consumer 1 Year Warranty Sony of Canada Ltd. ("Sony") hereby warrants, subject to the terms and conditions herein set forth, this product against defects in material and workmanship during the specified warranty period. In the event of a defect of material or workmanship during the specified warranty period, Sony will repair the same, effecting all necessary parts replacements with either new or refurbished parts, without charge for either parts or labour.
4-425-969-01 SONY® I Car Audio I LIMITED WARRANTY(u.s.only) 11 Sony Electronics Inc. ( Sony") warrants this product against defects in material or workmanship for the time periods and as set forth below when purchased directly from Sony or a Sony Retailer. Pursuant to this Limited Warranty, Sony will, at its option, (i) repair the product using new or refurbished parts or (ii) replace the product with a new or refurbished product.