3-223-813-11 (1) Cordless Telephone with Answering System Operating Instructions SPP-A985 ©2000 Sony Corporation US
Owner’s Record The model and the serial numbers are located at the bottom of the unit. Record the serial number in the space provided below. Refer to these numbers whenever you call upon your Sony dealer regarding this product. Model No. SPP-A985 Serial No.
IMPORTANT SAFETY INSTRUCTIONS When using your telephone equipment, basic safety precautions should always be followed to reduce the risk of fire, electric shock and injury to persons, including the following: 1. Read and understand all instructions. 2. Follow all warnings and instructions marked on the product. 3. Unplug this product from the wall outlet before cleaning. Do not use liquid cleaners or aerosol cleaners. Use a damp cloth for cleaning. 4.
13. Avoid using a telephone (other than a cordless type) during an electrical storm. There may be a remote risk of electric shock from lightning. 14. Do not use the telephone to report a gas leak in the vicinity of the leak. SAVE THESE INSTRUCTIONS CAUTION: To reduce the risk of fire or injury to persons by battery, read and follow these instructions. 1. Use only the following type and size battery pack: Sony BP-T23. 2. Do not dispose of the battery pack in a fire. The cell may explode.
Caution You are cautioned that any changes or modifications not expressly approved in this manual could void your authority to operate this equipment. Note This equipment has been tested and found to comply with the limits for a Class B digital device, pursuant to Part 15 of the FCC Rules. These limits are designed to provide reasonable protection against harmful interference in a residential installation.
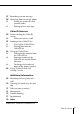
Table of contents Getting Started 8 Read this first 9 Step 1: Checking the package contents 10 Step 2: Setting up the base phone 13 Step 3: Preparing the battery pack 16 Step 4: Entering the area code 20 Identifying the parts Basics 24 Making calls 28 Redialing 29 Receiving calls Telephone Features 32 Speed dialing 32 Storing phone numbers and names 34 Making calls with speed dialing 35 Phone Directory 35 Storing phone numbers and names 37 Changing a stored name and/or phone number 38 Erasing a memory loc
57 Recording a memo message 58 Operating from an outside phone 58 Setting the remote ID code (security code) 59 Picking up new messages Caller ID Features 60 Understanding the Caller ID service 60 When you receive a call 61 Looking at the Caller ID list 61 Viewing the Caller ID list 62 Erasing data from the Caller ID list 64 Using the Caller ID list 64 Calling back a number from the Caller ID list 65 Storing a number of the Caller ID list into the Phone Directory 66 To change the number of digits of the ph
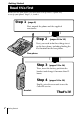
Getting Started Read this first Before you use your phone, you must first set it up. Here’s a quick way to set up your phone: Steps 1, 2, 3 and 4. Step 1 (page 9) First, unpack the phone and the supplied accessories. Step 2 (pages 10 to 12) Next, you need to do three things to set up the base phone, including finding the best location for the base phone. Base phone Step 3 (pages 13 to 14) Then, insert the battery pack into the handset and charge it for more than 12 hours.
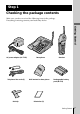
Step 1 Checking the package contents Make sure you have received the following items in the package. If anything is missing, contact your local Sony dealer.
Step 2 Setting up the base phone Do the following steps: • Choose the best location • Connect the base phone • Choose the dialing mode Choose the best location Where you place the base phone affects the reception quality of the handset.
Connect the base phone If you want to hang the base phone on the wall, see page 69. 3 Getting Started Hook the cord. To an AC outlet To DC IN 9V 2 AC power adaptor (supplied AC-T131) To LINE To the telephone outlet 1 Telephone line cord (supplied) 1 Connect the telephone line cord to the LINE jack and to a telephone outlet. 2 Connect the AC power adaptor to the DC IN 9V jack and to an AC outlet. 3 Raise the antenna. Make sure it points towards the ceiling.
Step 2: Setting up the base phone (continued) Notes • Use only the supplied AC-T131 AC power adaptor. Do not use any other AC power adaptor. • Connect the AC power adaptor to a continuous power supply. • Place the base phone close to the AC outlet so that you can unplug the AC power adaptor easily. Polarity of the plug – Tip If your telephone outlet is not modular, contact your telephone service company for assistance.
Step 3 Preparing the battery pack Charge the battery pack for more than 12 hours before you start using your phone. compartment lid of the handset. 2 Insert the battery pack (with BP-T23 contacts facing down) into the battery compartment. Getting Started 1 Slide open the battery 3 Close the battery compartment lid. 4 Place the handset on the base phone. You can place it with either side facing up.
Step 3: Preparing the battery pack (continued) Battery duration A fully charged battery pack lasts for about: • Approx. 7 hours when you use the handset continuously • Approx. 7 days when the handset is in standby mode. Notes • The battery pack will gradually discharge over a long period of time, even when not in use. • If you leave the battery pack in the handset without charging it, the battery pack will be completely discharged. It may require several times of charging to recover to its full capacity.
Handset spare battery usage As only one battery pack is supplied with this unit, it is necessary to purchase an additional battery pack (optional) for use as a handset spare battery pack. lid of the base phone. 2 Insert the battery pack (with BP-T23 contacts facing down) into the battery compartment. Getting Started 1 Open the battery compartment 3 Close the battery compartment lid. The SPARE BATT lamp lights up. Charge the battery pack for more than 24 hours so that the battery is fully charged.
Step 4 Entering the area code When you use this phone for the first time, or move to an area that has a different area code, you must enter your home area code. Otherwise, you cannot use some functions of this phone and the Caller ID functions. This is also necessary because the phone must be able to select an area code to properly dial call from the Caller ID list. Depending on your region, enter 3-digit area code as follows: Case 1.
Notes • If the home area code is already entered, it appears on the display in step 4. To enter a different home area code, see “To change the home area code” below. • Do not allow more than 20 seconds to elapse between each step of the procedure. Getting Started Tips • You may press Jog Dial instead of (PGM) in step 6. • To check the current home area code, perform steps 1 to 4. The home area code appears on the display for about 20 seconds.
Step 4: Entering the area code (continued) To enter the local area code (For 10 digits phone numbers users) If a call matches one of the local area codes you entered, the phone number will be registered with 10 digits in the Caller ID list (area code + number). If a call does not match one of the local area codes you entered, the phone number will be registered with 11 digits in the Caller ID list (1 + area code + number). Some regions of the country allow you to have more than one local area code.
Notes • If the local area code is already entered, it appears on the display in step 5. To enter a different local area code, see “To change the local area code” below. • Do not allow more than 20 seconds to elapse between each step of the procedure. Getting Started Tips • You may press Jog Dial instead of (PGM) in step 7. • To check the current local area code, perform steps 1 to 5. The local area code appears on the display for about 20 seconds.
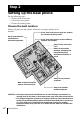
Identifying the parts Refer to the pages indicated in parentheses for details. Base Phone qf 1 2 3 4 5 6 7 8 9 0 qa qs qd qg qh qj qk ql w; wa ws wd wf wg wh wj wk wl e; ea 1 SKIP/QUICK button (p. 53) Press to skip to the next message. Keep the button pressed for quick playback of messages. 2 PLAY/STOP (MAILBOX 1, 2, 3) buttons (p. 51, 53) Plays back recorded messages in each mailbox. 3 NEW CALL lamp (p. 61) Flashes when there is a “NEW” data in the Caller ID list. 4 REPEAT/SLOW button (p.
Getting Started es ed ef ql ERASE button (p. 48, 54) wh INTERCOM button (p. 42) Erases the recorded greeting or messages. w; VOL +/– buttons (p. 26, 32, 54) Adjusts the speaker volume or press to move the cursor on the display. wa DIAL MODE switch (p. 12) Selects pulse or tone dialing. ws RINGER LEVEL switch (p. 31) Adjusts the ringer volume. wd REDIAL/PAUSE button (p. 28, 33) Redials the last number called/ inserts a pause in the dialing sequence. wf SPEED DIAL button (p.
Identifying the parts (continued) Handset 1 2 0 3 4 5 qa qs qd 6 7 8 9 qf qg qh qj qk 1 Antenna 2 Speaker 3 Jog Dial (p. 16, 35, 61) 4 TALK button (p. 24, 29) Lets you make or receive a call. 5 INTERCOM button (p. 42) Lets you talk between the base phone and handset. 6 HOLD button (p. 25) Puts a call on hold. 7 Battery compartment (p. 13) 8 TONE button (p. 25) Allows you to switch temporarily to tone dialing. 22US Getting Started 9 PGM (Program) button (p.
Getting Started ql w; qg # button (p. 66) Used to change the number of digits of the phone number in the Caller ID list. qh PAUSE button (p. 36) Inserts a pause in the dialing sequence. qj MUTING button (p. 25) Mutes your voice during a conversation. qk Microphone ql I (HEADSET) jack (p. 24, 29, 70) w; VOL (volume) switch (p. 25) Adjusts the handset volume.
Basics Making calls 1 Pick up the handset from the base phone. 2 Press (TALK) and wait until (CALL WAITING/ FLASH) I (HEADSET) jack VOL switch (HOLD) (*TONE) (MUTING) (REDIAL) “TALK” appears on the display. The display also shows the talk time in hours, minutes and seconds. You will then hear a dial tone. “HANDSET IN USE” appears on the display of the base phone and the LINE lamp on the base phone lights up. If “CHANNEL SEARCHING” appears on the display, move closer to the base phone.
Additional tasks To Do this Adjust the handset volume Set the VOL switch to H (high), M (middle) or L (low). Press (HOLD). “HOLD” appears on the display. Press (HOLD) again to resume the conversation. Mute your voice Press (MUTING) to disable the microphone. “MUTING” appears on the display. Press (MUTING) again to cancel. Switch to another call (“call waiting” service*) Press (CALL WAITING/ FLASH). Press (CALL WAITING/ FLASH) again to return to the first caller.
Making calls (continued) If you have a spare battery You can replace the battery pack without disconnecting the call during a conversation. To replace the battery pack, perform the following procedure. 1 Press (HOLD) on the handset. The call is on hold and “HOLD” appears on the display. 2 3 Replace the battery pack. Press (HOLD) or (TALK) to resume the conversation. Making calls through the speakerphone Press (SPEAKERPHONE) on the base phone.
Notes • While conversing with an outside caller via the handset, the display on the base phone shows “HANDSET IN USE”. If you press (SPEAKERPHONE) at this time, you can talk to the handset and to the line connected. • When the talk time exceeds 9:59’59, the display counts from 0:00’00 again. To obtain the best speakerphone performance • You may not be able to hear the other party’s voice in a noisy place. Therefore, use the speakerphone in a quiet room.
Making calls (continued) Redialing 1 Press (TALK) and wait until “TALK” appears on the display. The LINE lamp on the base phone lights up. If you’re at the base phone, press (SPEAKERPHONE). “SPEAKERPHONE” appears on the display and the SPEAKERPHONE lamp lights up. 2 Press (REDIAL) to redial the last number dialed. If you’re at the base phone, press (REDIAL/PAUSE). Note If the number exceeds 32 digits or if it is erased, five short error beeps will alert you that the number cannot be redialed.
Receiving calls 1 When you hear the phone ring: •Press (TALK). or (CALL WAITING/ FLASH) I (HEADSET) jack VOL switch “TALK” appears on the display and the display also shows the talk time in hours, minutes and seconds. “HANDSET IN USE” appears on the display of the base phone and the LINE lamp on the base phone lights up. (MUTING) Basics (HOLD) • Pick up the handset from the base phone when the handset is placed on the base phone.
Receiving calls (continued) Additional tasks To Do this Adjust the handset volume Set the VOL switch to H (high), M (middle) or L (low). Put a call on hold Press (HOLD). “HOLD” appears on the display. Press (HOLD) again to resume the conversation. Mute your voice Press (MUTING) to disable the microphone. “MUTING” appears on the display. Press (MUTING) again to cancel. Switch to another call (“call waiting” service*) Press (CALL WAITING/ FLASH).
Receiving calls through the speakerphone When you hear the phone ring, press (SPEAKERPHONE) on the base phone. “SPEAKERPHONE” appears on the display and the display also shows the talk time in hours, minutes and seconds. SPEAKERPHONE lamp (HOLD) The SPEAKERPHONE lamp lights up. When you’re done talking; press (SPEAKERPHONE) again. (VOL) RINGER LEVEL switch (SPEAKERPHONE) (CALL WAITING/FLASH) Additional tasks To Do this Put a call on hold Press (HOLD). “HOLD” appears on the display.
Telephone Features Speed dialing You can dial with a touch of a few keys by storing a phone number on a dialing key. Storing phone numbers and names Example: to store “SONY” “123-4567”. 1 Press (PGM). “PROGRAM” appears on the display. 2 Press (SPEED DIAL). “ENTER 0 TO 9” appears on the display. 3 Press one of the dialing keys ((0) to (9)) to store a phone number on. (VOL) (REDIAL/PAUSE) (SPEAKERPHONE) ENTER NAME You will hear a confirmation beep. 4 Enter the name using the dialing keys.
5 Press (PGM). “ENTER NUMBER” appears. 6 Enter the phone number. SONY 1234567 You can enter up to 32 digits, including a tone and a pause, each of which is counted as one digit. When the phone number of 17 digits or more has been entered, the phone number appears in two lines. 1234567890123456 12 7 Press (PGM). Telephone Features You will hear a long confirmation beep, and the name and the number are stored. The display goes off.
Speed dialing (continued) Making calls with speed dialing 1 2 3 Press (SPEAKERPHONE). Press (SPEED DIAL). Enter the desired speed dialing number ((0) to (9)). The phone number stored as the speed dialing number will be dialed. To check the phone number before speed dialing When not making a call with the base phone, press (SPEED DIAL) and then one of the dialing keys ((0) to (9)). The number stored on the key appears on the display for five seconds.
Phone Directory You can dial a number by scrolling through the Phone Directory, in which up to 50 phone numbers can be stored. Storing phone numbers and names Example: to store “SONY” “123-4567”. Turn 1 Press (PGM). Press (Be sure not to press (TALK).) DIRECTORY AREA RINGER 2 Press Jog Dial. “ENTER NAME” appears. (PAUSE) 3 Enter the name using the dialing keys. You can enter up to 16 characters.
Phone Directory (continued) 4 Press (PGM). “ENTER NUMBER” appears. 5 Enter the phone number. SONY 1234567 You can enter up to 32 digits, including a tone and a pause, each of which is counted as one digit. When the phone number of 17 digits or more has been entered, the phone number appears in two lines. 1234567890123456 12 6 Press (PGM). You will hear a long confirmation beep, and the name and the number are stored. The display goes off.
Changing a stored name and/or phone number 1 Display the name and phone number you want to change by doing steps 1 and 2 in “Making calls from the Phone Directory” on page 38. SONY 1234567 2 Press Jog Dial. DIAL EDIT ERASE 1234567 3 Turn Jog Dial up to make “EDIT” flash and press Jog Dial. SONY 1234567 4 Telephone Features The cursor flashes at the last character of the name. Turn Jog Dial down to erase the characters and enter the new name. If you want to change only the number, skip this step.
Phone Directory (continued) Erasing a memory location SONY 1234567 1 Display the name and phone number you want to erase by doing steps 1 and 2 in “Making calls from the Phone Directory”. 2 Press Jog Dial. DIAL EDIT ERASE 1234567 3 Turn Jog Dial up to make “ERASE” flash and press Jog Dial. ERASE NO YES 1234567 4 Turn Jog Dial up to make “YES” flash, then press Jog Dial. You hear a long confirmation beep and the memory location is erased. Making calls from the Phone Directory 1 Press Jog Dial.
Tip You may press (TALK) to make a call instead of doing steps 3 and 4. About the search order The names appear in the following order when you turn Jog Dial up or down. t t • Alphabetical order: ABC...XYZ y symbols y * y # y 0 - 9 • Initial character: To search for “SONY” for example, press (7) and then turn Jog Dial to search through the names starting with P, Q, R, S or 7.
Setting the ringer type You can select a ringer type of the handset from four type. Turn Press 1 Press (PGM). 2 Turn Jog Dial up to make “RINGER” flash. DIRECTORY AREA RINGER 3 Press Jog Dial. The current ringer type appears. RINGER 1 SELECTED 4 Press one of the dialing keys ((1) to (4)) to select a ringer type. You will hear the corresponding ringer tone. 5 Press (OFF). Turning off the ringer of the handset 1 2 Perform steps 1 to 3 above. Press (0). You will hear a confirmation beep.
Switching the phones during a call You can easily switch between the handset and speakerphone on the base phone without disconnecting the call. To switch from the base phone to the handset 1 Press (HOLD) on the base LINE lamp phone. The call is on hold and “HOLD” appears on the display and the SPEAKERPHONE lamp on the base phone flashes. 2 Press (TALK) or (HOLD) on the handset. (SPEAKERPHONE) You can continue talking to the caller through the handset.
Talking between the phones (Intercom) You can converse using the base phone and the handset. You can start the intercom from either phone. To talk from the handset to the base phone Press (INTERCOM) on the handset. (OFF) After the base phone rings twice, you will be connected automatically. When a person at the base phone answers, you can talk with each other. (TALK) (INTERCOM) “INTERCOM” appears on the display. When you are done talking or if no one answers the phone Press (OFF) on the handset.
Notes • If there’s an incoming call while on the intercom, only the base phone rings. To answer the call, press (SPEAKERPHONE) on the base phone or (TALK) on the handset. The intercom is canceled and you can talk to the outside caller. • While conversing with an outside caller via the base phone or handset, you cannot make an intercom call. If you press (INTERCOM), you will hear a busy tone. Tips • You can receive an intercom call on the handset even when “RINGER” is set to “RINGER OFF”.
Transferring a call You can transfer a call between the handset and base phone without disconnecting the call. To transfer from the base phone to the handset 1 Press (INTERCOM) to page the handset. The call is put on hold on the base phone and the handset rings. “** PAGING **” appears on the display of both the base phone and handset. 2 Press (INTERCOM) on the (SPEAKERPHONE) handset. “INTERCOM” appears on the display of both the handset and base phone.
To transfer from the handset to the base phone 1 Press (INTERCOM) to page the base phone. The call is put on hold on the handset. (TALK) After the base phone rings twice, you will be connected automatically. When a person at the base phone answers, you can talk with each other. 2 Press (SPEAKERPHONE) on the base phone to talk to the caller with the base phone. “SPEAKERPHONE” appears on the display of the base phone.
Answering Machine Features Setting up the answering machine Setting the time and day of the week 1 Press (MENU) repeatedly until you hear “Set day and time”. ”- -” blinks on the display. 2 Press (SELECT) repeatedly to select the day of the week. 3 Press (TIME/SET). The day is set and the hour is announced. 4 Press (SELECT) repeatedly to select the hour. 5 Press (TIME/SET). The hour is set and the minute is announced. 6 Press (SELECT) repeatedly to select the minute. 7 Press (TIME/SET).
Tip All the mailbox buttons ((MAILBOX 1), (MAILBOX 2) and (MAILBOX 3)) work as the (PLAY/STOP) button; press any of the three in this case. To hear the current time Press (TIME/SET). The current time setting is announced. Recording the greeting You can record your own greeting for the “normal” and “announcement only” modes (see page 55). 1 Press (MENU) repeatedly until “Set out-going message” is announced. “- -” blinks on the display. 2 Press (REC/MEMO).
Setting up the answering machine (continued) To check the greeting Press (MENU) repeatedly until “Set out-going message” is announced. Then press (PLAY/STOP) to play back the greeting. To change the greeting Record a new greeting by following the instructions on the previous page. The new greeting replaces the old one. To erase the greeting 1 Press (MENU) repeatedly until “Set out-going message” is announced. 2 Press (ERASE). Notes • You can also erase the greeting during playback.
Setting the number of rings You can select the number of times the phone rings before it answers to take a message. There are four modes: 2, 4, 6, and Toll Saver. 1 Press (MENU) repeatedly until you hear “Set number of rings”. “- -” blinks on the display. 2 Press (SELECT) repeatedly to select a ring duration (2, 4, 6, or Toll Saver). To answer after 2 rings, select “2”. To answer after 4 rings, select “4”. To answer after 6 rings, select “6”.
Setting up the answering machine (continued) Setting the audible message alert You have the option of having a beep tell you if you have received any new incoming messages. 1 Press (MENU) repeatedly until (TIME/SET) (PLAY/STOP) you hear “Set audible message alert”. “- -” blinks on the display. 2 Press (SELECT) to set the (VOL) audible message alert on or off. 3 Press (TIME/SET). The setting is announced. 4 Press (PLAY/STOP) to exit the menu setup mode.
Turning on the answering function Message counter Press (ANSWER ON/OFF) on the base phone. The ANSWER ON/OFF button lights up. (ANSWER ON/OFF) Mailbox usage This phone offers you three voice mailboxes, providing a convenient way to share the mailbox feature with other members of your household or business.
Setting up the answering machine (continued) Note The answering function is preset to on. Tip The answering machine will automatically answer a call after 10 rings, even if the answering function is off and announces “Please enter your security code” to prompt the caller to turn on the answering function. When the memory is full The total recording time of this answering machine is approximately 15 minutes (including the greeting, messages, and memo).
Playing back messages If there are new messages, the display flashes the number of new messages. You will hear beeps if the audible message alert setting is on (see page 50). Press a mailbox button ((MAILBOX 1), (MAILBOX 2) or (MAILBOX 3)) to play back new messages in the selected mailbox. (REPEAT/SLOW) (SKIP/QUICK) Additional tasks when playing back messages Do this Stop playback Press a mailbox button ((MAILBOX 1), (MAILBOX 2) or (MAILBOX 3)).
Playing back messages (continued) Adjusting the speaker volume To adjust the speaker volume, press (VOL)(+) or (-). Notes • When you have reached the minimum or maximum volume level, you will hear three short beeps. • You cannot adjust the speaker volume while the phone is ringing. Tip There are 8 steps for the volume level (1 to 8). The volume level is preset to 5. Erasing messages 1 Press and hold (ERASE) for more than two seconds.
Selecting the Announcement Only Mode You can set the answering machine to play the greeting without recording incoming messages (announcement only mode). You might want to select this mode when, for example, you expect to be away for a while and you cannot pick up messages. 1 Press (MENU) repeatedly until (TIME/SET) you hear “Set announce only”. 2 Press (SELECT) to set the announcement only mode on or off. (PLAY/STOP) 3 Press (TIME/SET). The setting is announced.
Screening calls You can screen calls by leaving the answering machine on while you are at home. When a call is answered, you can hear the message being recorded through the base phone. You can decide either to continue recording or to answer the call. Alternatively, you may select to mute the message (see “Turning on/ off the screening calls function” below). The message will be recorded, but to hear it you will need to play back the message (see page 53). To answer the call Press (TALK) on the handset.
Recording a memo message You can leave messages for other users of the unit. 1 Press (REC/MEMO). 2 Press a mailbox button ((MAILBOX 1), (MAILBOX 2) or (MAILBOX 3)) to which you want to leave the message. “Now recording” is announced and counting starts. 3 Speak about 12 inches (30 cm) MIC (microphone) away from the microphone (MIC) to record your message. A memo can be up to four minutes in length. 4 Press (PLAY/STOP) to stop recording.
Operating from an outside phone Setting the remote ID code (security code) To operate the answering machine from a touch-tone phone while you are away from home, you need to set the remote ID code (security code). 1 Press (MENU) repeatedly until you hear “Set security code”. 2 Press (SELECT) to change the remote ID code (security code) setting. 3 Press (TIME/SET) to confirm your choice. The new remote ID code (security code) is announced. 4 Press (PLAY/STOP) to exit the menu setup mode.
Picking up new messages 1 2 Call your telephone number from a touch-tone phone. 3 Press the keys in the “Table of control codes” below for the desired operation command. 4 When you are finished, disconnect the line. When you hear the greeting, press (#) and enter your remote ID code (security code). You will hear a confirmation beep. The number of new messages will be announced. Notes • Do not let two seconds elapse between each digit of the remote ID code (security code) and the control code.
Caller ID Features Understanding the Caller ID service Caller ID allows the caller’s phone number to be shown on the display before the call is answered. In order to use this feature, you must first subscribe to the Caller ID service. The name of this service may vary depending on your telephone company. To use this feature, be sure to enter your home area code (see page 16). When you receive a call The phone number appears on the display with the date and time* as shown in the following example.
Looking at the Caller ID list The phone stores the data of the last 20 calls received including “OUT OF AREA” and “PRIVATE” calls. It keeps track of all calls received; even if they were not answered. Viewing the Caller ID list You can look through the Caller ID list to check the phone number and/or name of the calls received on the handset’s display. Note that the display on the base phone shows the current caller’s phone number and/or name only, and you cannot view the caller ID list on the base phone.
Looking at the Caller ID list (continued) About the “*” mark SMITH JOHN * 1-201-123-4567 “*” appears if there are more than two calls from the same phone number. The older data will be replaced by the new data, so the calls are counted as only one call. Erasing data from the Caller ID list Old data will be erased automatically when a 21st call comes in, but you can also manually erase unnecessary data one by one or erase the entire list.
To erase the entire list at once 1 Display any Caller ID data. SMITH JOHN 1-201-123-4567 2 Press Jog Dial. DIAL PGM ERASE 1-201-123-4567 3 Turn Jog Dial up to make “ERASE” flash and press Jog Dial. ERASE NO YES ALL 1-201-123-4567 4 Turn Jog Dial up to make “ALL” flash, then press Jog Dial. ALL ERASE NO YES 1-201-123-4567 5 Turn Jog Dial up to make “YES” flash, then press Jog Dial. NEW OO OLD OO You will hear a long confirmation beep and the entire list is erased.
Using the Caller ID list By using the Caller ID list, you can call back a phone number from the Caller ID list easily, or store numbers from the Caller ID list into the Phone Directory. Calling back a number from the Caller ID list 1 Display the phone number you Turn Press want to call from the Caller ID list (see page 61). SMITH JOHN 1-201-123-4567 2 Confirm the number and press Jog Dial. DIAL PGM ERASE 1-201-123-4567 3 Press Jog Dial again. The phone automatically dials the displayed number.
Storing a number of the Caller ID list into the Phone Directory 1 Display the name and phone number you want to store from the Caller ID list (see page 61). 2 Confirm the number and press Jog Dial. 3 Turn Jog Dial up to make “PGM” flash and press Jog Dial. SMITH JOHN 1-201-123-4567 DIAL PGM ERASE 1-201-123-4567 SMITH JOHN 12011234567 The cursor flashes at the end of the name. Enter or change the name, if necessary (see page 37). 4 Press Jog Dial. The cursor flashes at the end of the phone number.
Using the Caller ID list (continued) To change the number of digits of the phone number If the number of digits of the phone number in the Caller ID list is different from the actual phone number, you need to adjust the number of digits of the phone number to call back or store into the Phone Directory. 1 While the phone number from the Caller ID list is displayed, press (#) repeatedly until the phone number with the correct number of digits appears on the display.
When the local area code matches 2 SMITH JOHN 201-123-4567 SMITH JOHN 1-123-4567 SMITH JOHN 1-201-123-4567 SMITH JOHN 123-4567 Continue the operation to call or store the phone number with the correct number of digits (pages 64 and 65). Notes • You need to adjust the number of digits each time you call back from the Caller ID list as the changes to the Caller ID data is not stored in memory. • You may not be able to change the number of digits depending on the Caller ID data.
Using “Caller ID with call waiting” service This telephone is compatible with the “Caller ID with call waiting” service. Make sure that your telephone company offers this service. Like the basic Caller ID service, you need to subscribe to “Caller ID with call waiting” in order to use this service. Even though you may have already subscribed to “Caller ID” and “call waiting” as two separate services, you need to request a subscription to “Caller ID with call waiting” as a single service.
Additional Information Mounting the base phone on a wall 1 1 Raise the hang-up tab. 2 Plug the telephone line cord to Hang-up tab the LINE jack and the AC power adaptor to the DC IN 9V jack, and hook the cords. Use the shorter cord for mounting. 3 Attach the wall bracket to the center of the base phone. Align the f marks of the wall bracket with those of the base phone.
Carrying the handset by the belt clip You can hang the handset on the belt by attaching the belt clip to the handset. Attaching the belt clip Press the belt clip to the handset. Make sure that the side tabs click and go into the holes on the sides of the handset. Note To prevent the handset from dropping, make sure that each tab is completely inserted. Detaching the belt clip While pressing the back of the belt clip, pull the sides one by one until the tabs come off from the holes.
Notes on power sources On battery pack For the customers in the USA • Store the battery pack at a temperature between 41°F (5°C) and 95°F (35°C) for best performance. RECYCLING NICKEL-CADMIUM BATTERIES • If you do not use the handset for a long period of time, remove the battery pack from the handset after charging for more than 12 hours, and base phone after charging for more than 24 hours when you have a spare battery. This maintains battery life.
Troubleshooting Making calls If you’ve experienced any of the following difficulties while using your phone, use this troubleshooting guide to help you remedy the problem. Should any problem persist, consult your nearest Sony dealer. Symptom Remedy You hear five short error beeps when you press (TALK). • Make sure you have set up the base phone correctly (page 10). • Move the handset closer to the base phone. You hear no dial tone.
During conversation Speed dialing/ Phone Directory Intercom Symptom Remedy You hear interference during conversation. • Move the handset closer to the base phone. • Place the base phone away from noise sources (page 10). Your conversation is muted and “CHANNEL SEARCHING” appear on the display. • This is the out-of-range alarm. Move the handset closer to the base phone within one minute. • The battery is weak. Charge the battery for more than You hear a beep every three 12 hours (page 13).
Operating from an outside phone Answering machine Troubleshooting (continued) 74US Symptom Remedy Message is not recorded. • The remaining recording time is less than 30 seconds or 99 messages were recorded. The answering machine becomes “Memory full” status and does not record messages. Erase messages (page 54). • The message is less than two seconds. The answering machine does not record messages less than two seconds in length. No sound from the speaker of the base phone.
Caller ID Power source/battery Remedy The caller’s name and/or phone number does not appear on the display. • Make sure you have subscribed to Caller ID service. • Caller ID service may not work when the phone is connected to a Private Branch Exchange (PBX). • The call is made through company which does not offer Caller ID service. “OUT OF AREA” will appear on the display. • The call was “blocked”. “PRIVATE” will appear on the display. • You have answered the call while “** RINGING **” was displayed.
Troubleshooting (continued) Message counter The message counter on the base phone shows the following information. 76US When the counter shows It means Flashing number Number of messages not yet played back. CL Flashes when the day and time is cleared or delayed due to a power interruption, or when you connect the base phone to the AC outlet for the first time. Reset the time correctly (page 46). A The announcement only mode is selected (page 55). F The recording area is full.
Specifications General Base phone Frequency band 902 - 928 MHz Operating channel 30 channels Dial signal Tone, 10 PPS (pulse) selectable Supplied accessories See page 9. Power source DC 9V from AC power adaptor AC-T131 Battery charging time Approx. 24 hours Dimensions Approx. 7 3⁄ 8 x 2 3⁄4 x 9 1⁄8 inches (w/h/d), antenna excluded (approx. 186 x 68 x 229 mm) Antenna: Approx. 4 3⁄ 4 inches (approx. 120 mm) Mass Approx. 1 lb 8 oz (approx.
Index A D Adjusting volume handset volume 25, 30 speaker volume 26, 31, 54 Announcement only mode 55 Answering machine playing back messages 53 setting up 46 turning on 56 Area code 16 Audible message alert 50 Day and time stamp 46, 53 Dialing mode choosing 12 switching to the tone temporarily 25, 26 Directory Phone Directory 35 B Battery pack charging 13 duration 14 C Call waiting service 25, 26, 68 Caller ID 60 Caller ID list 61 calling back 64 memory match function 60 storing in Phone Directory 65 C
S Screening calls 56 turning on/off the screening calls function 56 Setting up base phone 10 handset 13 Spare battery 15 Speakerphone 26, 27 Speed dialing 32 Stamping messages with day and time 46, 53 Storing Caller ID data in Phone Directory 65 Switching phones during a call 41 T, U Toll saver 49 Talking between the phones 42 Tone dialing dialing mode 12 switching to 25, 26 Transferring a call 44 Troubleshooting 72 V, W, X, Y, Z Additional Information Volume handset 25, 30 speaker 26, 31, 54 Additional
For the customers in the USA Be sure to save the receipt and attach it to your WARRANTY card when having your equipment repaired at an authorized Sony service center. For online product registration, please contact www.sony.